by Joanne James14. March 2014 09:25Yay it's Friday - the weekend is almost here! For today's card I thought I'd try something different with the sketch over at Retrosketches this week:
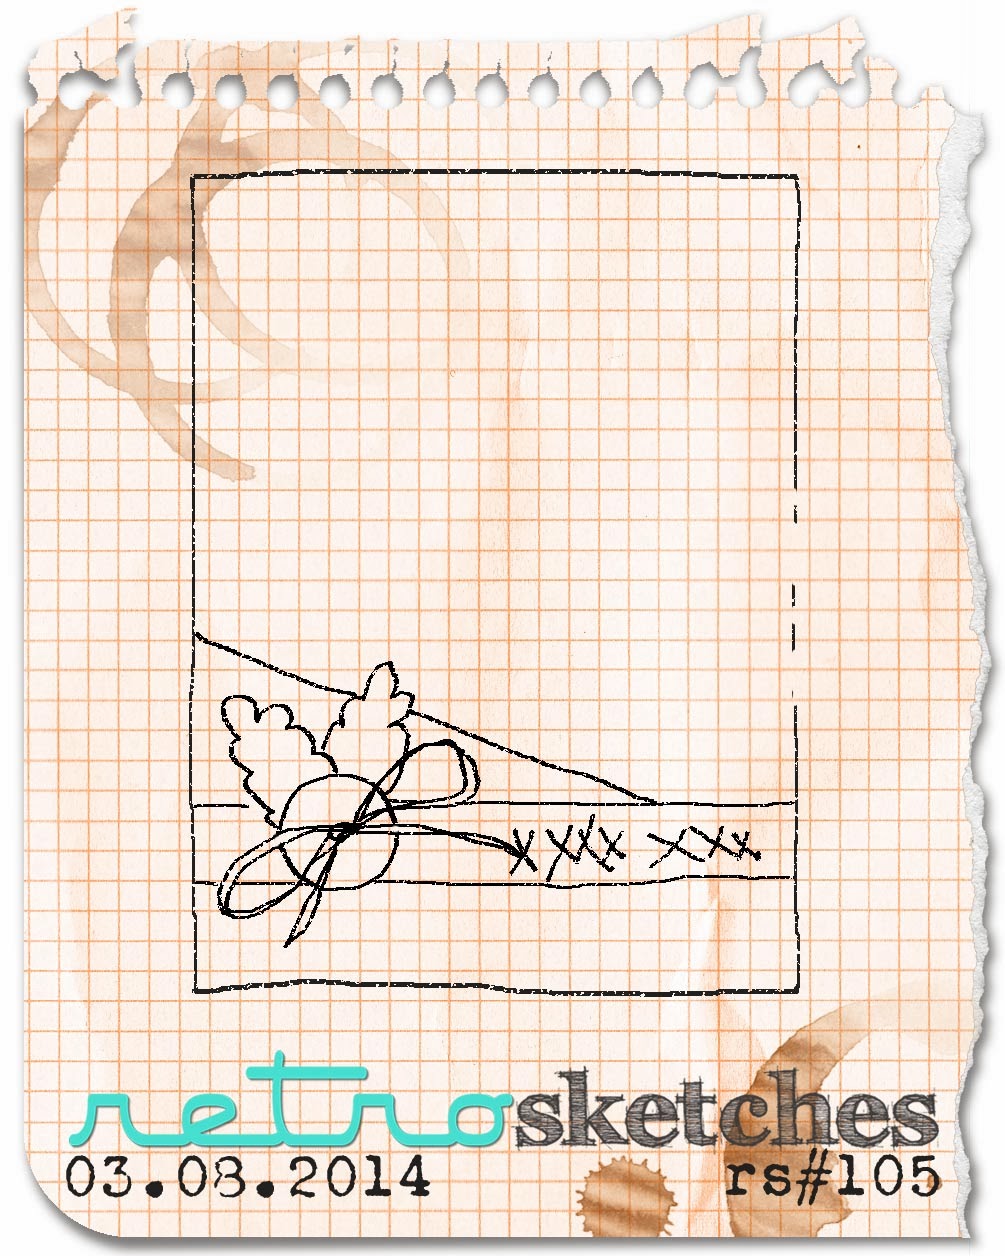
Geometrical patterns have been on-trend for a little while now, with stripes, chevrons and hexagons all very popular, and this trend has continued into 2014 with triangles. Lucky for us that Stampin' Up has a great Geometrical stamp set and co-ordinating triangle punch for perfectly punched triangles every time along with the bold and bright geometrical designs of the Kaleidoscope Designer Series Paper in the current seasonal catalogue and it was this that I used for the basis of my card:
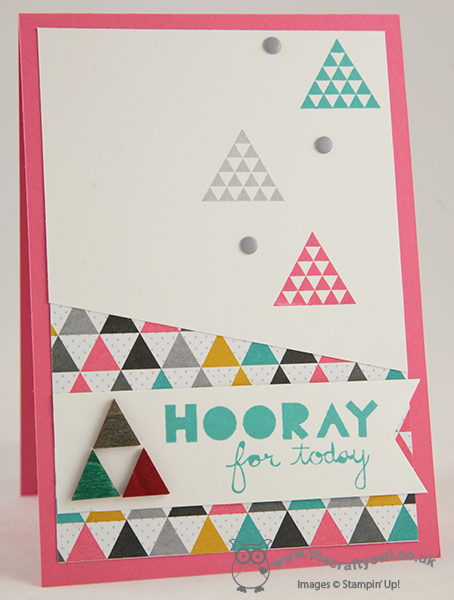
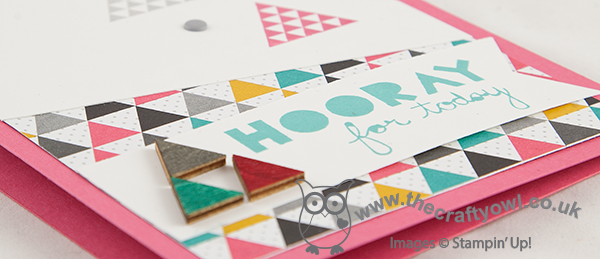
I decided to use the triangle as the repeat image for my patterned layer and used a few additional stamped ones to break up the white space on the top layer in co-ordinating colours. When it came to anchoring my sentiment banner, I didn't want to spoil the sharp angles of my card with a button and twine as in the sketch, but what to use instead? Then I remembered - the little triangles in the Essential Wooden Elements set would be perfect! I simply inked these by pressing into the ink pads of my chosen colours and arranged them to echo the pattern of the DSP - perfect!
I hope you like today's card; I have some fun things to share with you this weekend, so do pop back to see what else I've been up to. Until next time, happy stampin'!
Stampin' Up! Supplies Used:
by Joanne James13. March 2014 09:40Good morning everyone! When I came to make my card for this week's Paper Players challenge, I decided that Anne Marie's colour challenge this week would be perfect for a baby boy card, so using this week's CAS(E) this Sketch layout, I set to work:
After much experimentation, I decided to keep it clean and simple - this is what I came up with:
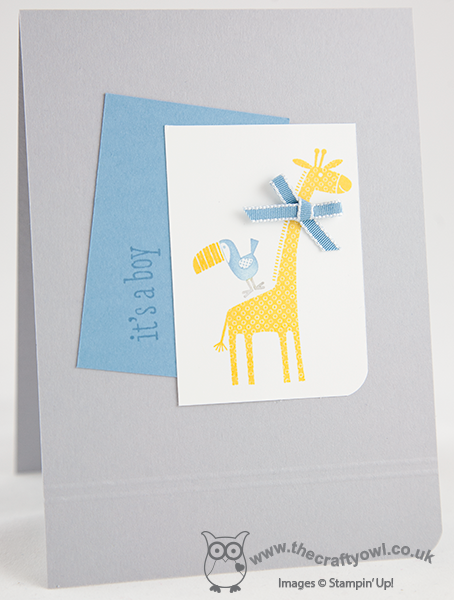
I stamped the giraffe from the Zoo Babies set in Crushed Curry, then inked up the little toucan bird with my Stampin' Write markers and lined him up with my Stamp-a-ma-jig to look as if he was sitting on the back of the giraffe. I then added a little 'vintage' taffeta ribbon bow in Marina Mist to the giraffe and rounded one corner of the panel for interest. I stamped my sentiment in Marina Mist on a second panel in the same colour and used Smoky Slate as my base. I love this grey; it's so soft and subtle and for this card worked much better than the blue or yellow, which looked too overpowering. I then simply added a few scored lines towards the bottom of the card and rounded the corner to echo the shape of the Whisper White panel.
I made so many variations of this card, with various embossed elements and fancy tags, but in the end I didn't like any as much as this one - why is it sometimes the simplest designs are the most difficult to create? This card is destined for Ben's teacher at school, who has just finished teaching to begin her maternity leave. We don't know what she's expecting, so at some point I need to make a baby girl card too just in case, although Ben is convinced that she is bound to give birth to a boy - the testosterone levels of a class of 21 boys and one girl will have influenced from beyond the womb, he's convinced!
Do check out the challenge pages above for more design inspiration - there are some great examples from both the design teams and in the galleries. I am also linking my card up with Addicted to CAS where the challenge this week is 'Baby' - I'm hoping to find lots of ideas for my 'baby girl' alternative there!
Back tomorrow with another project; until then, happy stampin'!
Stampin' Up! Supplies Used:
by Joanne James12. March 2014 10:11I'm hoping for a super-efficient day today: the dinner is already prepared and in the slow cooker, I've managed a few admin tasks and I'm getting my blog post in nice and early before I crack on with more creating and ticking a few more things off my ever-growing 'to do' list - I love days like this! Today I'm sharing two versions of essentially the same card - you'll see why shortly!
I loved the colours over at CAS Colours and Sketches this week and had a specific card in mind that I thought would also work for the challenge over at Less is More, where the challenge is One Layer cards featuring Spring flowers. So here are the CAS colours this week:
These colours reminded my of iris, a spring flower that we are starting to see in bloom now; I decided to use the orchid stamp from the Happy Watercolour set for my card (an iris is a type of orchid, right?!) because I needed to be able to create something abstract without any green and the stamps in this set are perfect for this. So here is my one layer card:
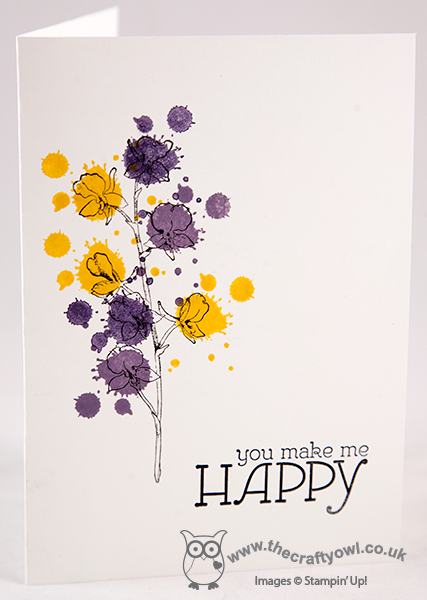
Instead of using one of the watercolour pieces to colour the flowers, I decided the bold colours needed something different so used one of the Gorgeous Grunge 'splodge' stamps instead; I saw something similar at a recent training event by Laura Mackie and decided this stamp would work nicely with the bold colour scheme. The splodges look random, but are perfectly placed: with the aid of my Stamp-a-ma-jig, it was easy to get the correct placement that I wanted. I then finished off with the 'happy' sentiment from the Happy Watercolour set - I love the font on this stamp. Having made this one layer card, I then decided to 'step it up' a little - here is my second card:
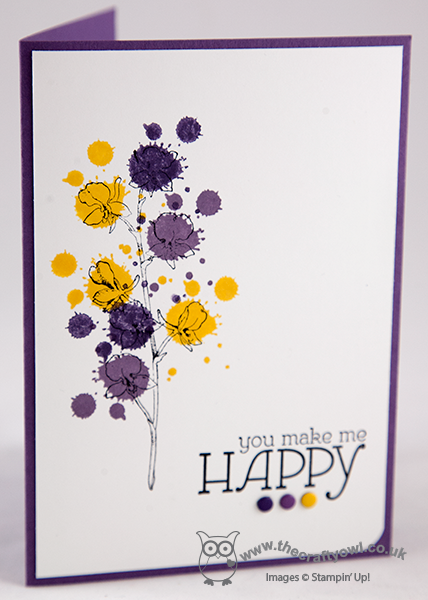
This time I layered on a base of Perfect Plum and finished the sentiment with some co-ordinating Candy Dots, rounding one corner of the white layer with my Envelope Punch Board. Some subtle additions, but they give the card quite a different look I think. I like both of these cards - which one do you prefer?
The 'Happy Watercolour' stamp set will feature in my classes on 28th and 30th April - if you live in Northampton and would like to join me to make some beautiful cards using this set, please get in touch for more information and to book your place. You can find my full class schedule here.
Right, I'm off to get inky! Back tomorrow with another project; until then, happy stampin'!
Stampin' Up! Supplies Used:
2dc518d3-fd24-4030-9b4f-d714327c5af4|0|.0|96d5b379-7e1d-4dac-a6ba-1e50db561b04
Tags: Candy Dots, Envelope Punch Board, Happy Watercolour, one layer cards, Gorgeous Grunge, Shop online, Stamp-a-ma-jig, Stampin' Up, Stampin' Up Card, Stampin' Up Card ideas, Stampin' Up Supplies
Cards | Classes | Stamping
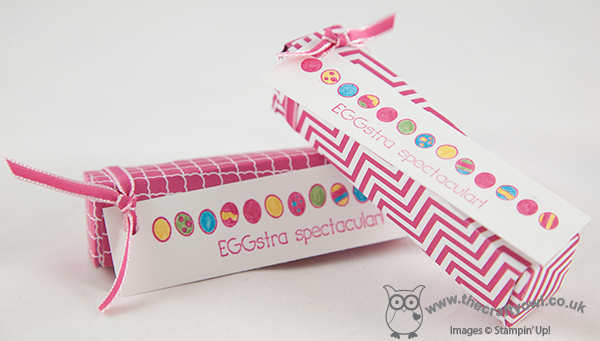
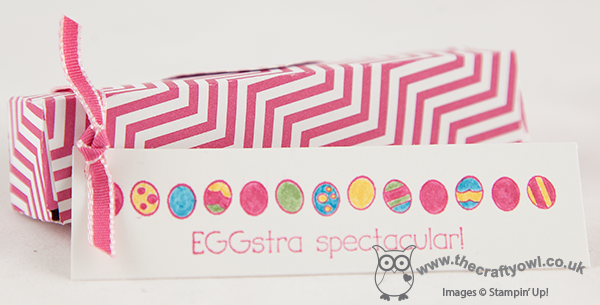
by Joanne James11. March 2014 15:13Firstly, thank you to everyone who has left comments on my blog, Facebook page, youTube channel or emailed me in person with comments and praise for my new Box Buster tool - I am genuinely touched that you have gone out of your way to share with me what a great tool you think this is and I'm delighted to be able to share it with you. Today I'm back with another video tutorial showing you a different box that you can make using your Envelope Punch Board - an open topped Easter bunny treat box - made using paper from the lovely Fresh Prints Designer Series Paper stack:
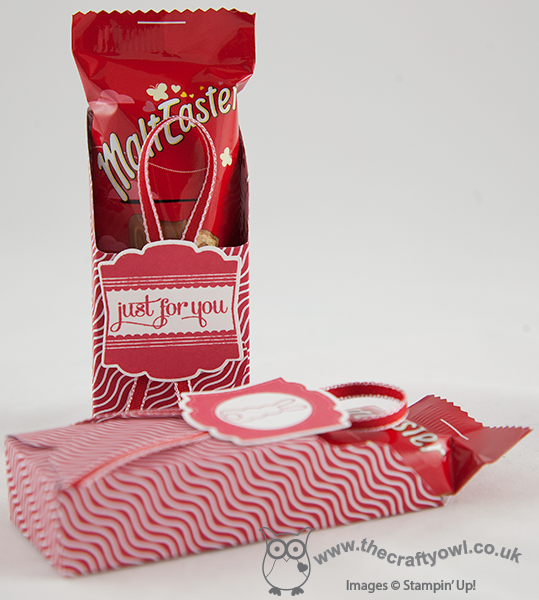
Sometimes you want to be able to see the contents of your box and today's box is just perfect for that. It also means that when you're making your box out of such lovely double-sided designer paper, you get a lovely glimpse of the reverse side too:
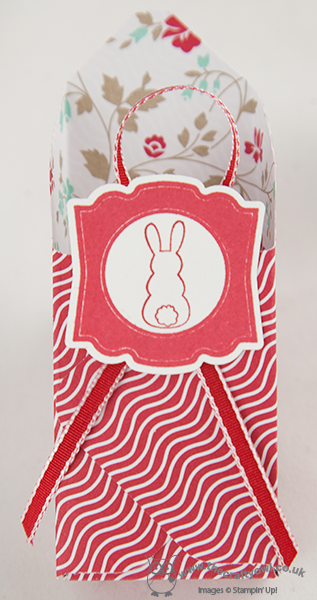
I love the Fresh Prints DSP stack - these paper stacks are great for small boxes and perfect if you're a card maker; I always get through several of these each season! Today's boxes were made to fit the Malteser Easter bunnies that are currently on sale in store right now, but as always with the aid of my Box Buster tool you could adapt the same style box to fit any size contents, just by measuring them; Box Buster from The Crafty Owl will do all the hard work for you and tell you what size paper you need and where you should make your punch marks. So, without further ado, here's what you've all been waiting for - the link to today's video:
)
I hope you found the tutorial useful - there's lots more still to come! Don't forget - you can access the Box Buster tool via the button on the right hand side of my blog home page or simply by clicking here.
Back tomorrow with another project; until then, happy box making!
Stampin' Up! Supplies Used:
c5d11fe0-3556-4a4f-8586-67c08127827c|0|.0|96d5b379-7e1d-4dac-a6ba-1e50db561b04
Tags: Box Buster, boxes, Artisan Label Punch, Eggstra Spectacular, Easter, Envelope Punch Board, Fresh Prints DSP Stack, Label Love, Shop online, Stamp-a-ma-jig, Stampin' Up, Stampin' Up Card ideas, Stampin' Up Supplies, video tutorial
Box Buster | Boxes | Envelope Punch Board | Video Tutorials
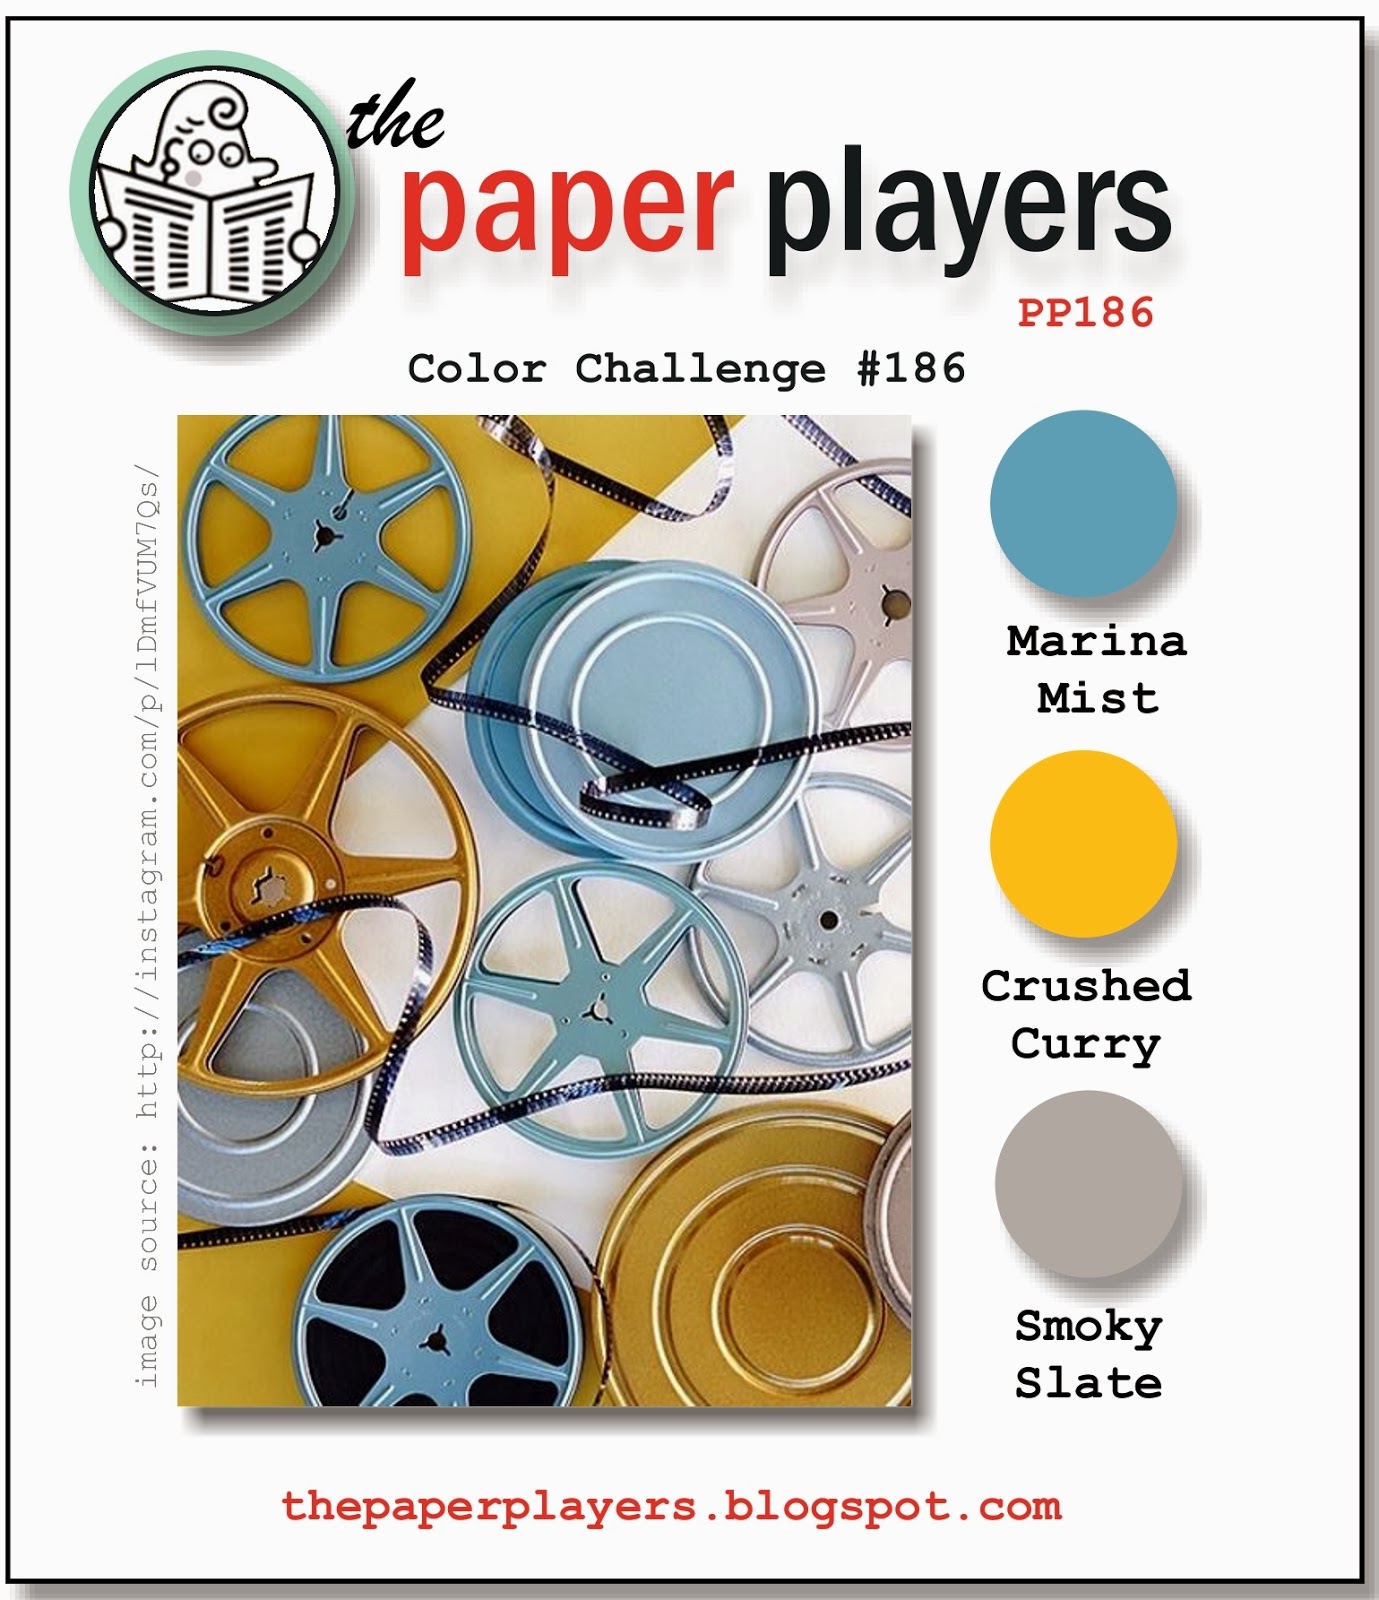
by Joanne James9. March 2014 22:18Good evening blog readers! Well, what a lovely day - today it was so mild and warm it almost felt like summer! I used my washing line for the first time this year and had a lovely couple of hours out riding my bicycle with the rest of the James family this afternoon, then came home and finished carving my first set of Undefined stamps. More on that later in the week; today I have an entry for this week's Colour Q challenge, where this is the inspiration:
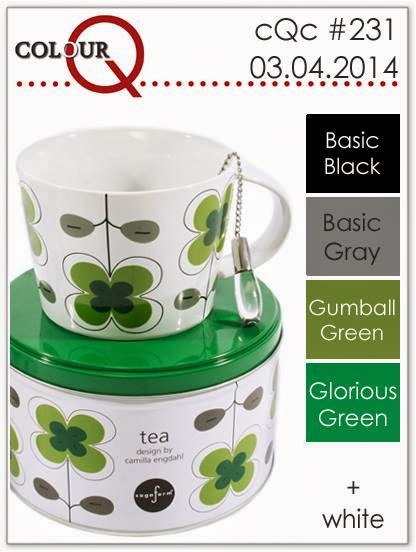
When I saw the colour scheme and clover leaf-type flowers, I immediately thought of St Patrick's Day; whilst not Irish myself (I'm not even wanting to admit my Welsh heritage following the Five Nations rugby results today!) this is the month when the Irish also celebrate their patron saint day, so having made daffodils for St David's Day last week, today it's the turn of the shamrock. I turned to My Digital Studio and created this Lucky Frameable, which could be used either on a card or framed as a piece of home décor:
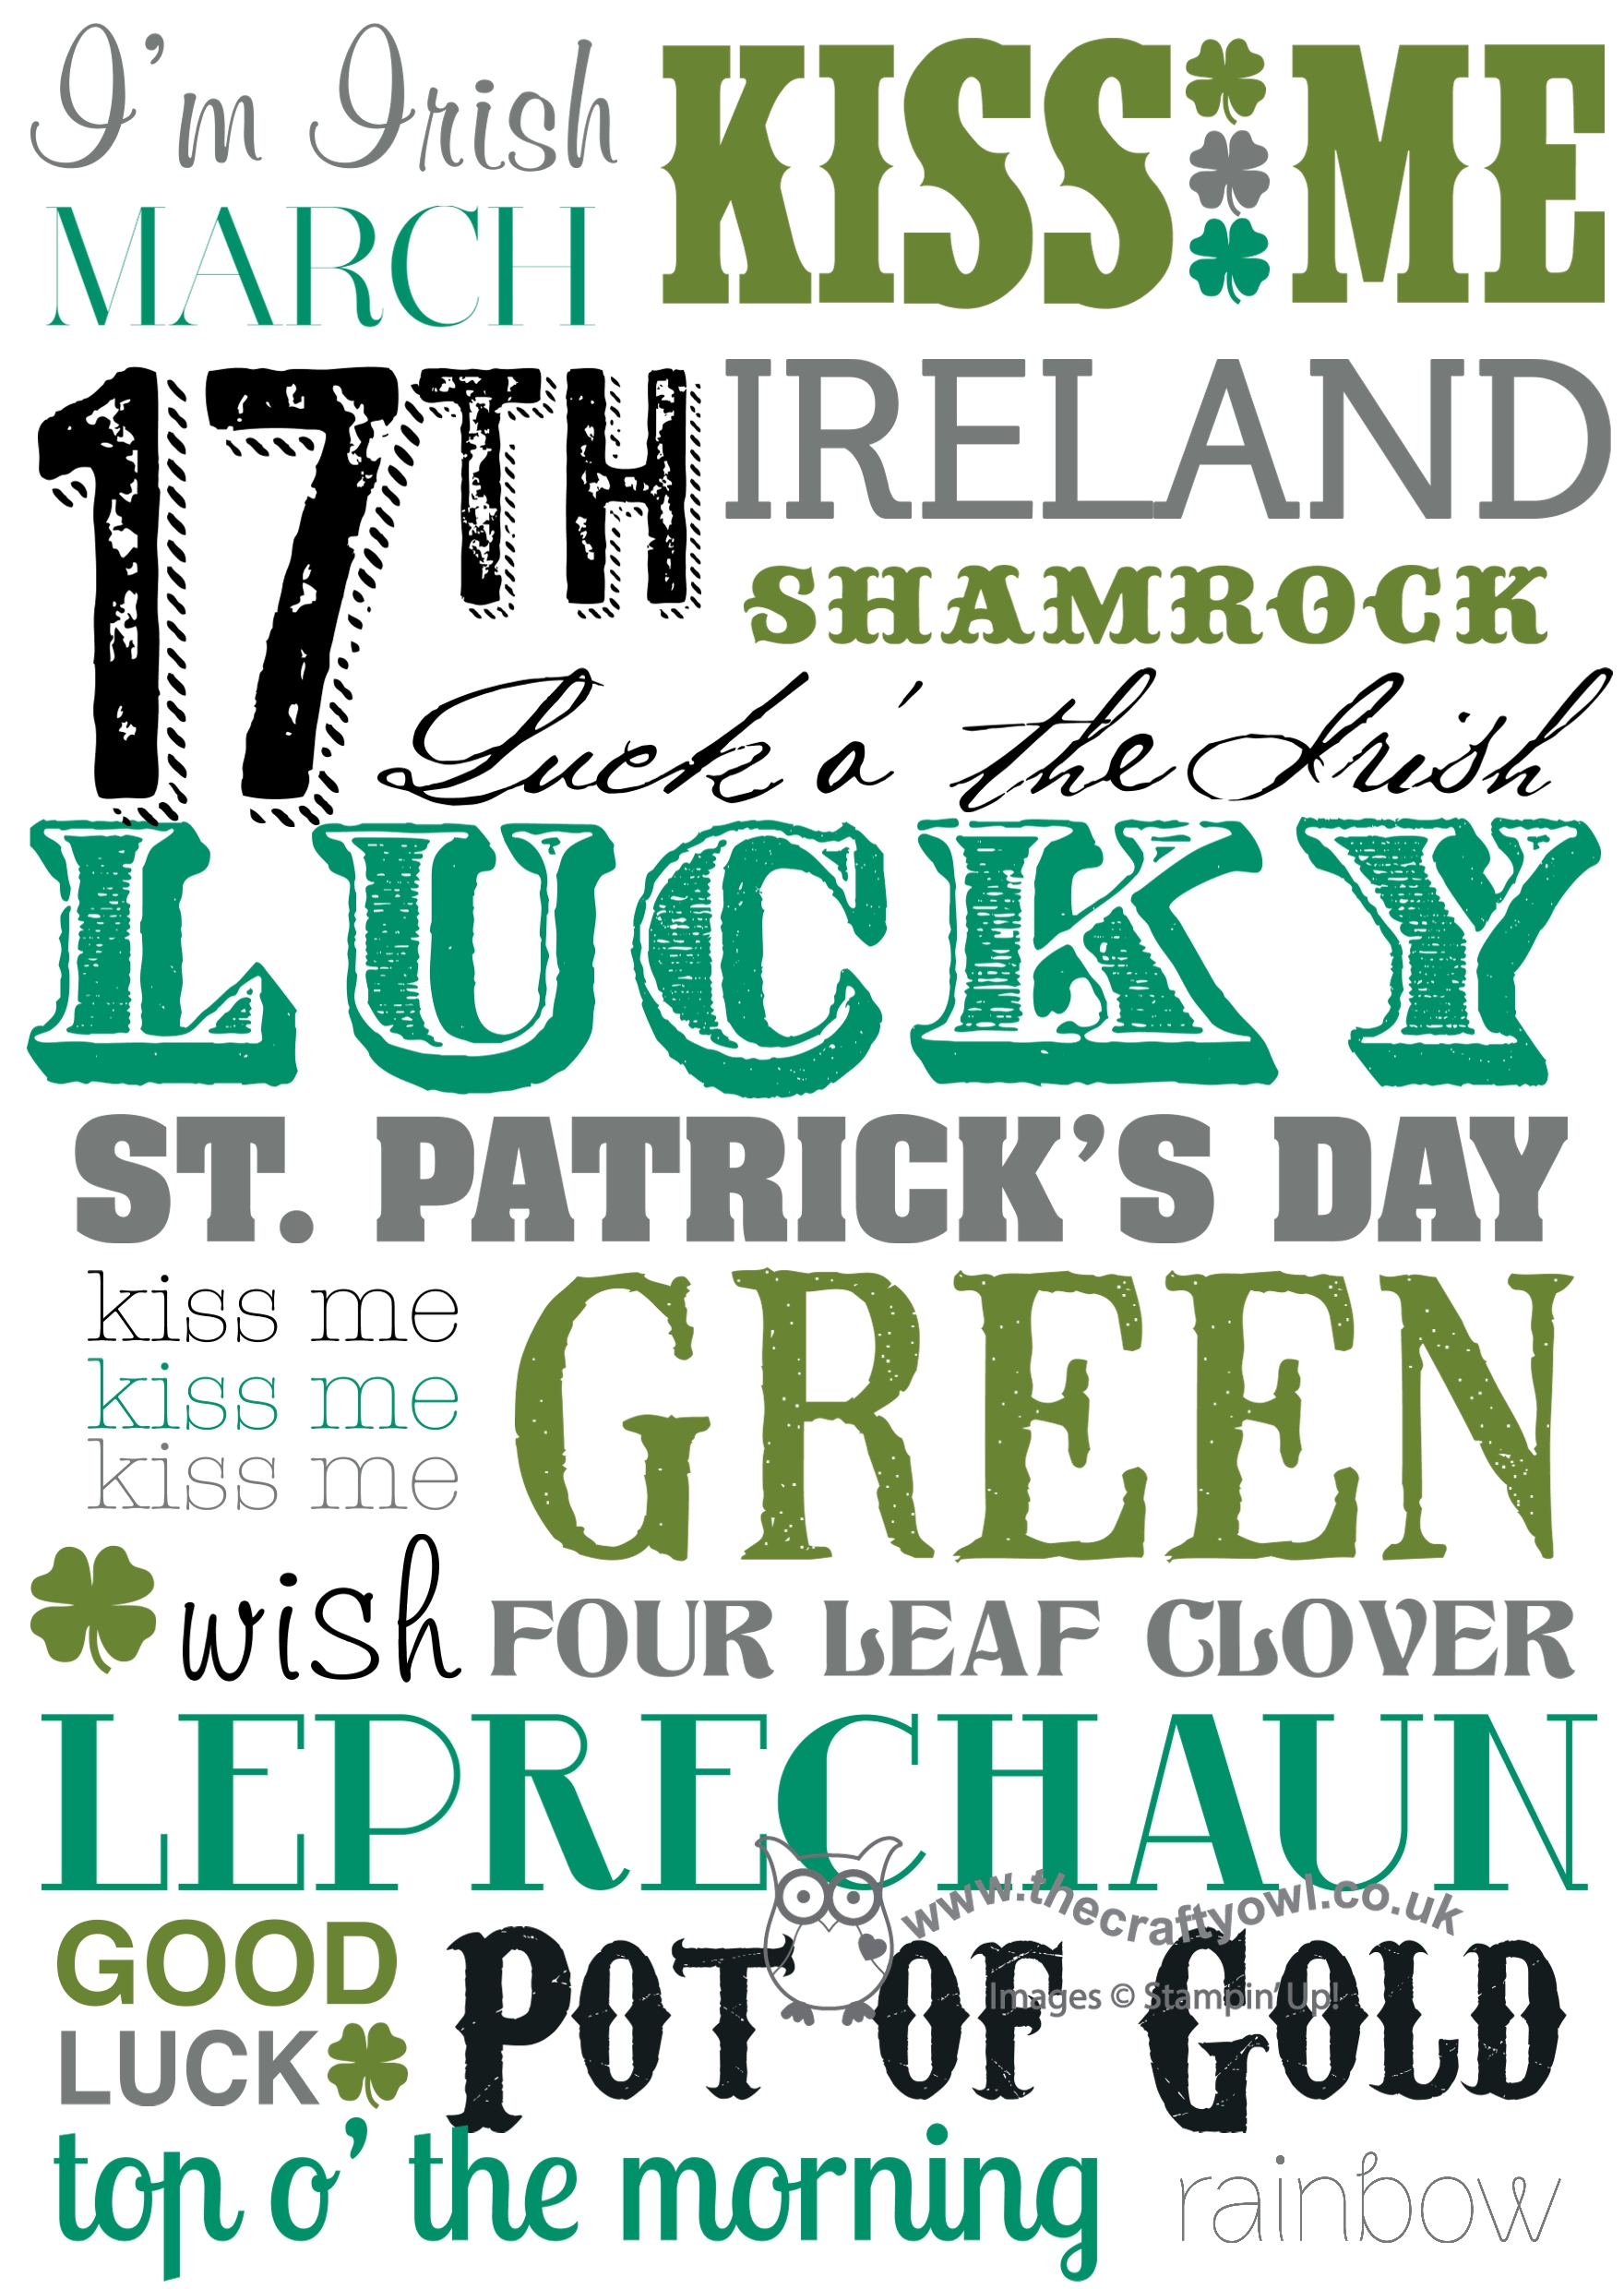
I love these graphic frameables (here's one I did for my New year cards this year) - you can play around with them until you get the look you're after. The other bonus with using MDS for today's project is that I could use all of the suggested colours, including the retired Glorious Green.
Back tomorrow with another project; until then, happy stampin'!
Stampin' Up! Supplies Used:
by Joanne James8. March 2014 20:54Today's card is one I designed for this week's Mojo Monday sketch challenge, where I was attracted by the layout and the 'frame' element that is central to the sketch:
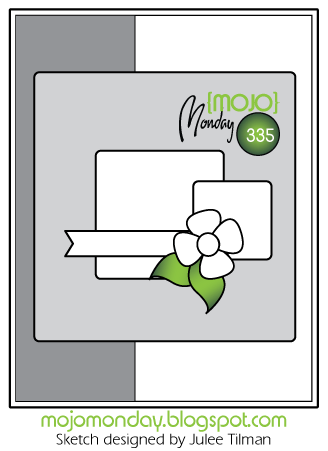
Here is my take on the sketch:
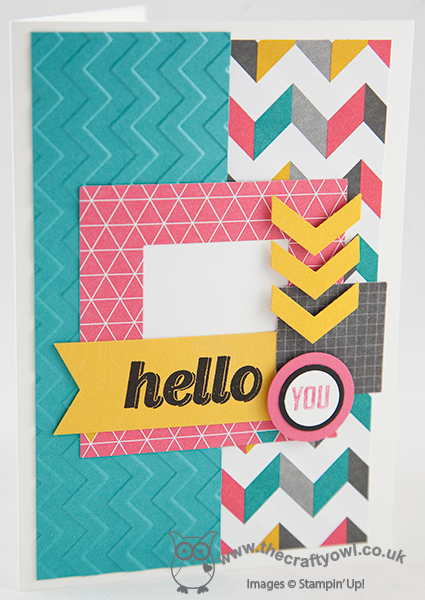
My card is a riot of graphic patterns and colour, using the Kaleidoscope Designer Series Paper as the inspiration for my colour scheme. I added a layer of texture with a Bermuda Bay panel that I dry-embossed with my Chevron Textured Impressions Embossing Folder, then layering the various elements in contrasting papers and finishing with a banner of Crushed Curry that I stamped with Versamark and heat embossed in black embossing powder to give it a lovely sheen. Cutting my frame was easy with the aid of my square framelits - this is one of those times when they are invaluable. I popped my chevron punched pieces on dimensionals, using them to draw the eye to my button 'You' (this is a partial stamp of the 'You & Me' stamp in the Perfect Pennants set).
I'm not one for mix-and-match of patterns as a rule, but sometimes it's ok to step outside of your comfort zone. I hope you're all enjoying your weekend; the weather has been much warmer and brighter here in the UK today - we managed to get some time outside in the garden today, which made a nice change.
Back tomorrow with another project; until then, happy stampin'!
Stampin' Up! Supplies Used:
e877f062-6a34-43c5-93b8-102c7a75c658|0|.0|96d5b379-7e1d-4dac-a6ba-1e50db561b04
Tags: Chevron Border Punch, Chevron Textured Embossing Folder, circle punch, Circles Framelits, Square Framelits, Stampin' Up, Stampin' Up Card, Stampin' Up Card ideas, Stampin' Up Supplies, Shop online, Perfect Pennants, Kaleidoscope, Simply Celebrate
Cards | Stamping
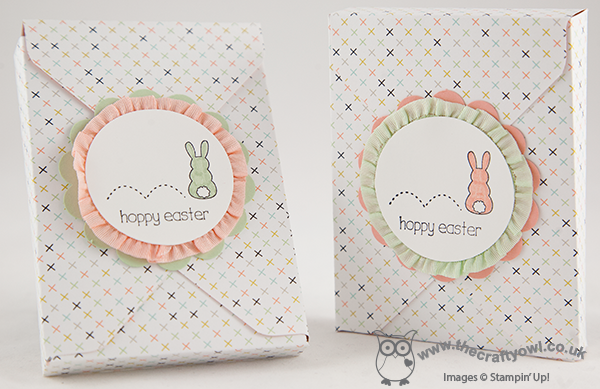
by Joanne James7. March 2014 19:25Hello everyone! From the home of 'cool time-saving tools' (if you're reading this and you're an SU! demonstrator you should also check out my Product Table Builder application) today I have the third of this week's video tutorials showing you how to make a super cute Easter mini-egg treat box using your Envelope Punch Board and my new Box Buster tool. You can use your Envelope Punch Board to make boxes of all shapes and sizes - including some rather dinky small ones. Check out this box that I made to hold 5 foil-wrapped mini eggs ready for Easter:
It measures just 20mm x 20mm x 85mm and it was so easy to work out the paper dimensions and punch points with the help of the Box Buster tool. Here's the video that shows you how I did it, along with a 'top tip' when creating narrow boxes like this:
This size box would also make a great wedding favour - it's the perfect size for sugared almonds if you're looking for something traditional. I hope you found today's video useful; why not use the Box Buster tool to create your own small or narrow boxes? You can use either millimetres or inches (to 1/8 of an inch) and create the box size of your choice?
Back tomorrow with another project; until then, happy stampin'!
Stampin' Up! Supplies Used:
by Joanne James5. March 2014 09:52Good morning blog readers and crafters! Back nice and early this morning with the second of my video tutorial posts showing you how to make any size box using your Envelope Punch Board and my new Box Buster tool. I've started early on my Easter treat boxes, so today's box shows you how to make this cute box:
The finished dimensions of today's box are 100mm x 75mm x 15mm. It was designed to fit a specific Easter treat - but you'll have to watch the video below to find out what it was! My new Box Buster from The Crafty Owl tool is just great for that - you can easily create a box to fit your chosen contents, without any hassle or wasted paper - you just measure the thing you want to put in the box, input the dimensions into the Box Buster tool and it does all the hard work for you: it will tell you exactly what size paper you need and where to make your first and second punch markings.
Today's project was worked out in millimetres, but the Box Buster tool will let you construct your box in either millimetres or inches - you choose! Here's the link to today's video tutorial:
Wasn't that SOOO easy?! Keep following this week as there are more box tutorials to come, showcasing a variety of box types with handy hints and tips for making the most of your Envelope Punch Board and my new Box Buster tool.
Back soon with another project; until then, happy stampin' (and box making!)
Stampin' Up! Supplies Used:
184e6871-6a47-4103-a0a0-0c3eb90de4fd|0|.0|96d5b379-7e1d-4dac-a6ba-1e50db561b04
Tags: 3D Projects, boxes, circle punch, Eggstra Spectacular, Envelope Punch Board, Sale-a-bration, Sale-a-bration 2014, Stampin' Up Card, Stampin' Up, Shop online, scallop circle punch, Sweet Sorbet, video tutorial
3D Projects | Boxes | Envelope Punch Board | Sale-a-bration | Stamping | Video Tutorials
by Joanne James4. March 2014 22:24Good evening lovely readers! I have finished editing my next video tutorial but have bumped it to tomorrow so that I can fit in a quick card that I made for this week's Paper Craft Crew challenge. here is this week's sketch layout:
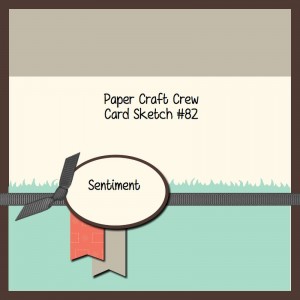
Here is the card I made using this layout:
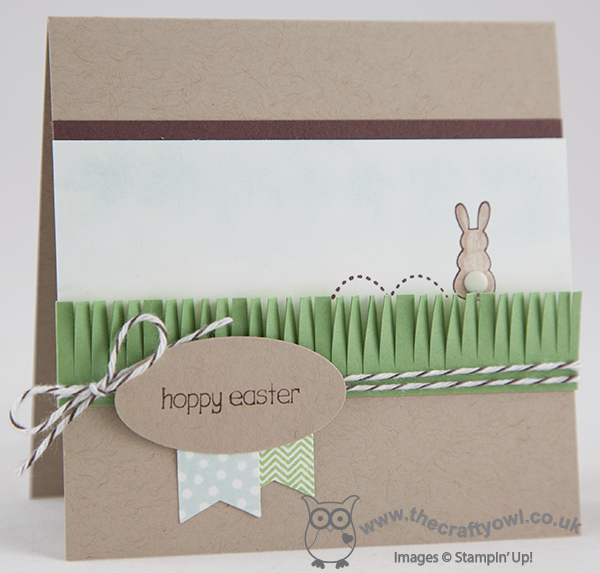
I went with a 4" square card for a change and a Crumb Cake base, then took a strip of Whisper White that I lightly sponged in Soft Sky across the top with Wild Wasabi across the bottom, then stamped the bunny minus the sentiment in Chocolate Chip and coloured him with Crumb Cake ink and a blender pen, before adding a candy dot for his tail. I matted this section on a strip of Chocolate Chip and then added a fringe of Wild Wasabi to the front of the card to make it look like the bunny was hiding in the grass. The new fringe scissors are great for creating grass in an instant and add a lovely texture. I then finished by wrapping some Early Espresso baker's twine around my card and tying in a bow. I stamped the sentiment onto an oval of Crumb Cake cardstock and finished with two co-ordinating banners, stamped using the Banner Blast stamp set and punched out with the matching punch. Both of these items are available free with a spend of £45 or more during Sale-A-Bration - contact me or visit my online store if you would like to place a £45 order and receive these gifts for free.
I've had a busy day today so am off to bed for a well-earned rest; back tomorrow with the second in my 'Any Size' box tutorial series. Until then, happy stampin'!
Stampin' Up! Supplies Used:
857a10ab-e2de-414a-a7f9-f2ec4120ed25|0|.0|96d5b379-7e1d-4dac-a6ba-1e50db561b04
Tags: Candy Dots, Easter, Earn Free Products, Sale-a-bration 2014, Sale-a-bration, Shop online, Stampin' Up, Stamp-a-ma-jig, Stampin' Up Card, Stampin' Up Supplies, Eggstra Spectacular, Fringe Scissors
Cards | Sale-a-bration | Stamping
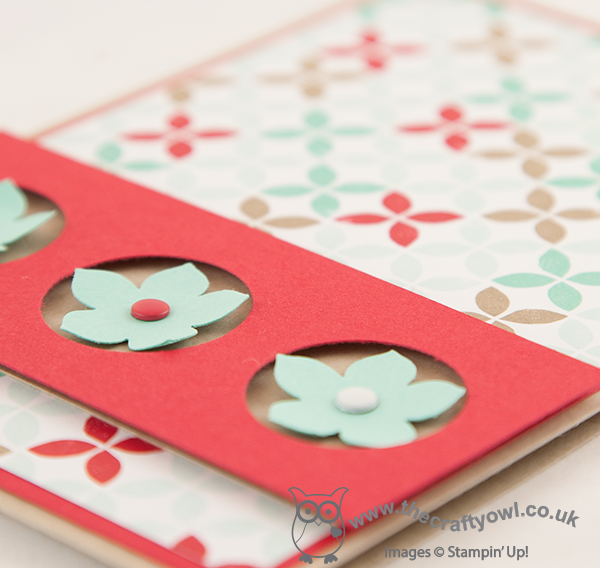
by Joanne James4. March 2014 16:28I'll be back later with another video tutorial showing you how to make another 'any size' box using your Stampin' Up! Envelope Punch Board and Box Buster from The Crafty Owl, but meanwhile I managed to grab a quick few minutes this morning to make a card for this week's Pals Paper Arts challenge. There is a great sketch from Nicole Watt this week that offers so many possibilities:
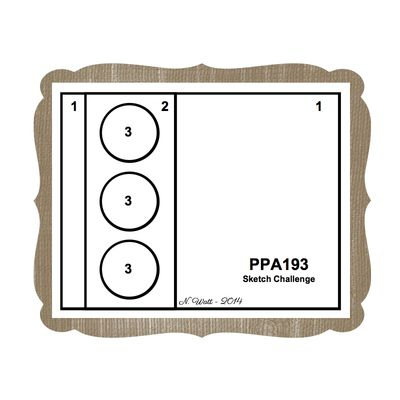
I've had my card in my head since I first saw the sketch, but only managed to get it translated into an actual card today. So here is my take on the sketch:
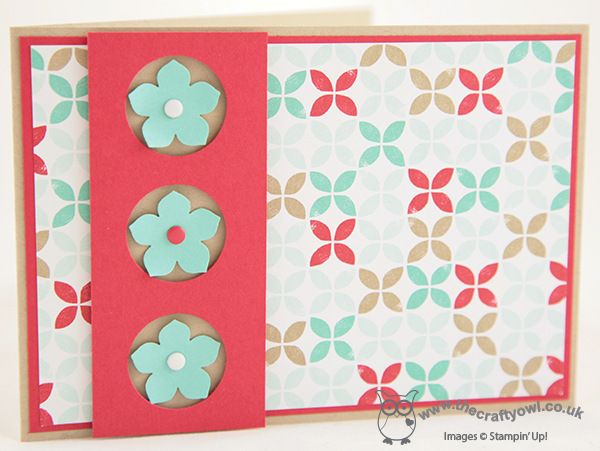
I went for a modern graphic card, using a sheet of the Fresh Prints Designer Series Paper Stack for my colour scheme. I punched the flowers using my Petite Petals punch without stamping them with the co-ordinating stamp set first, as I wanted to limit the pattern to the paper. I set the flowers in a section that has three holes punched with the 1" circle punch and raised this up on dimensionals to add some depth and give the flowers more of a 3D effect. I finished each of the flowers with a candy dot in either Real Red or Whisper White. having finished the card, I realised that it was one of life's rarities - no stamping! I really like this sketch layout and I'm sure will be using it again.
Back later with another video tutorial for you; until then, happy stampin'!
Stampin' Up! Supplies Used: