Celebrate Your Day With A Little Elephant Birthday Card

by Joanne James14. July 2019 09:00

Today it's Sunday and time for this week's new challenge over at The Paper Players! It's the turn of the fabulous LeAnne to host this week and she has a colour challenge for you to work with:


I really liked LeAnne's colour combo this week and I have a real shortage of male birthday cards in my box at the moment, especially for young boys (a whole bunch of Ben's friends have had birthdays lately with still more to come in the next couple of months), so that's where I decided to focus my efforts this week. I have two cards to share with you today, both featuring the Little Elephant set. They both use this week's sketch over at CAS(E) This Sketch; here's the first one:


Here's the low-down on today's cards:

I did some simple layering and inset my punched elephant carrying his balloons inside a circle aperture cut with my Layering Circle Dies, then overlayed a stacked diecut sentiment, cut with the Well Written Framelits, that I brushed with clear Wink of Stella for added sparkle. I also made a super clean and simple version that I am going to link up over at Less Is More for their theme of 'Celebrations' this week:


I switched the colours around and punched out the elephant's ear to ring the changes and for both cards I decorated the envelopes and the insides too. My Stamparatus made it easy to line up the balloon and the elephant's trunk - love that tool!

Here is the visual summary of the key products used on today's project for you to pin for easy reference:


You can see all of my Product and 'How To' summaries on my 'How To - Tips and Techniques' Pinterest board in case you've missed any. 

Having made these cards I decided they were maybe a little too youthful for my 'pre-teens' so I used this colour combo to make another masculine, more grown up card that I will share with you on Tuesday, so if you like this colour combo, be sure to pop back then and take a look.

Before you reach for your ink and papers, check out what our amazing team has created to inspire you this week:

Here's a quick recap of our challenge rules:
 
1.  Create a new paper project
2.  Upload your creation to your blog with a link back to us and provide a direct link to the post featuring your challenge submission.
3.  Please link your card to no more than four challenges, TOTAL.
4.  Have FUN!

You can see all of my 'How To' summaries on my 'How To - Tips and Techniques' Pinterest board in case you've missed any. 

Enjoy your day; I will be glued to the TV this afternoon enjoying the Wimbledon Men's Final - the culmination of two fantastic weeks of grass court tennis and spending some quality time with my boys since we are still Rebecca-less, as she continues to experience the delights of life with a German family (only 3 more days t go!) I'll be back tomorrow with another project. Until then, happy stampin'!


Stampin' Up! Supplies Used: 

Table built using Product Table Builder by The Crafty Owl - Independent Stampin' Up! Demonstrator.

First Steps New Baby Boy Welcome Card for AYSI197

by Joanne James9. April 2019 14:00

Today I'm sharing a card for the current challenge over at As You See It where the ladies have a great sketch to play with:

This is one of those versatile sketches that is a 'keeper' and can be used in so many ways. I still had my gingham papers out on my desk following Sunday's cards and decided it was perfect for a baby card - take a look:


Here's the low-down on today's card:

First Steps - My focal point sentiment comes from the 'First Steps' stamp set, an adorable collection of sweet baby images that are perfect for cards, invites, showers, samplers and more. I stamped my sentiment using my Stamparatus so that I could ink it several times and get a really solid image, then having stamped off first stamped the tiny footprints behind it in the same colour.  

Subtle Textures - I embossed my top panel with the Subtles embossing folder to add a little texture without detracting from the sentiment. I added a little more detail with the soft organdy ribbon and used my layers and scalloped border/mat detail to add a little more interest and to tie in my panel of Balmy Blue gingham check across the bottom. 

Monochromatic Blue - I kept my card simple with a monochromatic Balmy Blue and Whisper White colour combination however this design could be easily replicated in pink for a girl or any of the other colours in the Gingham Gala designer series paper stack for a more gender-neutral design.

Here is the visual summary of the key products used on today's project for you to pin for easy reference:


You can see all of my 'How To' summaries on my 'How To - Tips and Techniques' Pinterest board in case you've missed any. 

Enjoy your day and I'll be back tomorrow with another project. Until then, happy stampin'!


Stampin' Up! Supplies Used:

Table built using Product Table Builder by The Crafty Owl - Independent Stampin' Up! Demonstrator.

A Good Day Gingham Gala Card Trio

by Joanne James7. April 2019 09:00

Today it's Sunday and time for this week's new challenge over at The Paper Players! It's the turn of the fabulous LeAnne to host this week and she has a fun theme challenge for you to work with:

I decided to get making with my Gingham Gala designer series paper and made not one, not two but three cards for today's challenge - all of which use this week's Fusion sketch too (turned through 90 degrees):

I didn't get overly creative with my gingham panels as I wanted to use them as backgrounds in their own right and really let them shine.

So, to my cards! Each of them also coincidentally features a stamp from the stamp set, 'A Good Day', for my feature circles.  Here is the first one:


This card is my favourite from a creative point of view, as I love the sun/rain rainbow idea and the bright yellow check just makes this such a happy card!

For my second card I created one that uses not only the Fusion sketch but the theme too - no Easter eggs sure, but the cutest of Easter bunnies:


I stamped part of my sentiment on the banner. which I also bordered with one of the the edgelits in the Be Mine Stitched Framelits set and continued it on the inside of my card. I forgot to take a photo of my 'corrected' inside, but if you're interested and fancy a giggle you can pop over to my Facebook page to see the original one!

For my final card, I was inspired by this week's Global Design Project #GDP183 theme of 'A Day At The Park':

For me a day at the park is not complete without a ride on the swings, so this sweet little tree swing was perfect to fit this theme and paired with a sentiment from the Sale-A-Bration set 'Part of My Story' and the fresh green gingham makes for a sweet, uplifting card:


This is the card that I like most in terms of layout - whilst each of the images needs a different sized circular element, this is the one that I like the most in terms of overall proportion. 

Here are the visual summaries of the key products used on today's project for you to pin for easy reference:


You can see all of my Product and 'How To' summaries on my 'How To - Tips and Techniques' Pinterest board in case you've missed any. 

I hope you like my gingham trio; I also created a 'bonus' card using plaid as the main feature of my design so do pop back later in the week to see another example using this week's theme.

Before you reach for your ink and papers, check out what our amazing team has created to inspire you this week:

Here's a quick recap of our challenge rules:
 
1.  Create a new paper project
2.  Upload your creation to your blog with a link back to us and provide a direct link to the post featuring your challenge submission.
3.  Please link your card to no more than four challenges, TOTAL.
4.  Have FUN!

You can see all of my 'How To' summaries on my 'How To - Tips and Techniques' Pinterest board in case you've missed any. 

Enjoy your day; we are having a restful one with a roast dinner with all the trimmings for lunch and then we'll be watching the Oxford-Cambridge boat race on TV in the afternoon - armchair sportsmen for once! I'll be back tomorrow with another super-fun project that you are not going to want to miss. Until then, happy stampin'!


Stampin' Up! Supplies Used: 

Table built using Product Table Builder by The Crafty Owl - Independent Stampin' Up! Demonstrator.

Animal Expedition Notecard

by Joanne James16. March 2019 21:00

Today I'm sneaking in with another card that I made earlier with some leftover pieces from another project that I'm going to share with you on Tuesday - they were perfect for the current sketch over at Inspire.Create Challenge that finishes tomorrow:

 No photo description available.

This is a great card layout that would work with lots of papers and stamp sets. I had some offcuts of Animal Expedition designer series paper so used them to make a simple notecard - take a look:

I diecut my rhino and birdie pair from a piece of my leftover paper and added to a sentiment on some layered circles and my card was done!

Here is the visual summary of the key products used on today's project for you to pin for easy reference:


You can see all of my 'How To' summaries on my 'How To - Tips and Techniques' Pinterest board in case you've missed any. 

Enjoy your day and I'll be back tomorrow with my card for this week's challenge over at The Paper Players. Until then, happy stampin'!


Stampin' Up! Supplies Used:

Table built using Product Table Builder by The Crafty Owl - Independent Stampin' Up! Demonstrator.

Nerf Party Ideas For The Stampin' Creative Blog Hop

by Joanne James30. June 2018 06:00

It's Saturday and today I have a special post for you since I, along with the talented Kayla Macaulay, am a guest with the lovely ladies over on the Stampin' Creative Design Team Blog Hop:

You may have just arrived from the colourful Pip Todman over at Queen Pip Cards or alternatively this may be your first stop. Either way, welcome and be sure to continue to the next stop along the hop by clicking on the next name in the list below for more creative ideas. This month the theme is 'party central' and there are lots of ideas and inspiration for parties for many different occasions throughout the hop. 

When I started thinking about what I was going to create today, I immediately jumped to my collection of new catalogue products wondering which new set to use. But in actual fact, I ended up using one of the most long-standing staple items in my crafting arsenal for the majority of my makes today: my Layering Circles Framelits. The next party that I need to plan will be that of the youngest of the James Juniors and whilst we've had lots of debate about what form it will take, one thing is for sure - no party that centres around 11 year old boys is complete without some form of Nerf battle these days, so I decided to get ahead and take the opportunity to start making with this in mind. 

First up is a birthday card that I actually made for a friend of his who is celebrating his birthday today: I used the currently popular 'impossible card' fancy fold and along with some partial diecutting to create a Nerf target for the popped-up section. These cards are really not at all tricky to make, despite their name! You simply score across the horizontal and then make a single cut at the centre of one panel at right angles to this (I made mine at 3"), followed by two cuts wherever you like on the facing panel (mine are at (1 5/8" in from each edge) and then fold each half in opposite directions, leaving a gap front and back and creating the central pop-up. I kept the colour scheme really simple, using the new in-colours Blueberry Bushel and Grapefruit Grove, both of which are a perfect match for Nerf guns and foam bullets, and having layered my diecut target circles added a sight and a bullet popped up on dimensionals for a fun touch. Some in-colour Blueberry Bushel patterned paper and a sentiment courtesy of the Perennial Birthday stamp set finish my card.

This 'impossible card' fold is a fun way to add dimension and interest to a card whilst still enabling it to be folded flat for mailing. My card is an irregular size, since the size of the base was determined by the diameter of the outer target circle. The card measures 5 1/4" x 6" when flat, so requires a bespoke envelope which I created using my trusty Envelope Punch Board with the help of my Envelope Expert tool. 
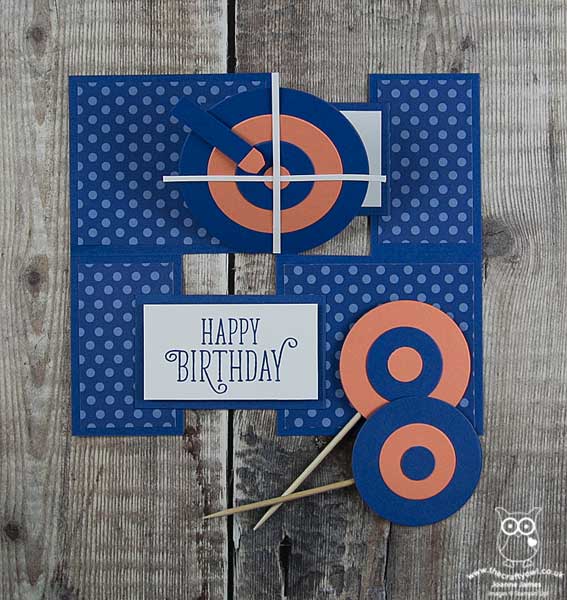
 

 The other targets you can see in the forefront of my card are some cake toppers I made. I am currently in the middle of a kitchen renovation and have only a microwave and the BBQ for cooking, so there was no opportunity to bake any cakes to put them in but I'm sure you get the idea!

I also created a fun party favour using Stampin' Up!'s Mini Pizza Boxes. I'm so glad these made it into the annual catalogue, they really are so useful for dressing up for all kinds of things. I brayed my box with Bluberry Bushel ink then created a belly band with another target on top and a thank you tag. Can you guess what is inside?
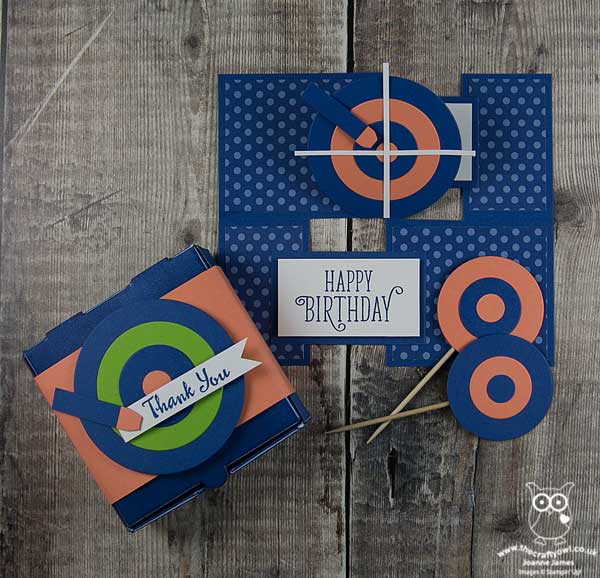
 

Yes, more foam Nerf bullets! The Mini Pizza Boxes are the perfect size to house 14 bullets and since the children seem to use hundreds of these when they are playing in their Nerf battles, I figured a few more each wouldn't go amiss!
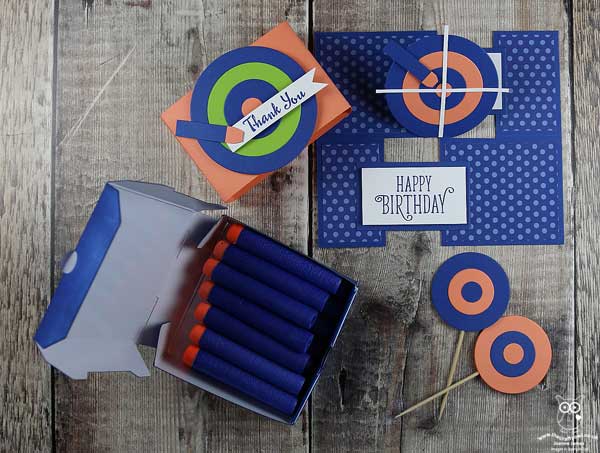
 

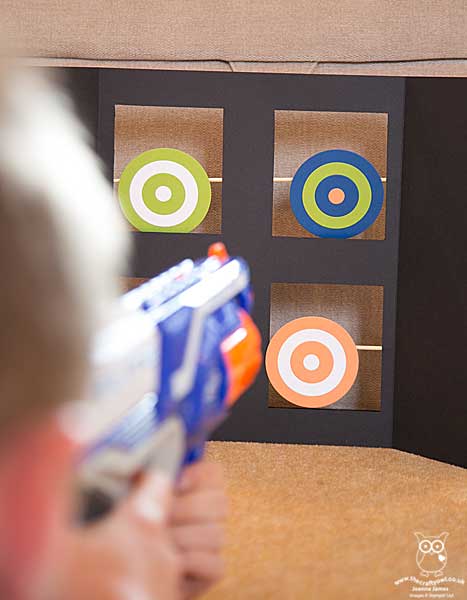
 Lastly for today I also created a set of freestanding spinning Nerf targets, based on this one I saw over at Frugal Fun 4 Boys. If you click on the link you can follow the instructions to make your own - I simply used a collection of layered circles, adding in some Whisper White and Granny Apple Green for more colour variety. This is great for indoor or outdoor use, so I'm sure will be added to the toybox supplies. This is my tester in action, declaring it to be too easy - I think he needs to move further away so that it's more of a challenge!
 

I hope you liked my collection of fun party ideas, that in fact require very little in the way of supplies to make. I have another Nerf-themed birthday card to share, which is the one I have made for Ben's birthday, but will save that for another time!

Here is the visual summary of the key products used on today's project for you to pin for easy reference:
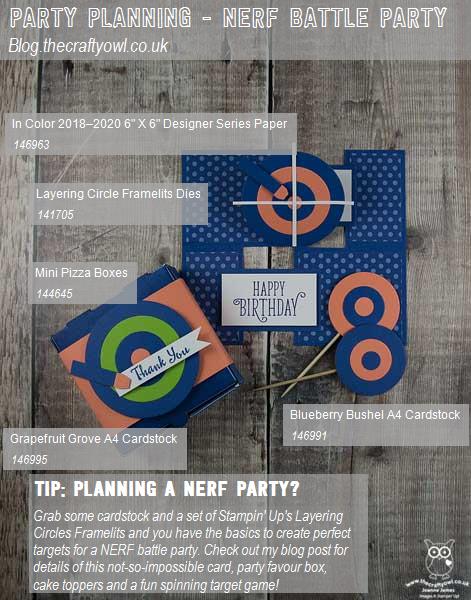
 

You can see all of my Product and 'How To' summaries on my 'How To - Tips and Techniques' Pinterest board in case you've missed any. 

For now, why not continue the blog hop for more creative party ideas? Do check out them rest of the Stampin’ Creative team to see what celebrations they have been preparing for. To carry on with the hop click on the names in the list below:


Enjoy the rest of your day. Mine will be a busy one, with a Family Fun Day, birthday party and sleepover (thankfully not at my house!) and the final performance of The Sound of Music for my eldest singing superstar - can't wait. I'll be back tomorrow with this week's post over at The Paper Players where the celebrations continue as we are celebrating our 400th birthday! We have a very special challenge for you as a result with lots of prizes to give away too so do pop back then - you are not going to want to miss it. Until then, happy stampin'!


Stampin' Up! Supplies Used: 

Table built using Product Table Builder by The Crafty Owl - Independent Stampin' Up! Demonstrator.

Wild About You Animal Expedition PP399

by Joanne James24. June 2018 09:00

Another busy week in the James household with little time for crafting - boohoo! I did have a great technique class earlier this week where we made cards using the 'Share What You Love' Suite and have had the opportunity to chat with lots of my lovely customers this week as they have been collecting their new catalogue orders, so it's not all bad. And today it's Sunday and time for this week's new challenge over at The Paper Players - yay! It's the turn of our very own queen of diecuts, the lovely Laurie, to host this week and she has my favourite, a sketch challenge, for you to work with:


I decided that the sketch layers lent themselves to featuring some new designer series paper and having just taken delivery of the Animal Expedition papers I had to start cutting them up for my card this week - take a look:


Here's the low-down on today's card:

Animal Antics - My card today contains very little stamping - it really is all about the paper. Oh and how I love designer series paper! I used two different designs from the Animal Expedition DSP on my card: a background panel featuring a selection of cute animals, including the animals to be found in the co-ordinating 'Animal Outing' stamp set along with a few extras too, including crocodiles and a sloth. For my circle element, I used one of the other paper designs featuring larger versions of the same animals and cut out a sloth with a circle framelit, allowing the fussy cut edges to overhang the border of my mount - isn't he just the cutest?

Wild About ... My Everyday Label - The only stamped element on my card is the sentiment. I punched this out using my Everyday label punch by feeding the cardstock into the punch from the back in order to create the longer rectangle, then snipped off the circular elements top and bottom in order to create a uniform shape that was easier to mount. 

A Bright Colour Combo - I chose to use Lemon Lime Twist for my card base and label, to provide a bright contrast to my busy patterned paper. I mounted all of my panels on Rich Razzleberry, pulling the colour from the little purple bird that is chatting to the sloth. I also added a thin border of Old Olive to frame my sloth. Feel free to save this colour combination for your future projects:

Here is the visual summary of the key products used on today's project for you to pin for easy reference:


You can see all of my Product and 'How To' summaries on my 'How To - Tips and Techniques' Pinterest board in case you've missed any. 

Before you reach for your ink and papers, check out what our amazing team has created to inspire you this week:

Here's a quick recap of our challenge rules:
 
1.  Create a new paper project
2.  Upload your creation to your blog with a link back to us and provide a direct link to the post featuring your challenge submission.
3.  Please link your card to no more than four challenges, TOTAL.
4.  Have FUN!

I can't wait to see what you create with this week's sketch and look forward to visiting your blogs this week! Enjoy the rest of your weekend as it will be over all too quickly. We have the last bits of the kitchen to pack away before major building work starts tomorrow on the new one, along with another school project - last week it was Eid cards, this time a map of the Tour de France route - to assist in the completion of. Thank heavens for Stampin' Up! and a ready stash of onhand craft supplies! I'm hoping to get some crafting done this week in between making copious cups of builders tea so will be back soon with more projects sharing some new makes.

Either way, you are definitely going to want to pop by next Sunday for the next Paper Players challenge; we will be celebrating our 400th anniversary and have a ton of fun in store for you! Until next time, happy stampin'!


Stampin' Up! Supplies Used: 

Table built using Product Table Builder by The Crafty Owl - Independent Stampin' Up! Demonstrator.

Pink Abstract Impressions For The Paper Players PP395

by Joanne James27. May 2018 09:00

It's Sunday and time for this week's new challenge over at The Paper Players! It's the turn of my awesome friend LeAnne to host this week and she has my favourite, a sketch challenge, for you to work with:


I struggled a little with my card this week; I think too much time spent on admin and not enough crafting, coupled with new catalogue syndrome (so many new things to play with and a ton of things on their way out, sometimes it's hard to know where to start!) left me feeling a little stuck for inspiration. Eventually I decided to go pink and have a play with my stamps and papers from the new Garden Impressions Suite - take a look:


Here's the low-down on today's card:

Garden Impressions - The new Garden Impressions Suite is a collection of papers and images inspired by Impressionist art. The abstract florals and paper patterns are reminiscent of Monet's fabulous flowers and garden at Giverny, with broad brushstrokes and bold use of colour. I know this is going to be one of my favourite sets in the new catalogue.

Abstract Flowers - Having chosen the pink floral paper, I set about creating a single stamped abstract flower on a layered circle, stamping off the first layer and stamping layers two and three at full strength. These stamps are super-easy to line up and I just love the loose abstract effect. 

A Pink Pair - I used a combination of white and the two pinks in the designer series paper, melon Mambo and Powder Pink, as the colours for my card today - here they are if you would like to save them for your future inspiration:


Here is the visual summary of the key products used on today's project for you to pin for easy reference:


You can see all of my Product and 'How To' summaries on my 'How To - Tips and Techniques' Pinterest board in case you've missed any. 

I'm still not sure about this card - I added the ribbon as I felt it needed a little something, but I don't know if it works? Maybe it's just too pink?! I do love that sentiment though.

Before you reach for your ink and papers, check out what our amazing team has created to inspire you this week:

Here's a quick recap of our challenge rules:
 
1.  Create a new paper project
2.  Upload your creation to your blog with a link back to us and provide a direct link to the post featuring your challenge submission.
3.  Please link your card to no more than four challenges, TOTAL.
4.  Have FUN!

I can't wait to see what you create with this week's sketch and look forward to visiting your blogs this week! Enjoy the rest of your weekend - we have a Bank Holiday here in the UK so are looking forward to an extra day and hopefully some BBQ weather too. I'll be back tomorrow with another project; until then, happy stampin'!


Stampin' Up! Supplies Used: 

Table built using Product Table Builder by The Crafty Owl - Independent Stampin' Up! Demonstrator.

A Little Wild Elephant Baby Boy Congratulations Card

by Joanne James24. April 2018 17:00

With the birth of a Royal baby yesterday, a second son and third child for the Duke and Duchess of Cambridge, it seemed only fitting today to share a card to welcome the arrival of a baby boy to the world that fits perfectly for the following challenges: 


I used both the sketch and photo inspiration over at Fusion and coloured my sweet baby elephant with my Smoky Slate Stampin' Blends for the challenge over at StampInkPaper - take a look:


 Here's the low-down on today's card:

A Little Wild Elephant - The little animals in the 'A Little Wild' stamp set are just the cutest and so perfect for a card to welcome a new arrival. Today's card just had to feature the elephant, given the Fusion photo inspiration; I also used a strip of retired designer series paper (from the A Little Foxy DSP stack) for my horizontal strip as it was perfect to tie my colours in together. 

It's All In The Curve - I decided to curve my sentiment to follow the line of my layered circle, so chose to use the 'congratulations' stamp from the Beautiful Bouquet set. It's photopolymer which means that even though it is a straight stamp, it is flexible enough to be moulded to an alternative shape.  

Fun On The Inside - One of the cute features of the 'A Little Wild' animal stamps is that as they are designed to work as a gift tag, they include both front and back of the animals. This doesn't preclude them from being used on cards - in fact, it's a fun way to decorate both the front and back of your envelope and the inside of your card. I added a sentiment from the same stamp set, a strip of left over DSP and a cute enamel heart  - and for once, I remembered to take a photograph to share it with you! Here it is:

How sweet is that?! The blues could easily be switched out for pinks to make a girl card with the same details - an idea for another day, perhaps!

Here is the visual summary of the key products used on today's project for you to pin for easy reference:


You can see all of my 'How To' summaries on my 'How To - Tips and Techniques' Pinterest board in case you've missed any. 

Enjoy your evening and I'll be back tomorrow with another project. Until then, happy stampin'!


Stampin' Up! Supplies Used:

Table built using Product Table Builder by The Crafty Owl - Independent Stampin' Up! Demonstrator.

Bubble Over Large Letters Party Banner Decoration

by Joanne James31. March 2018 08:00


Today it's the last day to snap up a Sale-A-Bration freebie, whether that's free stamps with your starter kit when you join my team, extra hostess rewards when you place an order of £200 or more or a free gift with a purchase of £45 or more. You only have until 10.50pm this evening though, so don't leave it too late!


I'm sharing the last of my Sale-A-Bration makes with you today, a party banner featuring the Bubble Over stamp set and Bottles & Bubbles Framelits Dies, and the FREE Bubbles & Fizz Designer Series Paper - take a look:


My banner letters are courtesy of the Letters For You stamp set and co-ordinating Large Letters framelits, on some layered circles before adding to the pennants featuring all of the designer paper designs. Here's a picture of it hanging properly at last November's Onstage event:


This is a great set for making part banners for a birthday or summer BBQ celebration (if it stops raining for long enough here in the UK to light one, of course!) and the Bubbles and Fizz designer papers add great colour and pattern with a fun party vibe.

Here is the visual summary of the key products used on today's project for you to pin for easy reference:


You can see all of my 'How To' summaries on my 'How To - Tips and Techniques' Pinterest board in case you've missed any. 

I'll be back tomorrow with this week's project for our new challenge over at The Paper Players. Until then, happy stampin'!


Stampin' Up! Supplies Used:

Table built using Product Table Builder by The Crafty Owl - Independent Stampin' Up! Demonstrator.

Truly Tailored Dapper Day Masculine Card

by Joanne James26. March 2018 21:00

Happy Monday everyone! Yes it's a late post following a busy day as always, but as promised I have another card using yesterday's sketch over at The Paper Players that is also perfect for this week's TGIF Challenge:


I loved this sketch and in addition to yesterday's party-themed cards (you can see those here if you missed them) also used it to make a fun masculine card - I didn't post it yesterday as my PP teamie, the lovely Jan Clothier, had the same idea and used the same set, so I saved mine until today. It also demonstrates one of my favourite ways to use my Stampin' Write markers - take a look:


Here's the low-down on today's card:

True Gentleman - Classic patterns and elongated hexagons make the True Gentleman Suite tasteful, tailored and irresistible; this is how the catalogue describes this suite and whilst this isn't a set that sits at the top of my list, I do love the DSP patterns and colours (surprise, surprise!) and the clean, block style of the fonts in the Truly Tailored stamp set. And whilst I haven't used it here, the Tailored Tag Punch is a lovely modern, angular label that can be used with many other sets too. There are traditional masculine browns in this suite, but I chose to feature the brighter blues and greens on my card today, picking out the Crushed Curry yellow from the plaid background pattern with my baker's twine bow for an additional pop of colour.

Direct To Stamp - I used my Stampin' Write markers in one of my favourite ways on today's card; by colouring the sentiment directly with my markers, I was able to use both Tranquil Tide and Night of Navy on one stamp. I was also able to highlight certain areas of the stamp in order to alter the layout: if you compare my stamped image to that of the original stamp in the table below, you will see I omitted the moustache altogether and split the top line of the sentiment and stamped it on the upper portion of my circle, with the remainder on the bottom leaving a space in between.

Build A Bowtie - I decided to put that space between my custom-coloured sentiment to good use and add a bowtie - not a stamped one though, rather one punched with the Bow Builder Punch - dapper indeed! I finished the centre of my bow with a little of the textured corduroy ribbon that I used to edge my panel too as a fun finishing touch.

I also used two different colour markers on one stamp on the inside of my card too - although can't seem to find the photo of that, so will have to retake and add it to my post later.

Here is the visual summary of the key products used on today's project for you to pin for easy reference:


You can see all of my Product and 'How To' summaries on my 'How To - Tips and Techniques' Pinterest board in case you've missed any. 

I'll be back tomorrow with a couple of fun and simple Easter projects. Until then, happy stampin'!


Stampin' Up! Supplies Used: 

Table built using Product Table Builder by The Crafty Owl - Independent Stampin' Up! Demonstrator.

Mini Catalogue

BROWSE THE CATALOGUE

The mini catalogue is now live! Read and download your copy here.

Shop Online

Access my online shop 24 x 7, 365 days of the year:

Current April hostess code:

VDKNV7BH

Shop Online

Join My Team

It's always a great time to join Stampin’ Up! New team members can get £130 worth of products for only £99 + free business supplies + free shipping + all the fun being a part of Stampin’ Up! Stampin' Up! has something for everyone: join my growing team and benefit from my support to enjoy Stampin' Up! however you choose.

If you're interested, call me for a chat to understand how I can help you realise your goals. Alternatively, if you have already decided to sign up and you just can't wait, please click here for the link to the online form where you can sign up and order your starter kit right away! 

Latest Kit!

Stampin Cut and Emboss

The Rock Legend Kit has all you need to make 8 cards with coordinating envelopes. Along with the new Panda Friends Kit, both are available from January 4th for just £14 each - get yours here!

2023-24 Annual Catalogue

BROWSE THE CATALOGUE

Click on the catalogue for a full list of current SU! supplies - if you would like to order any of the items featured, please drop me a line at [email protected] or give me a call on 07773 421446 - I'd be happy to help.

New Online Exclusives

There are new products available exclusively in the online store from 5 March - check them out here.

About Me

Hi I'm Joanne and live in Northampton and when I'm not looking after my husband and two beautiful children, am an avid crafter with a passion for all things Stampin' Up!

I must confess that I have never been a big rubber stamper - until I discovered Stampin' Up! that is. I love the fact that I can get such great results with co-ordinating stamps, inks, papers and punches - the possibilities are endless! Join me on my stamping journey as I share the things I love and be inspired to create amazing things yourself!

Follow Me

Monthly Newsletter

Box Builder

Click the button above to use Box Buster to create your custom box design using the Envelope Punch Board!

Kits Collection Now Available!

Stampin Cut and Emboss

The new Kits Collection from Stampin' Up! is now available!

Click here to see the current kits available and order yours online today.

I Design For


Stampin' Up Stuff

This is my personal blog and is not endorsed by Stampin’ Up! I hope you find it a plentiful source of ideas and personal inspiration but please don't copy my designs for contest submission or use for classes, publication or sale without express permission.