A Little Wild Elephant Baby Boy Congratulations Card

by Joanne James24. April 2018 17:00

With the birth of a Royal baby yesterday, a second son and third child for the Duke and Duchess of Cambridge, it seemed only fitting today to share a card to welcome the arrival of a baby boy to the world that fits perfectly for the following challenges: 


I used both the sketch and photo inspiration over at Fusion and coloured my sweet baby elephant with my Smoky Slate Stampin' Blends for the challenge over at StampInkPaper - take a look:


 Here's the low-down on today's card:

A Little Wild Elephant - The little animals in the 'A Little Wild' stamp set are just the cutest and so perfect for a card to welcome a new arrival. Today's card just had to feature the elephant, given the Fusion photo inspiration; I also used a strip of retired designer series paper (from the A Little Foxy DSP stack) for my horizontal strip as it was perfect to tie my colours in together. 

It's All In The Curve - I decided to curve my sentiment to follow the line of my layered circle, so chose to use the 'congratulations' stamp from the Beautiful Bouquet set. It's photopolymer which means that even though it is a straight stamp, it is flexible enough to be moulded to an alternative shape.  

Fun On The Inside - One of the cute features of the 'A Little Wild' animal stamps is that as they are designed to work as a gift tag, they include both front and back of the animals. This doesn't preclude them from being used on cards - in fact, it's a fun way to decorate both the front and back of your envelope and the inside of your card. I added a sentiment from the same stamp set, a strip of left over DSP and a cute enamel heart  - and for once, I remembered to take a photograph to share it with you! Here it is:

How sweet is that?! The blues could easily be switched out for pinks to make a girl card with the same details - an idea for another day, perhaps!

Here is the visual summary of the key products used on today's project for you to pin for easy reference:


You can see all of my 'How To' summaries on my 'How To - Tips and Techniques' Pinterest board in case you've missed any. 

Enjoy your evening and I'll be back tomorrow with another project. Until then, happy stampin'!


Stampin' Up! Supplies Used:

Table built using Product Table Builder by The Crafty Owl - Independent Stampin' Up! Demonstrator.

You're One In A Dozen

by Joanne James11. February 2017 20:00

I've had a rare relaxing day today: mostly about food, family fun and a little stamping time too. I made a card for this week's challenge over at Freshly Made Sketches where there have a great sketch this week:


Here's my card:


Here's the low-down on today's card:

A Perfect Mix - I got this set for the little baking images; as a keen baker I knew I would have lots of fun with these. I love the punny sentiments too and they make for some cute little love notes - I couldn't resist the 'one in a dozen' for my card today.

A Stitched Rectangle - I used one of the square Stitched Shape Framelits to create my elongated stitched rectangle. This is really easy to do and a great way to get even more value out of your framelits. All you need to do is cut your cardstock to the required width, then place your square stitched framelit at one end and partially cut, stopping before the end, then move the framelit to the other end and partially cut again towards the middle.

A Little Foxy - I was originally going to use the grey heart pattern on the reverse of the sheet of A Little Foxy designer paper on my card, to accentuate the blue of my egg. On something of a whim I flipped it over before I glued it and decided I liked this diagonal lined pattern better with the added colour. Well, we can all change our minds!

I think this would make a fun masculine Valentine or just a note to let someone know how special they are.

Here is the visual summary of the key products used on today's project for you to pin for easy reference:


You can see all of my 'How To' summaries on my 'How To - Tips and Techniques' Pinterest board in case you've missed any. 

I'll be back tomorrow with this week's card for a new challenge over at The Paper Players. Until then, happy stampin'!


Stampin' Up! Supplies Used:

Table built using Product Table Builder by The Crafty Owl - Independent Stampin' Up! Demonstrator.

Cookie Cutter Christmas Eskimo Sneak Peek

by Joanne James18. August 2016 08:05

I've had a few blog-free days this week; we are in thick of the summer holidays and I've been spending time with the James Juniors, meeting up with friends, cooking and cycling and more. Crafting time has been limited and blogging time even less so, but I'm not complaining! We've been having fun and enjoying the sunshine and I'm sure that those of you out there in a similar situation understand completely! That said, today it's time for a new challenge over at Create With Connie and Mary and this week we have a colour combination for you:


I also used this week's sketch over at Retrosketches for my layout. I was so tempted to create a Foxy Friends card, given that these colours all appear in the A Little Foxy DSP stack; instead though, I used this paper and broke out one of my preorder Christmas stamps - wahoo! - to make my first card using my new goodies. Here's my card:


How cute is that little chap?! Here's the low-down on today's card:

Cookie Cutter Eskimo - This cute eskimo comes from the Cookie Cutter Christmas stamp set which is part of a bundle with the co-ordinating Cookie Cutter Builder Punch. He comes with a santa, gingerbread man, reindeer and teddy bear too but for today I thought he would look great on my card in his Pool Party outfit with Calypso Coral shoes. It's tricky to see, but I also added a liberal dose of clear Wink of Stella to his fur trim which gives it a lovely shimmer. The sentiment is perfect too: it carries on to the inside of the card with 'warm heartfelt greetings for a very merry Christmas'.

A Little Foxy For The Festive Season - I used two of the papers from the A Little Foxy DSP stack for the layered panels on my card. This is such a versatile pack with lots of great patterns that work all year round, Christmas included!

A Little Sparkle And Shine -  As my card was for Christmas, I took the opportunity to add some touches of silver for a little festive sparkle: a small silver metallic doily behind my eskimo, some silver metallic thread, a liberal sprinkling of rhinestones. Well, if you can't add some sparkle at Christmas when can you add it?!

Here is the visual summary of the key products used on today's project for you to pin for easy reference:


You can see all of my 'How To' summaries on my 'How To - Tips and Techniques' Pinterest board in case you've missed any. 

You only have to wait until the 1st of September before you can order this little chap and lots of other goodies from the seasonal catalogue - not long now! If you can't wait, talk to me about joining my team - you are able to order items from the new catalogue immediately as part of your starter kit. I am currently preparing my catalogues to be sent out to my customers; if you don't currently have a demonstrator and would like a copy of the new Autumn Winter catalogue, get in touch with me and I can add you to my list.

Do visit the other Design Team members to see what they did with this week's colours; there's lots of inspiration over on their blogs too!

Enjoy your day and I'll be back tomorrow with another project; until then, happy stampin'!


Stampin' Up! Supplies Used:

Table built using Product Table Builder by The Crafty Owl - Independent Stampin' Up! Demonstrator.

It's Your Day My Foxy Friend!

by Joanne James14. July 2016 08:05

Today it's time for a new challenge over at Create With Connie and Mary and this week we have a sketch for you:


For my card today I headed straight to my Little Foxy suite of products and decided on another card using the cute Foxy Friends set and co-ordinating Fox Builder Punch - I just couldn't resist!


Here's the low-down on today's card:

My Foxy Friend - I know I could have made so many animals with my Foxy Friends stamp set, but the fox won me over again! I stamped him in Calypso Coral and punched all the pieces out separately (I punched the tail backwards, as I still wanted it on the left, although it would have been much easier to stamp and punch the right way around and stick it on the right!) and layered them onto my tree stump, which I cut out by hand.

Toadstools Galore - I chose another of the great patterns from the A Little Foxy DSP stack for my feature panel and used its colour scheme to dictate the mat layers and base colour of my card. I went with a square base as per the sketch in Smoky Slate and left it plain; on reflection I think it could use some texture as it is a rather large expanse of plain cardstock, but I am not unhappy with it! I also added a swathe of Pool Party Satin Ribbon beneath my fox as one of the horizontal banners; I love this satin ribbon and am so pleased we now have it in more colours.

Sunburst Sayings - I went with a simple birthday sentiment from the 'Sunburst Sayings' set, continued on the inside of my card with 'Happy Birthday to you', stamped in Archival Grey directly onto my card base. Nothing too fussy as I think this card would work well as either a male or female card, so wanted to keep it neutral.

The Foxy Friends bundle just has so many creative possibilities! If you haven't bought yours yet, this month would be the perfect time to do so; if you purchase the bundle and a pack of the 'A Little Foxy' Designer Series Paper Stack together you will have spent £45 and so you will earn yourself a £4.50 money-off coupon any purchases next month too - bargain! Just click on the links below to hop on over to my online store to order yours today - and don't forget to add this month's hostess code 63RNATE3 to get a little thank you in the post from me too.

Here is the visual summary of the key products used on today's project for you to pin for easy reference:


You can see all of my 'How To' summaries on my 'How To - Tips and Techniques' Pinterest board in case you've missed any. 

Do visit the other Design Team members to see what they did with this week's sketch; there's lots of inspiration over on their blogs too!

Enjoy your day and I'll be back tomorrow with another project; until then, happy stampin'!


Stampin' Up! Supplies Used:

Table built using Product Table Builder by The Crafty Owl - Independent Stampin' Up! Demonstrator.

Happy Hello From A Foxy Friend

by Joanne James12. July 2016 18:00

I've been enjoying a nice couple of days of rest and relaxation but today am back to it from my sun lounger! I have a nice and easy Foxy Friends card for you, featuring the cute fox! Take a look:


Here's the low-down on today's card:

Take One Fox - I stamped the fox in Calypso Coral directly onto a circle of Whisper White, then stamped his head again onto a piece of scrap paper, punched it out and popped it over the main image on dimensionals. 

Spots and Chevrons - I paired the fox with a couple of pieces of patterned paper: the chevron pattern is from the A Little Foxy DSP Stack and the polka dot banner from the Subtles stack (my paper is actually the old design as I was using up some of my stash, but there is an almost identical pattern in the current Subtles DSP stack - the dots are just slightly bigger).

Add A Happy Hello - I finished my card with a sentiment from one of my 'go to' sentiment sets, Tin of Cards, stamped in Archival Black. I love the sentiments in this set - the font seems to go with everything and they are a great size for most cards.

I also added a piece of retired Basic Grey stitched ribbon, as this was all that I had to hand when I made this card; the new Smoky Slate stitched Ribbon would work beautifully for this card though - I've included the link for this in the supplies table below.

This is the card that I made at my last Coffee and Card session at Bell of Northampton before we broke up for the summer and this little chap proved very popular. The Foxy Friends bundle just has so many creative possibilities! If you haven't bought yours yet, this month would be the perfect time to do so; if you purchase the bundle and a pack of the 'A Little Foxy' Designer Series Paper Stack together you will have spent £45 and so you will earn yourself a £4.50 money-off coupon any purchases next month too - bargain! Just click on the links below to hop on over to my online store to order yours today - and don't forget to add this month's hostess code 63RNATE3 to get a little thank you in the post from me too.

Here is the visual summary of the key products used on today's project for you to pin for easy reference:


You can see all of my 'How To' summaries on my 'How To - Tips and Techniques' Pinterest board in case you've missed any. 

Back tomorrow with another project; until then, happy stampin'!


Stampin' Up! Supplies Used:

Table built using Product Table Builder by The Crafty Owl - Independent Stampin' Up! Demonstrator.

What Does The Fox Say? Foxy Friends

by Joanne James26. June 2016 09:00

It's Sunday and time for a new challenge over at The Paper Players! Thank you to everyone who joined us for our 300th anniversary celebrations last week - there were some fabulous cards in the gallery and it's your support for our challenge that keeps us going. Congratulations to all those who were winners in our grab bag prize draw - I'm looking forward to sending mine out to someone soon!

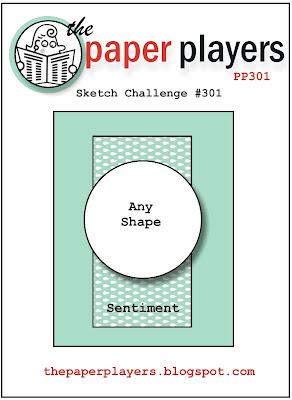
It's my turn to host again this week and I have my most favourite of all challenges, a sketch, for to play along with:


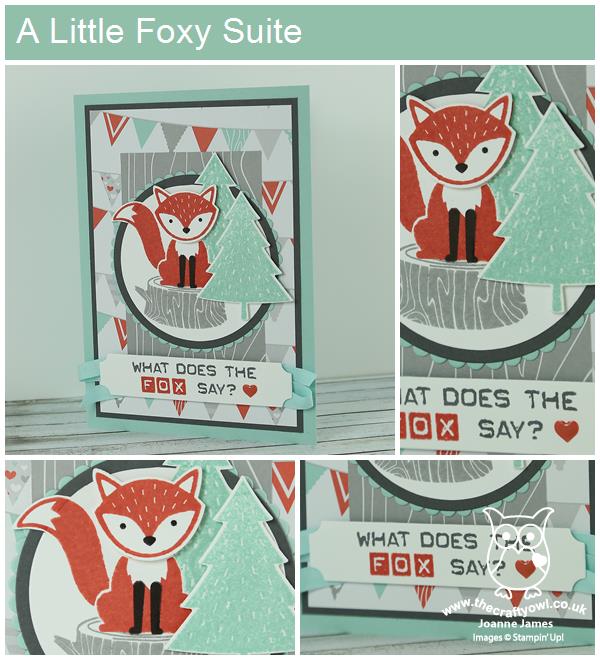
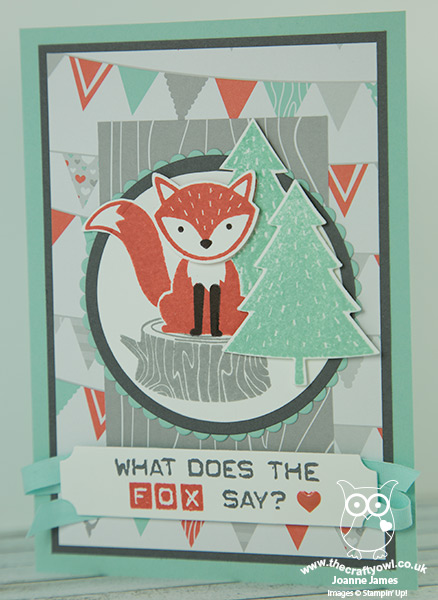
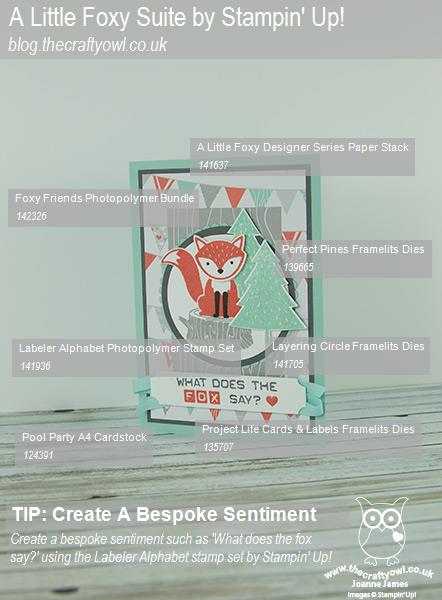
For my card this week I decided to go with some of my favourite new items from the new annual catalogue - the Little Foxy Suite:


Here's the low-down on today's card:

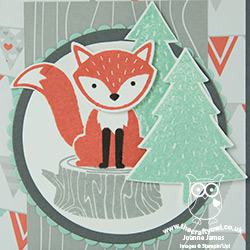
More Than A Little Foxy - So I'm in love with this cute fox! The 'Foxy Friends' stamp set makes all kinds of cute baby critters and woodland animals - I think this fox is just the sweetest. The fact that he comes with a co-ordinating punch - I used it here to punch out his head for extra dimension - is a bonus and the co-ordinating paper stack makes this suite a force to be reckoned with. 

Layered Layers - My card today is all about the layers. Whilst my sketch looks quite simple, I used a total of 9 separate layers on my card. In addition to my mats and patterned papers, I used the new Layering Circles Framelits to create the surrounds for my woodland scene, added to which partial diecutting of the uppermost circle and the masked stamping of the fox, tree stump and trees, adds further depth and the illusion of even more layers.

What Does The Fox Say? - I thought this would make a fun sentiment for my card today, easily created using the Labeler Alphabet, which is perfect for bespoke sentiments and cut out with the Project Life Cards and Labels Framelits. I highlighted the word 'Fox' in Calypso Coral with the solid letters and added an enamel heart too. Oh and my fox - he says "Happy Birthday!" in case you were wondering :-)

Here is the visual summary of the key products used on today's project for you to pin for easy reference:


You can see all of my 'How To' summaries on my 'How To - Tips and Techniques' Pinterest board in case you've missed any. 

Before you reach for your ink and papers, check out what our amazing team has created to inspire you this week:

The Paper Players Design Team
 
 
Here's a quick recap of our challenge rules:
 
1.  Create a new paper project
2.  Upload your creation to your blog with a link back to us and provide a direct link to the post featuring your challenge submission.
3.  Please link your card to no more than four challenges, TOTAL.
4.  Have FUN! 


I look forward to seeing what you create with my sketch this week. I have a day of sewing in store with some last minute guard costumes to make for Rebecca's school production of the Wizard of Oz this week, so my day will involve much green fur fabric - wish me luck!

Back tomorrow with another project; until then, happy stampin'!


Stampin' Up! Supplies Used:

Table built using Product Table Builder by The Crafty Owl - Independent Stampin' Up! Demonstrator.
 

Mini Catalogue

BROWSE THE CATALOGUE

The mini catalogue is now live! Read and download your copy here.

Shop Online

Access my online shop 24 x 7, 365 days of the year:

Current March hostess code:

S9F2XJJW

Shop Online

Join My Team

It's always a great time to join Stampin’ Up! New team members can get £130 worth of products for only £99 + free business supplies + free shipping + all the fun being a part of Stampin’ Up! Stampin' Up! has something for everyone: join my growing team and benefit from my support to enjoy Stampin' Up! however you choose.

If you're interested, call me for a chat to understand how I can help you realise your goals. Alternatively, if you have already decided to sign up and you just can't wait, please click here for the link to the online form where you can sign up and order your starter kit right away! 

Latest Kit!

Stampin Cut and Emboss

The Rock Legend Kit has all you need to make 8 cards with coordinating envelopes. Along with the new Panda Friends Kit, both are available from January 4th for just £14 each - get yours here!

2023-24 Annual Catalogue

BROWSE THE CATALOGUE

Click on the catalogue for a full list of current SU! supplies - if you would like to order any of the items featured, please drop me a line at [email protected] or give me a call on 07773 421446 - I'd be happy to help.

New Online Exclusives

There will be new products available exclusively in the online store from 5 March - check them out here.

About Me

Hi I'm Joanne and live in Northampton and when I'm not looking after my husband and two beautiful children, am an avid crafter with a passion for all things Stampin' Up!

I must confess that I have never been a big rubber stamper - until I discovered Stampin' Up! that is. I love the fact that I can get such great results with co-ordinating stamps, inks, papers and punches - the possibilities are endless! Join me on my stamping journey as I share the things I love and be inspired to create amazing things yourself!

Follow Me

Monthly Newsletter

Box Builder

Click the button above to use Box Buster to create your custom box design using the Envelope Punch Board!

Kits Collection Now Available!

Stampin Cut and Emboss

The new Kits Collection from Stampin' Up! is now available!

Click here to see the current kits available and order yours online today.

I Design For


Stampin' Up Stuff

This is my personal blog and is not endorsed by Stampin’ Up! I hope you find it a plentiful source of ideas and personal inspiration but please don't copy my designs for contest submission or use for classes, publication or sale without express permission.