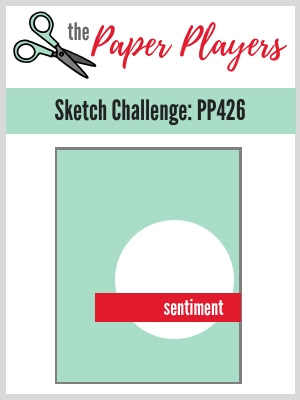
Today it's Sunday and time for this week's new challenge over at The Paper Players! It's the turn of the talented Jaydee to host this week and she has my favourite, a sketch challenge, for you to work with:


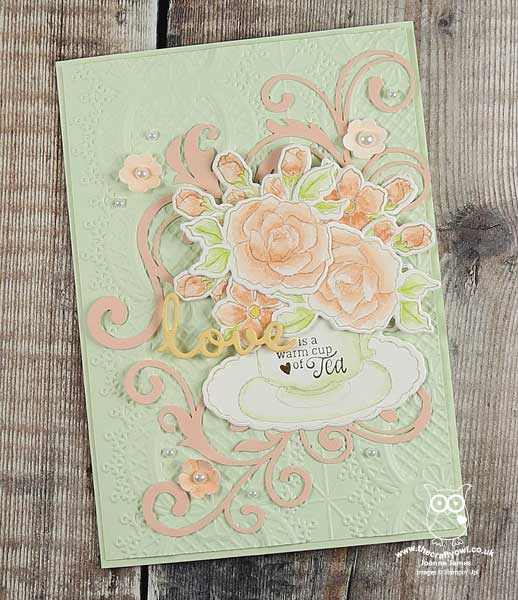
Today's card is something of a departure from my usual 'clean' style and is choc-full of detail, so I hope you like it! I've gone pastel with this week's Global Design Project colours and whilst not for Valentine's my card is definitely all about love so is perfect for the Stamp Ink Paper challenge too - take a look:
Here's the low-down on today's card:
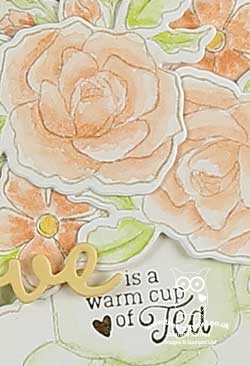
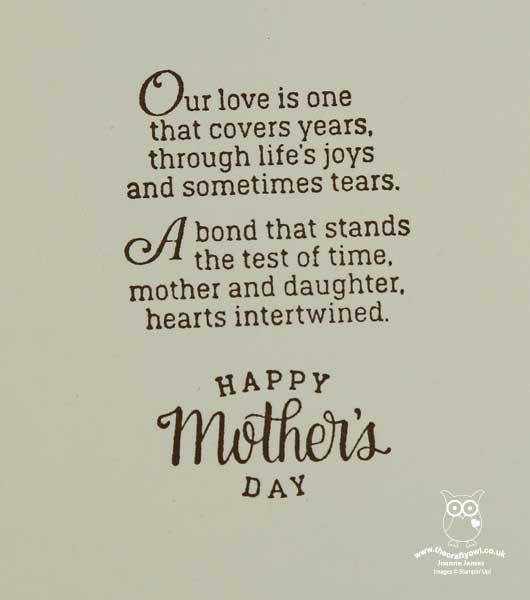
Time For Tea - The moment I laid eyes on the 'Tea Together' stamp set in the Spring-Summer catalogue, I knew it would have to find it's way into my shopping basket: as a self-confessed 'teapot' who often drinks between 6 and 8 cups of tea a day, it was bound to appeal, but the clincher was that it was paired with some wonderful Mother's Day sentiments too and the only person I know who drinks more tea each day than me is my Mum, so it seemed a perfect choice. Add to this the fact that the co-ordinating Tea Together Framelits Dies that cut out each of the elements, including the flowers, are available free during Sale-A-Bration with a £90 purchase and that was it - decision made! I decided to continue with my watercolouring phase and for today's teacup and flowers, as it suited the subtle, pastel colours and coloured, cut and layered until I was happy with the result.
Flourishes and Lace - I added additional detail to my background with a combination of an embossed panel - check out that fabulous lace effect detail - and some Petal Pink flourishes, carefully snipped from the new Beautifully Detailed Laser-Cut Paper, which is helpfully already coloured Petal Pink on one side (and white on the other side). Along with a few punched flowers and pearls, I'm really going for the vintage look and feel today.
A Mother's Love - I've been liberal with my interpretation of Jaydee's sketch, but you can still see the basic circular shape represented by my tea cup full of flowers and my horizontal overlaid sentiment, accentuated by stamping only part of the sentiment on the teacup and substituting the masked word 'love' with a stacked diecut, courtesy of the Well Written Framelits. Whilst I would definitely agree with the sentiment on the front of this card, the sentiment from the 'Tea Together' set really is one of the most wonderful we have had in a stamp set for a long time:
The perfect finishing touch for my Mother's Day card. Here is the visual summary of the key products used on today's project for you to pin for easy reference:
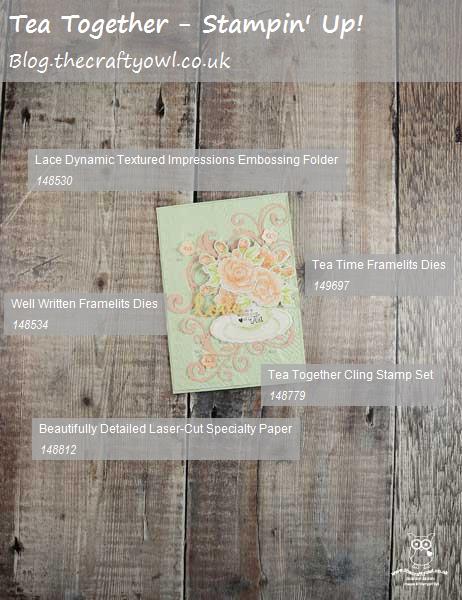
You can see all of my Product and 'How To' summaries on my 'How To - Tips and Techniques' Pinterest board in case you've missed any.
Before you reach for your ink and papers, check out what our amazing team has created to inspire you this week:
The Paper Players Design Team
Here's a quick recap of our challenge rules:
1. Create a new paper project
2. Upload your creation to your blog with a link back to us and provide a direct link to the post featuring your challenge submission.
3. Please link your card to no more than four challenges, TOTAL.
4. Have FUN!
You can see all of my 'How To' summaries on my 'How To - Tips and Techniques' Pinterest board in case you've missed any.
Enjoy your day; we are finishing up on our homework today along with the dreaded tax returns (each year I tell myself I will make time to process them well in advance of the deadline, yet it never happens!) Hopefully I will finish in time to sneak into my craft room for a quick make or two. Either way, I'll be back tomorrow with another project. Until then, happy stampin'!
Stampin' Up! Supplies Used: