by Joanne James23. April 2014 08:00My James juniors are back at school today after a long Easter break, but I assure you that's not the reason behind the sentiment for today's card ;-) I started off with an idea in mind for this week's Less Is More challenge, where the theme is 'something that makes you smile'; unintentionally, I ended up combining this with the colour challenge this week over at CAS Colours and Sketches, where black and shades of grey are the order of the day:

I knew immediately that my 'something that makes me smile' would have to be that cute little mouse from the Life in the Forest stamp set that I used on this card last week; I decided to use him in conjunction with the word 'smile' from the Happy Day stamp set and position him as if he was standing just behind the word and peering around. I stamped 'smile' in Versamark and heat embossed in black embossing powder, as I wanted the sentiment to really stand out and look solid, then stamped the mouse using black stazon and coloured him with the greys and my blender pen. I sometimes struggle with the simplicity of 'less is more', but this card seems to tick all the boxes for clean and simple: lots of white space, few layers (none) and minimal embellishments (none). I think this may be my 'zen' of CAS cards!
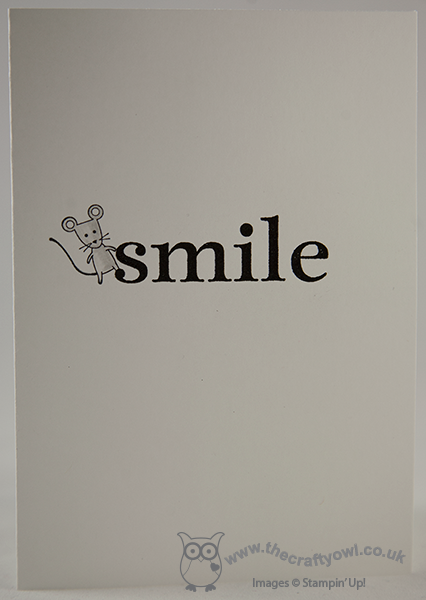
I love this card for all its black and white one-layered simplicity, but couldn't help play around with an initially discarded version where I sought to introduce some colour - this card is so far out of my comfort zone, I just couldn't help it. If you'd like to see a more colourful version, check out the post on my Facebook page today - I'd love to know which one you prefer. For me, the one above wins; as for the mouse, he makes me smile every time, with or without!
I'm off to my office for a nice early start: lots to do today, including amongst other things start preparing next week's classes. Back tomorrow with another project, until then happy stampin'!
Stampin' Up! Supplies Used:
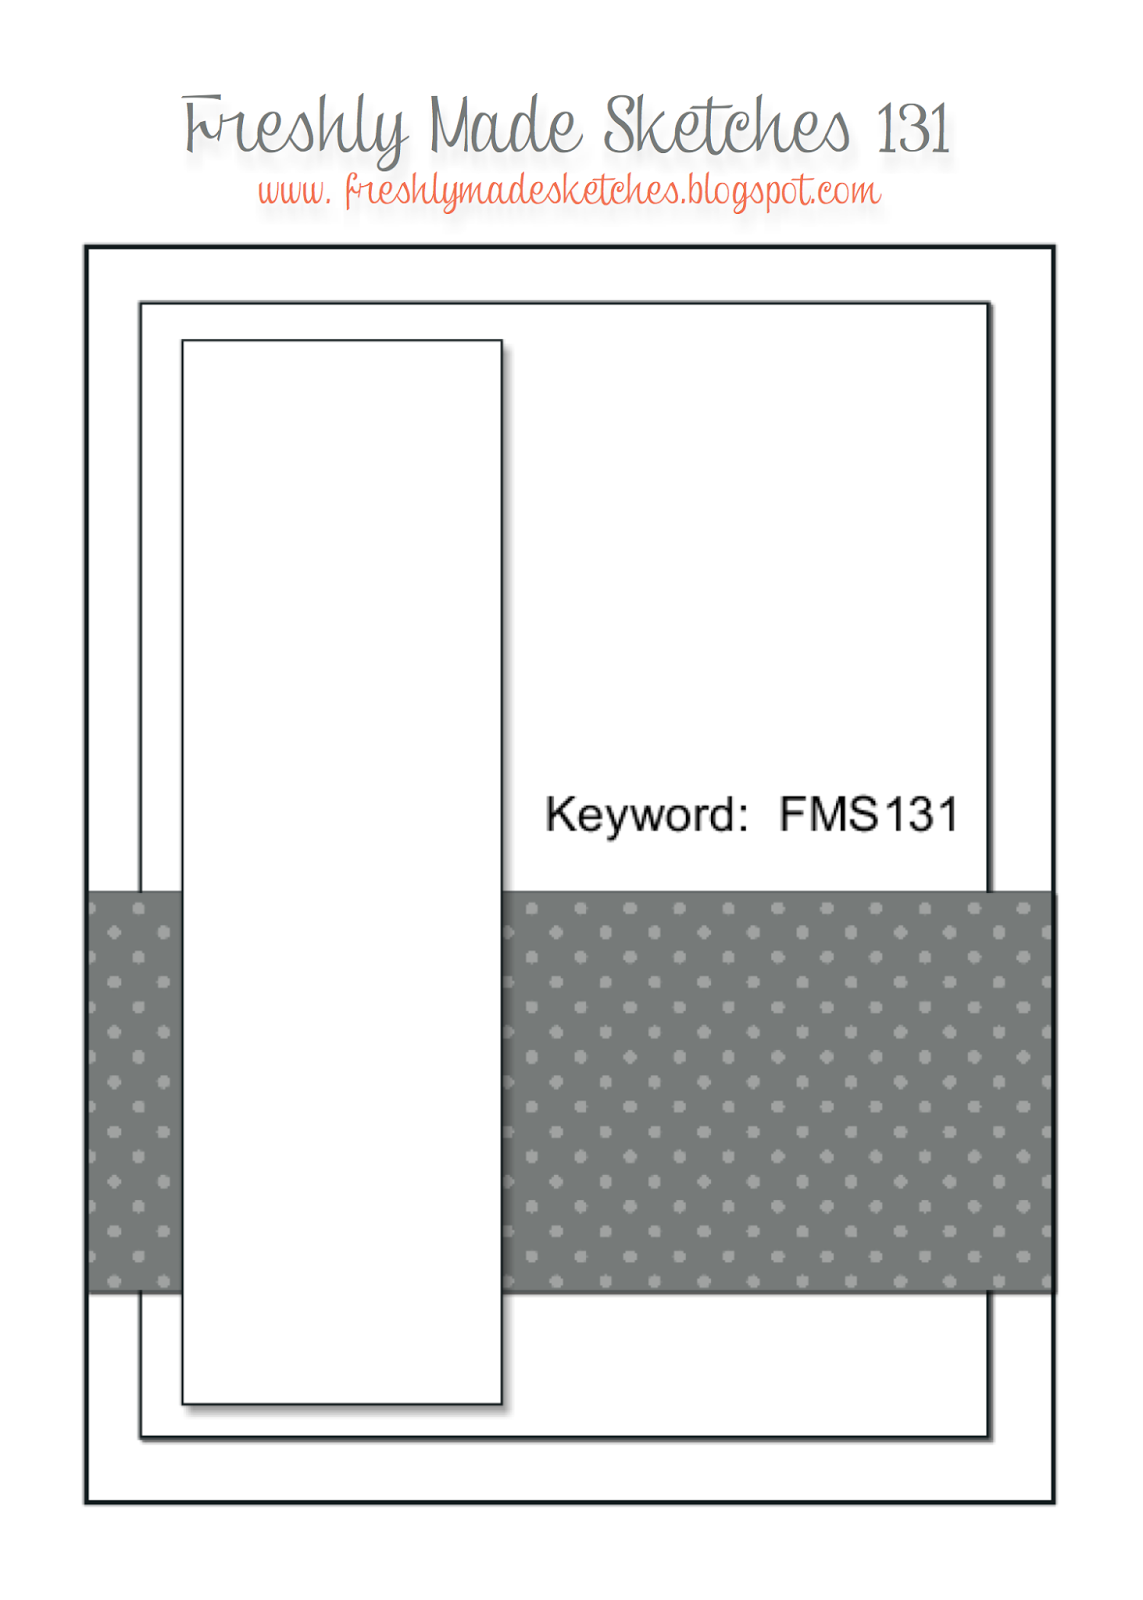
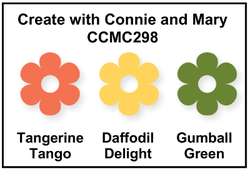
by Joanne James13. April 2014 22:33Today I'm sharing a card I made using the poppy in the Happy Watercolour set. I used the sketch over at Freshly Made Sketches for my simple layout and was inspired by the colours over at Create with Connie and Mary this week:
I decided to go with quite a simple design - here's my card:
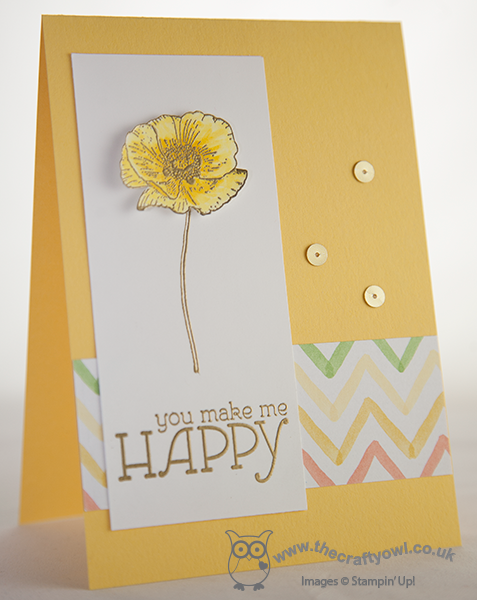
I used a Daffodil Delight card base and stamped my poppy stem only in Versamark and stamped it onto my base card and heat embossed in gold, then did the same again with the flowerhead on a separate piece of cardstock, coloured it with Daffodil Delight and my aquapainter and cut it out, then popped it onto my card on a dimensional. I know poppies are traditionally red, but they come in all kinds of different colours, including yellow - which also give the card a bright feel.
Here's a close up of the flowerhead:
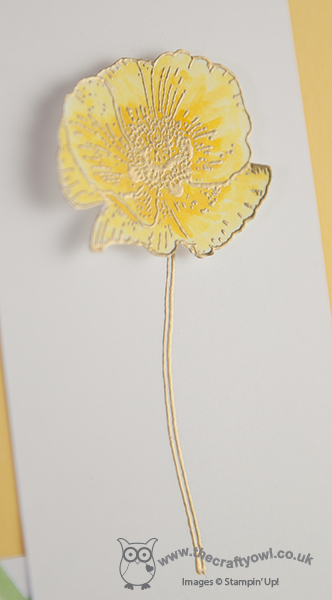
For my horizontal cross-section panel beneath the poppy, I used a piece of Watercolour Wonder DSP that features all of the challenge colours above. This is the only place where the green and orange features on my card, yet the colour works really well in breaking up what would otherwise be a rather monochromatic card. I added a few gold sequins to finish, and done.
If you'd like more ideas on how to use these colours, check out the design team inspiration - lots of great work on show, as always.
I'm off to take my juniors tenpin bowling with some friends today and then go and purchase some paint tester pots for Ben's bedroom redecoration - I love the Easter holidays!
Back tomorrow with another project; until then, happy stampin'!
Stampin' Up! Supplies Used:
by Joanne James7. April 2014 21:18When I saw the colour combo over at Dynamic Duos this week, I just knew I was going to have to make a card for this challenge! Of all the colour collections, Brights is my most favourite and this pink and blue combination just rocks!

Here is my card:
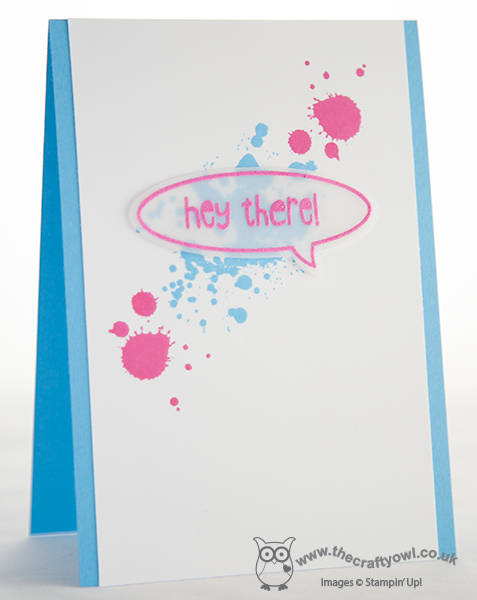
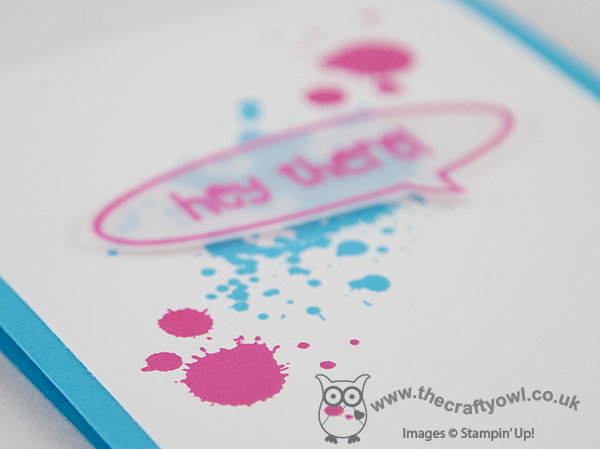
I decided to combine it with the sketch over at CAS(E) This Sketch this week too, where I decided to use the pattern literally and stamp my background with Gorgeous Grunge. For my sentiment I wanted something contemporary and in keeping with the grunge look, so I decided to go with a word bubble, stamped in Versamark onto vellum then heat embossed with Melon Mambo embossing powder - the photograph really doesn't do this justice, in real life it has a lovely raised sheen. The word bubble was adhered using rolled glue dots, hidden along the stamped outline; this gives just enough height but doesn't allow them to show through the vellum.
I think this would make a great card for a teenager, or just a general card to cheer someone up. I like this minimalist card so much, I might have to make a few more in alternative colour combinations!
Back tomorrow with another project and some important Stampin' Up! news that you won't want to miss; until then, happy stampin'!
Stampin' Up! Supplies Used:
a8d33050-087e-4244-b437-fc6f055ff41d|0|.0|96d5b379-7e1d-4dac-a6ba-1e50db561b04
Tags: Gorgeous Grunge, Embossing, Just Sayin', Word Bubbles Framelits, Big Shot, Magnetic Platform, Shop online, Stampin' Up, Stampin' Up Card, Stampin' Up Card ideas, Stampin' Up Supplies
Cards | Stamping
by Joanne James2. March 2014 23:23Today it's the first Monday of the month, which means one thing - card class! I'm looking forward to a fun afternoon with the ladies in the first of my classes this week, but before I go I have the first of today's blog posts for you - my card for this week's challenge over at Freshly Made Sketches. This week Narelle has designed the following sketch layout:
Since Mothering Sunday falls at the end of March here in the UK (earlier than my readers from across the pond) I decided it's time to start card making with Mothers in mind, so here's what I did with today's sketch:
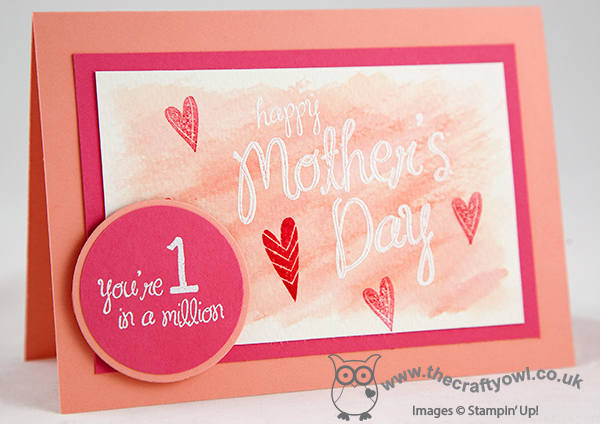
Using watercolour paper, I heat embossed my Happy Mother's Day sentiment in white and then using my Aquapainter and some Crisp Cantaloupe ink, I created a watercolour background. When the paper was dry, I stamped the hearts from the same set in Strawberry Slush ink over the top, stamping off some of them to create a variation in colour intensity. I stuck with the circle shape to highlight 'You're 1 in a Million' and also heat embossed this in white directly onto Strawberry Slush cardstock matted onto Crisp Cantaloupe, to echo the matting on the main section of my card. It almost looks like a badge doesn't it?
Back later with a very exciting video tutorial for you - how to make a box of any size using your envelope punch board - you're not going to want to miss it!
Until then, happy stampin'!
Stampin' Up! Supplies Used:
by Joanne James21. February 2014 19:46I've had a very crafty day today and managed to make a few quick cards to catch up on some of this week's challenges. I'm just in time to get in my entry for this week's challenge at The Paper Players, where LeAnne's challenge this week is CAS Clean and Simple with Stars:
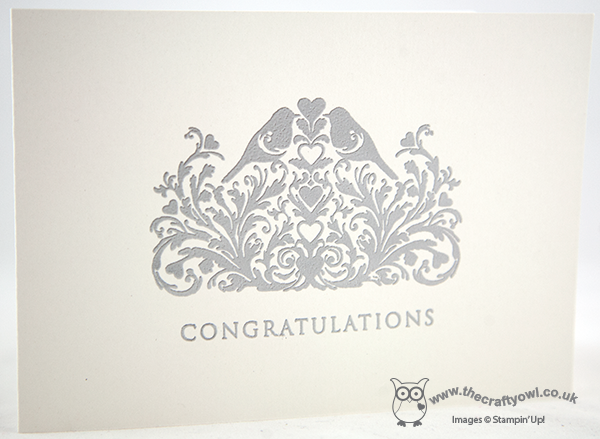
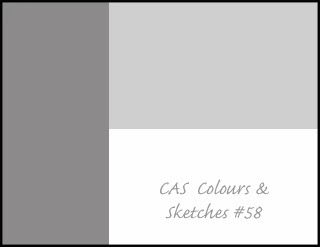
I decided to go with a gold and blue theme and used the sketch over at CAS Colours & Sketches this week for my layout (too late to enter for the challenge, but I liked the unusual layout) - here is my card:
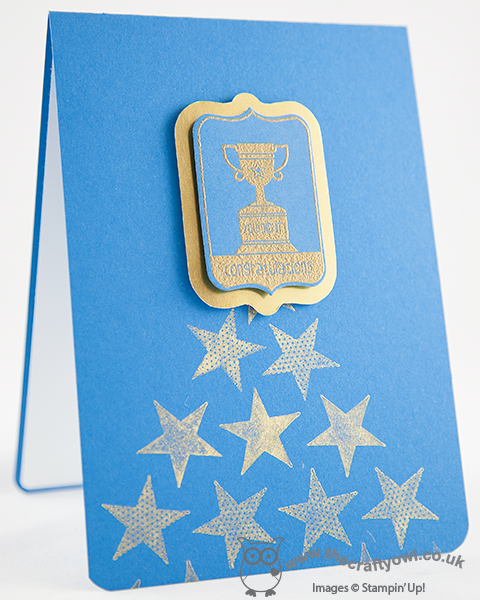
I stamped my stars with the gold metallic ink pad, then heat-embossed the 'Congratulations' stamp from the Ronald McDonald set on gold and set this on a mat of gold foil so that it really stood out. I cut out the label using the co-ordinating framelit and cut the foil mat freehand, using the outside edge of the framelit as a guide. This card will be on it's way to one of my team members - two of them have recently gained promotions, so along with a new team member this week, there's plenty to celebrate!
Back soon with another of my 'makes' today; until then, happy stampin'!
Stampin' Up! Supplies Used:
by Joanne James12. February 2014 09:56So I didn't quite manage to squeeze in another 'make' for you yesterday, but I'm here bright and breezy (or should that be windswept, given the gales we've had here for the last day or so!) this morning with today's card. Given my recent dalliances with the colour black, I thought I would try something different using black cardstock and one of my most favourite stamps - yes, the Flowerfull Heart (still available to order until Friday if you'd like one - click on the link to my online shop below!) Here is my card:
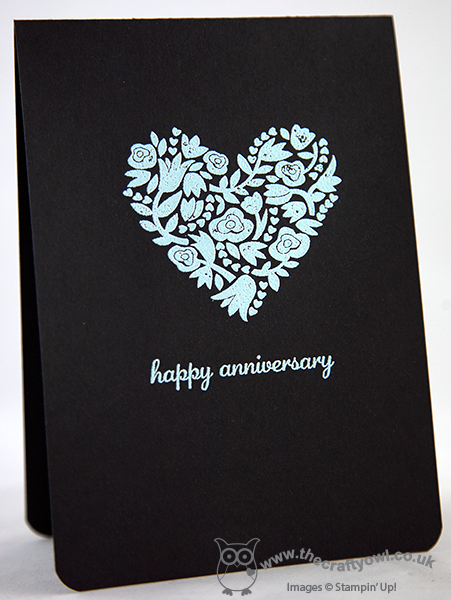
Now, I know you might be thinking "Anniversary card - on black??!" but hear me out! I wanted to use this stamp again with some heat embossing; I toyed with gold (well, it worked pretty well on this card I think) but eventually decided to use Pool Party embossing powder. My colour combination was inspired by one of the DSP patterns in the Sweet Sorbet pack that is available as one of the free Sale-A-Bration gifts currently when you spend £45 or more - the little blue Pool Party flowers with black centres. I would not necessarily have thought about using these colours together had it not been for this paper. A simple sentiment from the 'Express Yourself' hostess set (such a versatile set of greetings in a very usable font, it can be yours when you host a Stampin' Up! party - contact me to book yours) finishes this simple card.
So what do you think - a colour combination that works or one to be avoided, especially on a romantic card? I'd love to know what you think. I'm also linking this card up with the 'One Layer Card - Anything Goes' challenge over at Less is More this week (currently the only card using black for it's 'white space' - should I be worried?!) and CAS(E) This Sketch as my card uses their sketch again:
Funny how you can use the same two starting points, yet end up with two cards that couldn't be more different. Back tomorrow with another project; until then, happy stampin'!
Stampin' Up! Supplies Used:
9fe4b513-b28f-441e-b5cc-fe0fd6c2169c|0|.0|96d5b379-7e1d-4dac-a6ba-1e50db561b04
Tags: Embossing, Flowerfull Heart, Host a Party, Express Yourself, one layer cards, Sale-a-bration 2014, Shop online, Stamp-a-ma-jig, Stampin' Up, Stampin' Up Card, Stampin' Up Card ideas, Stampin' Up Supplies, Anniversary, Weddings
Cards | Host a Party | Promotions | Sale-a-bration | Stamping
by Joanne James12. February 2014 09:08Another early post from me today - makes me look organised, but if you'd witnessed the library book hunt that rampaged through the James household this morning before school, you could be forgiven for thinking otherwise! As promised, today's card uses the same stamp from the 'From This Day Forward' set that I used yesterday, but to give a completely different effect. Here is my card:
The photograph really doesn't do this card justice (not least because it is so difficult to get a great shot of an almost all-white card!) but up close, this card is really beautiful; I stamped the image and sentiment in Versamark onto Shimmery White cardstock - a lovely cardstock for this kind if project, it is flecked with minute specks of shimmer glitter and catches the light beautifully - and then heat embossed with silver embossing powder to add texture (important when your card is only one layer) and a lovely sheen).
It just goes to show that you don't always need lots of layers to create an impactful card - I'm getting quite into this one layer thing!
I'm going to link up today's card with this week's challenge over at 'Less is More' where the challenge is 'One layer - anything goes' and at CAS(E) this Sketch, as I used this sketch for my layout (turned through 90 degrees).
I'm off to get crafty - lots to do today! I might even pop back later and squeeze in another post.
Until then, happy stampin'!
P.S.: In case you're wondering we found the library book eventually - phew!
Stampin' Up! Supplies Used:
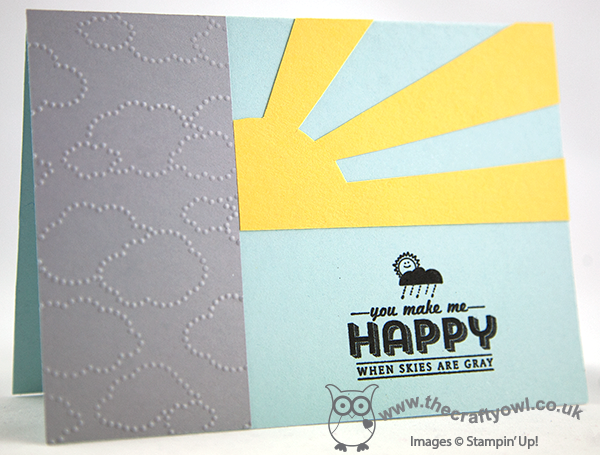
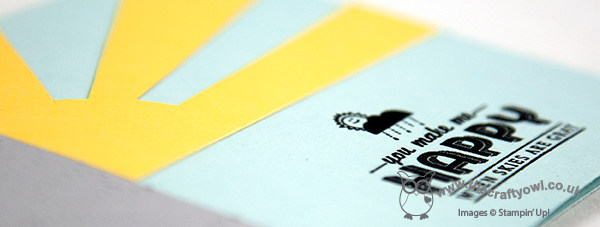
by Joanne James26. January 2014 20:50Today's card uses a stamp from another of the forthcoming Sale-A-Bration stamp sets called 'See Ya Later': a collection of 4 stamps each featuring a fun phrase. Today's card seems quite appropriate given the weather that we've been having in the UK this weekend; here's my card:
My layout was inspired by the sketch over at CAS Colours & Sketches this week:
I embossed the Smoky Slate panel with the Cloudy Day embossing folder - this item is retired, but is still currently available on the clearance rack if you'd like to snap up a bargain - it just fits with the sentiment of this stamp. I stamped the sentiment in Versamark and embossed with black embossing powder so that it would stand out on the finished card. The real star of this card though is the bright sunburst coming out from behind the clouds, which just lifts the subtle grey and Soft Sky blue to another level.
I'm also linking today's card up with CAS-ual Fridays, where the challenge is to use blocks of colour in your design.

With the rain and the almighty storm with thunder and lightening yesterday afternoon, this card is sure to brighten your day!
Back tomorrow with another project; until then, happy stampin'!
Stampin' Up! Supplies Used:
by Joanne James20. January 2014 20:33Today I have another Flowerfull Heart card to share with you; this time a larger A5 size card that could be used for a wedding, anniversary, birthday or Valentine's for someone special. So here is my card:
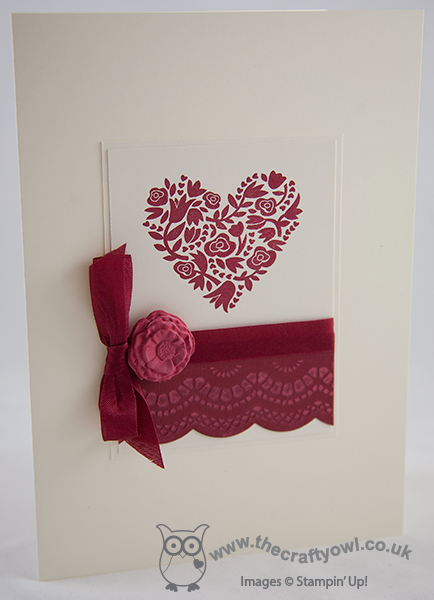
I love this card! It is elegant in its simplicity, yet at the same time packed with detail. Whilst the card has a lot of 'white space' (the actual base card colour is Very Vanilla, just to confuse you!), I created a double-layered centre panel on which I stamped both the Flowerfull Heart in Cherry Cobbler and then edged the bottom with some Cherry Cobbler Core'dinations cardstock, which I embossed then sanded lightly to show the contrasting layer. I covered the join with some Cherry Cobbler seam binding ribbon which I tied in a bow at the side, then lastly finished with a flower made from Stampin' Up!'s Simply Pressed Clay, which I first coloured with Cherry Cobbler reinker before moulding. Here's a close up of the flower:
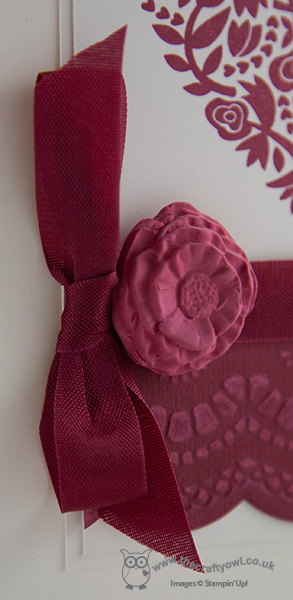
These really are so easy to make: you just press the clay into the mould, pop it out and leave it to dry. you can colour it before or after you put it in the mould, depending on the effect you're after.
A quick post from me today; having barely got rid of my last cold, I now seem to be catching another, so it's a hot drink and early night for me!
Back tomorrow with another project; until then, happy stampin'!
Stampin' Up! Supplies Used:
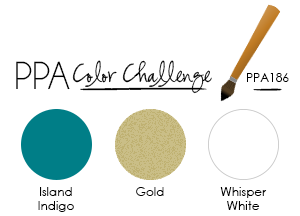
by Joanne James6. January 2014 21:09Today has been a fun day, with my first class of the year. A fun - if quiet! - time was had by all, with all my ladies being very accommodating of my continued voiceless state. I'll share more on our class makes later in the week, but today I'm sharing a card that I am entering for this week's Pals Paper Arts challenge, PPA186, which is to use the following colours:
With this in mind, I inked up my Flowerfull Heart stamp again but this time made a slider card - take a look:
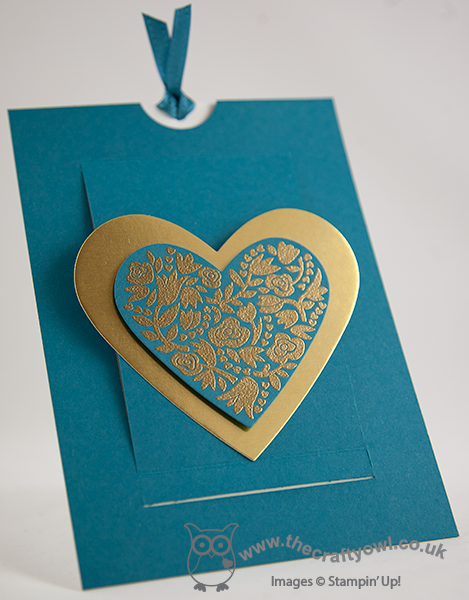
I stamped the heart in Versamark and heat embossed with gold embossing powder, then layered the heart on another one made from gold foil. When the ribbon end is pulled, it reveals the message inside:
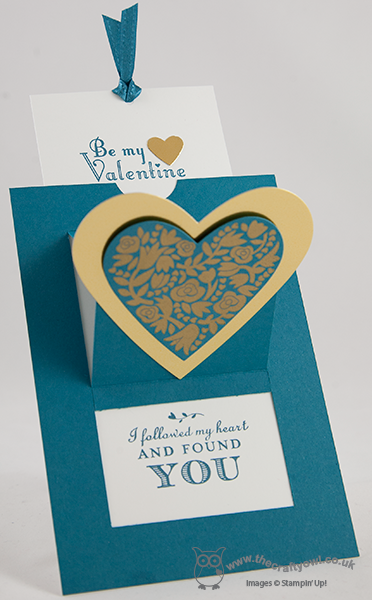
The inside of the slider card is stamped with my favourite stamp from the 'Follow My Heart' set on the lower inside panel, and the valentine stamp from the 'Delightful Dozen' on the extending top section (I replaced the stamped heart with a gold foil one). I think this would make a lovely masculine valentine's card; the gold foil and embossing adds a real luxurious feel.
I will be sharing a video tutorial on how to make this card as soon as my voice returns, so stay tuned. Meanwhile, check out the inspiration from the designers and participants over at Pals Paper Arts here.
Back tomorrow with another card; until then, happy stampin'!
Stampin' Up! Supplies Used:
1aaaf41f-cd5c-4638-ad4c-132b9f354924|0|.0|96d5b379-7e1d-4dac-a6ba-1e50db561b04
Tags: Big Shot, Flowerfull Heart, Heart Punch, Hearts Framelits, Delightful Dozen, Magnetic Platform, Follow My Heart, Embossing, Valentines, Shop online, Stampin' Up, Stampin' Up Card, Stampin' Up Card ideas, Stampin' Up Supplies
Cards | Stamping