Beautiful Boughs Meets Rooted in Nature for a Woodland Christmas PP466

by Joanne James3. November 2019 09:00

Today it's Sunday and time for this week's new challenge over at The Paper Players! It's the turn of the fabulous Anne Marie to host this week and she has a fun theme challenge for you to work with:


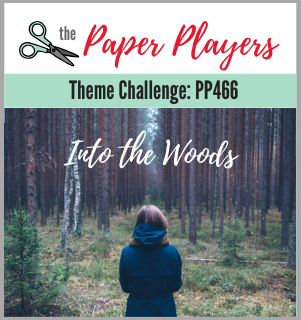
I had a few ideas for Ann Marie's 'woodsy' theme today and decided to really go all-out to incorporate as many wood-themed elements into my card as possible. I decided to continue with another Christmas card to add to my collection and ended up creating something a little different (for me!) - take a look:


Here's the low-down on today's card:

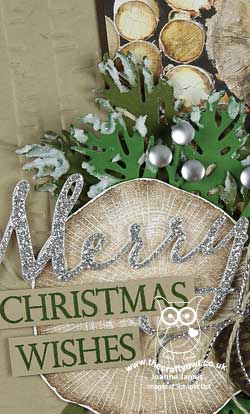
Knock on Wood - My card has lots of elements that tie in to the wood theme: some woodland background dry embossing, a panel of retired Wood Textures DSP, the tree trunk stamp from Rooted in Nature (stamped in Crumb Cake and then sponged with Early Espresso around the edge), as well as some greenery and a couple of pine cones that could easily be spotted on a walk through the woods.

Texture, Texture - There are lots of layers and textural elements on today's card too: in addition to the dry embossing, I added shimmery white embossing paste to my greenery for  textured snow and the glimmer paper and twine bow also adds contrast. I originally started out using Jen's sketch over at Freshly Made Sketches (you can see that sketch here), but ended up adding so many layers and bits and pieces I rather lost my usual 'clean' look. Whilst I love the finished result, I will need to go back to the drawing board if I'm to put in an FMS entry this week!

Woodland Sparkle - All that wood made for a rather neutral card, with only the greens adding colour to the mix of browns. I decided to add a silver glimmer 'merry' diecut for some festive sparkle, along with some frosted epoxy droplet 'berries' and a silver and linen twine bow. I really like the finished effect.

Here is the visual summary of the key products used on today's project for you to pin for easy reference:


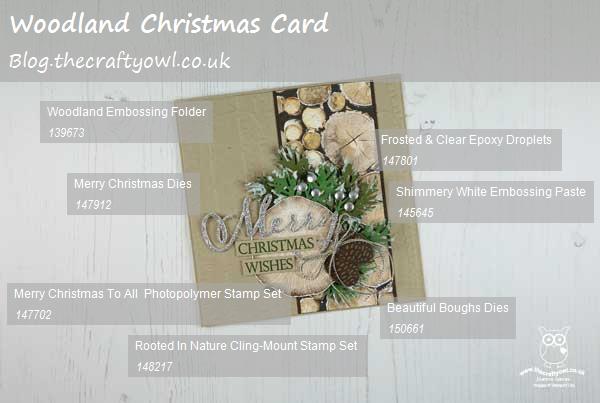
You can see all of my Product and 'How To' summaries on my 'How To - Tips and Techniques' Pinterest board in case you've missed any. 

I'm also linking up today's card to the Festive Friday Challenge (my card features silver, wood, texture, circles and green from the inspo list) and the challenge over at Paper Craft Crew where I went across the middle of the board: embossing paste/rustic/gone wild and the top left-bottom right diagonal: found in the forest/rustic/sponging)

Before you reach for your ink and papers, check out what our amazing team has created to inspire you this week:

Here's a quick recap of our challenge rules:
 
1.  Create a new paper project
2.  Upload your creation to your blog with a link back to us and provide a direct link to the post featuring your challenge submission.
3.  Please link your card to no more than four challenges, TOTAL.
4.  Have FUN!

Enjoy your day; we are enjoying the last day of the half-term holiday before returning the school tomorrow. We have some hockey planned and a trip to the farm shop, along with preparations for my classes this week. I'll be back tomorrow with another project. Until then, happy stampin'!


Stampin' Up! Supplies Used: 

Table built using Product Table Builder by The Crafty Owl - Independent Stampin' Up! Demonstrator.

Perfectly Plaid Metallic Embossed Long Christmas Card

by Joanne James4. September 2019 20:00


Today I'm sharing a card for this week's TGIF challenge where they have a product spotlight on embossing powder and the team at Less is More where they are all about Metallics:


Metallics and embossing powder were the perfect combination but with three metallic powders in my desk drawer, which one to choose? In the end, I decided on all of them - take a look:


Here's the low-down on today's card:

I went long and thin with today's card and paired my embossed gold Merry Christmas sentiment with three identical pine trees, also from the new Perfectly Plaid stamp set, each of them heat embossed in a different metallic onto Thick Whisper White cardstock: silver, copper and gold respectively. I added a thin border of gold foil to the top and bottom of my panel before using dimensionals to adhere it to my cardbase. It was helpful that my metallic powders were an odd number -  odds often look better than evens on cards I think!

I have a tip for you when stamping objects in threes: always stamp the outer two first, then the central one; it's much easier to ensure they are evenly spaced that way. 

Here is the visual summary of the key products used on today's project for you to pin for easy reference:


You can see all of my 'How To' summaries on my 'How To - Tips and Techniques' Pinterest board in case you've missed any. 

The first of the James Juniors is back to school properly today; one down, one to go! In the meantime, we have a fun girly day planned with Junior number two who has another day before she is back too. Enjoy your day and I'll be back tomorrow with another project. Until then, happy stampin'!


Stampin' Up! Supplies Used:

Table built using Product Table Builder by The Crafty Owl - Independent Stampin' Up! Demonstrator.

Country Floral Colours of Spring Birthday Card

by Joanne James2. March 2019 06:00

Today I'm sharing a card for this week's challenge over at Inspire.Create Challenges where they have a beautiful Spring colour palette this week:


With the unseasonably warm weather we have been having here in the UK this past week or so, I am definitely feeling like Spring is around the corner. The flowers in the garden are waiting to burst into bloom so I just had to use these fresh colours for another dry embossed card using one of my current favourites from the second Sale-A-Bration release that went live on 15th February, the new Country Floral Dynamic Textured Impressions Embossing Folder: 


Here's the low-down on today's card:

Country Floral - I couldn't resist the opportunity to create another card using the new Country Floral dynamic embossing folder. This time I tried something else new that is the reverse of this card that I shared with you the other day - I embossed a piece of Whisper White cardstock and then used my Blends markers in the challenge colours to colour the individual flowers. A little quicker than my previous card and a great way to include all of these lovely spring colours. 

A Perennial Birthday - I used a sentiment from the Perennial Birthday set in the annual catalogue on my card - the script compliments the embossing folder I think. I stamped mine using Pool Party ink on Whisper White and punched it out using the Everyday Label Punch and trimmed it slightly so that it could be matted with a Daffodil Delight base. 

Sale-A-Bration New Releases - My card today does use some of the Sale-A-Bration organdy ribbon that sold out some weeks ago. I don't like to tempt you with something you can no longer get your hands on, but it was the perfect finishing touch for my card. There is good news though - as of March 1st there are even more FREE product choices for the remainder of Sale-A-Bration (you can read all about them in my earlier post here if you missed it) so there is lots more to choose from!

Here is the visual summary of the key products used on today's project for you to pin for easy reference:


You can see all of my 'How To' summaries on my 'How To - Tips and Techniques' Pinterest board in case you've missed any. 

I am busy hosting my first residential crafting retreat of the year this weekend so I have a whole day of crafting fun ahead with some fabulous ladies. I will have more to share with you about it later this week, but in the meantime, if this is the kind of thing that appeals to you, why not check out the details for my next one in October here. It's open for booking and I would love to welcome you!

Enjoy your day and I'll be back tomorrow with this week's project for our new challenge over at The Paper Players. Until then, happy stampin'!


Stampin' Up! Supplies Used:

Table built using Product Table Builder by The Crafty Owl - Independent Stampin' Up! Demonstrator.

Strong & Beautiful Country Floral Monochromatic Card

by Joanne James26. February 2019 22:00

Today I'm sharing a card for this week's challenge over at Just Add Ink where the focus is on embossing:


Dry embossing, heat embossing, embossing paste - so many possibilities and all are in the mix with some great samples from the design team this week. I'm also linking up over at SUO Challenges for #SUOC217 since I am using one of my current favourites from the second Sale-A-Bration release that went live on 15th February, the new Country Floral Dynamic Textured Impressions Embossing Folder: 


Here's the low-down on today's card:

Country Floral - I really wanted to make the most of those flowers and decided to try out a technique that I hadn't tried before, where I inked the inside of my embossing folder before embossing my white cardstock so that my flowers remained white on an inked negative space. Whilst I liked the effect, the ink was too bold for the effect I wanted, so I decided to try something else that was new to me - I used my Light Petal Pink Blends marker and coloured the space completely. Time consuming? Yes. Worth it? Totally! The card looks even better in real life than in the photo; so soft and pretty.

Strong And Beautiful - Whilst my card is delicate and feminine in colour and style, the sentiment is from a great set in the seasonal catalogue that is perfect for cards for strong, confident women. It's called 'Strong and Beautiful' and contains some wonderful and uplifting sentiments. I stamped mine using Petal Pink ink on Whisper White and punched it out using the Everyday Label Punch and positioned it alongside a fancy bow made from the Floral Romance Variegated Ribbon which ties beautiful, soft bows. My sentiment resolves on the inside of my card with 'Thank you for always being there for me'. How lovely is that?

One Colour Wonder - I've made a few monochromatic cards lately - I must be on a roll! This one is particularly soft and pink and feminine and with good reason: it's headed to a dear friend of mine who is Mum to two boys so, along with her husband, is rather outnumbered in her household so rarely does the 'girly' thing so this is most definitely for her.

Here is the visual summary of the key products used on today's project for you to pin for easy reference:


You can see all of my 'How To' summaries on my 'How To - Tips and Techniques' Pinterest board in case you've missed any. 

I really love this embossing folder and have another card showcasing an alternative colouring technique to share with you later this week, so do pop back if you would like to see more samples.

Enjoy your evening and I'll be back tomorrow with another project. Until then, happy stampin'!


Stampin' Up! Supplies Used:

Table built using Product Table Builder by The Crafty Owl - Independent Stampin' Up! Demonstrator.

Double-Embossed Feathers and Frost Christmas Card

by Joanne James18. September 2018 07:00

Today I'm sharing a card for this week's challenge over at Just Add Ink where the team have my favourite kind of challenge - a sketch!

I initially thought I would replace the diamond shape in the centre with a circular wreath, until I was browsing my stamp sets and realised it would work perfectly with the foliage square in Feathers and Frost, so I set to work. Here's what I came up with:


 Here's the low-down on today's card:

Double-Embossing - I decided to heat emboss my leaves and sentiment on my card with silver embossing powder for some festive sparkle, adding a little more colour with my light Smoky Slate Blend pen, and also added some dry embossing to my white card base with the Layered Leaves dynamic embossing folder. Whilst this isn't especially Christmassy and is also quite difficult to see on the photograph, I love the extra texture and interest that it adds. 

Layered Shapes and Lots of Berries - I added a fussy-cut poinsetta from the same set to the centre of my leaves and coloured it with my Real Red Blends. I decided to use Real Red as an accent colour on my card, both in my layered mats and the many red rhinestones I used as berries. Yes, I used a ton of these sparkly beauties, however I wanted something more than flat colour and love the way they catch the light. Besides, there are 220 in a single pack - so plenty to go around!

Not Just Joy - I used the word 'Joy' as the circular element on the front of my card and completed my sentiment with two more sentiments from the set inside my card:


Here is the visual summary of the key products used on today's project for you to pin for easy reference:


You can see all of my 'How To' summaries on my 'How To - Tips and Techniques' Pinterest board in case you've missed any. 

Enjoy your day and I'll be back tomorrow with another project. Until then, happy stampin'!


Stampin' Up! Supplies Used:

Table built using Product Table Builder by The Crafty Owl - Independent Stampin' Up! Demonstrator.

Two Way Embossed Square Seasonal Wreath Christmas Card

by Joanne James20. August 2018 07:00

Happy Monday everyone! It's a new week and I've a few things ready to share with you this week, including a card today for a couple of challenges that is choc-full of sneak peeks:

   Paper Craft Crew Sketch Challenge 303! Play along with the latest challenge by visiting www.papercraftcrew.com #stampinup #papercraftcrew #papercrafts #stamping #sunnygirlscraps #crafting #crafts #craft #creative #creativity #create #sketchchallenge #colorchallenge #inspirationalchallenge #tictactoechallenge

Yes, it's still summer and I'm crafting for Christmas again, but having received my pre-order of goodies from the forthcoming Stampin' Up! Autumn-Winter Seasonal catalogue, I couldn't resist getting stuck in. Take a look:


 Here's the low-down on today's card:

An Embossed Seasonal Wreath - I loved the idea of the challenge over at Just Add Ink this week, which is to choose 2 different types of embossing on your card. It gave me the perfect opportunity to use a new-to-me embossing folder that is actually to be found in the annual catalogue, so available right away! The Seasonal Wreath TIEF attracted my attention as soon as I saw it; great for non-seasonal projects too, this wreath makes a great centrepiece on a card and I can see it being a staple of my Christmas crafting stash. It results in a subtle embossed finish (a little difficult to see the detail on my photo, but I can assure you it's there and it's gorgeous!) The wreath fits on a standard A6 card, but here I decided to make a 6" x 6" square one.

A Merry Christmas - For my second type of embossing, I went with the partial heat embossing of my Merry Merlot diecuts courtesy of the new Merry Christmas Thinlits - LOVE these! I simply sponged the lower portion of the diecut letters with Versamark and heat embossed with copper embossing powder. I took my colour combo for today's project from one of the new designer series paper packs - Joyous Noel - that features in the new catalogue. Whilst it doesn't feature on my card, the combination of Tranquil Tide, Merry Merlot and copper are inspired from these beautiful papers.

The Extra Details - There are a couple of additional 'sneak peeks' on today's card: the copper glimmer paper, the gorgeous Merry Merlot and Copper Reversible Ribbon and the sentiment on the inside of my card, courtesy of the Merry Christmas To All stamp set:


Are you keen to get your hands on some of these new products too? You will have to wait until 5th September to order them, but if you aren't already a customer of mine, don't already have a Stampin' Up! demonstrator and would like a copy of the new catalogue, then just get in touch with me by email with your address details or call me to reserve your copy.

Lastly, the sketch over at Paper Craft Crew inspired the layout for today's card; definitely one I'll use again.

Here is the visual summary of the key products used on today's project for you to pin for easy reference:


You can see all of my 'How To' summaries on my 'How To - Tips and Techniques' Pinterest board in case you've missed any. 

Enjoy your day and I'll be back tomorrow with another, slightly less festive, project. Until then, happy stampin'!


Stampin' Up! Supplies Used:

Table built using Product Table Builder by The Crafty Owl - Independent Stampin' Up! Demonstrator.

Pattern Party Copper Embossed Medallion

by Joanne James24. June 2017 10:44

It's the weekend and an activity-filled one here in the James household! Today I'm sharing a card for this week's challenge over at Freshly Made Sketches where the lovely Karren has an interesting sketch to work with:

I'm on a bit of a roll with my FMS cards lately -thank you Kim for choosing me as your Princess of Clean last week (if you missed it, you can see that card here) so thought I'd try my hand with Karren's sketch. I've been playing with embossing paste this week and this sketch was perfect for something I wanted to try - take a look:


Here's the low-down on today's card:

Pattern Party - The sweeping arch on the right-hand side of Karren's sketch was perfect for creating a textured design using my embossing paste and this medallion-inspired design with one of the Pattern Party Decorative Masks. The decorative design of the mask was such that I could use it to make my textured panel a real feature of my card.

Metallic Medallion - There is lots you can do with embossing paste: you can use it 'neat', colour it with re-inkers and also add colour using sponge daubers or Stampin' Spritzers. Here though I decided to see what it would look like if I sprinkled my wet embossing paste with copper embossing powder and heat set it to give a shiny metallic finish. This was really easy to do and whilst it doesn't give a perfect finish, it's easy to get pretty even coverage and it adds additional texture and interest as well as shine to the card. Along with the copper foil mat, this card has a real luxurious feel - I love it!

Dapper Denim Ombre - I used a piece of Dapper Denim ombre paper from the Color Theory designer series paper stack for the background to my textured medallion. It adds just enough additional interest without detracting from the star of the show. I added a circular sentiment from the Eastern Beauty stamp set to finish - it's in broadly the right place when compared to Karren's sketch, but I have used a little artistic licence here as it worked for my card.

Here is the visual summary of the key products used on today's project for you to pin for easy reference:


You can see all of my 'How To' summaries on my 'How To - Tips and Techniques' Pinterest board in case you've missed any. 

If you liked this card do pop back over the next few days, as I have additional examples of cards I've made using embossing paste and a variety of different techniques. Enjoy your day; I'm off to spend the rest of mine at the swimming pool (spectating rather than swimming!) and I'll be back tomorrow with another project for this week's new challenge over at The Paper Players. Until then, happy stampin'!


Stampin' Up! Supplies Used:

Table built using Product Table Builder by The Crafty Owl - Independent Stampin' Up! Demonstrator.

White and Gold Christmas Poinsettia Card

by Joanne James15. September 2015 21:02

Good evening blog readers! I had a lovely time with the ladies - and gent! - that attend my card class at a local residential care home this morning. As always, the lovely Sheila and Brenda were wonderful hostesses and today we were joined a new resident, Peggy, for the first time. We enjoyed a pleasant few hours making Christmas cards and this afternoon I caught up with one of my team over a quick coffee and got some jobs done before collecting the children and embarking on the usual Tuesday round of homework, piano lessons and dinner. Anyway, enough about my day! No time to make a card today, so I thought I'd share with you another of the cards we made at my Technique class this month. Another using the 'Reason For The Season' stamp set, but this time in white and gold:

I used extra thick Whisper White cardstock for my base, then created a layered central panel using a piece of gold foil cardstock and a piece of Whisper White covered with a piece of the gorgeous gold foil Winter Wonderland Designer Vellum Stack. I stamped the sentiment and flower onto a piece of Whisper White in Versamark and heat embossed in gold, then fussy cut the flower and punched the sentiment out using a 2" circle punch. To put together, I created a few loops of gold corded trim and adhered these to my card, followed by the sentiment then lastly the flower, overlapping each slightly. A sprinkling of gold sequins from the Metallics Sequin Assortment completes my card.

This is my favourite of all the cards we made in this month's technique class - I love the modern, crisp gold and white finish. That's all from me today; back tomorrow with a new collection of weekly deals. until then, happy stampin'!


Stampin' Up! Supplies Used:

Table built using Product Table Builder by The Crafty Owl - Independent Stampin' Up! Demonstrator.


Tags: , , , , , ,

Cards | Classes | Shop Online | Stamping

You've Got This Sneak Peek

by Joanne James21. May 2015 08:00

It's Thursday and time for a new challenge over at Create With Connie and Mary and this week we have a colour challenge for you:


I also have a sneak peek for you today as I made my card with a new set from the 2015-16 Annual Catalogue called 'You've Got This' - take a look:

This gorgeous stamp comes in two parts with a very useful hatched pattern background stamp that I stamped in Soft Sky on my Soft Sky panel, a few sentiments and beautiful large flower bloom. I stamped my flower in Versamark on vellum and heat embossed it in silver then I coloured the stem with Smoky Slate and the petals with Blackberry Bliss ink and used a blender pen to achieve the detail. I then fussy cut my flower and adhered it to my card front using glue dots, allowing the edges to lift away from the card. The sentiment was also heat embossed in silver directly to the card front and I finished my card with a piece of Soft Sky seam binding ribbon tied in a bow. 

I just love this flower stamp and know that this is one I will be getting lots of use out of, so you can definitely expect to see more of it. I'm looking forward to seeing what you do with this colour combination this week - do check out how the other designers have used this colour combination too, as there are some great and varied cards to inspire you. 

I'm also linking today's card up with this week's challenge over at Can You Case It? where their theme is 'May Flowers' - I think my card certainly qualifies as one of those!


I'll be back tomorrow with another sneak peek project, so stay tuned for that. Unitl then, happy stampin'!


Stampin' Up! Supplies Used:

  • Embossing Buddy
  • Versamark Pad
  • Silver Stampin' Emboss Powder
  • Heat Tool - Uk Plug
  • Soft Sky 1/2" Seam Binding Ribbon
  • Soft Sky Classic Stampin' Pad
  • Card Stock A4 Soft Sky
  • Blackberry Bliss Classic Stampin' Pad
  • Smoky Slate Classic Stampin' Pad
  • Blender Pens
  • White Vellum A4 Card Stock


Something Lacy Congratulations Card

by Joanne James12. May 2015 21:32

I've had a busy couple of days with this month's classes (hence no blog post yesterday - I'm sorry about that!) so today I thought I would share with you one of the cards we made. This month's technique class has focused on using background stamps and our chosen feature stamp set was the lovely 'Something Lacy'. The class also featured heat embossing and this card shows how coloured embossing powder adds a real touch of luxury to a card:

For our Blushing Bride monochromatic wedding card, we stamped the Something Lacy background stamp in Versamark and heat embossed with Blushing Bride embossing powder. This panel was wrapped with some White satin ribbon before adhering the Blushing Bridge cardstock base. A couple of layered labels cut with the Big Shot and Labels framelits were then added, with the sentiment chosen from the now retired 2015 Sale-A-Bration set 'Simply Wonderful', which was also heat embossed. A few pearls and punched flowers, along with a big bow, finish my card. This card has a lovely sheen in real life that really isn't captured in the photograph and the monochromatic colour scheme is so very pretty.

The 'Something Lacy' background stamp is available until the end of the current seasonal catalogue on the 2nd June and isn't carrying over into the annual catalogue, so if it's on your wish list, you only have a couple of weeks left to purchase. The Labels Framelits are retiring and have already sold out, however Blushing Bride embossing powder is still in stock and half price, so there's still time to snap up a bargain!

That's all from me today; back tomorrow with another project and this week's Wednesday Weekly Deals. Until then, happy stampin'!


Stampin' Up! Supplies Used:

Table built using Product Table Builder by The Crafty Owl - Independent Stampin' Up! Demonstrator.


Mini Catalogue

BROWSE THE CATALOGUE

The mini catalogue is now live! Read and download your copy here.

Shop Online

Access my online shop 24 x 7, 365 days of the year:

Current March hostess code:

S9F2XJJW

Shop Online

Join My Team

It's always a great time to join Stampin’ Up! New team members can get £130 worth of products for only £99 + free business supplies + free shipping + all the fun being a part of Stampin’ Up! Stampin' Up! has something for everyone: join my growing team and benefit from my support to enjoy Stampin' Up! however you choose.

If you're interested, call me for a chat to understand how I can help you realise your goals. Alternatively, if you have already decided to sign up and you just can't wait, please click here for the link to the online form where you can sign up and order your starter kit right away! 

Latest Kit!

Stampin Cut and Emboss

The Rock Legend Kit has all you need to make 8 cards with coordinating envelopes. Along with the new Panda Friends Kit, both are available from January 4th for just £14 each - get yours here!

2023-24 Annual Catalogue

BROWSE THE CATALOGUE

Click on the catalogue for a full list of current SU! supplies - if you would like to order any of the items featured, please drop me a line at [email protected] or give me a call on 07773 421446 - I'd be happy to help.

New Online Exclusives

There will be new products available exclusively in the online store from 5 March - check them out here.

About Me

Hi I'm Joanne and live in Northampton and when I'm not looking after my husband and two beautiful children, am an avid crafter with a passion for all things Stampin' Up!

I must confess that I have never been a big rubber stamper - until I discovered Stampin' Up! that is. I love the fact that I can get such great results with co-ordinating stamps, inks, papers and punches - the possibilities are endless! Join me on my stamping journey as I share the things I love and be inspired to create amazing things yourself!

Follow Me

Monthly Newsletter

Box Builder

Click the button above to use Box Buster to create your custom box design using the Envelope Punch Board!

Kits Collection Now Available!

Stampin Cut and Emboss

The new Kits Collection from Stampin' Up! is now available!

Click here to see the current kits available and order yours online today.

I Design For


Stampin' Up Stuff

This is my personal blog and is not endorsed by Stampin’ Up! I hope you find it a plentiful source of ideas and personal inspiration but please don't copy my designs for contest submission or use for classes, publication or sale without express permission.