Up, Up And Away with The Paper Players!

by Joanne James22. February 2015 10:00

It's Sunday and time for another challenge over at The Paper Players. Thank you to everyone who played along with my CAS bird challenge last week - there were some fabulous entries. This week the lovely Sandy is hosting and she has a sketch challenge for us - my favourite! Here is her sketch:


I decided to use the colour palette over at Colour Me for my card today - I haven't had the opportunity to play along with these lovely ladies since I finished my Design Team post over there at the start of the year, so time to say 'hello ladies!' to Hayley, Tara and the team. I just so happen to be using another stamp in the 'Time To Celebrate' hostess set that I used on my Paper Players card last week - take a look:

The temptation to use a feather in my design as per the sketch was high, however there are some wonderful examples using feathers by other members of the Design Team, so I decided to look at what else I could use and settled on the hot air balloon instead. My top mat layer is a piece of 'Flashback' DSP, the circle pattern perfect to echo the central circle of the sketch. I embossed a piece of Very Vanilla cardstock with the now retired 'Cloudy Day' embossing folder and sponged the sky in Pool Party around the clouds and framed this with a Real Red circular frame cut with my Big Shot and Circle Framelits. I added a simple sentiment banner with a little fussy cutting around the 'y' in 'you', then mounted the hot air balloon with dimensionals for a little lift. I stamped the balloon on very Vanilla and coloured it with my So Saffron Stampin' Write marker and the lightest of my Cherry Cobbler Blendabilities. I also added a little Crystal Effects to my stars for some additional dimension, although that's quite difficult to see in the photo below: 

That's my card done and I hope you like it. I love the stamps in the 'Time To Celebrate' hostess set - if they are your thing too, please get in touch if you would like to host a party to lay your hands on your very own set. Before you reach for your ink pads, do visit the other design team members to see what interesting ideas they've had this week:

The Paper Players Design Team
 
Here's a quick recap of our challenge rules:
 
1.  Create a new paper project
2.  Upload your creation to your blog with a link back to us and provide a direct link to the post featuring your challenge submission.
3.  Please link your card to no more than three challenges, TOTAL.
4.  Have FUN! 

I look forward to seeing how you interpret Sandy's sketch this week - so many possibilities! 

Back tomorrow with another project; until then, happy stampin'!


Stampin' Up! Supplies Used:

Table built using Product Table Builder by The Crafty Owl - Independent Stampin' Up! Demonstrator.


You Make Me Happy Sale-A-Bration Class Card

by Joanne James7. February 2014 21:05

Well, that was a week! One of my busiest and I sure am glad it's the weekend. Tonight I thought I would share with you one of the cards we made at my classes this week. All the cards we made featured Sale-A-Bration products that could be yours free with an order of £45 or more. Today's card is another featuring the 'You Make Me Happy' stamp from the 'See Ya Later' stamp set:

We stamped the sentiment onto the centre of our 'sun', which we constructed from layered circles and either triangles created with the new triangle punch or banner pieces using the banner punch (my sample shows triangles). I cut a tiny cloud out of an offcut of silver foil and added it to the front on a dimensional to add interest, and added a strip of This and That washi tape below the embossed panel just to bring a little colour and create definition.

If you would like to be the proud owner of this stamp set, then pop on over to my online store via the product links below to place your order. If you live local to me in Northampton and the surrounding area, why not come to one of my monthly card classes or my weekend project classes? My full class schedule can be found here; you don't need to have any previous knowledge or experience, we are a friendly bunch and all are welcome. Do give me a call if you'd like to know more.

Back tomorrow with another project; unitl then, happy stampin'!


Stampin' Up! Products Used:

Table built using Stampin' Up! Product Table Builder from The Crafty Owl.

You Are My Sunshine!

by Joanne James26. January 2014 20:50

Today's card uses a stamp from another of the forthcoming Sale-A-Bration stamp sets called 'See Ya Later': a collection of 4 stamps each featuring a fun phrase. Today's card seems quite appropriate given the weather that we've been having in the UK this weekend; here's my card:

My layout was inspired by the sketch over at CAS Colours & Sketches this week:

I embossed the Smoky Slate panel with the Cloudy Day embossing folder - this item is retired, but is still currently available on the clearance rack if you'd like to snap up a bargain - it just fits with the sentiment of this stamp. I stamped the sentiment in Versamark and embossed with black embossing powder so that it would stand out on the finished card.  The real star of this card though is the bright sunburst coming out from behind the clouds, which just lifts the subtle grey and Soft Sky blue to another level.

I'm also linking today's card up with CAS-ual Fridays, where the challenge is to use blocks of colour in your design.

With the rain and the almighty storm with thunder and lightening yesterday afternoon, this card is sure to brighten your day!

Back tomorrow with another project; until then, happy stampin'!


Stampin' Up! Supplies Used:

Table built using Stampin' Up! Product Table Builder from The Crafty Owl.


Oh, Whale Party Invitations and Thank Yous - Take Two

by Joanne James5. August 2013 18:11

Today I am having a brief interlude in sharing the festive makes from my weekend Christmas workshop, to share with you another party invitation and co-ordinating thank you card made with the 'Oh, Whale!' stamp set. As I mentioned in yesterday's post, my youngest celebrated his forthcoming 6th birthday with a swimming pool party held jointly with one of his classmates, whose 6th birthday was last week. Having used the 'Oh, Whale' set for Rebecca's party a couple of months ago (you can see her invites here), it seemed the obvious choice, although a different design was required. Here is what I came up with:

This time 2 whales were the order of the day and they were attached to the inside of the card, visible through an aperture cut with an oval framelit. Here's the view of the inside of the card; the 'Make a Wish' set is great for creating party invitations and makes it really easy:

Luckily for me, the classmate who was celebrating his birthday jointly with Ben was no other than the son of one of my downlines, Barbara, so between us we managed to get a great production line going and knocked out these invitations in super quick time. We also created our co-ordinating thank you postcards, which we pre-printed with a short thank you message (well, have you ever tried to get two six year old boys to write a bunch of thank you cards from scratch during the school summer holidays? We needed to give them a helping hand!). Here's the finished card:

This time I created a mask to enable me to stamp two whales without the need to cut out and layer and I printed the text using MDS.

That's my last set of 'Oh, Whale' party invitations for a while. Back tomorrow with another of the projects we made in our Christmas workshop. Until then, happy stampin'!


Stampin' Up Supplies:

Stamps: Oh Whale, Make a Wish

Cardstock: Whisper White, Marina Mist

Ink/Stampin' Write Markers: Night of Navy, Marina Mist, Basic Grey

Tools: Cloudy Day Textured Embossing Folder, Ovals Framelits, Happy Whale Clearlits, Stamp-a-ma-jig

Finishing Touches: 1/4" Night of Navy Stitched Grosgrain Ribbon, Basics Rhinestones (coloured black with a Sharpie)

Oh, Whale! Party Invitations

by Joanne James17. June 2013 22:00

So something different today - birthday invitations! I was going to share a birthday card with you today but changed my mind (bloggers prerogative!) As already mentioned this week, it was Rebecca's 8th birthday last Saturday. She is having a swimming pool party next Sunday to celebrate with her friends and so water-themed invitations were the order of the day. She decided that 'Oh, Whale' was to be the stamp set of choice for the task, I saw this lovely Valentine card here and loved the layout, so decided to use this as the basis for my party invitation design. Here are the finished invitations:

I switched out the hearts, went for a darker blue whale and couldn't miss the opportunity to use my Cloudy Day Embossing Folder to add texture to the circle behind the whale. I really like the mix of circle styles on this card and the way the DSP, punched circle and paper piercing bring the whole design together. I then used the 'Make a Wish' set to make light work of the details on the inside of the card (no photo of this though - oops!)

Back tomorrow with another project; until then, happy stampin'!


Stampin' Up Supplies:

Stamps: Oh Whale, Make a Wish

Cardstock: Whisper White, Real Red, Polka Dot Parade Designer Series Paper (Marina Mist)

Ink/Stampin' Write Markers: Night of Navy, Marina Mist, Real Red

Tools: Circles #2 Originals Die, Cloudy Day Textured Embossing Folder, Small Heart Punch, Essentials Paper Piercing Pack, Stamp-a-ma-jig


Giraffe Punch Art

by Joanne James24. May 2013 21:19

As promised, I'm back today with the last of the owl punch cards from this month's class. Our last card was another alternative use for this versatile punch; this time, to make a cute giraffe punch art card:


To make this card, the owl's body (minus his feet!) becomes the giraffe's head - clever, right?! We then used a variety of circle punches and the large oval punch to create the rest of him. The edges of the finished giraffe were sponged in So Saffron ink to add dimension and I placed him inside the card looking out, for added interest. The oval aperture was easy to make using an oval framelit and a few branches from the Bird Builder punch were added to give the giraffe something to munch on. I finished this card with embossed clouds and an 'Oh Hello' sentiment highlighted with a Cute Clip (love these!), but you could just as easily use a happy birthday greeting - I think this would make a lovely card for a little person.

I hope you like the finished card - there were a few interesting adaptations to this card by the ladies at my class: everything from hearts added to the sentiment banner to eyelashes on the giraffe. That's one of the things I love about teaching classes - whilst I scope out the original design, it can still be adapted or customised to make it individual to you. If you would like to attend my stamping classes, please do get in touch via [email protected] for more details. Next month's class is a One Sheet Wonder class using the Secret Garden stamp set and framelits. 

Back tomorrow with another project - until then, happy stampin'!


Stampin' Up Supplies:

Stamps: Oh Hello

Cardstock: Whisper White, Marina Mist, Pink Pirouette, So Saffron, Chocolate Chip, Basic Black, Certainly Celery

Ink/Stampin' Write Markers: Early Espresso

Tools: Owl Punch, Cloudy Day Textured Impressions Embossing Folder, 1" Circle Punch, 3/4" Circle Punch, Bird Builder Punch, Oval Framelits, Itty Bitty Shapes Punch (circle), Large Oval Punch

Finishing Touches: Cute Clip


Oh Baby Washing Line

by Joanne James23. May 2013 21:26

Busy day revolving around my little ones today with music recitals, class assemblies, ballet lessons and visiting friends for tea - I swear my two have a better social life than me! Anyway, finally sitting down to share another card from this month's class with you - today, a cute baby card, complete with washing line:

I used the lovely Twitterpated designer paper for the dresses and dungarees, as the largely pastel colours suit a new baby card. I must confess to using some now retired ribbon that was lurking at the back of my drawer to edge the dresses because the pleated edge was perfect for the dress edge. The dresses and dungarees are all made from the 'waistcoat' section of the owl punch, with a few nips and tucks here and there. My most favourite thing about this card is the mini-brad dungaree buttons - I love them!

I've added a pink 'oh baby' sentiment circle to this card, but in class we made two: one pink and one blue, so that they could be added at a later stage when the recipient was known; now that's what you call organised! Back tomorrow with my last class card - until then, happy stampin'!


Stampin' Up Supplies:

Stamps: Ciao Baby!

Cardstock: Whisper White, Old Olive, Island Indigo, Baja Breeze, Pink Pirouette, Twitterpated DSP

Ink/Stampin' Write Markers: Baja Breeze, Pink Pirouette

Tools: Owl Punch, Cloudy Day Textured Impressions Embossing Folder, Simply Scored Borders Scoring Plate, 7/8" Scallop Circle Punch, 1" Circle Punch

Finishing Touches: 1/8" Mini Brads, Island Indigo Baker's Twine, Ruffled Ribbon (retired)

Nurse Owl Get Well Soon

by Joanne James22. May 2013 20:36

As promised, here's the second card from last week's Owl Punch card class - this time Nurse Owl coming to wish the recipient 'Get Well Soon':

I've seen these little nurse owls lots of times and think they make a great focal point for a 'get well soon' card. The nurses hat is made from an upside-down 'waistcoat' piece of the owl, whilst the cross is punched with one of the punches from the the Itty Bitty Punches set. This is the only card from our class that we made that wasn't an original design of mine. Jo Dumbleton shared this card on her Facebook page recently and as I was planning my class, with my owl punch, cloudy day embossing folder and 'sick' stamp at the ready, I knew her card would be perfect to showcase all three - and I didn't feel I could improve upon it. I hope you like it too.

Back tomorrow with another of our class cards - and it will be an owl, but not as you know it; you'll have to pop back tomorrow to see what I mean ... until then, happy stampin'!


Stampin' Up Supplies:

Stamps: Word Play

Cardstock: Whisper White, Basic Black, Crumb Cake, Chocolate Chip, Real Red, Brights DSP, Polka Dot Parade DSP

Ink/Stampin' Write Markers: Night of Navy

Tools: Owl Punch, Large Oval Punch, Itty Bitty Shapes Punch, Cloudy Day Textured Impressions Embossing Folder, 3/16" Corner Punch

Finishing Touches: 1/4" Night of Navy Stitched Grosgrain Ribbon


Thoughts of You - Rain or Shine?

by Joanne James4. May 2013 16:05

Well, it might be May, but this is so a day of April showers! After my third trip back out to the washing line to rescue my washing from another downpour, I gave up and resorted to the tumble dryer. Not very eco-friendly I know, but with sports kits that need to be washed, dried and ironed to be back at school on Tuesday, what is a girl to do?!

Given the weather, it seems like a great oportunity to share another of my training day outputs with you:


The Cloudy Day Embossing Folder is a personal favourite of mine, and my 'go to' embossing pattern at the moment - I love the ease with which you can create the cloud effect. A nice pink umbrella, fussy cut with my trusty paper snips - who wouldn't be cheered by one of these on a showery day? - and another Cute Clip, to highlight the sentiment. There's a lot going on around the sentiment - here's a close up view:


This would be a great card to brighten someone's day - I hope it has lifted your spirits too! I'm off to do a quick hour's crafting whilst the house is quiet, as everyone else has gone out to the weekly swimming lesson. Back tomorrow with another project; until then, happy stampin!


Stampin' Up Supplies:

Stamps: Rain or Shine

Cardstock: Lucky Limeade, Pacific Point, Whisper White, Sunshine and Sprinkles DSP

Ink: Basic Grey, Pacific Point

Tools: Cloudy Day Embossing Folder, Scallop Trim Border Punch

Finishing Touches: Basics Rhinestones, 1/4" Stitched Grosgrain Ribbon Basic Grey, Cute Clips

Angry Bird in Action - Masculine Swap Card

by Joanne James15. April 2013 21:20

As I mentioned in yesterday's post, I was on a team training day yesterday. One of the things we like to do at these events is share 'swaps', where we each make multiples of a card or 3D project with a particular theme in mind and then 'swap' with each other. This is a great way to share in each others creativity, inspire others and to be inspired and also gives lots of items to share with customers at parties and classes. The theme for yesterday's swaps was 'masculine' and whilst I often struggle with 'grown-up' masculine, having a 5 year old son gives me plenty of opportunity to design for 'young' masculine and I'm never short of ideas. As you can see in yesterday's post, Angry Birds is an ever-popular theme at the moment, so with this in mind I worked up a slightly altered version to a card that I seem to make quite a lot of these days. Here's my original card that I've made a number of times:
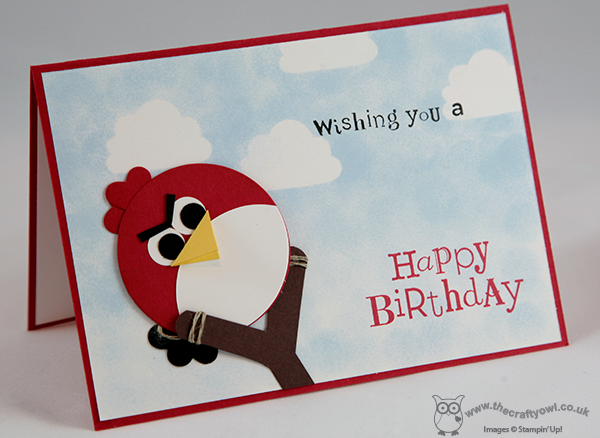
And here's the slightly altered version that I made for my swaps yesterday - can you spot the key difference?
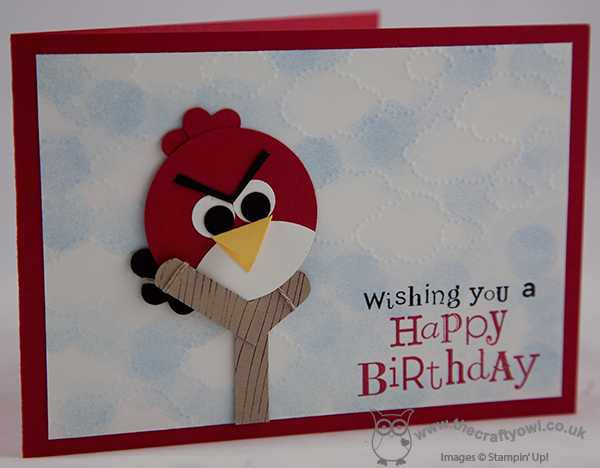
Did you spot it? Instead of sponging around a template for clouds as in the first card (I use the top of the cupcake from the Cupcake Builder Punch for this  - it makes a great cloud!) I partially embossed the background using the new Cloudy Day Textured Impressions Embossing Folder and sponged blue in between the clouds, leaving the bottom right hand corner un-embossed to allow me to stamp my sentiment onto a flat card surface. Another small difference is that instead of using Chocolate Chip cardstock for the slingshot, I used Crumb Cake, stamped in Chocolate Chip ink with the Woodgrain stamp. This last decision was prompted more by the fact that I had a large number of Crumb Cake card offcuts from a previous project that were perfect for use here (if you're reading this Chris P, this one's for you - I told you I'd find a use for those Crumb Cake offcuts!!) Punch art is great for using up all those odds and ends of cardstock left over from other projects, although having set out to make 30 of these, I did wonder if I should have chosen something a little more straightforward!

Anyway, I was really pleased with the way the all turned out. The design of this bird is slightly different to the red bird on yesterday's bookmark - I think the eyebrows make him look angrier. Here's a close up of the detail:
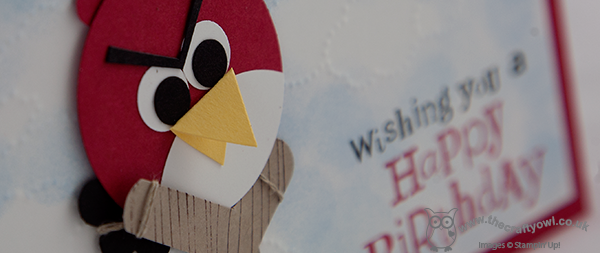
I love the beak too - there's just so much going on in this card, even after making so many I don't really tire of it. All my swaps were exchanged yesterday so I can't show you a photo of all 30, however I did make a few extras for some upcoming birthdays so I'll leave you with this last group shot of the little red fellas getting ready to be launched from their slingshots:

On that happy note, I'm off to start prepping; the Easter holidays are finally over and the children are back to school tomorrow. i'll be sad to see them go, but on the up side I'll have more time to spend in my craft room and I have lots there to keep me busy. I'll be back tomorrow with a new project - and possibly a 'sneak peek' of one of the cards we will be making in Wednesday's card class. So come back tomorrow and check it out; until then, happy stampin'!


Stampin' Up Supplies:

Stamps: Wacky Wishes (Hostess), Woodgrain

Cardstock: Real Red, Daffodil Delight, Basic Black, Whisper White, Crumb Cake

Inks: Real Red, Basic Black, Chocolate Chip, Bashful Blue

Tools: 1 3/4" Circle Punch, Small Heart Punch, Owl Punch, Itty Bitty Shapes Punch (circle), Big Shot, Cloudy Day Textured Impressions Embossing Folder, Sponge Dauber, Stamp-a-ma-jig

Finishing Touches: Linen Thread

Mini Catalogue

BROWSE THE CATALOGUE

The mini catalogue is now live! Read and download your copy here.

Shop Online

Access my online shop 24 x 7, 365 days of the year:

Current March hostess code:

S9F2XJJW

Shop Online

Join My Team

It's always a great time to join Stampin’ Up! New team members can get £130 worth of products for only £99 + free business supplies + free shipping + all the fun being a part of Stampin’ Up! Stampin' Up! has something for everyone: join my growing team and benefit from my support to enjoy Stampin' Up! however you choose.

If you're interested, call me for a chat to understand how I can help you realise your goals. Alternatively, if you have already decided to sign up and you just can't wait, please click here for the link to the online form where you can sign up and order your starter kit right away! 

Latest Kit!

Stampin Cut and Emboss

The Rock Legend Kit has all you need to make 8 cards with coordinating envelopes. Along with the new Panda Friends Kit, both are available from January 4th for just £14 each - get yours here!

2023-24 Annual Catalogue

BROWSE THE CATALOGUE

Click on the catalogue for a full list of current SU! supplies - if you would like to order any of the items featured, please drop me a line at [email protected] or give me a call on 07773 421446 - I'd be happy to help.

New Online Exclusives

There will be new products available exclusively in the online store from 5 March - check them out here.

About Me

Hi I'm Joanne and live in Northampton and when I'm not looking after my husband and two beautiful children, am an avid crafter with a passion for all things Stampin' Up!

I must confess that I have never been a big rubber stamper - until I discovered Stampin' Up! that is. I love the fact that I can get such great results with co-ordinating stamps, inks, papers and punches - the possibilities are endless! Join me on my stamping journey as I share the things I love and be inspired to create amazing things yourself!

Follow Me

Monthly Newsletter

Box Builder

Click the button above to use Box Buster to create your custom box design using the Envelope Punch Board!

Kits Collection Now Available!

Stampin Cut and Emboss

The new Kits Collection from Stampin' Up! is now available!

Click here to see the current kits available and order yours online today.

I Design For


Stampin' Up Stuff

This is my personal blog and is not endorsed by Stampin’ Up! I hope you find it a plentiful source of ideas and personal inspiration but please don't copy my designs for contest submission or use for classes, publication or sale without express permission.