by Joanne James4. March 2014 16:28I'll be back later with another video tutorial showing you how to make another 'any size' box using your Stampin' Up! Envelope Punch Board and Box Buster from The Crafty Owl, but meanwhile I managed to grab a quick few minutes this morning to make a card for this week's Pals Paper Arts challenge. There is a great sketch from Nicole Watt this week that offers so many possibilities:
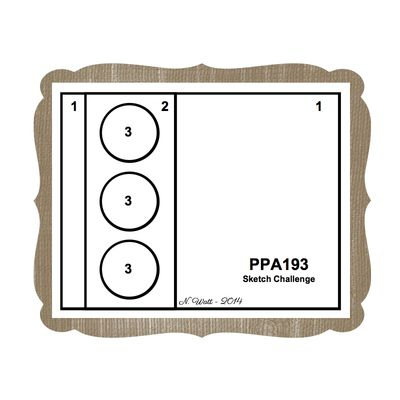
I've had my card in my head since I first saw the sketch, but only managed to get it translated into an actual card today. So here is my take on the sketch:
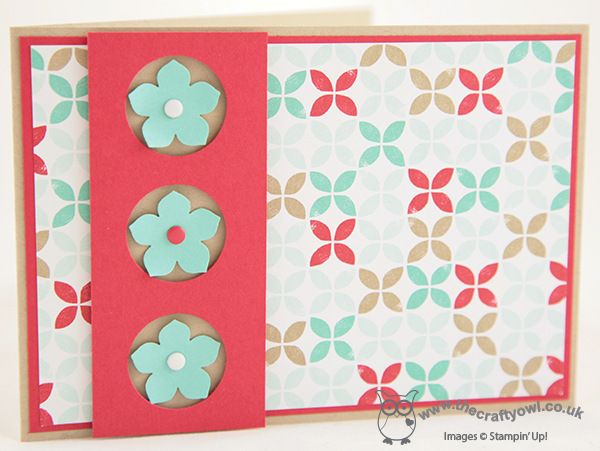
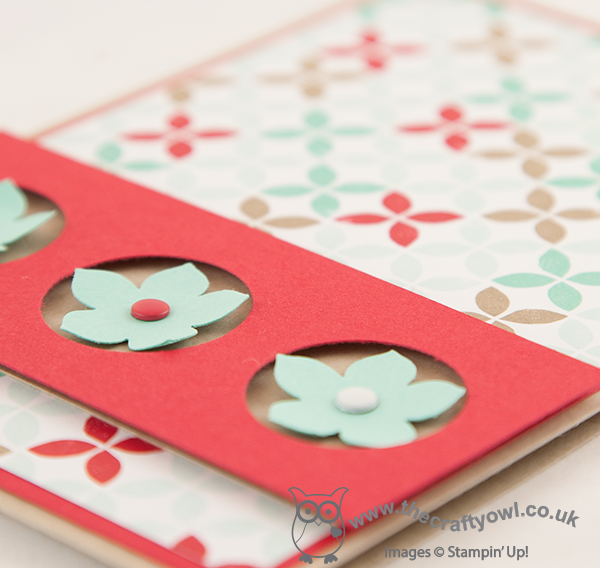
I went for a modern graphic card, using a sheet of the Fresh Prints Designer Series Paper Stack for my colour scheme. I punched the flowers using my Petite Petals punch without stamping them with the co-ordinating stamp set first, as I wanted to limit the pattern to the paper. I set the flowers in a section that has three holes punched with the 1" circle punch and raised this up on dimensionals to add some depth and give the flowers more of a 3D effect. I finished each of the flowers with a candy dot in either Real Red or Whisper White. having finished the card, I realised that it was one of life's rarities - no stamping! I really like this sketch layout and I'm sure will be using it again.
Back later with another video tutorial for you; until then, happy stampin'!
Stampin' Up! Supplies Used:
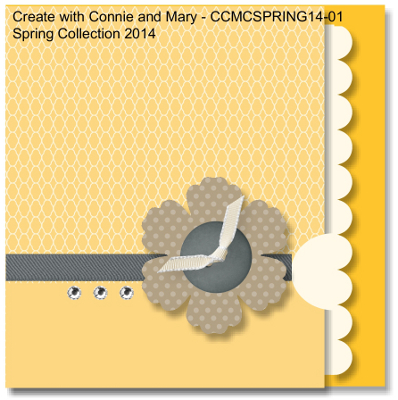
by Joanne James31. January 2014 08:55Another early post from me today - I must be organised, or at least more organised than usual! Today's card uses the sketch over at Create with Connie and Mary for the 2014 Spring Collection Challenge. Here is the sketch:
Having enjoyed the 'reveal' aspect of the hidden message tag card I made for the Paper Players yesterday, I thought I would do something similar with this card - the cut-away and the scalloped edge layer seemed to be calling for a pull-out. So here is my card:
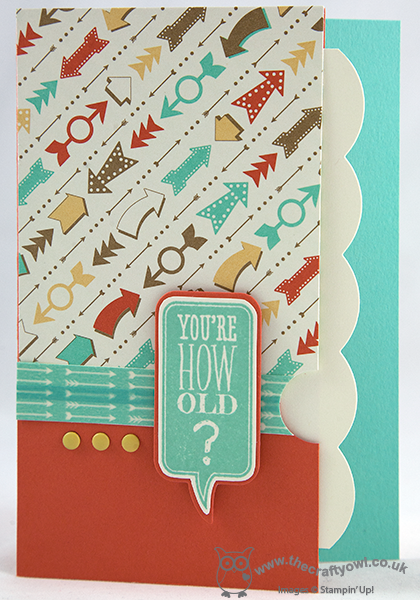
This is the first time I've used the new Retro Fresh Designer Series paper and I love it - the colours are, well retro and fresh!! I made the pattern a feature of my card and embellished with another of the Just Sayin' word bubbles, this time layered and mounted on a base cut with the co-ordinating Word Bubbles framelits - don't you just love a matching framelit?! (and you save 15% if you buy them together) I also created a joining piece from the new Retro Fresh washi tape which I stuck on some Very Vanilla cardstock (I love how the little arrows draw your eye to the speech bubble).
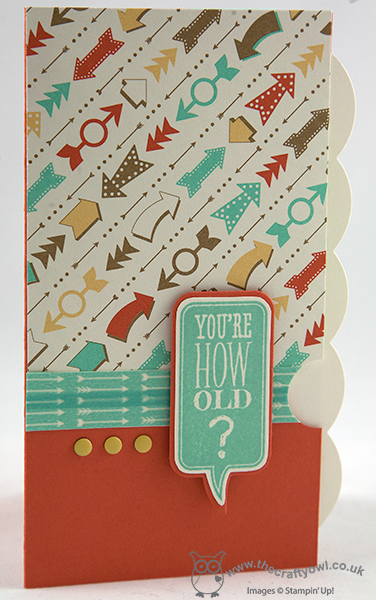
I chose to make a pocket from the top layer so that the scalloped edge section could be pulled out to reveal another of the 'See Ya Later' Sale-A-Bration stamps, that I coloured with my Tangerine Tango, Coastal Cabana and Baked Brown Sugar Stampin' Write markers:
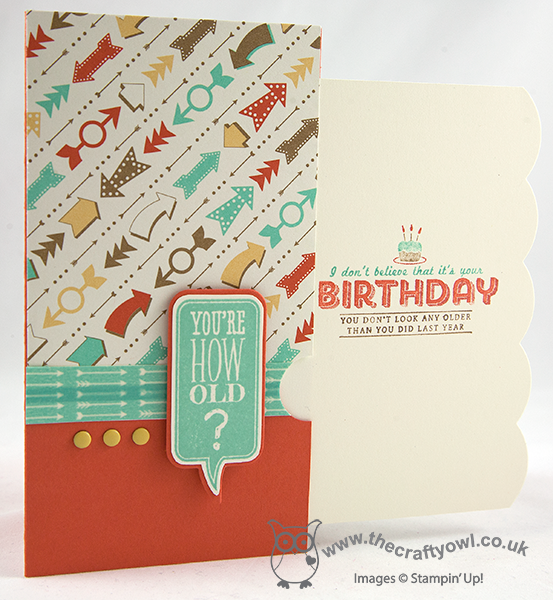
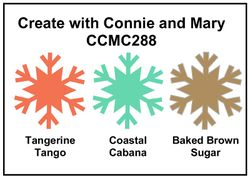
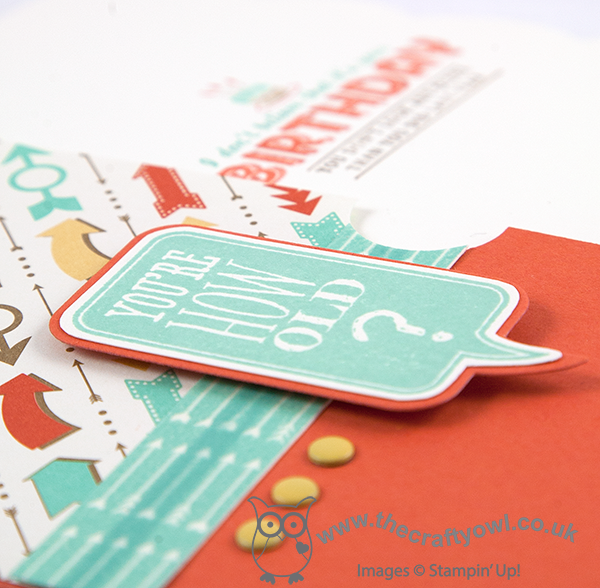
I made this card for a friend of mine who is celebrating a 'significant birthday' this week; I'll spare her modesty by not revealing her age, but let's just say the sentiment on this card just seemed very appropriate! I'm also going to link this card up with Create With Connie and Mary's colour challenge this week, which I didn't see until after I made my card but is featuring the colour palette that I've used this week:
I am loving these colours - might have to try and do another card or two now I've opened that new paper pack!
EDIT: By popular request, here are the dimensions for the above card:
- Tangerine Tango Card Base: 14.9cm x 18.5cm (scored at 8cm)
- Retro Fresh DSP: 10cm x 8cm
- Extra Tangerine Tango Bottom Front Section: 4.9cm x 8cm
- Attach the DSP to the bottom orange front section using the Retro Fresh washi tape
- Attach this panel front to the front card base on 3 sides only with Tombo (the section measuring 8cm x 14.9cm as opposed to the larger section measuring 10.5cm x 14.9cm) - this creates the pocket
- Very Vanilla Insert: 12.5cm x 8cm, edged with the Large Scallop Edgelit
- Adhere a strip of Coastal Cabana cardstock measuring 3cm x 14.9cm to the inside edge of the back panel of the card base
I'm off to watch Rebecca play in a netball match this afternoon - pray for fine weather for me, or at least that the match gets moved onto the indoor court! Back tomorrow with another project; until then, happy stampin'!
Stampin' Up! Supplies Used:
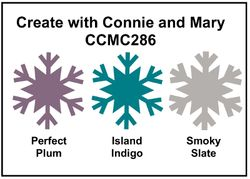
by Joanne James21. January 2014 20:39Good evening blog readers! I had lots of jobs to do today, but after a morning of paperwork I decided the housework could wait and I spent the afternoon cardmaking instead (oops!!) Today I'm sharing another Valentine's card, this time with a more masculine feel. I used the colours from this week's challenge over at Create with Connie and Mary as my starting point:
I decided to use my 'Hearts A Flutter' stamp set, as although this is one of my favourite sets and one I use a lot all year round, I haven't used it on any of my Valentine's cards yet this year. Here is my card:
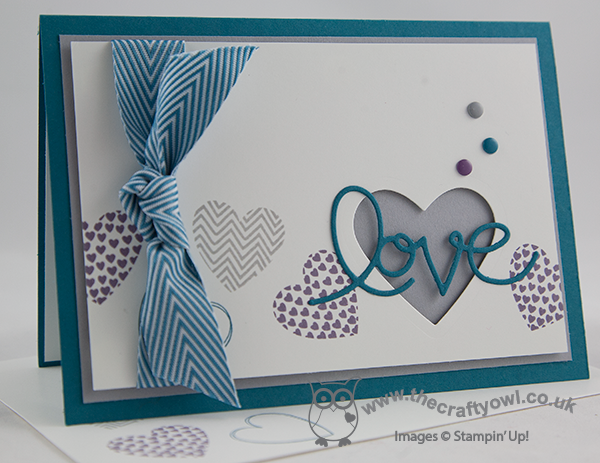
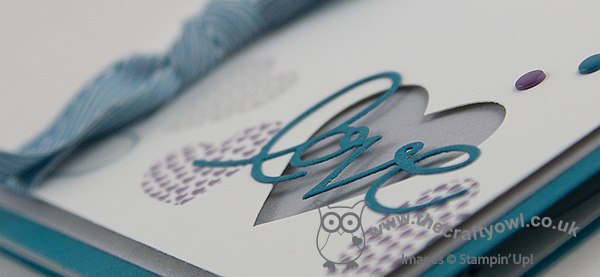
I stamped my hearts somewhat randomly across the lower half of my card, either side of my focal point. I mounted the top layer of cardstock on dimensionals for two reasons: firstly, to make the ribbon easier to attach and secondly so that the heart that I cut out (I used my hearts framelits for this) would have some depth and my die cut 'love' would have more impact. I deliberately chose to use Smoky Slate for my middle layer, as I wanted the heart to have a more masculine appeal, especially as I used ribbon on my card too; Island Indigo Chevron Ribbon isn't too girly, but adds a luxurious feel to the card. A few candy dots to finish just to add balance and done.
Whilst I designed this card with a man in mind, I think it would work equally well for a woman, especially if you're not the kind of person who is into all things pink and red.
Back tomorrow with another Valentine's themed card; until then, happy stampin'!
Stampin' Up! Supplies Used:
3b716918-6b62-4e10-9759-5e7a63b00c72|0|.0|96d5b379-7e1d-4dac-a6ba-1e50db561b04
Tags: Anniversary, Candy Dots, Hearts a Flutter, Hearts Framelits, Expressions Thinlits Dies, Magnetic Platform, masculine cards, Shop online, Stampin' Up, Stampin' Up Card, Stampin' Up Card ideas, Stampin' Up Supplies, Valentine's
Cards | Stamping
by Joanne James14. January 2014 12:51Well, it had to happen - I successfully shared my cold with my daughter, who as a result is off school today feeling considerably down in the dumps! Even a bonus dose of 'Animal Rescue' on TV can't make up for missing two of her favourite lessons of the week - Art and PE. I'm sure a couple of days in the warm to catch up on some sleep and get things under control will help no end. As for me - my day is not quite turning out as planned, although this does mean one thing - an early blog post for a change!
The title of my post today is 'Two For One - Time Two' for two reasons: I am entering today's card into two challenges, and I also used two different flower sets to create my pattern. So, here is my card:
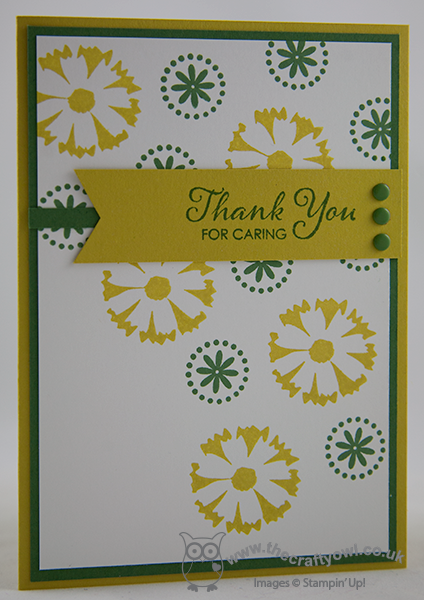
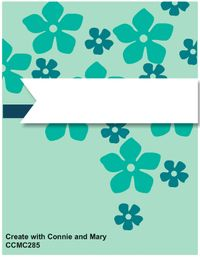
My card layout was inspired by this week's sketch challenge at Create with Connie and Mary CCMC285 - here is the sketch:
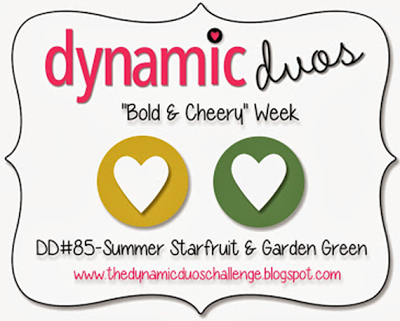
My colour combination was inspired by the current colour combination over at Dynamic Duos DD#85 - Summer Starfruit and Garden Green:
So here's a confession for you: I've had a Garden Green inkpad for 12 months and the first time I broke the seal on it was yesterday to make this card!! Whilst I use Garden Green card occasionally, I don't use Regals collection ink pads very often at all (Cherry Cobbler being the notable exception, of course). I have one other ink pad in this collection still in it's cellophane too; any guesses as to which one?! For a first time use, I quite like this colour combination. And for my other combination - did you spot which flower stamp sets my pattern came from? The yellow flower is from the 'Petal Parade' set that will be available during Sale-A-Bration at the end of the month and the green one is from 'Mixed Bunch'. I toyed with embellishing my flower centres, but decided against it, instead using three candy dots to 'anchor' my banner in place.
I'm off to replenish the tissue box and hopefully make a start on swaps for team training this weekend.
Back tomorrow with another card; until then, happy stampin'!
Stampin' Up! Supplies Used:
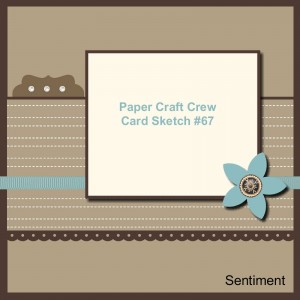
by Joanne James18. November 2013 20:08Today I'm sharing my entry for this week's Paper Craft Crew sketch challenge. Here is this week's challenge sketch:
I decided to use the nativity stamp from the Stapin' Up! 'Best of Christmas' stamp set. I haven't used this stamp before and think it's rather cute, however a few of my customers have avoided using this stamp as they see it as a children's stamp so I wanted to create a card using this stamp that had a more grown-up feel to it. This is what I came up with:
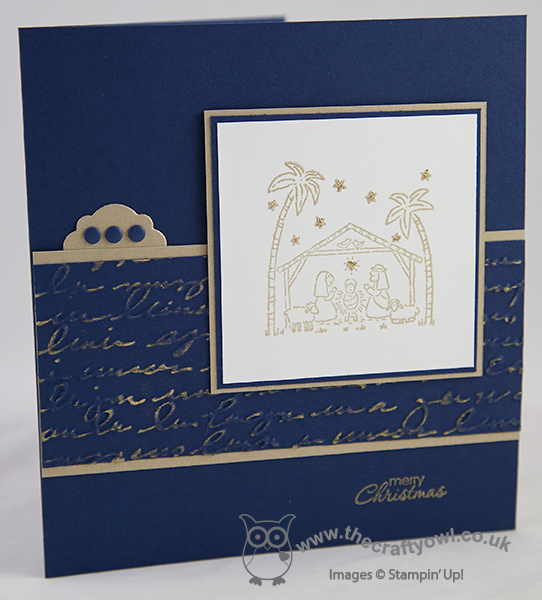
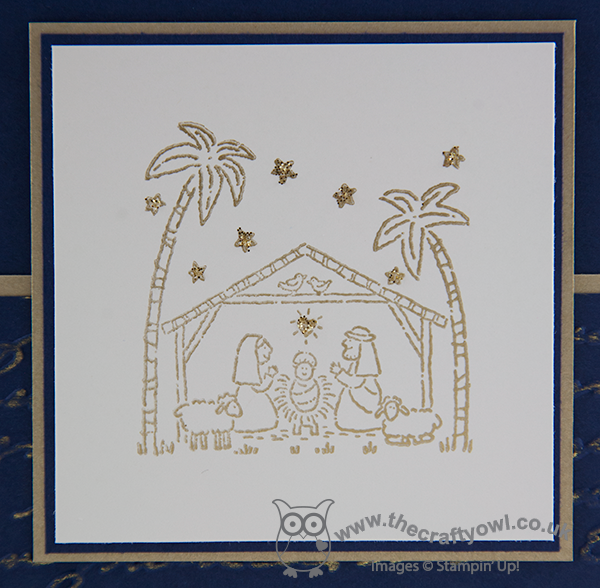
I used a Night of Navy card base, then stamped the image in gold metallic ink on Whisper White and matted it on squares of both navy and brushed gold. I highlighted the stars and heart with some gold glitter just to add a little extra sparkle, but otherwise left the image as stamped. Here's a close up of the stamped image so you can see the shimmer:
The layer beneath the image that runs across the card was made from a strip of navy cardstock embossed with the Print Poetry Embossing Folder with I then swiped the gold metallic ink pad across the surface to add some shine and pick up the detail of the embossed script. This was border was also matted with brushed gold cardstock and finally the sentiment was stamped in gold to finish. I used the narrow label from the Circle Card Thinlits set for the label piece and finished with three Night of Navy candy dots to tone in with the rest of my card.
Whilst this stamp will always look a child's drawing, I think this card shows that with the right colour combination and layout the boundaries can be stretched a little. Why don't you pop over to the Paper Craft Crew's challenge page and have a look at the design team inspiration there and see what the other challenge entrants have come up with.
Back tomorrow with a project and another video tutorial using the Envelope Punch Board; until then, happy stampin'!
Stampin' Up! Supplies Used:
f75c9073-ff84-4971-a39f-f6eaac50cae8|0|.0|96d5b379-7e1d-4dac-a6ba-1e50db561b04
Tags: Best of Christmas, Big Shot, Christmas, Circle Thinlit Card, Candy Dots, Petite Pairs, Pretty Print TIEF, Shop online, Stampin' Up, Stampin' Up Card, Stampin' Up Card ideas, Stampin' Up Supplies
Cards | Stamping
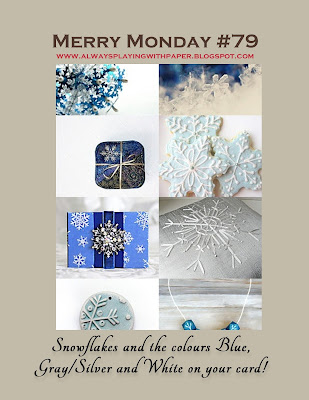
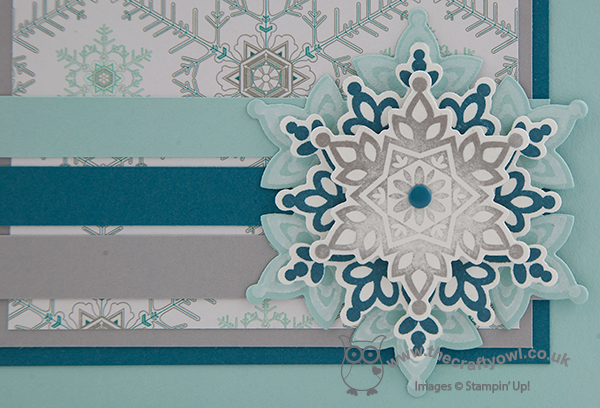
by Joanne James18. October 2013 21:06I know, you're probably thinking 'Merry Monday? It's only Friday!' I'm not wishing away my weekend, far from it. Rather today's card is another Christmas card made with the challenge over at Always Playing with Paper in mind. The challenge was to use blues, grey/silver and white and snowflakes:
I've been wanting to use a sketch layout I saw over at the Paper Pal Arts site a little while ago; here's the card I made:
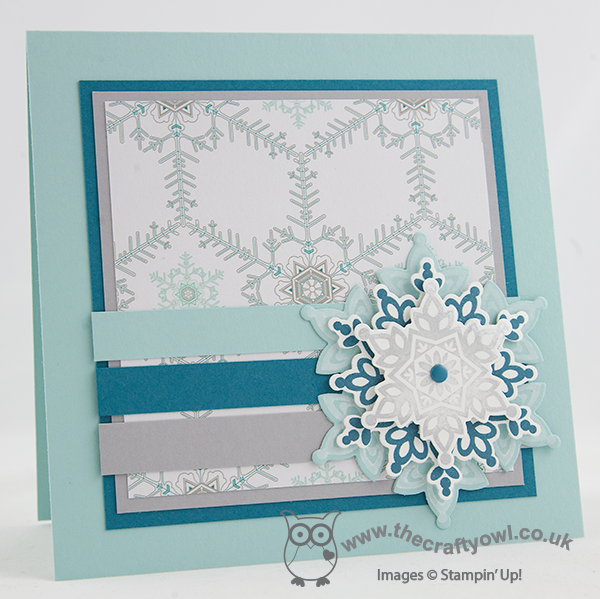
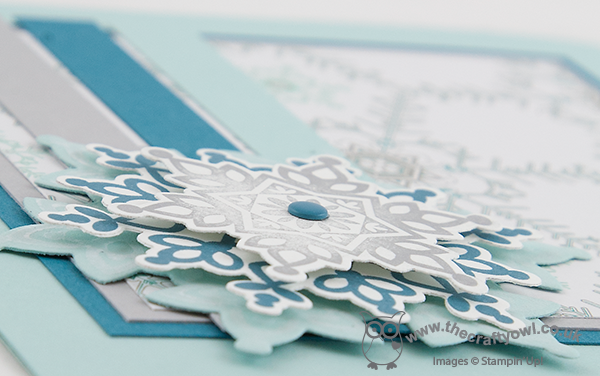
I used Pool Party for the base of my card and layered with Island Indigo and Smoky Slate and some of the Winter Frost DSP for the top layer. My design is anchored with a lovely Festive Flurry layered snowflake , which is stamped Whisper White on Pool Party cardstock for the first layer, Island Indigo on Whisper White for the second layer and then Metallic Silver on Whisper White for the top layer, finished with a single Island Indigo candy dot - I love these! Here's a close up of the snowflake, with the shimmery metallic silver finish (that is very difficult to photograph!):
This photo shows the build of layers of the snowflake - this set is so good for this and the framelits make cutting out so easy:
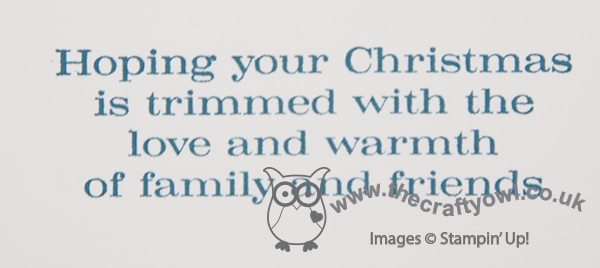
I finished the inside by stamping this verse from the Christmas Messages set:
As of today the James Juniors are on half term for two weeks. We have lots of homework to do, but I am relieved to be having a break from some of the challenges and routine of school life and looking forward to having fun with some pre-Christmas activities of our own. I'm also looking forward to another of my special project classes this weekend; I have a group of lovely ladies coming to make Christmas banners using the Build a Banner kit. Check out my Facebook page tomorrow if you would like a 'sneak peak'; otherwise I will be sharing the completed banners next week.
Back tomorrow with another project; until then, happy stampin'!
Stampin' Up Supplies Used:


ddeb249c-3846-4e93-a87f-ed70704c824d|0|.0|96d5b379-7e1d-4dac-a6ba-1e50db561b04
Tags: Christmas, Christmas Messages, Festive Flurry, Festive Flurry Framelits, Shop online, Stampin' Up, Stampin' Up Card, Stampin' Up Card ideas, Stampin' Up Supplies, Big Shot, Candy Dots
Cards | Stamping
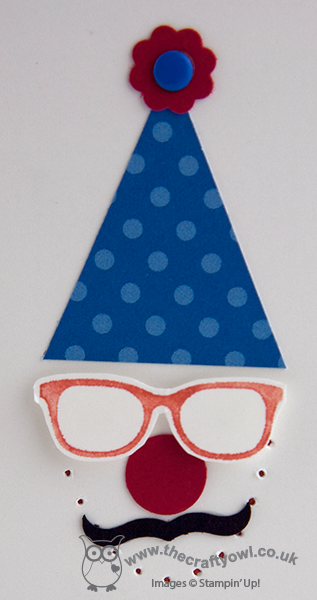
by Joanne James20. September 2013 20:48If you're local to Northampton, you will probably have heard about the Northampton Clown - he has been big news here in the last week or so, even reaching the dizzy heights of the national press. He's been trending on Twitter, has his own hashtag and social media page - and he is the inspiration for this birthday card that I made for my Dad, who celebrates his birthday today:
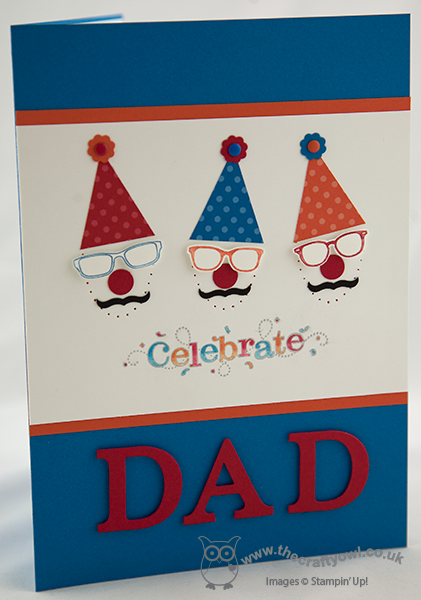
I've had the idea of an abstract face with a moustache ever since I bought my Petite Curly Label Punch and decided to create a clown face, complete with red nose, specs and candy-dot topped party hat. This little trio bear absolutely no resemblance to the Northampton Clown, but were fun to create nonetheless!
Here's a close-up of one of them, showing the piercing I used to give the face shape:
Back tomorrow with the card I made for Grampa from James Juniors; until then many happy returns of the day Dad and to everyone else, happy stampin'!
Stampin' Up! Supplies Used:


2a67c08d-e329-4453-bdd0-e5f321183c7e|1|5.0|96d5b379-7e1d-4dac-a6ba-1e50db561b04
Tags: Candy Dots, Itty Bitty Punches, masculine cards, Paper Piercing, Petite Curly Label Punch, Spectacular, Stampin' Up, Stampin' Up Card, Stampin' Up Card ideas, Stampin' Up Supplies, Shop online, Typeset Alphabet
Cards | Punch Art
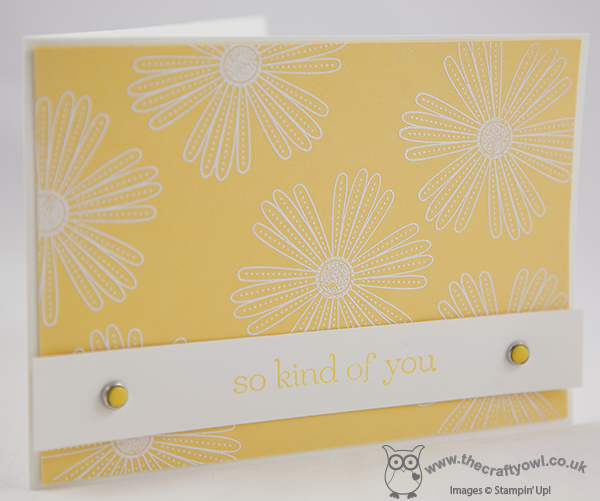
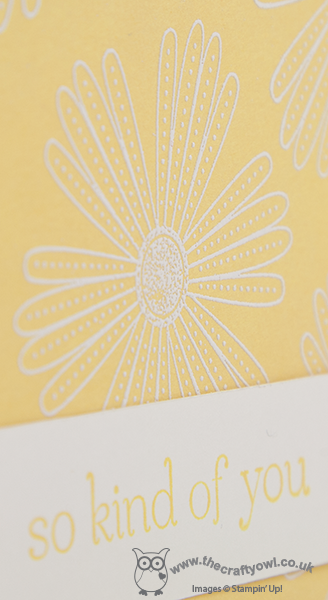
by Joanne James11. July 2013 22:06Another mad busy day today, working on several commissions, a few household chores and preparing for the last day of the school term tomorrow. As promised, here's the other card Barbara and I made when we were busy embossing the other day - a sunny yellow base with a heat embossed white daisy pattern:
Here's a close up of the embossed detail where you can see the raised pattern:
I love the simplicity of this kind of card and Barbara and I originally left ours with the embossed panel taking centre stage, but I later decided to add a sentiment from the Sweet Essentials stamp set and two of the lovely new build-a-brads with Daffodil Delight candy dots (did you guess the new product correctly?!)
Just a reminder too that 'Sweet Essentials' is one of the greeting stamp sets available at 25% off this month - it can be yours for £10.46 (clear mount).
Back tomorrow with another project - another of my new annual catalogue favourites. Until then, happy stampin'!
Stampin' Up Supplies:
Stamps: Sweet Essentials
Cardstock: Whisper White, Daffodil Delight
Ink/Stampin' Write Markers: Daffodil Delight, Versamark
Tools: Heat Gun
Finishing Touches: White Embossing Powder, Brights Candy Dots, Candy Dots Brad Bases