Colouring Inside The Lines And Recycling Christmas Gifts Already!

by Joanne James8. January 2017 09:00

It's Sunday and time for the first challenge of 2017 over at The Paper Players! Did you spot our new look? Our fearless leader, the lovely Nance, has given us a refresh and makeover over the Christmas break and we are returning bright-eyed and bushy-tailed and raring to go! Our new guest designers are joining us too; a warm PP welcome to Crystal, Valentyna and Deanne - we are so happy to have you join us for the first part of 2017! 

To kick off the new year, it's the turn of my good friend LeAnne to host this week and she has a timely theme challenge for us to work with:


If your house is anything like mine, the festive season has generated much packaging waste and many opportunities for recycling. So this week's challenge is perfect! I took the opportunity to recycle a Christmas gift on my card today and used the sketch over at Fab Friday for my layout. Recycling Christmas gifts already?! It's not quite as bad as it sounds - take a look:


Here's the low-down on today's card:

Join The Colouring Craze - One of my Christmas gifts was a page-a-day colouring calendar. Well, to be truthful I bought one for Rebecca and loved it so much I treated myself to one! The calendar comes in a pretty box that can be used to display our coloured pieces once completed. I decided that by recycling my pages, I could easily use them to create a birthday card. Here's my day one finished page before I trimmed it to fit my card:

Effortless Blending - I coloured my page using Stampin' Up!'s new watercolour pencils and used a blender pen to seamlessly blend the colours and give a smooth finish as the paper was too thin to blend using an aquapainter. I also adhered my coloured piece to a piece of extra thick Whisper White for extra rigidity. I love that these pencils can be used in a number of different ways and am looking forward to trying other techniques with them too.

A Fiesta of Colour - I chose to inject some bright summer colour into my card today, using a card base of Daffodil Delight and a selection of papers from the Festive Birthday Designer Series Paper set for my layers behind the coloured-in panel. I love these clashing brights - here are my main colours in case you would like to save them for future project inspiration too:

Here is the visual summary of the key products used on today's project for you to pin for easy reference:


You can see all of my Product and 'How To' summaries on my 'How To - Tips and Techniques' Pinterest board in case you've missed any. 

I hope you like today's card; you could create the same effect using the new 'Inside The Lines' Designer Series Paper Sale-A-Bration gift (free with a purchase of £45 or more) - I will have a fun project for you using this paper later this week, so be sure to pop by and check it out.

Before you reach for your ink and papers, check out what our amazing team has created to inspire you this week:

The Paper Players Design Team
 
 
Here's a quick recap of our challenge rules:
 
1.  Create a new paper project
2.  Upload your creation to your blog with a link back to us and provide a direct link to the post featuring your challenge submission.
3.  Please link your card to no more than four challenges, TOTAL.
4.  Have FUN! 


I look forward to seeing what you create with our fun theme this week. Enjoy the rest of your weekend as it will be over all too quickly; I'll be back tomorrow with another project; until then, happy stampin'!


Stampin' Up! Supplies Used: 

Table built using Product Table Builder by The Crafty Owl - Independent Stampin' Up! Demonstrator.

Carried Up And Away Birthday Card

by Joanne James5. January 2017 20:35

Hello lovely readers! I hope you've all enjoyed browsing the new Spring-Summer Stampin' Up! catalogue and this year's Sale-A-Bration offering and are busy making wishlists and buying those must-have items. Today I'm sharing a card I made with my pre-order goodies back in December for my team Christmas outing. Instead of our usual team meeting, we decided in December to have our very own festive Crafternoon Tea. In addition to enjoying a lovely afternoon tea, we spent the afternoon doing a shoebox swap with each of us creating the cards cards that the others had designed, some using new pre-order items from the spring-Summer and SAB catalogues, thus providing us with lots of new samples. I am loving the new hot air balloons so I just had to feature them on my card:


Here's the low-down on today's card:

Up & Away Balloon - The star of today's card is most definitely the layered diecut hot air balloon - isn't it gorgeous? It's made using the new Up & Away Thinlits Dies. This is a great set with three different balloon sizes, clouds and lots of basket and layering options along with this lovely detailed large balloon. 

Your Smiles Lift Me Up - What's better than a great die set? Well, a great die set with a co-ordinating stamp set! the 'Lift me Up' stamp set has some great stamped balloon images, clouds and accessories as well as five varied sentiments for everything from birthdays to congratulations and sending smiles. 

Carried Away For Free - The paper on today's card is from the Carried Away Designer Series Paper pack that can be yours for FREE with a £45 purchase. It co-ordinates perfectly with the Lift Me Up bundle - a selection of pretty balloons, skyscapes and maps in bold, bright colours. Love it!

Here is the visual summary of the key products used on today's project for you to pin for easy reference:


You can see all of my Product and 'How To' summaries on my 'How To - Tips and Techniques' Pinterest board in case you've missed any. 

Here's a picture of some of my lovely team members at our festive gathering - what a great bunch:


I love these ladies, none of whom would I have met but for our shared love of crafting and some of whom joined during previous Sale-A-Brations. Sale-A-Bration is a great time to join Stampin' Up! with one of the best recruitment offers; if you would like to know more about the benefits of joining my team, please do get in touch for a no-obligation chat - we would love you to join us!

That's all from me; back tomorrow with another project; until then, happy stampin'!


Stampin' Up! Supplies Used: 

Table built using Product Table Builder by The Crafty Owl - Independent Stampin' Up! Demonstrator.

Sale-A-Bration and The New Stampin' Up! 2017 Spring-Summer Catalogue is Here

by Joanne James4. January 2017 06:00

It's time to shake off the January blues, today is THE day - yes, the highlight of the Stampin' Up! calendar, Sale-A-Bration is here! No more sneak peeks - the catalogue is available, the shop is live and from now until 31st March the benefits are yours for the taking. You can click on the icon above or the catalogue on the right hand side of my blog page to access the Sale-A-Bration leaflet to download a copy or go directly to my online shop to place an order - we are LIVE!

So what is Sale-A-Bration? For anyone who hasn't come across it before, it's Stampin' Up!'s annual promotion that is loaded with offers whether you shop, join or host:


Earn a free Sale-A-Bration product for every £45 you spend between 4 January and 31 March. It's the perfect time to purchase those products you've had on your wish list and earn more products for free! 

It’s the best time of year to join Stampin’ Up! During Sale-A-Bration, you can become a demonstrator for just £99 and choose £30 more of FREE products for your Starter Kit. Plus, the kit ships for free! There is plenty of choice and flexibility, whether you want to be a hobby demonstrator and just use your discount to enable you to purchase craft supplies more cheaply, or alternatively would like to build a flourishing direct sales business and sell supplies to others - it's entirely up to you. In addition, you can choose two free stamp sets of your choice - that could be worth as much as another £93 to you!

Earn an additional £20 in hostess credits when you host a party and have party sales of £200 or more (this also applies to individual orders). So for party sales of £200, that makes a whopping £40 of Stampin' Rewards - more freebies! What's more, you can even apply your Stampin' Rewards to a Starter Kit and become a demonstrator yourself - I would love to welcome you to my team!

If you would like to host a party, real or virtual, please do get in touch; my diary is filling up but there are still lots of slots available and I would love to share these great benefits with you. If you've ever thought about becoming an SU! demonstrator, now is a great time to do so - I would love to have a no-obligation chat with you about joining my team and the benefits.

As if that wasn't enough, today also sees the launch of the new Spring-Summer catalogue - full of gorgeous new products:

Just click on the image above or in the sidebar on the right to browse the catalogue online, or contact me on 07773 421446 if you would like a paper copy posted out to you and you don't already have a demonstrator. If you are as excited as me and just can't wait, here's the link to my online store - everything is available to purchase from today!

Thanks so much for popping by today - it's always nice to share good news! Back tomorrow with a project showcasing some of the products from the new catalogue. Until then, happy shopping!

Botanicals For You Flower Wreath Card

by Joanne James27. March 2016 20:29

I had a little time this afternoon so I had a go at the challenge over at Global Design Project, where this week they are case-ing the designer Jessica Williams:


I don't get the opportunity to play along at GDP as much as I'd like but they do have some great challenges and I particularly like the CASE The Designer ones. Inspiration can strike in many ways and I think this type of challenge is a great way to create something that is clearly inspired by one person's work yet is wholly your own. It also makes for an interesting blog post (hopefully!) that explains where the inspiration for your own take on the original work came from. So, without further ado, here is my card:

So how did Jessica's card inspire me? Read on to find out:

Layout - Whilst I love the layout of Jessica's card, I decided this was one of the things that I was going to change. I used this week's sketch over at Mojo Monday for my card.

Colours - Jessica's colour combination is not one I would ordinarily have chosen, so I decided to work with it to see where it took me. I kept Sahara Sand for my base, although I did major on Watercolour Wonder as opposed to Calypso Coral though, largely on account of my choice of ribbon. Whilst this ribbon is rather wide for a card bow, I liked the rather fancy bow that Jessica used on her card and decided to use my ribbon to make a similar statement. Likewise, whilst I incorporated the black and white colours of Jessica's washi tape borders, I chose to use some Everyday Chic Designer Series Paper for the twin panels on my card. 

Wreath and Sentiment - I recreated the wreath on my card, but instead of using the 'Timeless Love' stamp set, I created my own using the flowers and leaves from the Sale-A-Bration set 'Botanicals For You'. I was also inspired by the sentiment of Jessica's card - I chose one from the 'Suite Sayings' stamp set that has a similar tone. 

Here is the visual summary of the supplies used to make today's card for you to save for easy future reference:


I hope you like my card and found the explanation of my creative process insightful. I'd love to know what you think of my CASE of Jessica's card; do leave me a comment below - I read and appreciate them all!

I'll be back tomorrow with another couple of projects; until then, happy stampin'!


Stampin' Up! Supplies Used:

Table built using Product Table Builder by The Crafty Owl - Independent Stampin' Up! Demonstrator.


Honeycomb Happiness Pop-Up Chick Card

by Joanne James27. March 2016 10:00

It's Sunday and time for a new challenge over at The Paper Players! It's the turn of the talented LeAnne to host our challenge this week and she has my favourite type of challenge, a sketch, for you to play along with:

    PPA-293-Mar24

As it's Easter Sunday today, for my card this week I decided to make one last Easter card to share with you, using this week's colours over at Pals Paper Arts. I'm also linking up with the Friday Mashup again as I've used the theme part of their challenge (Easter and chicks or bunnies - read on and all will become clear!) Here is the front of my card:


Simple enough: some polka dot panels, alongside an oversize flower made with 1 1/2 and 1 3/4 circle punches and the Flower Fair Framelits as a backdrop to my pair of Easter eggs. The eggs themselves are using a tip picked up from Cindy Schuster on the Stampin' Up! corporate blog (you can see her card here) where she used the balloon punch to create Easter Eggs (I stamped mine first using the outline in the 'Balloon Celebration' set and used the grunge stamp in 'Awesomely Artistic' for my mottled effect).

The best bit for me about today's card is the inside, take a look:

Having wrestled with myself every time I went to stick one of the Honeycomb embellishments to the front of my card, knowing that it would mean either a box needed to send it or risk the embellishment being crushed (I'm still suffering post-traumatic stress from having watched Shannon West uncerimoniously squash one on the front of a card whilst on stage at Onstage Live in Brussels last November!!) , I decided that there was a perfect way around it - use it on the inside! I stamped my chick from the 'Honeycomb Happiness' Sale-A-Bration stamp set on the inside of my card along the central score line, paper-pieced him with another stamped on So Saffron card, then added my honeycomb embellishment (I spritzed one of the white ones in So Saffron). I also stamped my Easter greeting from the 'Suite Sayings' stamp set on the inside of my card on the left-hand panel:


Isn't that just the cutest?! I am so happy with how this turned out! I can now use my Honeycomb Embellishments with a clear conscience!

Here is the visual summary of the key products used on today's project for you to pin for easy reference:

You can see all of my 'How To' summaries on my 'How To - Tips and Techniques' Pinterest board in case you've missed any.  

Before you reach for your ink and papers, check out what our amazing team has created to inspire you this week:

The Paper Players Design Team
 
 
Here's a quick recap of our challenge rules:
 
1.  Create a new paper project
2.  Upload your creation to your blog with a link back to us and provide a direct link to the post featuring your challenge submission.
3.  Please link your card to no more than four challenges, TOTAL.
4.  Have FUN! 


I look forward to seeing what you create with this week's sketch. We have a rare sport-free day today. We are looking forward to our Easter egg hunt (likely to be indoors if the weather forecast is correct!), a leisurely lunch and an afternoon eating too many chocolate eggs whilst watching a good movie!

Back tomorrow with another project (or two!); until then, happy stampin'!


Stampin' Up! Supplies Used:

Table built using Product Table Builder by The Crafty Owl - Independent Stampin' Up! Demonstrator.

Work of Art Easter Egg and Honeycomb Happiness Chick

by Joanne James25. March 2016 18:57

Good Friday blessings one and all! I've spent most of today outdoors making the most of the sunny weather; I met my girlfriends for a run this morning and we went on a James family bike ride this afternoon. No time to craft, but since the forecast is dreadful for the rest of the week I'm sure I'll make up for it! Today's card is for the challenge over at The Friday Mashup. I love this challenge and am sad to read that this one is their last one!

This week you can use the sketch above or create a project with an Easter theme and chicks or bunnies, or mashup and create with both. I went with the latter for this card, although I do have a mashup card planned for a few days time! Here's today's card:

I actually made this card with the ladies at my Coffee and Card session at Bell's in Northampton this week. The key elements of my fun Easter card are as follows:

An oval egg - I used my Big Shot and Ovals Framelits to create my fun Easter egg in my layer of Pink Pirouette cardstock. Now I know that technically an egg is more pointed at one end, but without an egg framelit this oval makes a pretty good alternative! Before cutting out my oval, I stamped my chick onto the card. Why? Read on below to find out!

An Easter work of art - To decorate my egg, I cut a second mat of white the same size as my pink layer and stamped the large brushstroke stamp from the 'Work of Art' stamp set in a variety of pastel colours and placed this behind the aperture. The curve of the stamped image adds to the illusion of the egg shape.

A happy chick - The little chick from the 'Honeycomb Happiness' Sale-A-Bration set has been getting lots of use this week as he is perfect for Easter cards. I stamped mine onto So Saffron cardstock, snipped him out with my paper scissors and coloured his beak with my Pumpkin Pie Stampin' Write marker. I didn't fussy cut those fiddly legs though - remember the chick I stamped on the pink layer earlier? Yes, I simply coloured the ones on this layer with my Pumpkin Pie Stampin' Write marker and then lined up my yellow chick with the stamp outline, adhering him with a couple of Stampin' Dimensionals. Clever, right? You have just 6 more days to get your hands on the 'Honeycomb Happiness' stamp set for free with a £45 order; if it's on your wish list, don't leave it too late!

An Easter sentiment courtesy of the 'Easter Lamb' stamp and a trio of Itty Bitty punched flowers completes my card. 

Here's the visual summary of the key supplies used to make today's card for you to save for easy reference:


That's all from me today; if you would like to know more about my drop-in Coffee and Card Sessions, you can read all about it here. We have a short break for Easter then the next one is scheduled for 13th April - I'd love to see you there. I'll be back tomorrow with another project. until then, happy stampin'!


Stampin' Up! Supplies Used:

Table built using Product Table Builder by The Crafty Owl - Independent Stampin' Up! Demonstrator.


Sale-A-Bration Pedal Pusher Times Two!

by Joanne James21. March 2016 11:23

Here I am with today's post that contains not one but two cards - a variation on a theme! There are only 11 more days left of this year's Sale-A-Bration with Stampin' Up! and I wanted to share with you a couple of cards I made with my most favourite of the second wave of limited-time products that you can receive free with a £45 spend - the Pedal Pusher stamp set. Both cards have been made with a couple of challenges in mind - the first for this week's colour challenge at Color Throwdown:

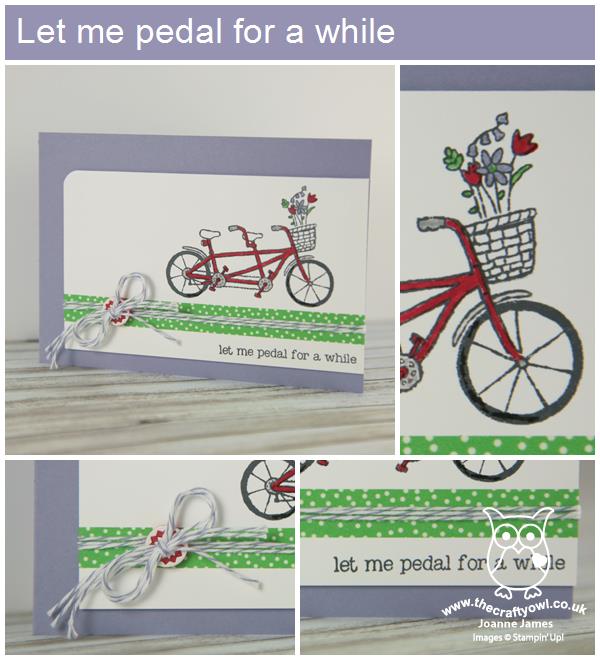
Having had Wisteria Wonder, a colour I don't use often, out on my desk for yesterday's Paper Players card, I couldn't fail to be inspired by the inspiration photo and decided to ink up my Pedal Pusher Sale-A-Bration stamp set for the first time:

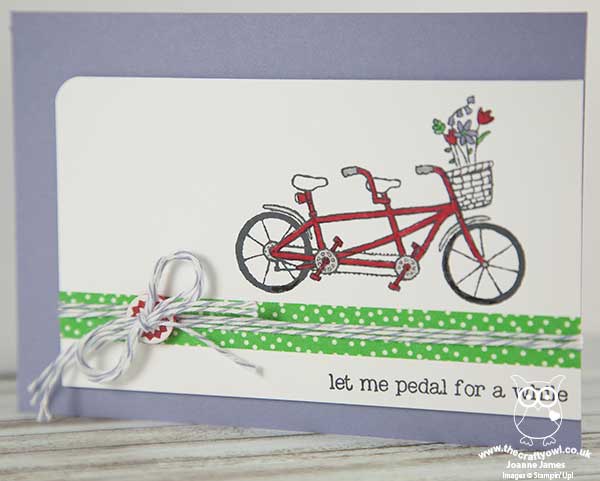
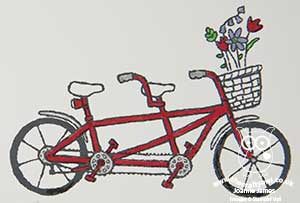
I decided to use the Wisteria Wonder for my card base, but decided my bicycle should be red - somewhat ironic, as my actual bicycle is purple, but it's more of a Rich Razzleberry colour, so not one for this card. Anyway, I digress! I added a strip of Cucumber Crush 'Cherry on Top' designer washi tape horizontally across my card, stamping my bicycle above it, coloured with my Stampin' Write Markers, and my sentiment below it. I added some retired Wisteria Wonder baker's twine and a retired button from my stash to finish this card. 

The Pedal Pusher stamp set is just great for so many reasons - here's my top 3:

It's versatile - there are so many little pieces to customise your bicycle, including three sentiments all of which play on the tandem bicycle theme.

It's photopolymer - makes aligning all the pieces easy-peasy and allows for perfect stamping every time.

It's free - with a £45 spend before 31st March.

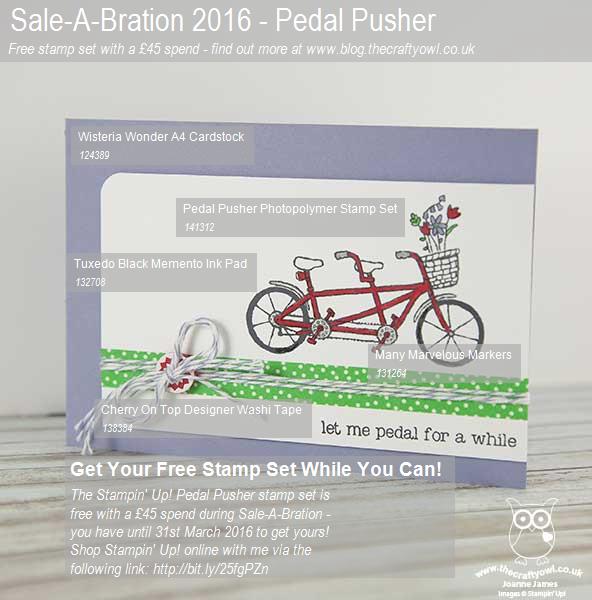
Here's the visual summary of the supplies used to make today's card for easy reference:


To demonstrate its versatility, for my second card I went a little more clean and simple and restricted my colour palette to white, Melon Mambo and Basic Black, adding an alternative sentiment and basket contents:

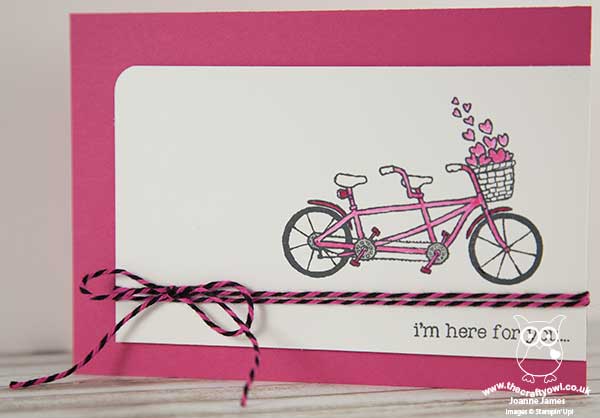
This time I coloured my bike using some Melon Mambo ink and my aquapainter and I also added a little clear Wink of Stella to my floating hearts for a nice shimmer. How cute is that?! The perfect card to let a friend know you are thinking of them. I'm linking this card up with the lovely ladies over at Less Is More this week, where the theme is 'what's outside your window'. Whilst I'm guessing a bicycle might not be the most obvious choice for some, now that Spring has sprung my bicycle will often be found outside my window - before I get on it and join my hubby and the James juniors for a long bike ride. With school holidays starting from tomorrow, I am hoping for lots of fine weather and the chance to indulge in this pleasant past time. 

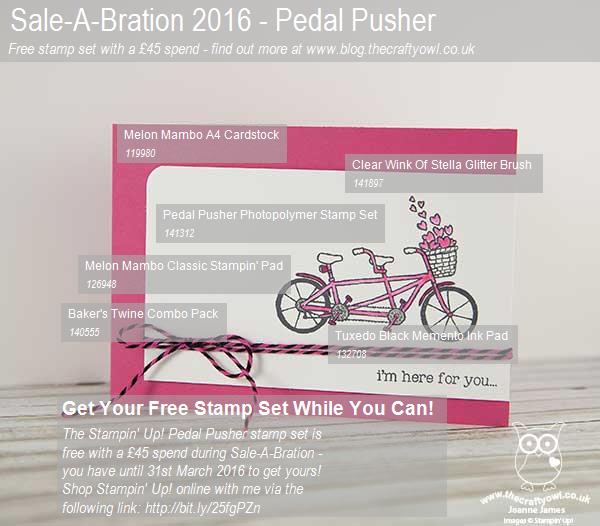
Here's the visual summary of the supplies used to make the above card for easy reference:


That's all from me today; I'm off to squeeze in a quick trip to Ikea (if there is such a thing!) before going to watch Rebecca in her final school netball match of the season. Yesterday both James Juniors played basketball for school and were narrowly beaten into second place in their county qualifier, however Rebecca's club hockey match had a much more successful outcome, with her team earning a place at the U12 regional finals next month. Go Northampton Saints Hockey! The netball team cam third out of five in last week's inter-school netball tournament, so it would be nice for the girls to end the season with a win - here's hoping! 

Back tomorrow with another project. Until then, happy stampin'!


Stampin' Up! Supplies Used:

Card 1:

Table built using Product Table Builder by The Crafty Owl - Independent Stampin' Up! Demonstrator.

Card 2: 

Table built using Product Table Builder by The Crafty Owl - Independent Stampin' Up! Demonstrator.


Botanical Gardens Suite - On Your Special Day

by Joanne James14. March 2016 21:21

Good evening lovely readers! I have had a busy day with the second of this month's technique classes this morning and a Spring concert for one of the James Juniors this afternoon. Today I'm sharing a card I made for this week's challenge over at TGIF Challenges that was also one of the cards I made with the ladies in my card class this morning. I haven't played along with the TGIF team for a while and I couldn't resist this week's sketch:

My card features all of the products in the Botanical Gardens bundle offer (buy all 3 and save 15%) - Botanical Gardens Designer Series Paper, Botanical Blooms stamp set and Botanical Builder Framelits Dies - and features a fun technique. Here is my card:

Today's card is a celebration of the Botanical Gardens product suite, but there are three things that really make it special:

Customised Designer Series Paper - The paper I used for the background on my card is one of a number of patterns in the Botanical Gardens Designer Series paper pack that can be customised using the Botanical Blooms stamp set. Many of the leaves and flowers can be stamped with veins and stamens in the colours of your choice to create a variety of different looks. I had great fun adding detail to my background and this best thing is, this can be different every time. 

Fuss-free Flowers - I just love the Botanical Builder Framelits Dies for limitless floral creative possibilities, yet the two things that really make these fuss-free can't even be seen on this card: the Big Shot Die Brush and the Big Shot Precision Base Plate. Both perfect for working with intricate dies, they really do enable these flowers to pop out easily, no wax paper required. You may think you don't need these items, however whilst you could use a standard or magnetic platform, you will definitely get better results using these tools. My customers keep telling me this too, so impressed are they with the results.

A Free Sentiment - The sentiment on my card is from the Sale-A-Bration set 'Botanicals For You'. This stamp set co-ordinates with the other Botanicals products and is available free with a £45 spend before the end of the month. The Botanical Gardens bundle costs £46.75, so if you buy the bundle, you can get this set for free too - bargain!

Here is today's visual summary of the key products used and top tip for easy reference:


I hope you like today's card; I have two more to share this week using this product suite that were also makes in my technique class today, so stay tuned for those. Back tomorrow with another project; until then, happy stampin'!


Stampin' Up! Supplies Used: 

Table built using Product Table Builder by The Crafty Owl - Independent Stampin' Up! Demonstrator.

Wildflower Fields Meets Suite Sayings

by Joanne James26. February 2016 23:08

Yay it's Friday! My day feels like it's been a long one and I am looking forward to the weekend for sure! Today I have a card for this week's challenge over at Retrosketches which also fits the bill for the new challenge over at As You See It:

   AYSIChallenge125

I decided to make another Easter card, this time using some of my Sale-A-Bration Wildflower Fields designer series paper and the lovely Easter sentiment in the 'Suite Sayings' stamp set:

I used extra-thick Whisper White for my card base and added alternating strips of the bold flower patterned papers for my background. I tweaked the sketch slightly in as much as I used the central panel to showcase my sentiment, which broke up the detail of the busy paper, and chose Blackberry Bliss and Hello Honey for my ink, mats and ribbon colours. I embellished with a few flowers punched with my Petite Petals and Blossom Bunch punches and a retired Hello Honey button. This is the first stamp I've used in my 'Suite Sayings' stamp set; this is such a versatile set with a great variety of sentiments - I think this Easter one is my favourite though.  

Here's today's visual reference showing the key supplies used to make today's card:


That's all from me today; back tomorrow with another project. Until then, happy stampin'!


Stampin' Up! Supplies Used:

Table built using Product Table Builder by The Crafty Owl - Independent Stampin' Up! Demonstrator.


Honeycomb Happiness Hello Chick

by Joanne James22. February 2016 07:30

Happy Monday everyone! I have a card made with a few challenges in mind today:


I was keen to try out an idea I had for this week's challenge over at CASology where the cue card is 'egg' and decided to use the open sketch over at Freshly Made Sketches for my layout. I've seen lots of cards on Pinterest featuring no-line watercolouring this week, so wanted to have a go using the little chick in the 'Honeycomb Happiness' stamp set, one of a number of Sale-A-Bration stamp sets that is free with a £45 spend before 31st March. I will also be linking up to SUO Challenges where the team are featuring Sale-A-Bration products in their challenge this week. Here's my card:

How cute is this little fella? I think he is adorable! I stamped my chick onto watercolour paper in Sahara Sand, then watercoloured him using my aquapainter and So Saffron, Daffodil Delight and Crushed Curry inks. The key to no-line watercolouring is to make sure that when you stamp your initial image you use a light-coloured ink that 'disappears' as you colour in. Having painted his whole self, I then proceeded to cover him up! I fussy cut an eggshell, also from watercolour paper, then coloured it with my Soft Sky ink and adhered it over my chick so that it looked like he was just breaking out of his shell. Some shadow and a sentiment finished this panel. I then added a thin strip of Everyday Chic designer series paper along the edge, having coloured in the pattern with my Daffodil Delight and Crushed Curry Stampin' Write markers, before adhering to my Daffodil Delight card base with dimensionals. I really enjoyed my first attempt at this style of watercolouring and I can see me using this chick in lot of other ways too. He will undoubtedly be useful as Easter approaches, but he would also make a cute addition to a baby card. The one thing I'm not sure about in hindsight is the strip of dsp - I think it's a little bold for the rest of my card. 

Here is today's visual summary for easy reference:


That's all from me today; I'll be back tomorrow with a super cute project for this week's challenge over at Pals Paper Arts. Until then, happy stampin'!


Stampin' Up! Supplies Used:

Table built using Product Table Builder by The Crafty Owl - Independent Stampin' Up! Demonstrator.

Mini Catalogue

BROWSE THE CATALOGUE

New Year, new products - the new Stampin' Up! Mini Catalogue is here! For more details and to download your copy click here

Shop Online

Access my online shop 24 x 7, 365 days of the year:

Shop Online

Join My Team

It's always a great time to join Stampin’ Up! New team members can get £130 worth of products for only £99 + free business supplies + free shipping + all the fun being a part of Stampin’ Up! Stampin' Up! has something for everyone: join my growing team and benefit from my support to enjoy Stampin' Up! however you choose.

If you're interested, call me for a chat to understand how I can help you realise your goals. Alternatively, if you have already decided to sign up and you just can't wait, please click here for the link to the online form where you can sign up and order your starter kit right away! 

Scrapbooking

Stampin' Up! has introduced a new range of 12x12" scrapbooking product and kit - the full range is now available to purchase online. To download a copy of the new digital Scrapbooking Catalogue click here.

Latest Kits!

Stampin Cut and Emboss

The Birthday Bash Kit is just one of the latest kits in the online store - get yours here!

2024-25 Annual Catalogue

BROWSE THE CATALOGUE

Click on the image to download your copy of the 2024-25 annual catalogue. For a full list of current SU! supplies, go to my online store. If you would like any help or advice, please drop me a line at joanne@thecraftyowl.co.uk or give me a call on 07773 421446 - I'd be happy to help.

New Online Exclusives

There are new products available exclusively in the online store from 1 April - check them out here.

About Me

Hi I'm Joanne and live in Northampton and when I'm not looking after my husband and two beautiful children, am an avid crafter with a passion for all things Stampin' Up!

I must confess that I have never been a big rubber stamper - until I discovered Stampin' Up! that is. I love the fact that I can get such great results with co-ordinating stamps, inks, papers and punches - the possibilities are endless! Join me on my stamping journey as I share the things I love and be inspired to create amazing things yourself!

Follow Me

Monthly Newsletter

Box Builder

Click the button above to use Box Buster to create your custom box design using the Envelope Punch Board!

Kits Collection Now Available!

Stampin Cut and Emboss

The new Kits Collection from Stampin' Up! is now available!

Click here to see the current kits available and order yours online today.

I Design For


Stampin' Up Stuff

This is my personal blog and is not endorsed by Stampin’ Up! I hope you find it a plentiful source of ideas and personal inspiration but please don't copy my designs for contest submission or use for classes, publication or sale without express permission.