Video Tutorial: How To Make Baker's Twine Looped Flowers

by Joanne James25. May 2016 20:03

Wednesday - how did we get to the middle of the week already?! I've had a busy couple of days, with today including my fortnightly coffee and card drop-in session at Bells in Kingsthorpe, Northampton followed by a get-together over lunch with one of my team members. I am busy preparing my new catalogue samples and getting my catalogues ready to go out to both my online and face to face customers. If you've purchased Stampin' Up! products from me in the last six months, a complimentary catalogue will be winging its way out to you within the next week. If you haven't purchased from me recently but would like a copy of the new catalogue, please do get in touch with me either via email [email protected] or by phone and I will arrange to send a catalogue out to you too!

Today I have a video tutorial to share with you! Do you remember this card that I made a while ago?


I used this fun flower embellishment made with the It's My Party Baker's twine to decorate my Botanical Builder Framelits Die colour-blocked card. You can read more about it on the original blog post here if you missed it or would like to refresh your memory.

I promised you a video tutorial on how to make those cute baker's twine looped flower embellishments and finally here it is: 

They really are such fun to make and can be used to dress up cards and packaging and can be made from all kinds of baker's twine and linen thread. 

I hope you enjoyed today's video and it inspires you to have a go and try something new. I'll be back tomorrow with a fun birthday card for this week's new challenge over at Create With Connie and Mary. Until then, happy stampin'!

Botanical Builders Happy Birthday

by Joanne James2. May 2016 21:27

I hope you've all had a lovely day and for those of you like me in the UK that you've enjoyed the Bank Holiday. I managed to squeeze in a little gardening before the rain set in this afternoon, at which point I came inside to craft. I made this card for a couple of challenges:


I loved the colour palette and inspiration over at Color Throwdown this week so couldn't resist squeezing in an entry, and I used the new sketch over at Mojo Monday for my layout. Here's my card:

My card was inspired by the Color Throwdown inspiration photo and those amazing cakes and florals - here's the low-down on how I made it:

Stylish Stripes - I used Night of Navy for my card base and adhered a full panel of Night of Navy that I embossed with the Stylish Stripes Textured Impressions Embossing folder to the card front, to echo the diagonal swirls of the cake icing on the photo. This is one of my most used embossing folders and I shall be sad to see it retire at the end of this month; if you haven't got one, snap it up now before it's too late.

Happy Birthday Everyone - The sentiment on my card is from the exclusive hostess set 'Happy Birthday Everyone'. I just love this font and the accompanying finishing sentiments that go with it. I finished the inside of my card with 'to a good friend' as this is where my card is headed as one of mine has a birthday this week.

Botanical Builder Flowers - I never tire of my Botanical Builder framelits and these white and yellow flowers really pop against the navy base of my card. I also added a thin border of Daffodil Delight, cut using my retired large scallop edgelit die. 

Here is the visual summary of the key products used on today's project for you to pin for easy reference:


You can see all of my 'How To' summaries on my 'How To - Tips and Techniques' Pinterest board in case you've missed any. 

A little extra for you today too: I bought my friend a little something to go with her card and wrapped that in a box made using some Regals designer series paper and made with my Box Buster tool and trusty Envelope Punch Board. Here's a picture:

Isn't that pretty? So nice when you can co-ordinate your card and gift and Stampin' Up! certainly does make that easy for us!

That's all from me today; back tomorrow with another project. until then, happy stampin'! 


Stampin' Up! Supplies Used:

Table built using Product Table Builder by The Crafty Owl - Independent Stampin' Up! Demonstrator.

Crafternoon Tea at Bell of Northampton - Spaces Available!

by Joanne James11. April 2016 19:00

I have had a busy start to my week: the James Juniors are back at school after an enjoyable Easter break so today has been spent catching up on correspondence, spending more time making my swaps for Onstage later this week and planning for my week ahead, which includes the fist of this month's Technique Classes tomorrow - more on that later this week.

Today I want to share a home decor project that I will be making at my 'Crafternoon Tea' event that I am holding at Bell of Northampton in Kingsthorpe on Saturday 7th May, featuring the Botanical Builder Framelits Dies and the 'Hello Life' stamp set:

All instruction and materials will be provided for the session and each person will leave with a decorated 9” x 9” frame to keep. Check out this close-up of the gorgeous flowers: 

Once you’ve completed your project, you can tuck into a scrumptious afternoon tea for two with scones and cakes alongside a large selection of sandwiches stuffed to bursting with egg mayonnaise, chicken and horseradish, cheddar cheese with chilli jam and many more scrumptious fillings freshly prepared by Tea and Cake @ Bell.

The session will run from 10am-2pm on Saturday 7th May and cost £56 for two people. Buy it for yourself or as a gift! Why not treat yourself and your mum, friend or daughter to a voucher for an indulgent afternoon tea and crafting session! There are still spaces left for this event - I would love you to join me! If this is something that appeals to you, click here to make your booking online.

I'll be back tomorrow with a 'sneak peek' of the card that I will be making in my drop-in Coffee and Card Session at Bell's on Wednesday this week between 10-12 noon. Until then, happy stampin!

Tags: , , , ,

3D Projects | Classes

Botanical Builder Flowers And A Happy Hello From The Paper Players

by Joanne James10. April 2016 09:00

It's Sunday and time for a new challenge over at The Paper Players! It's my turn to host our challenge this week and I have an interesting colour combination for you to play along with:


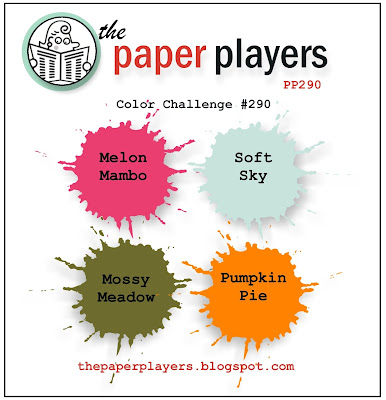
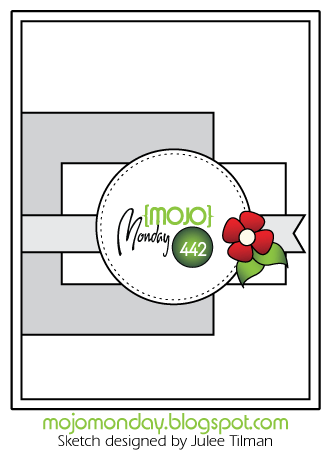
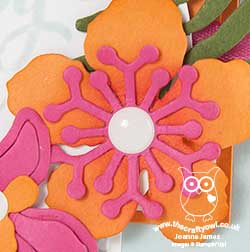
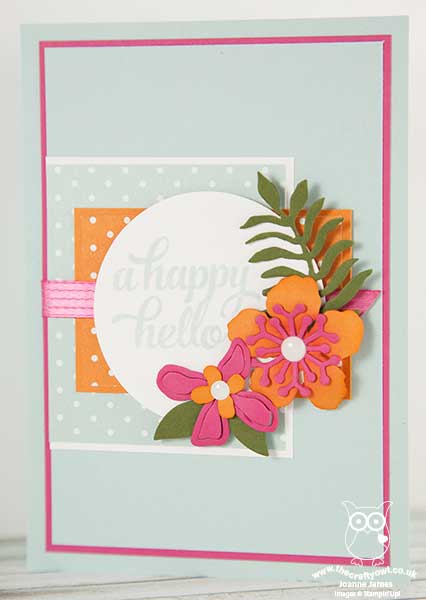
I knew when I chose my colour palette some months ago that I would do something with flowers; for my card this week I was inspired to use the Botanical Builder Framelits Dies - I just love those flowers and I knew they would be great to create the tropical flowers I had in mind with my colour scheme. I also used this week's sketch over at Mojo Monday for the layout for my card:


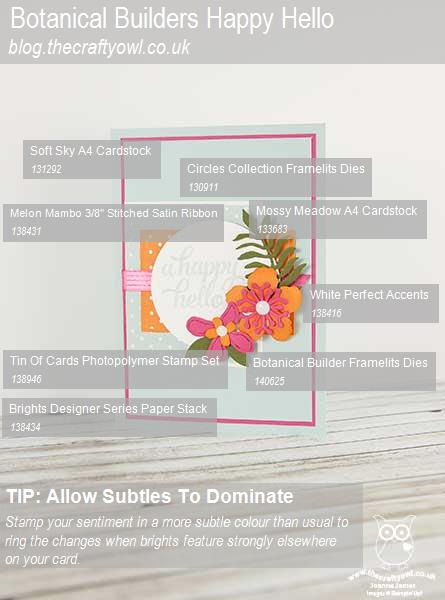
Here's the low-down on today's card:

Lots of Layers - I love layers and this card has lots of them! I kept them either plain or with a unified pattern of polka dots so that they wouldn't overwhelm the sentiment and flowers that are the focal point of my card.

Subtles versus Brights - Balancing my colour choices today may be considered a challenge in itself. I used my Brights largely as accent colours, although the one thing I did differently on my card was stamp my sentiment if Soft Sky, the lightest colour. This is a real departure for me as normally I would stamp it in the strongest darkest colour for impact, yet sometimes it pays to take a more subtle approach - I hope you agree :-)

The Perfect Accent - Yes I used those White Perfect Accents for my flowers again - I love them, whether left 'naked' as here today or coloured up using my Sharpies. They make such a great flower centre.

Here is the visual summary of the key products used on today's project for you to pin for easy reference:


You can see all of my 'How To' summaries on my 'How To - Tips and Techniques' Pinterest board in case you've missed any. 

Before you reach for your ink and papers, check out what our amazing team has created to inspire you this week:

The Paper Players Design Team
 
 
Here's a quick recap of our challenge rules:
 
1.  Create a new paper project
2.  Upload your creation to your blog with a link back to us and provide a direct link to the post featuring your challenge submission.
3.  Please link your card to no more than four challenges, TOTAL.
4.  Have FUN! 


I look forward to seeing what you create with this week's colours. We are off to basketball today but no hockey - one more week off for Easter until we are back on the pitch! This means cycling if the sun is shining or board games if it rains - let's see where we end up!

Back tomorrow with another project; until then, happy stampin'!


Stampin' Up! Supplies Used:

Table built using Product Table Builder by The Crafty Owl - Independent Stampin' Up! Demonstrator.

Botanical Blooms CAS Thank You Card

by Joanne James16. March 2016 21:09

I'm back! No blog post from me yesterday I'm afraid: I have been battling a dreadful cold this week and with my busy days a few early nights have been in order. Today I'm back with another of my technique class cards using all three products from the Botanical Garden bundle, this time a clean and simple thank you card. I made this card early last week before last week's sketch over at Freshly Made Sketches was published, so I couldn't quite believe it when I saw both the sketch and Amy o'Neill's FMS Design Team card, that bears many similarities to mine - spooky how that happens sometimes! Here is the card I designed for my class:

This card is all about the vine; it can be used in lots of different ways (here's another example on an earlier card here) but one thing is for sure, it makes such a beautiful edging for a card. On this card it is cut into the front piece of my extra thick Whisper White card base and a piece of Botanical Gardens Designer Series Paper adhered to the back panel beneath it to show through when closed. The focal point of my card is another flower cut using my Big Shot and the Botanical Gardens framelits, but the other things that make this card special are:

Suite Sayings Sentiment - One of my favourite current sentiment sets, Suite Sayings, has a wide variety of sayings and this one is perfect for a thank you 'just because'.

Awesomely Artistic Grunge - I added a little back splatter using the grunge stamp in the Awesomely Artistic set to add a little more colour and soften my card, without obscuring too much of the all important 'white space' that adds so much to a truly CAS card.

A Trio of Embellishments - I actually managed to use three separate embellishments to my card: a White Perfect Accent for my flower middle (coloured black with my Sharpie), some strands of looped gold twine and a vellum leaf. Each of them adding a subtle detail without overwhelming.

Here's visual summary of key products used to make today's card for easy reference:


I hope you like today's card. I'll be back tomorrow with a card for this week's new challenge over at Create With Connie and Mary. Until then, happy stampin'!


Stampin' Up! Supplies Used:

Table built using Product Table Builder by The Crafty Owl - Independent Stampin' Up! Demonstrator.


Botanical Gardens Suite - On Your Special Day

by Joanne James14. March 2016 21:21

Good evening lovely readers! I have had a busy day with the second of this month's technique classes this morning and a Spring concert for one of the James Juniors this afternoon. Today I'm sharing a card I made for this week's challenge over at TGIF Challenges that was also one of the cards I made with the ladies in my card class this morning. I haven't played along with the TGIF team for a while and I couldn't resist this week's sketch:

My card features all of the products in the Botanical Gardens bundle offer (buy all 3 and save 15%) - Botanical Gardens Designer Series Paper, Botanical Blooms stamp set and Botanical Builder Framelits Dies - and features a fun technique. Here is my card:

Today's card is a celebration of the Botanical Gardens product suite, but there are three things that really make it special:

Customised Designer Series Paper - The paper I used for the background on my card is one of a number of patterns in the Botanical Gardens Designer Series paper pack that can be customised using the Botanical Blooms stamp set. Many of the leaves and flowers can be stamped with veins and stamens in the colours of your choice to create a variety of different looks. I had great fun adding detail to my background and this best thing is, this can be different every time. 

Fuss-free Flowers - I just love the Botanical Builder Framelits Dies for limitless floral creative possibilities, yet the two things that really make these fuss-free can't even be seen on this card: the Big Shot Die Brush and the Big Shot Precision Base Plate. Both perfect for working with intricate dies, they really do enable these flowers to pop out easily, no wax paper required. You may think you don't need these items, however whilst you could use a standard or magnetic platform, you will definitely get better results using these tools. My customers keep telling me this too, so impressed are they with the results.

A Free Sentiment - The sentiment on my card is from the Sale-A-Bration set 'Botanicals For You'. This stamp set co-ordinates with the other Botanicals products and is available free with a £45 spend before the end of the month. The Botanical Gardens bundle costs £46.75, so if you buy the bundle, you can get this set for free too - bargain!

Here is today's visual summary of the key products used and top tip for easy reference:


I hope you like today's card; I have two more to share this week using this product suite that were also makes in my technique class today, so stay tuned for those. Back tomorrow with another project; until then, happy stampin'!


Stampin' Up! Supplies Used: 

Table built using Product Table Builder by The Crafty Owl - Independent Stampin' Up! Demonstrator.

Color Me Irresistible Botanical Blooms Happy Birthday

by Joanne James3. March 2016 08:05

Today it's time for a new challenge over at Create With Connie and Mary and this week we have a colour combination for you:


I thought this colour combination was quite an unusual one and I did spend a lot of time working out what to do with it! Eventually there were two things that set me off on the path that led to today's card: one was the desire to use a piece of the coloured Color Me Irresistible Specialty Designer Series Paper and the other was this card by the lovely Connie Babbert! I loved the layout of Connie's card and knew when I saw it that it would be perfect for what I had in mind - here is the end result:


I decided to use Hello Honey for my card base and make a feature panel of the Color Me Irresistible paper - this paper is quite dramatic but the hint of pattern and combination with the other two challenge colours worked perfectly. A few layered Botanical Builder flowers and a happy birthday sentiment from the 'Tin of Cards' stamp set, finished with a black satin ribbon bow, finish my card. I just love the flower combinations that you can achieve with the Botanical Builder Framelit Dies - in addition by sponging the centres and edges and adding feathered lines using the tip of your Stampin' Write marker, as I did on the largest of the blooms on today's card, it's easy to create beautifully realistic and dimensional flowers. 

Here is today's visual summary for easy reference:


Do visit the other Design Team members to see what they did with this week's colours; there's lots of inspiration over on their blogs too!

Enjoy your day and I'll be back tomorrow with another project; until then, happy stampin'!


Stampin' Up! Supplies Used:

  • Tuxedo Black Memento Ink Pad
  • Botanical Builder Framelits Dies
  • Tin Of Cards Photopolymer Stamp Set
  • Color Me Irresistible Specialty Designer Series Paper
  • Very Vanilla A4 Cardstock
  • Hello Honey A4 Cardstock
  • Hello Honey Classic Stampin' Pad
  • Cajun Craze Classic Stampin' Pad
  • Cajun Craze A4 Cardstock
  • Basic Black 3/8" Stitched Satin Ribbon
  • Neutrals Candy Dots
  • Project Life Corner Rounder

Playful Pals Jungle Elephant Hello Card

by Joanne James2. February 2016 08:00

I have a day of back-to-back classes today, with my second technique class of the month (I know and only 2nd February!) and my monthly Project Life memory keeping class in store, so a nice early blog post for you today! I have a fun card using this week's sketch over at CAS(E) This Sketch and the challenge over at The Friday Mashup to use a zoo animal on your card:


I thought the CAS(E) This Sketch layout was perfect for an idea I'd had using the Playful Pals stamp set and co-ordinating Pyramid Pals Thinlits Dies - take a look:

I had this idea of an animal in the bush/jungle peeking out amongst the greenery so I decided on an elephant and having stamped and cut out the elephant pieces in Smoky Slate, I adhered him to my bright orange background before adding my Botanical Builder leaves and my sentiment cut with the Greetings thinlits. Isn't that fun? I have visions of this elephant trampling greenery for miles around as it rampages through the bush. I envisaged my animal as living in the wild, although clearly elephants can be seen at the zoo too. This is my first outing with the Playful Pals set but I know that I am going to use of lots more - there are so many creative possibilities with a set like this! 

That's all from me today; back tomorrow with this week's weekly deals and another project. Until then, happy stampin'!


Stampin' Up! Supplies Used: 

Table built using Product Table Builder by The Crafty Owl - Independent Stampin' Up! Demonstrator.

Botanical Builders Purple Flowers Birthday Card

by Joanne James30. January 2016 08:50

It's Sunday and time for a new challenge over at The Paper PlayersThis week it is the turn of the sweet Jaydee to host and she has a tic-tac-toe for you to play along with:


When I was considering which squares to use to create my card, I noticed that none of the other girls on the team had used purple. This is one of my favourite colours, so I decided to use this as my starting point. I was also drawn to the black and white striped background and central focal image of Connie Collins' card for 'Case The Designer' over at The Global Design Project, so wanted to combine the two. I settled on the top row - flowers, bling, purple - for my card today:

My background paper is from the 'Go Wild' paper stack - these papers are not just great for animal prints! I used a trio of purples for my flowers, die cut using the Botanical Builder Framelits Dies, and I used them to frame my birthday sentiment from the Tin of Cards stamp set - I just love the fonts in this set. My 'bling' is in the form of a liberal dose of Wink of Stella on my main flower and a scattering of rhinestones across my card. 

Before you reach for your ink and papers, check out what our amazing team has created to inspire you this week:

The Paper Players Design Team
 
 
Here's a quick recap of our challenge rules:
 
1.  Create a new paper project
2.  Upload your creation to your blog with a link back to us and provide a direct link to the post featuring your challenge submission.
3.  Please link your card to no more than four challenges, TOTAL.
4.  Have FUN! 


I look forward to seeing what you create with this week's tic-tac-toe challenge - so many creative possibilities! Rebecca is playing in a hockey tournament today so I shall be wrapped up warm with a mug of tea in hand as I watch and hoping for a little craft time this afternoon. Enjoy your Sunday however you are spending it!

Back tomorrow with another project; until then, happy stampin'!


Stampin' Up! Supplies Used: 

Table built using Product Table Builder by The Crafty Owl - Independent Stampin' Up! Demonstrator.

Just For You Botanical Blooms Card

by Joanne James20. January 2016 09:00

It's Wednesday - hurrah! Today I have a card for this week's challenge over at CAS Colours and Sketches where they have the following sketch to work with:

I turned the sketch through 90 degrees for my card today and used the large sentiment from the 'Botanicals For You' Sale-A-Bration set, paired with some Botanical Gardens Designer Series Paper and yes, another of those flowers made using the Botanical Builder Framelits Dies - I just can't get enough of them! Here's my card:

I just love the different flower combinations you can make with these framelit dies! Whilst I do have something different to share with you tomorrow, rest assured you haven't seen the last of these yet!

That's all from me today; I'll be spending the day in my office - I'm hoping for a productive one! I'll be back tomorrow with a card for this week's new challenge over at Create With Connie and Mary. Until then, happy stampin'!


Stampin' Up! Supplies Used:

Table built using Product Table Builder by The Crafty Owl - Independent Stampin' Up! Demonstrator.


Mini Catalogue

BROWSE THE CATALOGUE

The mini catalogue is now live! Read and download your copy here.

Shop Online

Access my online shop 24 x 7, 365 days of the year:

Current March hostess code:

S9F2XJJW

Shop Online

Join My Team

It's always a great time to join Stampin’ Up! New team members can get £130 worth of products for only £99 + free business supplies + free shipping + all the fun being a part of Stampin’ Up! Stampin' Up! has something for everyone: join my growing team and benefit from my support to enjoy Stampin' Up! however you choose.

If you're interested, call me for a chat to understand how I can help you realise your goals. Alternatively, if you have already decided to sign up and you just can't wait, please click here for the link to the online form where you can sign up and order your starter kit right away! 

Latest Kit!

Stampin Cut and Emboss

The Rock Legend Kit has all you need to make 8 cards with coordinating envelopes. Along with the new Panda Friends Kit, both are available from January 4th for just £14 each - get yours here!

2023-24 Annual Catalogue

BROWSE THE CATALOGUE

Click on the catalogue for a full list of current SU! supplies - if you would like to order any of the items featured, please drop me a line at [email protected] or give me a call on 07773 421446 - I'd be happy to help.

New Online Exclusives

There will be new products available exclusively in the online store from 5 March - check them out here.

About Me

Hi I'm Joanne and live in Northampton and when I'm not looking after my husband and two beautiful children, am an avid crafter with a passion for all things Stampin' Up!

I must confess that I have never been a big rubber stamper - until I discovered Stampin' Up! that is. I love the fact that I can get such great results with co-ordinating stamps, inks, papers and punches - the possibilities are endless! Join me on my stamping journey as I share the things I love and be inspired to create amazing things yourself!

Follow Me

Monthly Newsletter

Box Builder

Click the button above to use Box Buster to create your custom box design using the Envelope Punch Board!

Kits Collection Now Available!

Stampin Cut and Emboss

The new Kits Collection from Stampin' Up! is now available!

Click here to see the current kits available and order yours online today.

I Design For


Stampin' Up Stuff

This is my personal blog and is not endorsed by Stampin’ Up! I hope you find it a plentiful source of ideas and personal inspiration but please don't copy my designs for contest submission or use for classes, publication or sale without express permission.