Happy Easter With Suite Sayings MM490

by Joanne James31. March 2017 21:00


I've had a busy day today with the end of Sale-A-Bration and both of my James Juniors have broken up for the Easter vacation too, so lots going on! I'm sharing a quick card card I made using this week's sketch over at Mojo Monday:

I decided this sketch was perfect to showcase one of my favourite Easter sentiments from the Suite Sayings set - take a look:


I paired my sentiment panel with some layers featuring two of the beautiful floral patterns in the Affectionately Yours Specialty Designer Series Paper and some gorgeous Cucumber Crush striped ribbon. I will miss these in-colour ribbons when they retire at the end of May; stocks of in-colour items are already running low, so if you are reading this and still have re-inkers or other 2015-17 in colour items on your wishlist, you should consider ordering them sooner rather than later, since as we all know once the retirement list publishes in a couple of week's time they will be the first things to sell out.

Here is the visual summary of the key products used on today's project for you to pin for easy reference:


You can see all of my 'How To' summaries on my 'How To - Tips and Techniques' Pinterest board in case you've missed any. 

A bright and colourful card with minimal supplies, yet the ribbon adds a real touch of luxury.

I'll be back tomorrow with another project. Until then, happy stampin'!


Stampin' Up! Supplies Used:

Table built using Product Table Builder by The Crafty Owl - Independent Stampin' Up! Demonstrator.

Mondrian-Inspired Colourblock Congratulations Card

by Joanne James14. August 2016 10:00

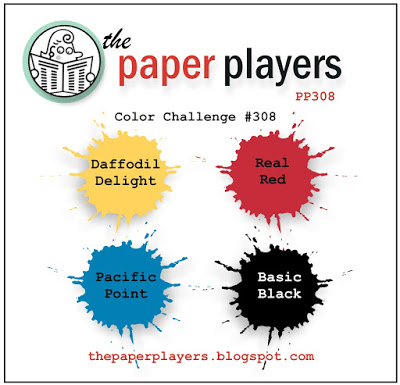
It's Sunday and time for a new challenge over at The Paper Players! It's my dear friend Claire's turn to host this week and she has a great palette of primary colours for you to work with:
    AYSIChallenge140

These colours are perfect for a back to school project. I actually used these colours for a quick card that I made for this week's sketch challenge over at the As You See It Challenge earlier this week but couldn't link it up as their site is down, so I thought I would instead share it today (edited to add: subsequently back on line now so I've linked):
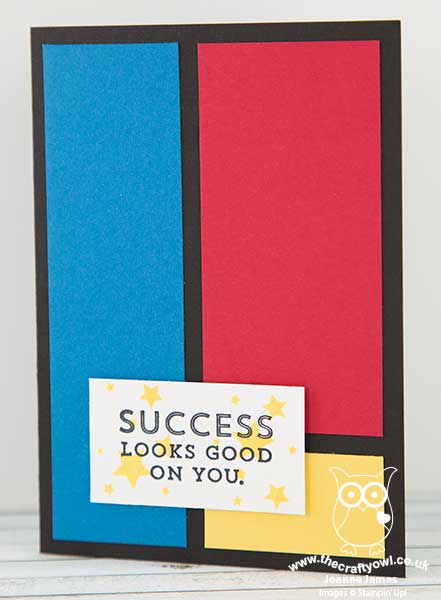
 

There is so much you could do with the AYSI sketch, but I found myself constantly returning to the idea that it had all the makings of a Mondrian painting - so I decided to create a clean and simple card in that style. Here's the low-down on today's card:

Mondrian Blocks of Colour - Piet Mondrian is a Dutch painter famous for his modern art using bold blocks of primary colours and white, delineated with black lines. My card is a super-simple card in this style; my fellow PP designer, Hannelie Bester, has also made a card with a Mondrian influence this week that is much more intricate and detailed and if you're a fan of this style of art you should definitely check it out.

Suite Words of Success - This message of success comes from the 'Suite Sayings' sentiment set. I've not used this set in a while, but I've used it many times earlier this year and it's one I was so pleased to see carried over from the Spring-Summer seasonal catalogue into the annual. This modern font was the perfect fit for my card today.

Perpetual Stars - Rather than leave my sentiment just black on white, I did break with my colour blocking slightly to add a burst of bright yellow stars to add to the celebratory feel. I used the star stamp from the Perpetual Calendar stamp set for this - such a useful set with lots of small stamps that are perfect for small details. 

I know lots of students expecting GCSE exam results this year, so I thought this would make a great exam success card. Maybe one that would work for a boy too - not too 'pretty'!

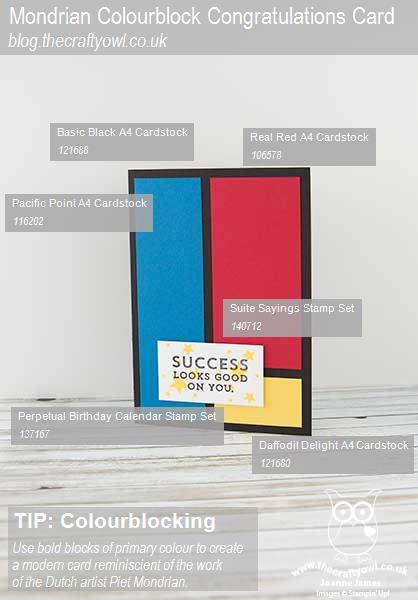
Here is the visual summary of the key products used on today's project for you to pin for easy reference:
 

You can see all of my 'How To' summaries on my 'How To - Tips and Techniques' Pinterest board in case you've missed any. 

Before you reach for your ink and papers, check out what our amazing team has created to inspire you this week:

The Paper Players Design Team
 
 
Here's a quick recap of our challenge rules:
 
1.  Create a new paper project
2.  Upload your creation to your blog with a link back to us and provide a direct link to the post featuring your challenge submission.
3.  Please link your card to no more than four challenges, TOTAL.
4.  Have FUN! 


I look forward to seeing what you create with our colours this week.

Back tomorrow with another project; until then, happy stampin'!


Stampin' Up! Supplies Used:

Table built using Product Table Builder by The Crafty Owl - Independent Stampin' Up! Demonstrator.

Last Chance For Wednesday Weekly Deals!

by Joanne James13. April 2016 10:00

It's Wednesday and time for the last week of Wednesday Weekly Deals! As I mentioned last week, improvements in stock control at Stampin' Up! mean that this is the last week that they will be offered. They will be replaced with less frequent but better 'Specials' promotions on an adhoc basis - please make sure you're checking my blog regularly for details. So for the final week, there really are some great deals - as always, these offers are valid for one week only. 

If you want to take advantage of any of the deals on offer, you can support my business by placing your order online by clicking here or using the link to my store on the right hand side of my blog page where it says 'Shop Online' or with me in person. Don't forget to add the new Hostess Code for April UD3KDWM4 if your order is under £150 and be sure to make sure that you don't check the 'no contact' box if you'd like to be kept updated with the progress of you order and receive a little thank you in the post from me. If you are local, then give me a call to place your order if you'd like to save on P&P.

Here's a summary of this week's one-week only Wednesday deals - click on each item to go to the online store to purchase:

Table built using Product Table Builder by The Crafty Owl - Independent Stampin' Up! Demonstrator.
 

Some great bargains to be had this week: my favourite sentiment set of the moment, 'Suite Sayings', the always-useful 1" square punch, the Bear Hugs framelits (I will be using these on tomorrow's blog card so look out for that!) and the Rose Wonder stamp set which you can see on today's creative post. And last but certainly not least, the White Perfect Accents - I will be buying these up in bulk this week!

Back shortly with today's creative post; until then, happy shopping!

Friends and Flowers Peas In a Pod Baby Card

by Joanne James30. March 2016 08:00

Happy Wednesday everyone! I've already posted today's weekly deals here; don't forget you also have only 48 hours to still take advantage of this year's Sale-A-Bration offers too. Today I have a fun card using this week's sketch over at the As You See It Challenge:

AYSIChallenge129

The challenge brief doesn't restrict us to feathers; anything can be used as long as the card front can fit five of them! I decided that peas in a pod were the way to go for a fun baby card - take a look:

Cute, right? Here's the low-down on today's card:

Friends and Flowers - My peas in a pod are one of the stamps in the 'Friends and Flowers' stamp set. This is a versatile set that includes a variety of stamps that co-ordinate with the Festive Flower Builder punch; I've used the stamp set on its own for today's card. I decided to watercolour my peas, which also made it easier for me to obscure the baby faces on all but one of my pea pods to make one stand out.

Sweet Sentiment - This fun sentiment is from my favourite sentiment set of the moment, 'Suite Sayings' and just perfect for a baby card, especially one with a pea peeking out of a pod.

A Touch of Pink - I finished my card with a sprinkle of pink sequins and some glittery pink enamel dots from the Love Blossoms embellishment kit. This kit is worth it for the enamel dots alone!

Here's the visual summary of the key supplies used to make today's card for you to save for future reference:


I will be back with another card tomorrow for this week's new challenge over at Create With Connie and Mary; until then, happy stampin'!


Stampin' Up! Supplies Used:

Table built using Product Table Builder by The Crafty Owl - Independent Stampin' Up! Demonstrator.

Botanicals For You Flower Wreath Card

by Joanne James27. March 2016 20:29

I had a little time this afternoon so I had a go at the challenge over at Global Design Project, where this week they are case-ing the designer Jessica Williams:


I don't get the opportunity to play along at GDP as much as I'd like but they do have some great challenges and I particularly like the CASE The Designer ones. Inspiration can strike in many ways and I think this type of challenge is a great way to create something that is clearly inspired by one person's work yet is wholly your own. It also makes for an interesting blog post (hopefully!) that explains where the inspiration for your own take on the original work came from. So, without further ado, here is my card:

So how did Jessica's card inspire me? Read on to find out:

Layout - Whilst I love the layout of Jessica's card, I decided this was one of the things that I was going to change. I used this week's sketch over at Mojo Monday for my card.

Colours - Jessica's colour combination is not one I would ordinarily have chosen, so I decided to work with it to see where it took me. I kept Sahara Sand for my base, although I did major on Watercolour Wonder as opposed to Calypso Coral though, largely on account of my choice of ribbon. Whilst this ribbon is rather wide for a card bow, I liked the rather fancy bow that Jessica used on her card and decided to use my ribbon to make a similar statement. Likewise, whilst I incorporated the black and white colours of Jessica's washi tape borders, I chose to use some Everyday Chic Designer Series Paper for the twin panels on my card. 

Wreath and Sentiment - I recreated the wreath on my card, but instead of using the 'Timeless Love' stamp set, I created my own using the flowers and leaves from the Sale-A-Bration set 'Botanicals For You'. I was also inspired by the sentiment of Jessica's card - I chose one from the 'Suite Sayings' stamp set that has a similar tone. 

Here is the visual summary of the supplies used to make today's card for you to save for easy future reference:


I hope you like my card and found the explanation of my creative process insightful. I'd love to know what you think of my CASE of Jessica's card; do leave me a comment below - I read and appreciate them all!

I'll be back tomorrow with another couple of projects; until then, happy stampin'!


Stampin' Up! Supplies Used:

Table built using Product Table Builder by The Crafty Owl - Independent Stampin' Up! Demonstrator.


Honeycomb Happiness Pop-Up Chick Card

by Joanne James27. March 2016 10:00

It's Sunday and time for a new challenge over at The Paper Players! It's the turn of the talented LeAnne to host our challenge this week and she has my favourite type of challenge, a sketch, for you to play along with:

    PPA-293-Mar24

As it's Easter Sunday today, for my card this week I decided to make one last Easter card to share with you, using this week's colours over at Pals Paper Arts. I'm also linking up with the Friday Mashup again as I've used the theme part of their challenge (Easter and chicks or bunnies - read on and all will become clear!) Here is the front of my card:


Simple enough: some polka dot panels, alongside an oversize flower made with 1 1/2 and 1 3/4 circle punches and the Flower Fair Framelits as a backdrop to my pair of Easter eggs. The eggs themselves are using a tip picked up from Cindy Schuster on the Stampin' Up! corporate blog (you can see her card here) where she used the balloon punch to create Easter Eggs (I stamped mine first using the outline in the 'Balloon Celebration' set and used the grunge stamp in 'Awesomely Artistic' for my mottled effect).

The best bit for me about today's card is the inside, take a look:

Having wrestled with myself every time I went to stick one of the Honeycomb embellishments to the front of my card, knowing that it would mean either a box needed to send it or risk the embellishment being crushed (I'm still suffering post-traumatic stress from having watched Shannon West uncerimoniously squash one on the front of a card whilst on stage at Onstage Live in Brussels last November!!) , I decided that there was a perfect way around it - use it on the inside! I stamped my chick from the 'Honeycomb Happiness' Sale-A-Bration stamp set on the inside of my card along the central score line, paper-pieced him with another stamped on So Saffron card, then added my honeycomb embellishment (I spritzed one of the white ones in So Saffron). I also stamped my Easter greeting from the 'Suite Sayings' stamp set on the inside of my card on the left-hand panel:


Isn't that just the cutest?! I am so happy with how this turned out! I can now use my Honeycomb Embellishments with a clear conscience!

Here is the visual summary of the key products used on today's project for you to pin for easy reference:

You can see all of my 'How To' summaries on my 'How To - Tips and Techniques' Pinterest board in case you've missed any.  

Before you reach for your ink and papers, check out what our amazing team has created to inspire you this week:

The Paper Players Design Team
 
 
Here's a quick recap of our challenge rules:
 
1.  Create a new paper project
2.  Upload your creation to your blog with a link back to us and provide a direct link to the post featuring your challenge submission.
3.  Please link your card to no more than four challenges, TOTAL.
4.  Have FUN! 


I look forward to seeing what you create with this week's sketch. We have a rare sport-free day today. We are looking forward to our Easter egg hunt (likely to be indoors if the weather forecast is correct!), a leisurely lunch and an afternoon eating too many chocolate eggs whilst watching a good movie!

Back tomorrow with another project (or two!); until then, happy stampin'!


Stampin' Up! Supplies Used:

Table built using Product Table Builder by The Crafty Owl - Independent Stampin' Up! Demonstrator.

Botanical Blooms CAS Thank You Card

by Joanne James16. March 2016 21:09

I'm back! No blog post from me yesterday I'm afraid: I have been battling a dreadful cold this week and with my busy days a few early nights have been in order. Today I'm back with another of my technique class cards using all three products from the Botanical Garden bundle, this time a clean and simple thank you card. I made this card early last week before last week's sketch over at Freshly Made Sketches was published, so I couldn't quite believe it when I saw both the sketch and Amy o'Neill's FMS Design Team card, that bears many similarities to mine - spooky how that happens sometimes! Here is the card I designed for my class:

This card is all about the vine; it can be used in lots of different ways (here's another example on an earlier card here) but one thing is for sure, it makes such a beautiful edging for a card. On this card it is cut into the front piece of my extra thick Whisper White card base and a piece of Botanical Gardens Designer Series Paper adhered to the back panel beneath it to show through when closed. The focal point of my card is another flower cut using my Big Shot and the Botanical Gardens framelits, but the other things that make this card special are:

Suite Sayings Sentiment - One of my favourite current sentiment sets, Suite Sayings, has a wide variety of sayings and this one is perfect for a thank you 'just because'.

Awesomely Artistic Grunge - I added a little back splatter using the grunge stamp in the Awesomely Artistic set to add a little more colour and soften my card, without obscuring too much of the all important 'white space' that adds so much to a truly CAS card.

A Trio of Embellishments - I actually managed to use three separate embellishments to my card: a White Perfect Accent for my flower middle (coloured black with my Sharpie), some strands of looped gold twine and a vellum leaf. Each of them adding a subtle detail without overwhelming.

Here's visual summary of key products used to make today's card for easy reference:


I hope you like today's card. I'll be back tomorrow with a card for this week's new challenge over at Create With Connie and Mary. Until then, happy stampin'!


Stampin' Up! Supplies Used:

Table built using Product Table Builder by The Crafty Owl - Independent Stampin' Up! Demonstrator.


Watercolour Wishes Suite Sayings Easter Card

by Joanne James9. March 2016 09:00

The week is flying by - Wednesday already! Today I have a great clean and simple card for this week's challenge over at CAS(E) This Sketch that you really could put together in a jiffy. Firstly, here's this week's sketch:

I decided to make a quick Easter card featuring one of my favourite sentiments from the 'Suite Sayings' stamp set and some left over bits and pieces from my Watercolour Wishes card kit - take a look:

Using a piece of Pool Party cardstock for my cardbase, there are three key things that make this card:

Suite Sayings Stamp Set - This is one of those sets that has a sentiment for pretty much any occasion and this Easter one is a favourite of mine. I love the swirly script and the size, which works perfectly inside or on the front of a card.  

Lots of Labels Framelits Dies - I used the largest of the Lots of Labels Framelits Dies, cutting my Whisper White cardstock to just narrower than the die so that I could extend the length of my panel and only cut the framelit shape along one end. This is a useful technique - here's a photo that shows how it should look before you put it through the Big Shot:


Watercolour Wishes Card Kit - This has to be most favourite Stampin' Up! kit of all time - it contains everything you need to make 20 cards; what's more the stamp set, ink spots and acrylic block can all be used to create more projects with your own card bases once you've made up those in the kit. There are lots of spare embellishments too, with banners, flowers, washi tape, sequins and wooden pieces left over - perfect to make the most of today's card.

Here is the visual summary of today's card for reference:


I hope you like today's card - sometimes a quick card is in order and in 'waste not, want not' mode this one was a perfect opportunity to use up the generous leftovers from my kit!

I'm off to my Coffee and Card Drop-in Session this morning at Bell of Northampton - you can read all about that here - and am going to watch one of my juniors play in a netball match this afternoon. Back tomorrow with my card for this week's challenge over at Create With Connie and Mary where we have a fun sketch in store for you. Until then, happy stampin'!


Stampin' Up! Supplies Used:

Table built using Product Table Builder by The Crafty Owl - Independent Stampin' Up! Demonstrator.


Wildflower Fields Meets Suite Sayings

by Joanne James26. February 2016 23:08

Yay it's Friday! My day feels like it's been a long one and I am looking forward to the weekend for sure! Today I have a card for this week's challenge over at Retrosketches which also fits the bill for the new challenge over at As You See It:

   AYSIChallenge125

I decided to make another Easter card, this time using some of my Sale-A-Bration Wildflower Fields designer series paper and the lovely Easter sentiment in the 'Suite Sayings' stamp set:

I used extra-thick Whisper White for my card base and added alternating strips of the bold flower patterned papers for my background. I tweaked the sketch slightly in as much as I used the central panel to showcase my sentiment, which broke up the detail of the busy paper, and chose Blackberry Bliss and Hello Honey for my ink, mats and ribbon colours. I embellished with a few flowers punched with my Petite Petals and Blossom Bunch punches and a retired Hello Honey button. This is the first stamp I've used in my 'Suite Sayings' stamp set; this is such a versatile set with a great variety of sentiments - I think this Easter one is my favourite though.  

Here's today's visual reference showing the key supplies used to make today's card:


That's all from me today; back tomorrow with another project. Until then, happy stampin'!


Stampin' Up! Supplies Used:

Table built using Product Table Builder by The Crafty Owl - Independent Stampin' Up! Demonstrator.


Birthday Bouquet Balloons Card

by Joanne James21. February 2016 09:00

It's Sunday and time for a new challenge over at The Paper Players! It's my turn to host our challenge this week and I have a fun clean and simple challenge for you to play along with:


Up, up and away! Balloons are very on-trend currently, but you can use any airborne object on your card today - just keep it clean and simple. For my card this week I was inspired to use balloons and in contrast to yesterday's bright balloon card decided to feature a piece of the delicately patterned balloon paper from the Birthday Bouquet designer series paper set:


I used a base of Mint Macaron to which I adhered a strip of Pool Party 3/8" Glitter Ribbon before adding a piece of the balloon patterned paper. I added a simple sentiment from the 'Suite Sayings' stamp set, which I cut out with my Project Life Cards & Labels Framelits, and added a couple of balloons stamped with the 'Balloon Builders' stamp set to give the same muted effect as the paper. Finally, I created some tassels with some frayed Pool Party Glitter Ribbon and a few clear sequins to finish my card. On reflection, whilst my card has minimal layers it doesn't have much of the 'white space' that is traditionally typical of 'clean and simple' cards, but I love the soft feel if it and the glimmer from the ribbon and the balloon tassles so I had to share it with you! I'm also linking up again with the team over at The Global Design Project where their theme this week has been balloons - what can I say, we were obviously thinking along similar lines!

For those of you who like a visual summary, here's something new that I will be featuring in my blog posts - a labelled photograph of the key products required to make today's card: 

These images are perfect for pinning to give you a visual reference of the supplies needed to re-create this card which can be useful if you want to come back to it at a later date. I will be pinning these to my new 'How To - Tips and Techniques' Board on Pinterest too, which you can find here.

Before you reach for your ink and papers, check out what our amazing team has created to inspire you this week, all of whom have created some fantastic examples of clean and simple cards:

The Paper Players Design Team
 
 
Here's a quick recap of our challenge rules:
 
1.  Create a new paper project
2.  Upload your creation to your blog with a link back to us and provide a direct link to the post featuring your challenge submission.
3.  Please link your card to no more than four challenges, TOTAL.
4.  Have FUN! 

I look forward to seeing your clean and simple creations in the gallery. We are off to basketball and back to hockey today and are planning a fun afternoon of board games and maybe a walk out along the canal if the weather stays dry for long enough. 

Back tomorrow with another project; until then, happy stampin'!


Stampin' Up! Supplies Used: 

Table built using Product Table Builder by The Crafty Owl - Independent Stampin' Up! Demonstrator.


Mini Catalogue

BROWSE THE CATALOGUE

The mini catalogue is now live! Read and download your copy here.

Shop Online

Access my online shop 24 x 7, 365 days of the year:

Current March hostess code:

S9F2XJJW

Shop Online

Join My Team

It's always a great time to join Stampin’ Up! New team members can get £130 worth of products for only £99 + free business supplies + free shipping + all the fun being a part of Stampin’ Up! Stampin' Up! has something for everyone: join my growing team and benefit from my support to enjoy Stampin' Up! however you choose.

If you're interested, call me for a chat to understand how I can help you realise your goals. Alternatively, if you have already decided to sign up and you just can't wait, please click here for the link to the online form where you can sign up and order your starter kit right away! 

Latest Kit!

Stampin Cut and Emboss

The Rock Legend Kit has all you need to make 8 cards with coordinating envelopes. Along with the new Panda Friends Kit, both are available from January 4th for just £14 each - get yours here!

2023-24 Annual Catalogue

BROWSE THE CATALOGUE

Click on the catalogue for a full list of current SU! supplies - if you would like to order any of the items featured, please drop me a line at [email protected] or give me a call on 07773 421446 - I'd be happy to help.

New Online Exclusives

There will be new products available exclusively in the online store from 5 March - check them out here.

About Me

Hi I'm Joanne and live in Northampton and when I'm not looking after my husband and two beautiful children, am an avid crafter with a passion for all things Stampin' Up!

I must confess that I have never been a big rubber stamper - until I discovered Stampin' Up! that is. I love the fact that I can get such great results with co-ordinating stamps, inks, papers and punches - the possibilities are endless! Join me on my stamping journey as I share the things I love and be inspired to create amazing things yourself!

Follow Me

Monthly Newsletter

Box Builder

Click the button above to use Box Buster to create your custom box design using the Envelope Punch Board!

Kits Collection Now Available!

Stampin Cut and Emboss

The new Kits Collection from Stampin' Up! is now available!

Click here to see the current kits available and order yours online today.

I Design For


Stampin' Up Stuff

This is my personal blog and is not endorsed by Stampin’ Up! I hope you find it a plentiful source of ideas and personal inspiration but please don't copy my designs for contest submission or use for classes, publication or sale without express permission.