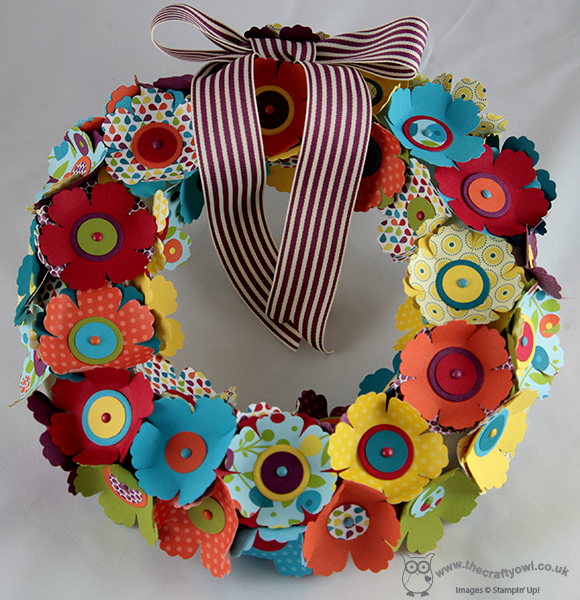
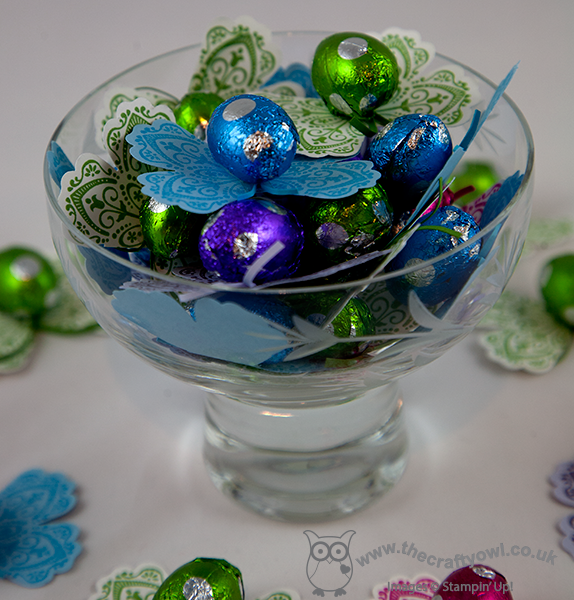
by Joanne James6. May 2015 09:37Good morning everyone - today I have something a little different for you! I ran a very successful class a little while ago to make a beautiful home decor Spring flower wreath. I am demonstrating how to make this wreath at a Spring Open Evening at Bell Of Northampton this evening so thought this was a good opportunity to share it with you too:
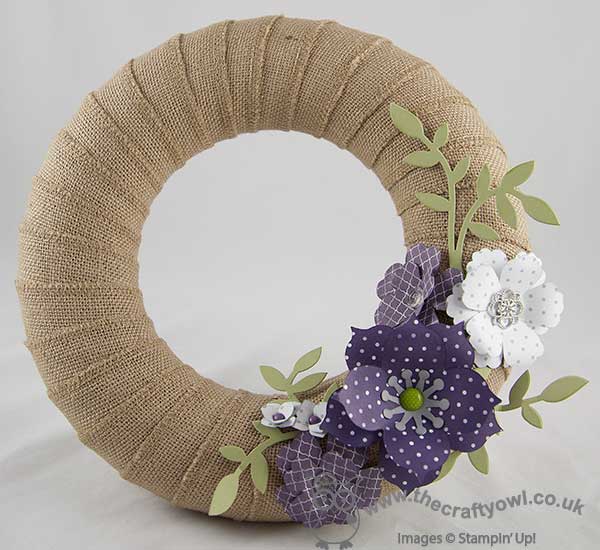
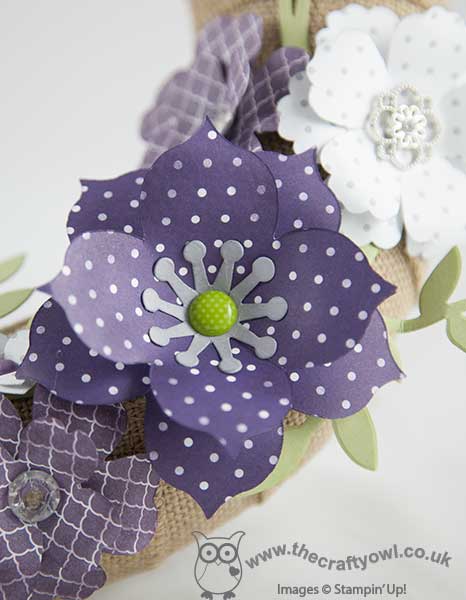
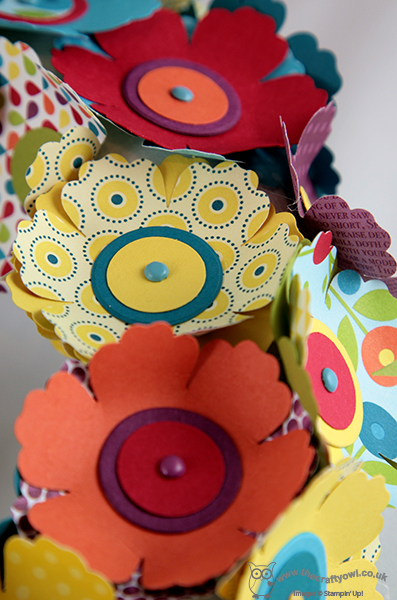
We started with a polystyrene wreath base and covered it with a roll of burlap, then decorated it with a selection of flowers made with a variety of dies and punches. The largest flower, leaves and the bases for the medium flowers were made using the Big Shot and Flower Frenzy Bigz L Die; the remaining flowers were made using a combination of the retiring Blossom punch, the Pansy punch and the Petite Petals punch. The Blossom punch and Flower Frenzy Bigz die are now out of stock, as is the patterend paper that I used, but you could make something similar with other punches and dies. We used a variety of buttons, brads and embellishments to decorate our flowers: I used Vintage Faceted Buttons, Something Borrowed Embellishments and some retired brads from my stash to decorate mine. I chose Elegant Eggplant, Smoky Slate and Pear Pizzazz as my colourway but each of the ladies tailored their colour choices and embellishments to their personal preferences. Here's a closeup of my flowers - I think they are gorgeous:
I created an album with pictures of their finished wreaths on my Facebook page here - you really should go and check them out as there are some amazing pieces and they all look so very different in the various colourways. If you haven't already, perhaps you could give me a 'like' whilst you're there - I'm only 10 away from my next milestone!
If you live in or around Northampton and would like to see me demonstrate how to make these flowers, do pop along to Bell's between 6-9pm this evening:
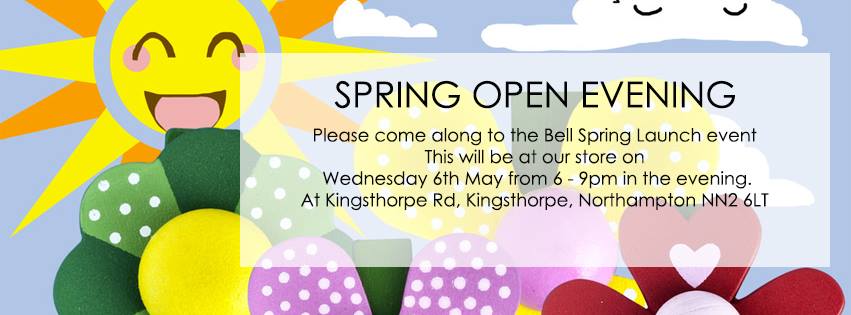
I hope you like today's project - it's one of my favourites! Back tomorrow with a card for this week's new challenge over at Create With Connie and Mary. Until then, happy stampin'!Full details via the link above and on my Facebook Page. There are lots of other demonstrations taking place - there will be someone fabulous chefs in residence cooking up delicious treats, a little pampering as well as other in-store delights that will all make for a pleasant browsing experience.
Stampin' Up! Supplies Used:
4946a4b9-930f-4216-b7d6-268e638019dd|0|.0|96d5b379-7e1d-4dac-a6ba-1e50db561b04
Tags: 3D Projects, Wreaths, Blossom Punch, Pansy punch, Petite Petals Punch, Big Shot, Flower Frenzy Bigz Die, Shop online, Stampin' Up! Demonstration, Stampin' Up, Stampin' Up Supplies, Something Borrowed
3D Projects | Classes | Promotions | Stampin' Up! Events
by Joanne James19. May 2013 20:55I've been out today making the most of the lovely weather and enjoying a 5 mile cycle ride and BBQ with my family and friends at the school my children attend, but have a quick post to share that shows a really quick way to make a beautiful box that can be used to package a gift for someone special. OK, did I say 'make'? Well, I did cheat a little; I used one of the kraft boxes that Stampin' Up! sells and covered it in some pretty patterned paper then added a handmade flower for 'wow' factor:
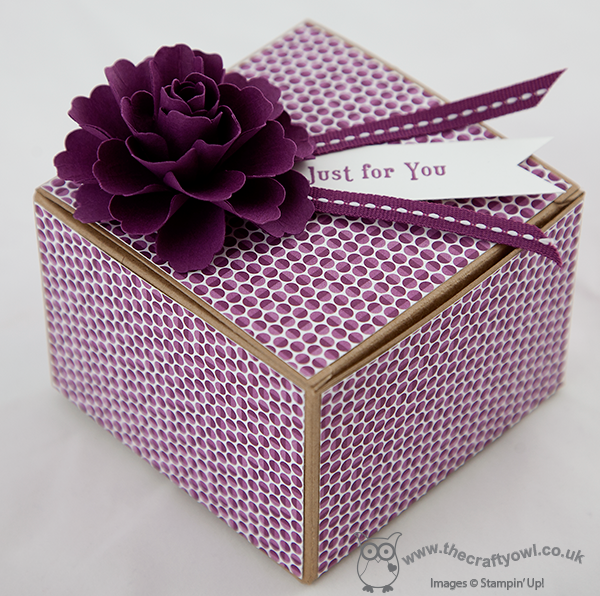
The flower really is so easy to do: you just cut six flowers using the Blossom punch, then roll the petals around a piece of dowel or something similar to curl them. Each one is then adhered to each other, with the central flower rolled tightly and then the remaining sections less so the further away from the centre they are. Add some ribbon and a tag and done. These boxes are often overlooked in the catalogue as they are somewhat 'tucked away' on page 161; they cost £2.75 for a pack of 4, so represent great value and at 9 x 9 x 6.4cm are large enough to hold a candle, baked goods or any kind of small gift.
Back tomorrow with another project; until then, happy stampin'!
Stampin' Up Supplies:
Stamps: Tea Shoppe
Cardstock: Sycamore Street Designer Series Paper (Sale-A-Bration - retired), Whisper White
Ink/Stampin' Write Markers: Rich Razzleberry
Tools: Blossom Punch
Finishing Touches: 1/4" Rich Razzleberry Stitched Grosgrain Ribbon
by Joanne James8. May 2013 21:51A quick post from me today, as I've spent most of my evening making a paper mache mask for my 5 year old to take into school tomorrow (apparently, this is Mum's homework - and that's according to the teacher, so I can't really quibble with my son!) My card is one I made to share with the ladies at my last stamp class, showing them the different effects you could get with the Blossom Punch flower:
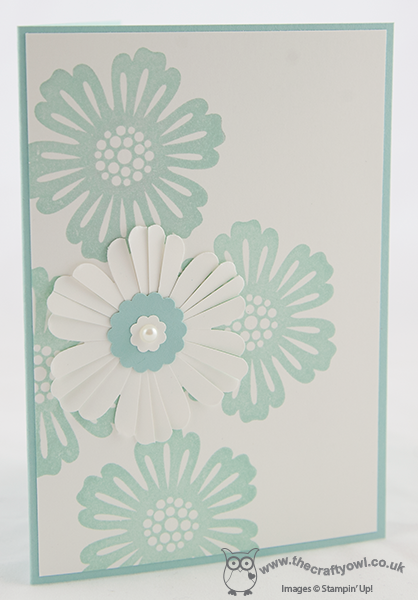
I chose Pool Party as the feature colour for this card - I'm so glad this in-colour is staying. A simple stamped background, but by cutting the petals right through along their length it gives a very delicate finish. All finished off with a couple of scalloped circles and a large pearl - very simple and could be used for a variety of occasions.
That's all for today; there is lots happening in my craft room at the moment, with regional training swaps, commissions, class planning and lots more to share, so come back tomorrow for another project. Until then, happy stampin'!
Stampin' Up Supplies:
Stamps: Mixed Bunch
Cardstock: Pool Party, Whisper White
Ink/Stampin' Write Markers: Pool Party
Tools: Blossom Punch, 7/8" Scallop Circle Punch, Itty Bitty Punches
Finishing Touches: Basics Pearls
by Joanne James25. April 2013 20:52Today I thought I'd share another card with you from my recent 'Mixed Bunch' class. I created it after seeing something similar on Pinterest and it made it into the class because I think it's a good example of how you can use a punched shape to create the illusion of a flower without having used the co-ordinating stamp:
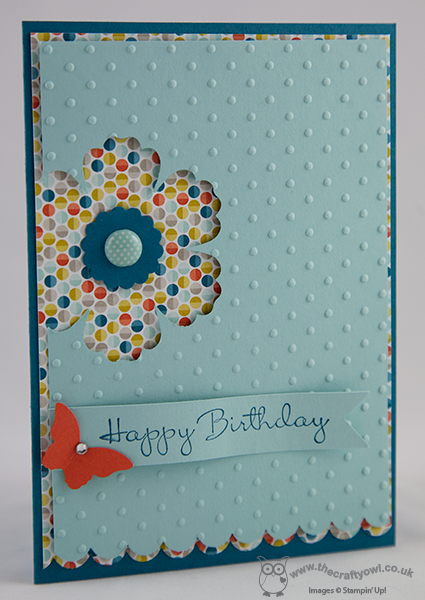
I cut a layer of Sycamore Street DSP and scalloped the edge and adhered it to the Island Indigo card base, then cut a further smaller layer out of Pool Party, embossed with the Perfect Polka Dots Embossing Folder and punched out a flower shape from the edge of the cardstock and adhered with dimensionals to reveal the patterned paper underneath. I then used a 7/8" scallop circle with a co-ordinating brad to create the flower centre. A banner sentiment and a bright orange butterfly completed the card.
Back with another card tomorrow - until then, happy stampin'!
Stampin' Up Supplies:
Stamps: Happiest Birthday Wishes (hostess - retired)
Cardstock: Island Indigo, Pool Party, Tangerine Tango, Sycamore Street DSP
Tools: Blossom Punch, Bitty Butterfly Punch, Perfect Polka Dots Embossing Folder, 7/8" Scallop Circle Punch
Finishing Touches: Basics Rhinestones, Designer Printed Brad
by Joanne James18. April 2013 20:35I enjoyed a pleasant card class yesterday evening with a lovely group of crafty ladies. We were using the 'Mixed Bunch' stamp set and the co-ordinating blossom punch and learning a few new techniques and tricks along the way. We made a number of different cards that can be used for different occasions and today I thought I would share with you my favourite of them all:
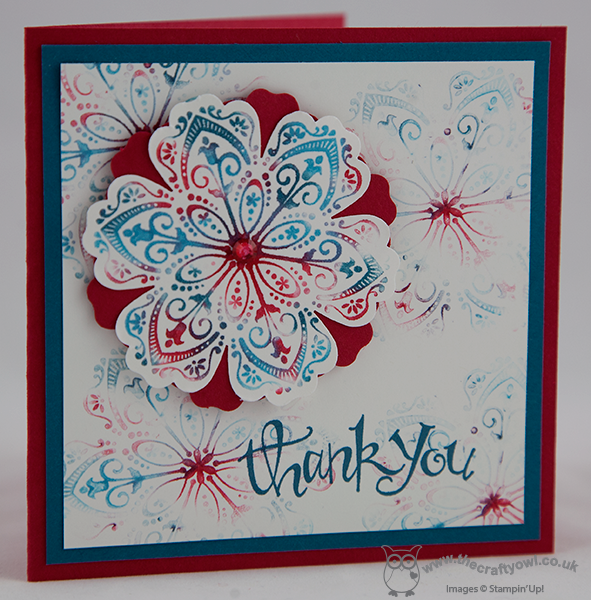
This four inch square card features the most detailed of the flower stamps in the Mixed Bunch set and the variagated colour effect was created by making our own ink pad using a baby wipe and three different coloured reinkers. We stamped and punched the first image, then without reinking the stamp, stamped off onto a square of white card to create a muted background paper. If you've never tried it, you should give it a go - it's great fun and the stamped images are really unique! We then layered the punched flower with a red punched blossom to add definition, finished with a basic rhinestone coloured red to match and layered the double flower using a dimensional to make it 'pop'. The addition of a sentiment in the bottom corner completed the card.
When I was making up the instruction sample before the class, I must confess to getting rather carried away with all the pretty stamped images I was producing, so printed a few extra to make into butterflies similar to the Easter egg butterfly I shared here, but this time to make into thank you cards to pop in with some customer orders and also to make this cute little magnetic note holder to stick on my fridge:
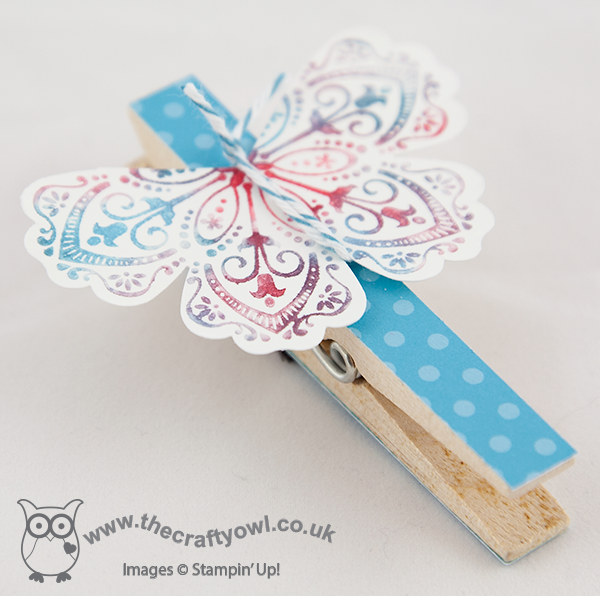
Cute, don't you think? The baker's twine antennae are the perfect finishing touch too. All in all, a fun class and with quite a few laughs along the way - what better way to spend a Wednesday evening. I'll share some of the other things I made for this class in future blog posts; meanwhile, I'm already looking forward to next month's class, when we will be using the owl punch and looking at both great owl cards and some of the many other things that can be made using this shape.
Back tomorrow with another project - until then, happy stampin'!
Stampin' Up Supplies:
Stamps: Mixed Bunch, Sassy Salutations
Cardstock: Real Red, Island Indigo, Whisper White
Ink/Stampin' Write Markers: Real Red, Island Indigo, Tempting Turquoise
Tools: Blossom Punch
Finishing Touches: Basics Rhinestones
by Joanne James12. April 2013 16:58Every once in a while I get a little bit more creative than usual and make something different to a card or box. I've been wanting to have a go at a paper wreath for a while and initially wanted to make a spring wreath in pastel shades, however when I received my Summer Smooches designer paper I fell in love with the bright colours and decided they would definitely enable me to create something that would brighten things up. So, after much punching, piercing and gluing, here's what I came up with:
I used a combination of Summer Smooches and Brights designer series papers, mixed in with some solid colours, all finished off with some co-ordinating brads and a lovely piece of wide vanilla and Rich Razzleberry ribbon, sadly now retired. I love the overall fiished effect - perfect to brighten up a dull corner of the house - and not a stamp or ink pad in sight!
Here's a close up of some of the flowers:
I think the layered flowers look really effective; another great example of what you can do with the blossom punch. You can also make a variety of stemmed flowers using this punch, but that's a blog post for another time! Meanwhile, if you would like to see more of this punch and the co-ordinating Mixed Bunch stamp set in action, join me for next week's Card and Technique class on Wednesday 17th April. The details are included in yesterday's post - if you'd like to come along, just drop me a line at joanne@thecraftyowl.co.uk.
I'll be back tomorrow with another project; until then, happy stampin'!
Stampin' Up Supplies:
Cardstock: Real Red, Tempting Turquoise, Daffodil Delight, Lucky Limeade, Island Indigo, Rich Razzleberry, Tangerine Tango, Summer Smooches DSP
Tools: Blossom Punch, 1" Circle Punch, 3/4" Circle Punch, hot glue gun
Finishing Touches: Brights Brads, Razzleberry Ribbon (retired)
by Joanne James11. April 2013 20:18It's rained pretty much all day today, so I thought I'd share a blue card for a 'blue' mood, at least as far as the weather is concerned! This is a card I designed and made for a recent team 'Rainbow Swap'. Across my wider team, we all chose one of the colours of the rainbow, then made five cards with that colour as the basis for the colour scheme and sent them to the others in the same colour group. In return, we received a 'swap' of a different design but with the same colour scheme. I was in the Blue colour group; here is the card I made:
I used one of the flower stamps from the Mixed Bunch stamp set and the co-ordinating Blossom Punch for my bold all-blue card. I used Pool Party as my base card, then layered flowers across the front in Island Indigo, Pool Party, Island Indigo and Midnight Muse. A simple greeting for any occasion and some ruffled ribbon and rhinestone detail on the uppermost flower added just enough sparkle to turn this card into something special. I got a lovely set of cards in return (but unfortunately haven't had the chance to photograph them - I will share them another time).
The Mixed Bunch stamp set and Blossom punch used to make this card is the stamp set that will feature in my card and technique class next week. The class will be held on Wednesday 17th April, 7.30-9.30pm. The class costs £10: we will be making four cards using the various stamps in this set and learning a number of new techniques along the way. All stamps, punches, cardstock and embellishments will be provided; all you need to bring is a basic toolkit (wet/dry adhesives, pencil, ruler, rubber, scissors, bone folder and cutter if you have one). If you would like to attend this class or any of the others currently planned, please contact me at joanne@thecraftyowl.co.uk for more details.
I'll be back tomorrow with a 3D project made using the Blossom Punch. Until then, happy stampin'!
Stampin' Up Supplies:
Stamps: Mixed Bunch, Tea Shoppe
Cardstock: Whisper White, Pool Party
Ink/Stampin' Write Markers: Pool Party, Island Indigo, Midnight Muse
Tools: Blossom Punch
Finishing Touches: Ruffled Ribbon, basics Rhinestones
by Joanne James30. March 2013 22:11I haven't blogged for a couple of days, so two posts today to make up for it! The first one is a really quick last-minute Easter make by Sarah Willis that I saw on Pinterest; these cute butterflies are so quick and easy to do you could easily make a whole pile of them in ten minutes:
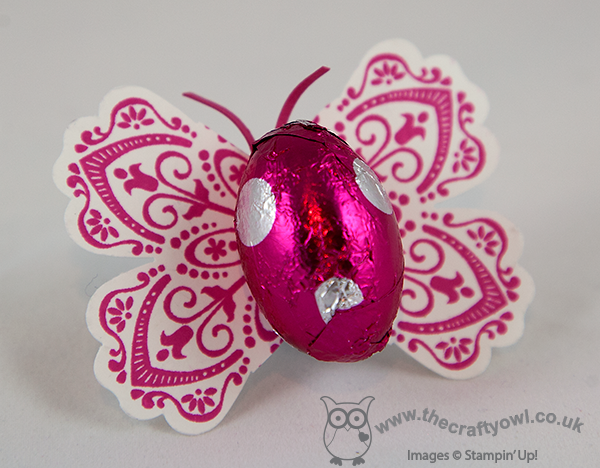
And we did! My 7 year old made all the butterflies in today's post - they were left over from a huge pile that she made as little end of term Easter gifts for the other children in her class at school. She simply stamped one of the flowers from the Mixed Bunch stamp set in four different colours, punched out with the co-ordinating punch, snipped out the top and bottom petals then used some sticky strip to attach some antenna and a mini egg to the centre of the wings and voila - one Easter egg butterfly, done. She managed to make a whole pile of these in no time at all:
Another great way to use this stamp set, which is one of my personal favourites. I am running a card class featuring this stamp set and the co-ordinating punch on the 16th and 17th of April. There will be more details to follow shortly; if you live local to me and would like to know more, please contact me for further details.
That's all for now - another quick post from me shortly to share an Easter card I made today. Happy stampin'!
Stampin' Up Supplies:
Stamps: Mixed Bunch
Cardstock: Whisper White
Ink: Melon Mambo, Tempting Turquoise, Gumball Green, Perfect Plum
Tools: Blossom Punch