What Does The Fox Say? Foxy Friends

by Joanne James26. June 2016 09:00

It's Sunday and time for a new challenge over at The Paper Players! Thank you to everyone who joined us for our 300th anniversary celebrations last week - there were some fabulous cards in the gallery and it's your support for our challenge that keeps us going. Congratulations to all those who were winners in our grab bag prize draw - I'm looking forward to sending mine out to someone soon!

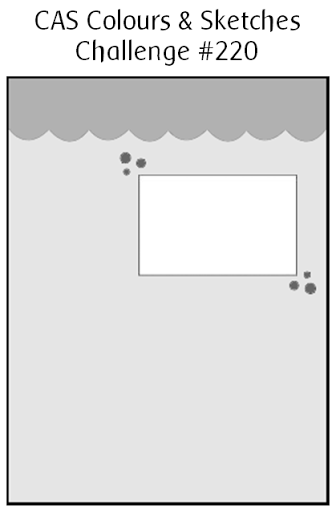
It's my turn to host again this week and I have my most favourite of all challenges, a sketch, for to play along with:


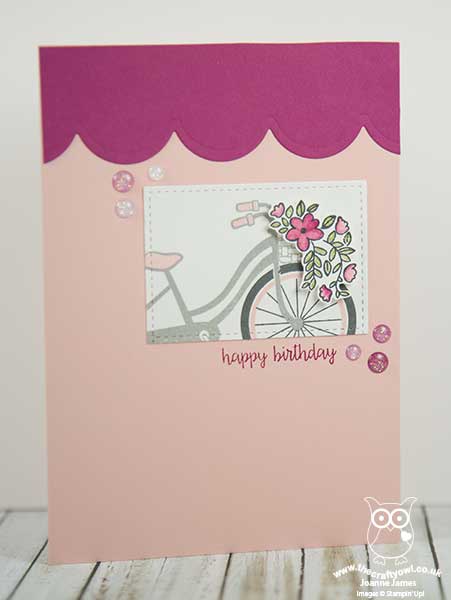
For my card this week I decided to go with some of my favourite new items from the new annual catalogue - the Little Foxy Suite:


Here's the low-down on today's card:

More Than A Little Foxy - So I'm in love with this cute fox! The 'Foxy Friends' stamp set makes all kinds of cute baby critters and woodland animals - I think this fox is just the sweetest. The fact that he comes with a co-ordinating punch - I used it here to punch out his head for extra dimension - is a bonus and the co-ordinating paper stack makes this suite a force to be reckoned with. 

Layered Layers - My card today is all about the layers. Whilst my sketch looks quite simple, I used a total of 9 separate layers on my card. In addition to my mats and patterned papers, I used the new Layering Circles Framelits to create the surrounds for my woodland scene, added to which partial diecutting of the uppermost circle and the masked stamping of the fox, tree stump and trees, adds further depth and the illusion of even more layers.

What Does The Fox Say? - I thought this would make a fun sentiment for my card today, easily created using the Labeler Alphabet, which is perfect for bespoke sentiments and cut out with the Project Life Cards and Labels Framelits. I highlighted the word 'Fox' in Calypso Coral with the solid letters and added an enamel heart too. Oh and my fox - he says "Happy Birthday!" in case you were wondering :-)

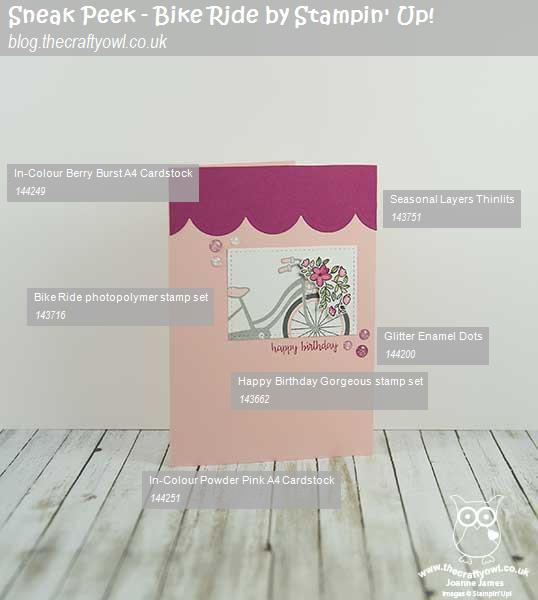
Here is the visual summary of the key products used on today's project for you to pin for easy reference:
 

You can see all of my 'How To' summaries on my 'How To - Tips and Techniques' Pinterest board in case you've missed any. 

Before you reach for your ink and papers, check out what our amazing team has created to inspire you this week:

The Paper Players Design Team
 
 
Here's a quick recap of our challenge rules:
 
1.  Create a new paper project
2.  Upload your creation to your blog with a link back to us and provide a direct link to the post featuring your challenge submission.
3.  Please link your card to no more than four challenges, TOTAL.
4.  Have FUN! 


I look forward to seeing what you create with my sketch this week. I have a day of sewing in store with some last minute guard costumes to make for Rebecca's school production of the Wizard of Oz this week, so my day will involve much green fur fabric - wish me luck!

Back tomorrow with another project; until then, happy stampin'!


Stampin' Up! Supplies Used:

Table built using Product Table Builder by The Crafty Owl - Independent Stampin' Up! Demonstrator.
 

Thank You Beary Much Baby Bear

by Joanne James25. June 2016 22:42


I had a lovely day yesterday in my memory keeping workshop with a lovely group of mums, however was utterly worn out last night! I've had a busy day today however I'm squeezing in a quick post this evening with a sweet card I made this afternoon for a couple of challenges:

I love this week's Mojo Monday sketch and knew immediately what I wanted to do with it; my card today also features one of my favourite new designer series papers - perfect for this week's challenge over at SUO Challenges where this is what they are asking us to use. Here's my card:


Here's the low-down on today's card:

Thank You Beary Much Baby Bear - I was lucky enough to win this coveted Baby Bear stamp in a prize patrol at Onstage in April and whilst I've used her lots and experimented with different colours and techniques, this is the first time I've shared her on my blog. She is a triple-layer stamp and has such wonderfully textured fur, just like an old fashioned traditional teddy bear. I find it easier to stamp the images in reverse to get better alignment - here I've stamped layer 3 in Soft Suede, layer 2 in Soft Suede stamped off once and layer 1 in Crumb Cake stamped off once.

Affectionately Yours - The Affectionately Yours designer series papers are just lovely; the copper embossed papers are very special, however my favourites are the prints that include Night of Navy - they are so different to anything we've had in a while, and I just love the vibrant colours. My choice today was deliberate, both to tie in with my Crumb Cake teddy bear and also because I had a plan for those flowers - read on...

Not Just A Tree Builder Punch - I decided to add a punched flower necklace to my bear, along with a flower pinned to her head (hence her being a female bear) that would echo the print on the paper. I used the little flower on the Tree Builder Punch to create my embellishments - just the right size to pretty up my bear - and I added a few pearls to the centres to complete them.

Here is the visual summary of the key products used on today's project for you to pin for easy reference:


You can see all of my 'How To' summaries on my 'How To - Tips and Techniques' Pinterest board in case you've missed any. 

I'll be back tomorrow with another project for this week's challenge over at The Paper Players; until then, happy stampin'!


Stampin' Up! Supplies Used:

Table built using Product Table Builder by The Crafty Owl - Independent Stampin' Up! Demonstrator.

Sweet Cupcake Double Z-Fold Card

by Joanne James23. June 2016 08:05

Today it's time for a new challenge over at Create With Connie and Mary and this week we have a colour combination for you:


I am on a total new product kick this week and decided that today's colours were perfect for a fun fold and a sweet cupcake - take a look:

Here's the low-down on today's card:

A Fancy Fold - Today's card is called a double z-fold card and is really easy to create. My card measures 5 1/2" x 5 1/2" square and was made out of one sheet of A4 Watermelon Wonder cardstock (I could have used my offcut for my strip across the front, but I didn't on this occasion as I wanted this to be a different colour, Whisper White). You can make this card using any size base: just choose your desired finished card height and width, cut your card base to the required height (e.g. 5 1/2") then if your desired width is 5 1/2", you will need a piece of cardstock 11" wide, and scored at a quarter of the width, so 2 3/4" and at the halfway point at 5 1/2". For your z-band, cut a piece of the same length and 1 1/2" wide, score at the same point, but fold along the scorelines in the opposite way to your card base and then rotate it through 180 degrees before adhering to your card. 

Sweet Layered Cupcake - I used all three of the challenge colours to create my delicious-looking cupcake, using triple-time stamping and the new 'Sweet Cupcake' stamp set. For the cupcake case I used Pool Party for all 3 layers, stamping off the first two stamps twice and once respectively to get layered colour. For the frosting, I stamped the first two layers in Blushing Bride, stamping off the first layer once and stamping the second layer full strength. The final layer is stamped in Watermelon Wonder, stamped off first to give a less intense finish. I then also brushed this layer with a liberal dose of clear Wink Of Stella for a sparkly shine.

Cupcake Cutouts - Sweet Cupcake is another stamp set with a co-ordinating framelit set that is available as a bundle at a 10% discount: the Cupcake Cutouts Framelits make light work of creating the perfect cupcake shape and also include other useful framelits and two very useful diecut words that can be used with the sentiments in the 'Sweet Cupcake' stamp set or on their own. Here I've used the 'sweet' overlaid on my cupcake to add a punch in Watermelon Wonder to finish my card.

Here is the visual summary of the key products used on today's project for you to pin for easy reference:


You can see all of my 'How To' summaries on my 'How To - Tips and Techniques' Pinterest board in case you've missed any. 

Do visit the other Design Team members to see what they did with this week's colours; there's lots of inspiration over on their blogs too!

Enjoy your day and I'll be back tomorrow with another project; until then, happy stampin'!


Stampin' Up! Supplies Used:

  • Sweet Cupcake Photopolymer Bundle
  • Watermelon Wonder A4 Cardstock
  • Watermelon Wonder Classic Stampin' Pad
  • Whisper White A4 Cardstock
  • Subtles Designer Series Paper Stack
  • Blushing Bride Classic Stampin' Pad
  • Pool Party Classic Stampin' Pad
  • Clear Wink Of Stella Glitter Brush

Falling Flowers Flourish - You've Got This

by Joanne James22. June 2016 07:00

Today I have a card using this week's CAS(E) This Sketch and the colours over at The Global Design Project as inspiration:


For my card today I decided to break out another new set and create an understated card with my new Falling Flowers stamp set:


Here's the low-down on today's card:

Falling Flowers Flourish - Every stamper needs a good floral flourish in their collection (it's the law, didn't you know? ;-) ) For some it has been Everything Eleanor, for others such as me it was Flowering Flourishes. Both of these sets now sadly retired, however I am doing a happy dance as this flourish in the new 'Falling Flowers' stamp set totally ticks my box - thank you Stampin' Up! The flourish looks beautiful on its own, but is also accompanied by other florals and a co-ordinating framelit set, May Flowers, to boot, for limitless creative possibilities. Here I've stamped it in Night of Navy and added a little extra colour with my blender pen to some of the leaves. 

The Importance of White Space - Whilst I love this colour combo, I think I'm having a love-hate relationship with the new In Colour, Sweet Sugarplum. It is a bold, strong purple and needs to be used in small doses if it isn't to overwhelm. On my card today I restricted it to my card base and the buds/berries on my flourish (I stamped them in Navy onto Sweet Sugarplum cardstock, fussy cut them and paper-pieced them together). I also added a touch of clear Wink of Stella to the buds for a little shimmer. 

An Enamel Shape for Balance - My flourish is definitely the star of the show on today's card and I paired it with one of my favourite sentiments from the 'You've Got This' stamp set as I was making this card with a special friend in mind. It needed one last thing to balance it out - I added a tiny Sweet Sugarplum In Colour Enamel Shape heart to make my card complete.

Here is the visual summary of the key products used on today's project for you to pin for easy reference:


You can see all of my 'How To' summaries on my 'How To - Tips and Techniques' Pinterest board in case you've missed any. 

Do visit the other Design Team members to see what they did with this week's sketch; there's lots of inspiration over on their blogs too!

I'm off to Bells this morning for my fortnightly Coffee and Card Session and have lots of errands to run today. Enjoy your day and I'll be back tomorrow with another project; until then, happy stampin'!


Stampin' Up! Supplies Used:

Table built using Product Table Builder by The Crafty Owl - Independent Stampin' Up! Demonstrator.

The Sky's The Limit Aeroplane Spinner Card

by Joanne James21. June 2016 09:53

Today I have a fun card made with this week's TGIF Challenge in mind:


The theme is 'travel' and I didn't have to go far as I mused 'trains, planes and automobiles ...' to myself when considering my options for today's card; I knew right away it was time to break out the new products and try something fun - a spinner card! Take a look: 


How much fun is that?! If you'd like to see a little video clip of my fun paper plane in action, click here to see the video I uploaded to my Facebook page. Forgive the wobble, I had the card in one hand and camera in the other!

Here's the low-down on today's card:

Time To Take Flight - The new Sliding Star Framelits Dies are just fantastic for making quick and easy spinner cards. They include two tracks (I've used the circular one here; the set includes a curved one too) that with the aid of a couple of washers or coins and some of the new thick adhesive foam strips, allow construction of a spinner card in no time at all. The framelits also include dies to cut out each of the shapes in the Shooting Star stamp set that make the spinners themselves (except for the globe, which co-ordinates with the 1 1/4" circle punch) so my paper aeroplane was ready to go in no time.

A Sprinkle of Clouds - To add subtle interest to my background, I added a little tone-on-tone stamping in Soft Sky using the cloud stamp from last year's RMHC stamp set 'Sprinkles of Life' that is still in the current catalogue. I stamped the panel before cutting the track so that my clouds align. 

Celebrate Exam Success - In addition to the aeroplane and globe (coloured with my Stampin' Write markers), the 'Shooting Star' stamp set also comes with a handful of punny sentiments that co-ordinate with the shapes for a suitably-themed card. I decided to go with 'The sky's the limit!' as I thought this would be a perfect card to send to someone celebrating exam success and I know lots of people sitting GCSE exams this year so will be needing a few of these. I punched it with my now-retired word window punch, but the new Classic Label Punch would be a great alternative. I finished the ends with a couple of silver mini brads (also retired!).

Here is the visual summary of the key products used on today's project for you to pin for easy reference:


You can see all of my 'How To' summaries on my 'How To - Tips and Techniques' Pinterest board in case you've missed any. 

Lastly, here's a video from those lovely people at the Stampin' Up! Home Office to show you just how easy it is to create spinners using this versatile set:

The sun is shining and for once it looks like it might stay that way, for today at least! My youngest James Junior is spending a 'moving up' day at his new school followed by an appointment for fitting of a whole new uniform ready for September. I have lots of work to do today but am also looking forward to unpacking the rather large boxes that my UPS man delivered as I was typing this, containing my customer orders from my new catalogue open house - so an exciting day all round!

Enjoy your day and I'll be back tomorrow with another project; until then, happy stampin'!


Stampin' Up! Supplies Used:

Table built using Product Table Builder by The Crafty Owl - Independent Stampin' Up! Demonstrator.

Pop Of Paradise Pineapple Trio

by Joanne James19. June 2016 22:22

I'm early here with Monday's post as I want to be able to link up with a couple of challenges that I had in mind when I created this card:


At Global Design Project there is the 'CASE The Designer' challenge this week and then a fun trio of colours and photo inspiration over at The Color Throwdown. The GDP 'CASE The Designer' challenges are always fun and this week it's the turn of Shawn De Oliveira and his Butterfly Basics card. For my card today I decided to CASE Shawn's layout and instead of flowers or watercolouring to take my image inspiration from the Color throwdown and get some fruity action:


Here's the low-down on today's card:

Pick Up A Pineapple - So what's competing with the flamingo in the current trend stakes? Well, the pineapple of course - they are everywhere! I finally succumbed and purchased the 'Pop Of Paradise' stamp set for that crazy flamingo and the first stamp I use is the pineapple! Easy to ink both parts separately, they add a fun touch to my thank you card. The sentiment banner is also from the same set, stamped in Archival Black and fussy cut.

CASE The Layout - The layout of Shawn's card worked perfectly for my pineapple trio. I just turned it through 90 degrees and used a strip of Cucumber Crush retired in colour washi tape for my top border, with a white baker's twine bow to separate it from the image panel. The thick black border was inspired by the outline of the pineapple image in the Color Throwdown picture.

Shine On - I decided to use a piece of the retired 'Shine On' specialty designer series paper for my background; flat kraft was a little plain and those sprigs of Cucumber Crush were just what my card needed.

Here is the visual summary of the key products used on today's project for you to pin for easy reference:


You can see all of my 'How To' summaries on my 'How To - Tips and Techniques' Pinterest board in case you've missed any. 

I have grocery shopping, office tasks and a game of hockey to look forward to today; Enjoy your day and I'll be back tomorrow with another project; until then, happy stampin'!


Stampin' Up! Supplies Used:

Table built using Product Table Builder by The Crafty Owl - Independent Stampin' Up! Demonstrator.

Tags: , , , , , ,

Cards | Shop Online | Stamping

Pop Of Pink Balloon Celebration

by Joanne James19. June 2016 09:00

It's Sunday and time for a new challenge over at The Paper Players! This week is a very special one for us - we are celebrating our 300th anniversary - isn't that just AMAZING?! It's the turn of the awesome Jaydee to host and she has chosen an appropriate theme for her CAS challenge this week for you to play along with - Celebration:


To celebrate this occasion we have blog candy to give away, and lots of it! The team has assembled not one, not two, but ten grab bags full of stamping goodness! To be eligible to win one, all you need to do is play along with our challenge this week. You can play as many times as you like, but each needs to be a new project (no back linking, please) and see The Paper Players blog for our other challenge rules. Winners will be selected from all PP300 challenge participants using Random.org and will be posted on Saturday June 25th.

For my card this week I decided to go with and a little pop of pink and a big party balloon for my celebratory card, using this weeks Freshly Made Sketches sketch (upside-down, of course!):

Here's the low-down on today's card:

Celebrate Today - Every celebration needs a balloon or two! I decided to go with a large pink one from the 'Celebrate Today' stamp set. This balloon was the perfect focal point for the sketch and the co-ordinating Balloon Framelits make cutting it out a cinch.

A Pop Of Pink - I decided to use a piece of the Pop of Pink specialty designer series paper for my background. The gorgeous black and white papers with a pop of pink (and a little gold too) were the inspiration for the colour scheme for my card. 

Touches of Gold - Whilst I didn't use any of the gold patterned Pop of Pink DSP, there are a number of subtle gold elements that make this card: the gold foil trim, the heat embossed sentiment and sparkle of the balloon and the trailing gold sequins.

Here is the visual summary of the key products used on today's project for you to pin for easy reference:


You can see all of my 'How To' summaries on my 'How To - Tips and Techniques' Pinterest board in case you've missed any. 

I haven't been with the team all this time, but I can honestly say I am so pleased to have been a part of it for as long as I have - these gals are truly inspirational, supportive and all-round top notch in equal measure and I sure hope I can be a part of the next 300! Before you reach for your ink and papers, check out what our amazing team has created to inspire you this week:

The Paper Players Design Team
 
 
Here's a quick recap of our challenge rules:
 
1.  Create a new paper project
2.  Upload your creation to your blog with a link back to us and provide a direct link to the post featuring your challenge submission.
3.  Please link your card to no more than four challenges, TOTAL.
4.  Have FUN! 

I look forward to seeing your celebratory CAS creations in our gallery this week and reading your kind comments on our blogs. Don't forget we have 10 bags of blog candy to give away too, so you should definitely consider an entry this week. You have to be in it to win it! I'm not telling you what's in my grab-bag  - it's a surprise! - but I can guarantee it's full of crafty goodness. We are shipping worldwide, so everyone can join in!

I'm not sure what today has in store for me, other than it will certainly involve some pampering of my husband by myself and the two children as it's Father's Day. Happy Fathers Day wishes to all of the men out there celebrating along with us today! 

Back tomorrow with another project; until then, happy stampin'!


Stampin' Up! Supplies Used:

Table built using Product Table Builder by The Crafty Owl - Independent Stampin' Up! Demonstrator.

A Playful Palette Happy Birthday

by Joanne James16. June 2016 08:05

I'm back from a special day yesterday: Rebecca celebrated her 11th birthday - wherever did that time go?! She was slightly disappointed that it was a school day, although genuinely touched by the number of children that came up to her to wish her a happy birthday yesterday, and two little juniors who even came and sang to her - how sweet! It seems when you're Head Girl everyone knows when it's your birthday!

Anyway - today it's time for a new challenge over at Create With Connie and Mary and this week we have a sketch for you:


For my card today I decided on a showcase of in-colours and one of the new designer series paper stacks - take a look:

Here's the low-down on today's card:

A Playful Palette of Colour - The designer series papers featured on my card today feature four of the five new in-colours (only Dapper Denim is absent) and are one of the products featured in the Playful Palette suite - modern and colourful designs, inspired by brushstrokes and artwork. Here's a photo showing other items in this creative suite:


Layering Squares - I cut each of my four squares with my new Layering Squares framelits and chose to highlight one of the squares with a narrow scalloped border in Peekaboo Peach. These layered squares are great for creating perfectly aligned borders, frames and shaker cards and can be used in endless different combinations to achieve a different effect each time.

Hello You Happy - I finished my card with a sentiment comprising a little banner using words from the 'Crazy About You' stamp set and a die cut 'happy' using one of the 'Hello You' thinlits. I diecut my 'happy' in Emerald Envy, dipped it in Versamark and then heat embossed it with clear embossing powder and repeated the process 3 times to get a smooth and glossy finish. It really stands out against the patterned papers and the Sweet Sugarplum base  - I love it!

Here is the visual summary of the key products used on today's project for you to pin for easy reference:


You can see all of my 'How To' summaries on my 'How To - Tips and Techniques' Pinterest board in case you've missed any. 

Do visit the other Design Team members to see what they did with this week's sketch; there's lots of inspiration over on their blogs too!

Enjoy your day; I'm getting together with some of my team for a catch-up, which should be fun. I'll be back tomorrow with another project; until then, happy stampin'!


Stampin' Up! Supplies Used:

  • Playful Palette Designer Series Paper Stack
  • Hello You Thinlits Dies
  • Layering Squares Framelits Dies
  • Crazy About You Stamp Set
  • Sweet Sugarplum A4 Cardstock
  • Peekaboo Peach A4 Cardstock
  • Emerald Envy A4 Cardstock
  • Very Vanilla A4 Cardstock
  • Tuxedo Black Memento Ink Pad
  • Versamark Pad
  • Clear Stampin' Emboss Powder
  • Heat Tool (Uk)

Father's Day Captain America Hero Card

by Joanne James14. June 2016 14:45

I'm back again! Apologies for yesterday's lack of blog post; at this time of year the last few weeks of the academic year are always busy, so it sometimes means my daily blog schedule is disrupted. Do bear with me - it's often not for want of things to share and more the time to write the posts, in amongst other commitments to my family, customers and team. There will always be posts to coincide with my design team commitments; there just might be the odd day when I don't make it to the laptop! Anyway today I do have a fun share that uses this week's colours over at The Paper Players again and the sketch layout at CAS Colours and Sketches:


My fellow Paper Player LeAnne, who chose this week's colours, also chose to use this sketch for her Sunday card (you can check it out along with the other Paper Player Team cards here) and whilst I was working on my team card, I also came up with this one that would make a fun last-minute Father's Day card:


I am using a few retired products on today's card, but you could quite easily substitute these with other similar products such as the scalloped tag topper punch, layered circle thinlits and an alternative alphabet stamp set such as the new Labeler Alphabet. Here's the low-down on today's card:

My Hero Captain America - The layered circle element on my card is inspired by the shield belonging to that all-American superhero Captain America. I used my circle framelits and the challenge colours, with a circle of silver foil card, to create my shield. I decided to make this card into a Father's Day card, but the sentiment could also be adapted for a younger boy's birthday card, which given the popularity of Marvel comic book heroes with my 8 year old and his friends currently is something I definitely need to look into!

Calling All Heroes - I used the Retired 'Calling All Heroes' stamp set for my custom sentiment on my tag; this comic book script adds just the right feel for my card. For my UK readers who might be thinking 'what set?' this set was available only in the USA. I was sent a set by the lovely LeAnne (thank you again!) and I knew that I would get lots of use from it with its fun comic book and superhero images. I also used other images from the set to decorate the inside of my card. For me it's a keeper!

It's In The Stars - Lastly, I punched a white star for the centre of my shield using the medium star punch and embossed the background panel for my cardfront using the Lucky Stars embossing folder to add texture and interest and tie in with my overall theme. 

Here is the visual summary of the key products used on today's project for you to pin for easy reference:


You can see all of my 'How To' summaries on my 'How To - Tips and Techniques' Pinterest board in case you've missed any. 

Enjoy your evening. I'm off to bake and ice some cupcakes for a very special birthday girl who will be celebrating tomorrow. I'll be back then with another project; until then, happy stampin'!


Stampin' Up! Supplies Used:

Table built using Product Table Builder by The Crafty Owl - Independent Stampin' Up! Demonstrator.

Patriotic Stars and Stripes Thoughtful Banners Card

by Joanne James12. June 2016 09:00

It's Sunday and time for a new challenge over at The Paper Players! It's the turn of my dear friend LeAnne to host our challenge this week and she has a great colour combination for you to play along with:


I thought these colours were calling out for a patriotic red, white and blue card. I toyed with creating something in honour of HM Queen Elizabeth II who is celebrating her official 90th birthday this weekend, but in the end decided to go with something more appropriate for American Independence day as 4th July is not that far away. This is what I came up with:


Here's the low-down on today's card:

Thoughtful Banners - I used the new 'Thoughtful Banners' stamp set to create my abstract stars and stripes card today. This set is all about the sentiments, with many combinations to choose from. It also has a useful stripe stamp, that can be used with or without the words and banners to create a striped pattern, as I've done here. This is a photopolymer stamp set too which makes it easy to line up without the need for a stamp-a-ma-jig - bonus! 

Duet Banner Punch - I could have used so many of the stamps in this set on my card today, however when I thought about independence and the armed forces both here in the UK and abroad, the one word that summed up how I felt was 'blessed' - blessed that so many men and women are prepared to serve our countries and protect the rights and freedoms we so often take for granted, so this was the word I chose to feature on the banner of my card. A banner that was easily created with the co-ordinating Duet Banner Punch. Buy this with the Thoughtful Banners stamp set as a bundle and save 10%; don't mind if I do!

Shine Like A Star - I backed my sentiment banner with a layered star, cut from silver foil with the Star Framelits and centred with a smaller one in Whisper White. 

Here is the visual summary of the key products used on today's project for you to pin for easy reference:


You can see all of my 'How To' summaries on my 'How To - Tips and Techniques' Pinterest board in case you've missed any. 

I hope this card is a fitting tribute to those who give of themselves in order to protect the freedoms of us all, for whom we should all feel truly blessed.

I'm linking up with the ladies over at SUO Challenges today where their current challenge is Summer Celebrations.

Before you reach for your ink and papers, check out what our amazing team has created to inspire you this week:

The Paper Players Design Team
 
 
Here's a quick recap of our challenge rules:
 
1.  Create a new paper project
2.  Upload your creation to your blog with a link back to us and provide a direct link to the post featuring your challenge submission.
3.  Please link your card to no more than four challenges, TOTAL.
4.  Have FUN! 


I look forward to seeing what you create with our colour palette this week. We have basketball this morning then an afternoon of music practice for Rebecca who is singing in a concert on Monday evening, along with more practice of her lines in readiness for her stage performance as Dorothy in her school production of the Wizard of Oz in just a few short weeks time. 

Back tomorrow with another project; until then, happy stampin'!


Stampin' Up! Supplies Used:

Table built using Product Table Builder by The Crafty Owl - Independent Stampin' Up! Demonstrator.

New Online Exclusives

There are new products available exclusively in the online store from 5 November - check them out here.

Latest Kits!

Stampin Cut and Emboss

The Layered Landscapes Kit and Nature's Paintings Kit are the latest kits in the online store - get yours here!

Shop Online

Access my online shop 24 x 7, 365 days of the year:

Current November hostess code:

9NKXDTTR

Shop Online

Mini Catalogue

BROWSE THE CATALOGUE

'Tis The Season - the new Stampin' Up! Mini Catalogue is here! For more details and to download your copy click here

Scrapbooking

Stampin' Up! has introduced a new range of 12x12" scrapbooking product and kit - the full range is now available to purchase online. To download a copy of the new digital Scrapbooking Catalogue click here.

2024-25 Annual Catalogue

BROWSE THE CATALOGUE

Click on the image to download your copy of the 2024-25 annual catalogue. For a full list of current SU! supplies, go to my online store. If you would like any help or advice, please drop me a line at joanne@thecraftyowl.co.uk or give me a call on 07773 421446 - I'd be happy to help.

Join My Team

It's always a great time to join Stampin’ Up! New team members can get £130 worth of products for only £99 + free business supplies + free shipping + all the fun being a part of Stampin’ Up! Stampin' Up! has something for everyone: join my growing team and benefit from my support to enjoy Stampin' Up! however you choose.

If you're interested, call me for a chat to understand how I can help you realise your goals. Alternatively, if you have already decided to sign up and you just can't wait, please click here for the link to the online form where you can sign up and order your starter kit right away! 

About Me

Hi I'm Joanne and live in Northampton and when I'm not looking after my husband and two beautiful children, am an avid crafter with a passion for all things Stampin' Up!

I must confess that I have never been a big rubber stamper - until I discovered Stampin' Up! that is. I love the fact that I can get such great results with co-ordinating stamps, inks, papers and punches - the possibilities are endless! Join me on my stamping journey as I share the things I love and be inspired to create amazing things yourself!

Follow Me

Monthly Newsletter

Box Builder

Click the button above to use Box Buster to create your custom box design using the Envelope Punch Board!

Kits Collection Now Available!

Stampin Cut and Emboss

The new Kits Collection from Stampin' Up! is now available!

Click here to see the current kits available and order yours online today.

I Design For


Stampin' Up Stuff

This is my personal blog and is not endorsed by Stampin’ Up! I hope you find it a plentiful source of ideas and personal inspiration but please don't copy my designs for contest submission or use for classes, publication or sale without express permission.