Northampton Saints-Inspired Clean and Simple Birthday Card

by Joanne James16. September 2018 09:00

Today it's Sunday and time for this week's new challenge over at The Paper Players - yay! It's the turn of my good friend Claire to host this week and she has a clean and simple challenge for you to work with:


Remember in addition to the theme of "sports/favourite team/team colours", this week is a Clean-and-Simple (CAS) challenge!  What do we mean by CAS?

  • Minimal layers and embellishments
  • Plenty of open space, aka "white" space
  • Simple and uncluttered

As my regular readers will now, the James household is big into sport: the James Juniors both swim competitively, Rebecca is a keen hockey player and also plays netball and cricket for her school teams, whilst Ben plays basketball, rugby football and cricket. We also enjoy sport as a family and are keen cyclists and scuba divers. Our weekends are often filled with one sporting activity or another and my life seems to revolve around fixtures, matches, galas and competitions. So I was rather spoilt for choice this week! In the end, as I needed something clean and simple I took my inspiration from a birthday gift that Ben received from one of his cousins recently - a drinks bottle bearing the colours and badge of our local town rugby team, the Northampton Saints. Here's a picture of the drink bottle: 


And here is the card it inspired that also works perfectly for this week's challenge over at Stamp Ink Paper which is all about large sentiments:


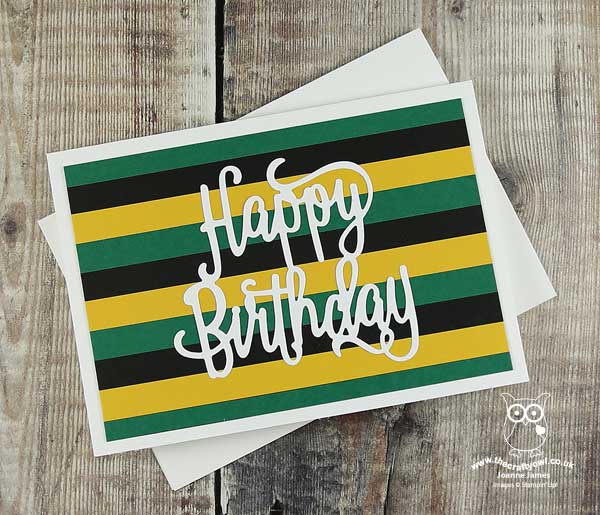
I used the stripes for my background and added a diecut sentiment in white - and that's it! Really not much explanation required for my card this week, no stamping and super clean and simple. I do have a tip for you though if you want to create a neat background using strips of cardstock: I cut my cardstock into 1cm strips that were longer than I needed, then glued them to a base piece of black cardstock that I then trimmed neatly to size before adhering to my white card base.

Here is the visual summary of the key products used on today's project for you to pin for easy reference:


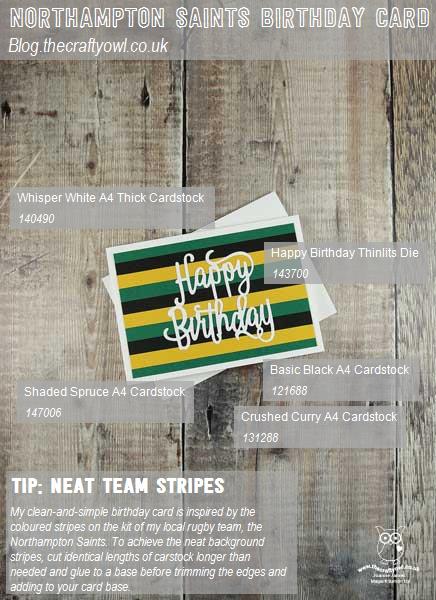
You can see all of my Product and 'How To' summaries on my 'How To - Tips and Techniques' Pinterest board in case you've missed any. 

My 16 year-old nephew plays rugby for the Northampton Saints Junior Academy and is one of the official ball boys for the first team on match days, so it's fair to say is Saints-mad. Ben has already decided this card should be for William; given that his next birthday is in November and this card is made already, I suddenly appear to be very organised for once - it will never last!

Before you reach for your ink and papers, check out what our amazing team has created to inspire you this week:

Here's a quick recap of our challenge rules:
 
1.  Create a new paper project
2.  Upload your creation to your blog with a link back to us and provide a direct link to the post featuring your challenge submission.
3.  Please link your card to no more than four challenges, TOTAL.
4.  Have FUN!

You can see all of my 'How To' summaries on my 'How To - Tips and Techniques' Pinterest board in case you've missed any. 

Enjoy your day; we have a second day of hockey and a birthday party to look forward to. I'll be back tomorrow with another project. Until then, happy stampin'!


Stampin' Up! Supplies Used: 

Table built using Product Table Builder by The Crafty Owl - Independent Stampin' Up! Demonstrator.

Happy Birthday Gorgeous Catalogue CASE Surprise Pop-Up Card

by Joanne James29. June 2017 07:00


Today I'm sharing another of the cards from my recent technique class featuring the Happy Birthday Gorgeous bundle. The outside is a CASE (copy and share everything) of the card on page 76 of the annual catalogue:


Here's the low-down on today's card:

Hip Hip Hooray - Today's card again features the 'Happy Birthday Gorgeous' stamp set, this time focusing on the balloons rather than the flowers for decoration, and also highlights the Happy Birthday Thinlit. These items are available as a bundle and whilst the thinlit is proving popular as a standalone item with many of my customers, the stamp set really is worth a look: flowers and balloons that have universal appeal and lots of great birthday sentiments, some of which also co-ordinate with the classic label punch, that I've used for the 'hip hip hooray' on my card front today. Besides, with a 10% discount when you buy both items, you are also getting even more value from your purchases - just sayin' :-)

A Happy Birthday Surprise - So you might be thinking I've lost the plot, as I mentioned above I was featuring both items in the bundle and the Happy Birthday Thinlit is no-where to be seen. Well, look what awaits when you open the card:


There it is! I made an easy pop-up mechanism so that as the recipient opens the card, they get a big, bold birthday message - how fun is that? This is so easy to do: you just need to make a couple of slits a few centimetres in from each side along the central fold and add a couple of additional scorelines in between them, then adhere the base of your diecut to the pop-out section. 

A Hint Of Fancy Foil - Lastly, for a little pizzazz I added a few strips of the super-shiny Foil Frenzy cardstock with the Tangerine Tango pattern to both the outside and inside of my card. I will be using most of mine for boxes and packaging as it is super sturdy, although it's worth keeping any offcuts to use on cards as a little goes a long way.

Here is the visual summary of the key products used on today's project for you to pin for easy reference:


You can see all of my 'How To' summaries on my 'How To - Tips and Techniques' Pinterest board in case you've missed any. 

Enjoy your day and I'll be back tomorrow with another project. Until then, happy stampin'!


Stampin' Up! Supplies Used:

Table built using Product Table Builder by The Crafty Owl - Independent Stampin' Up! Demonstrator.

Happy Birthday Gorgeous!

by Joanne James15. June 2017 09:00

Today is a special day in the James household: the eldest of my juniors turns 12. I'm not sure where those years went by, although I do know that what was once my chubby little baby girl is now rapidly turning into a wonderful young woman with thoughts, hopes and dreams. So today I thoughts I would share the birthday card I made for Rebecca - take a look:


When I came to make Rebecca's card, I knew there were a number of things I needed to include: pink, sparkle and a big birthday wish and today's card is the result! Here's the low-down on my card:

Berry Burst: A Grown Up Pink - Whilst Rebecca isn't a girly-girl, she is most definitely a lover of pink! One of the new in-colours, Berry Burst, was my choice of pinks for her card; I think this pink is a rather grown-up pink and perfectly suited to a card for a discerning young lady. It also has some lovely co-ordinating accessories such as the 1/2" Finely Woven Ribbon, which ties beautiful bows.

Move Over Glimmer, There's A Foil Frenzy Going On! - So I had to include a small piece of silver glimmer paper on my card - Rebecca just loves the stuff! - but the real shimmer and shine comes from the new Berry Burst spotty Foil Frenzy kraft cardstock. With bright, colourful designs, this heavyweight foiled kraft cardstock will be perfect for boxes and I can't wait to start constructing, but for today it made a great base for the front of my card. 

Stacked Diecuts Made Easy - For my sentiment I used the new Happy Birthday Thinlit to create my focal point, cutting and stacking three diecut pieces and brushing with clear Wink of Stella for a subtle sparkle before heat embossing with clear embossing powder a further three times. Effort? Yes. Worth it? Totally!  There is a new adhesive that you may not have noticed in the new catalogue that makes light work of stacking and adhering die cuts - the new Multipurpose Adhesive Sheets (page 203 - you are welcome!) are such a timesaver. Simply stick your cardstock to an adhesive sheet before rolling your thinlit through the Big Shot, then you can peel away the backing and your diecut is ready to stick - no mess, no fuss. 

Here is the visual summary of the key products used on today's project for you to pin for easy reference:


You can see all of my 'How To' summaries on my 'How To - Tips and Techniques' Pinterest board in case you've missed any. 

I'm pleased to report that Rebecca's card received the official 'thumbs up', which is really all you can ask for when you're making a card with a special someone in mind.

I'll be back tomorrow with another project. Until then, happy stampin'!


Stampin' Up! Supplies Used:

Table built using Product Table Builder by The Crafty Owl - Independent Stampin' Up! Demonstrator.

Happy Birthday Thinlits Brights

by Joanne James5. June 2017 12:00

I'm a little later posting today as I had the first of this month's technique classes this morning and I wasn't quite organised enough to post beforehand. Anyway, I'm here now with a bright and colourful card to cheer your day! I have another birthday card for you - this time one that uses the current sketch over at the Fab Friday Challenge:


This circle could be so many things, but I really felt it needed words - in fact, two big ones! Take a look:


 Here's the low-down on today's card:

Happy Birthday - It's big, it's bold and says it all right there: the Happy Birthday Thinlits Die really does make a big impact! Whether you pair it with flowers or balloons (the bundled stamp set 'Happy Birthday Gorgeous' has both), this die makes a statement when used on a card front or birthday packaging. Here I've layered it and offset both diecuts, for added impact. This is one die that is going to get lots of use, for sure.

Reversing Birthday Memories - The paper I've used on my card today is from the Birthday Memories designer series paper from the product suite of the same name. You will no doubt like me swoon over this fabulous paper and it's adorable hand painted colourful children's illustrations, however the reverse side should also not be overlooked - it includes some great repeat patterns, along with a wonderful rainbow striped pattern and the dotty pattern that I've used on my card today. 

Blue With A Touch Of Citrus - My choice of patterned paper inspired my colour choices today, although I switched out the Soft Sky for Pool Party as I wanted a warmer blue to balance my zingy citrus colours of Lemon-Lime Twist and Pumpkin Pie. Here's today's colour combination for you to save to inspire your future creations too:

Here is the visual summary of the key products used on today's project for you to pin for easy reference:


You can see all of my 'How To' summaries on my 'How To - Tips and Techniques' Pinterest board in case you've missed any. 

Enjoy your day and I'll be back tomorrow with another project. Until then, happy stampin'!


Stampin' Up! Supplies Used:

Table built using Product Table Builder by The Crafty Owl - Independent Stampin' Up! Demonstrator.

Mini Catalogue

BROWSE THE CATALOGUE

The mini catalogue is now live! Read and download your copy here.

Shop Online

Access my online shop 24 x 7, 365 days of the year:

Current April hostess code:

VDKNV7BH

Shop Online

Join My Team

It's always a great time to join Stampin’ Up! New team members can get £130 worth of products for only £99 + free business supplies + free shipping + all the fun being a part of Stampin’ Up! Stampin' Up! has something for everyone: join my growing team and benefit from my support to enjoy Stampin' Up! however you choose.

If you're interested, call me for a chat to understand how I can help you realise your goals. Alternatively, if you have already decided to sign up and you just can't wait, please click here for the link to the online form where you can sign up and order your starter kit right away! 

Latest Kit!

Stampin Cut and Emboss

The Rock Legend Kit has all you need to make 8 cards with coordinating envelopes. Along with the new Panda Friends Kit, both are available from January 4th for just £14 each - get yours here!

2023-24 Annual Catalogue

BROWSE THE CATALOGUE

Click on the catalogue for a full list of current SU! supplies - if you would like to order any of the items featured, please drop me a line at [email protected] or give me a call on 07773 421446 - I'd be happy to help.

New Online Exclusives

There are new products available exclusively in the online store from 5 March - check them out here.

About Me

Hi I'm Joanne and live in Northampton and when I'm not looking after my husband and two beautiful children, am an avid crafter with a passion for all things Stampin' Up!

I must confess that I have never been a big rubber stamper - until I discovered Stampin' Up! that is. I love the fact that I can get such great results with co-ordinating stamps, inks, papers and punches - the possibilities are endless! Join me on my stamping journey as I share the things I love and be inspired to create amazing things yourself!

Follow Me

Monthly Newsletter

Box Builder

Click the button above to use Box Buster to create your custom box design using the Envelope Punch Board!

Kits Collection Now Available!

Stampin Cut and Emboss

The new Kits Collection from Stampin' Up! is now available!

Click here to see the current kits available and order yours online today.

I Design For


Stampin' Up Stuff

This is my personal blog and is not endorsed by Stampin’ Up! I hope you find it a plentiful source of ideas and personal inspiration but please don't copy my designs for contest submission or use for classes, publication or sale without express permission.