Scalloped Tag Top Punch Concertina Card - Mother's Day

by Joanne James19. March 2014 20:33

Today I want to share with you another use for one of my new favourite punches - the scalloped tag top punch. This really is such a versatile punch that can be used in so many ways. There are lots of variations on how it can be used to make an unusual card closure - today's card is a fun, concertina style Mother's Day card, where the scalloped tag top punch is used to add detail to the closure. This is what the card looks like 'closed':

Ribbon is threaded through the punch out hole and around the card and tied in a bow to keep it shut, then when you undo the ribbon and open the card out, you see the message inside:

These cards are such fun to make and so easy. All you need is one sheet of 12" x 12" for the basic card. I used a sheet of the Gingham Garden DSP for my card, and layered the inside panels with Whisper White matted on Daffodil Delight. I cut the letters for 'Mothers' with my Typeset Alphabet die, but you could easily use an alphabet stamp set such as Morning Post or Notable Alphabet if you have one instead. I took the word 'Happy' from one of the 'See Ya Later' Sale-A-Bration stamp sets and the letters for 'Day' from my Sketched Alphabet individual stamps before punching out and layering on a mini banner. I then decorated with flowers stamped and punched from the Petite Petals bundle and the Itty Bitty Punches set in colours that co-ordinated with my chosen DSP. The last panel is left blank for you to write your personalised Mother's Day message.

I had intended to shoot a video tutorial on how to make one of these cards to accompany my series of Scalloped Tag Top Punch video tutorials, but time has not been on my side so I haven't managed it yet; I will look to complete one in the next week or so and when I do will update my blog with the link.

The best bits about this card: it's one of those projects where you don't have to deliberate over which side of your DSP to use, as you see both sides (dilemma avoided, for once) and also because of the closure, you don't need an envelope - this is a card and envelope in one! This style of card would work for lots of other occasions too - why not have a go and see what you come up with.

Back tomorrow with another project; until then, happy stampin'!


Stampin' Up! Supplies Used:

Table built using Product Table Builder by The Crafty Owl - Independent Stampin' Up! Demonstrator.


Undefined Take 1: In The Swim

by Joanne James16. March 2014 20:52

Good evening lovely readers! No blog post from me yesterday as I had a rare 'night off': James Juniors had a sleepover at Grannies' house and I was treated to a night at the movies (we saw 'Non Stop' with Liam Neeson - great action movie!) To make up for it, I have a whole set of cards to share with you today: my very first set of Undefined hand-carved stamps.

If you're a Facebook follower of The Crafty Owl, you may have seen today's thread that has been about what would you carve with yours followed by some guesses as to what I carved with mine. The Undefined Carving Kit is a great set with everything you need to cut and mount four stamps. This first set I carved was for Rebecca, who given her passion for swimming had a clear idea of what she wanted her stamps to feature - water, in a big way. So after much sketching and carving, this is what we came up with:
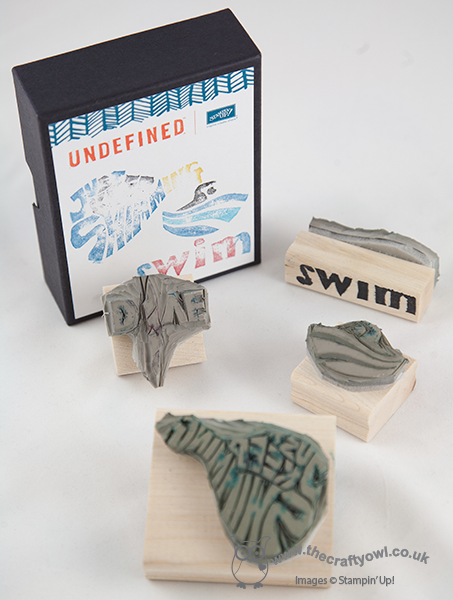
All of our stamps had something to do with swimming - the stamps themselves don't look that interesting, so I made a simple card to showcase each of the designs to give you a better idea of what they look like. So here's the first one, an abstract swimmer:
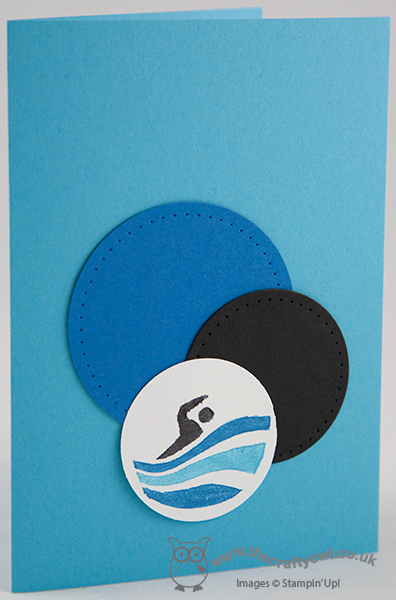
I simply mounted him with some paper pierced circles on a watery blue background. Here's a close up of the carved stamped image:
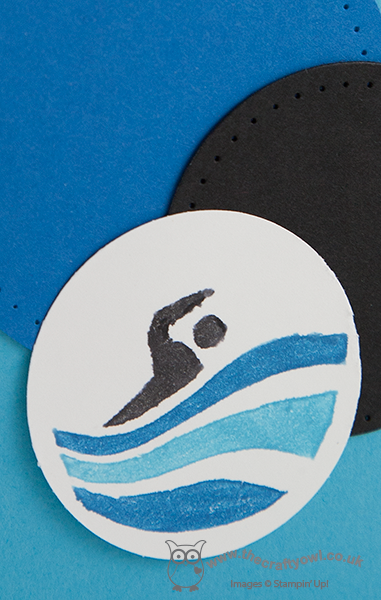
 

You can tell it's a hand carved stamp as it's nowhere near as sharp as a traditional SU! stamp, but then it's great fun to be able to create something unique that you carved yourself. Here is the second stamp - this time, a diver: 
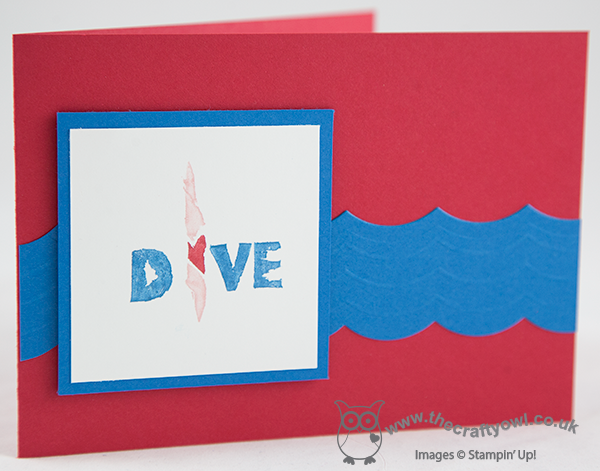
 I used my Borders scoring plate and Large Scallop Edgelit to create my waves in the background. The next one was actually the first stamp I carved and it shows - take a tip from me, if you're carving words, which is quite tough, don't start with a curved letter such as 'S' - in hindsight I needed a little more practice before I started this one!
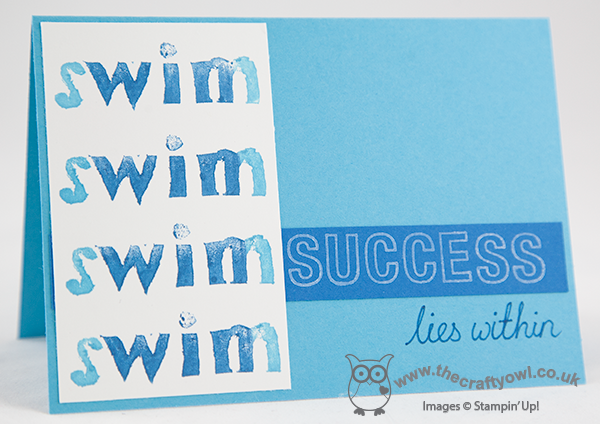
 I love the message of this card though - it was something I read on the internet as an inspirational quotation and I thought it was really apt; sometimes it's as much about the motivation and belief that you can achieve, as it is the winning itself. Our last stamp was a fun one - do you recognise this famous fish cameo? 
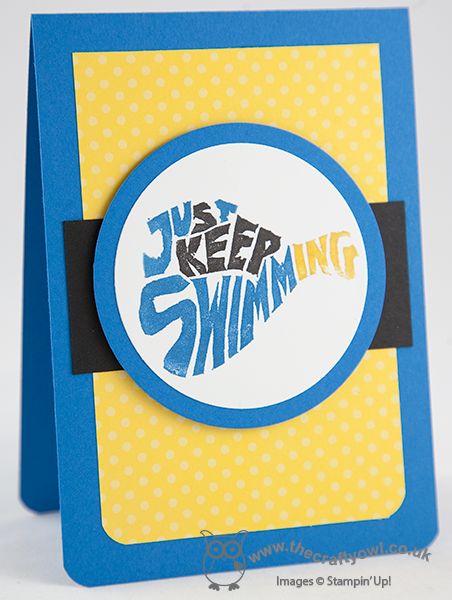
This is my take on Dory from the Disney movie 'Finding Nemo', a definite James family favourite and whilst it might look complicated, as the last of my stamps to carve I had had a little practice by this point, so think it turned out quite well.

I hope you like my first foray into the world of 'Undefined' - it really was fun and Rebecca LOVES her stamps, which is the main thing! I will have more to share with you another time as I still have Ben's set and mine to carve. if you would like more 'Undefined' inspiration, check out Stampin' Up!'s Undefined Pinterest page, where you will see lots of amazing creations!

Back tomorrow with another project; until then, happy stampin'!


Stampin' Up! Supplies Used:

Table built using Product Table Builder by The Crafty Owl - Independent Stampin' Up! Demonstrator.


Hello You Mojo Monday 335

by Joanne James8. March 2014 20:54

Today's card is one I designed for this week's Mojo Monday sketch challenge, where I was attracted by the layout and the 'frame' element that is central to the sketch:

Here is my take on the sketch:

My card is a riot of graphic patterns and colour, using the Kaleidoscope Designer Series Paper as the inspiration for my colour scheme. I added a layer of texture with a Bermuda Bay panel that I dry-embossed with my Chevron Textured Impressions Embossing Folder, then layering the various elements in contrasting papers and finishing with a banner of Crushed Curry that I stamped with Versamark and heat embossed in black embossing powder to give it a lovely sheen. Cutting my frame was easy with the aid of my square framelits - this is one of those times when they are invaluable. I popped my chevron punched pieces on dimensionals, using them to draw the eye to my button 'You' (this is a partial stamp of the 'You & Me' stamp in the Perfect Pennants set).

I'm not one for mix-and-match of patterns as a rule, but sometimes it's ok to step outside of your comfort zone. I hope you're all enjoying your weekend; the weather has been much warmer and brighter here in the UK today - we managed to get some time outside in the garden today, which made a nice change.

Back tomorrow with another project; until then, happy stampin'!


Stampin' Up! Supplies Used:

Table built using Product Table Builder by The Crafty Owl - Independent Stampin' Up! Demonstrator.


Video Tutorial 2: Make Any Size Box Using Your Envelope Punch Board and Box Buster from The Crafty Owl

by Joanne James5. March 2014 09:52

Good morning blog readers and crafters! Back nice and early this morning with the second of my video tutorial posts showing you how to make any size box using your Envelope Punch Board and my new Box Buster tool. I've started early on my Easter treat boxes, so today's box shows you how to make this cute box:

The finished dimensions of today's box are 100mm x 75mm x 15mm. It was designed to fit a specific Easter treat - but you'll have to watch the video below to find out what it was! My new Box Buster from The Crafty Owl tool is just great for that - you can easily create a box to fit your chosen contents, without any hassle or wasted paper - you just measure the thing you want to put in the box, input the dimensions into the Box Buster tool and it does all the hard work for you: it will tell you exactly what size paper you need and where to make your first and second punch markings.

Today's project was worked out in millimetres, but the Box Buster tool will let you construct your box in either millimetres or inches - you choose! Here's the link to today's video tutorial:


Wasn't that SOOO easy?! Keep following this week as there are more box tutorials to come, showcasing a variety of box types with handy hints and tips for making the most of your Envelope Punch Board and my new Box Buster tool.

Back soon with another project; until then, happy stampin' (and box making!)


Stampin' Up! Supplies Used:

Table built using Product Table Builder by The Crafty Owl - Independent Stampin' Up! Demonstrator.


Happenings Simply Created Cards

by Joanne James2. March 2014 20:59

Today I'm sharing some of the cards I made using the Happenings Simply Created Card Kit that features in the Spring-Summer catalogue. The kit contains everything you need to make 15 cards, including envelopes and costs just £13.50 - that equates to 90p per card, which is great value for a hand-finished card. It doesn't include inks or stamps - you can use the 'Says it All' set suggested in the catalogue, or you can use whatever sentiment sets you already own. I used a selection of stamps on my cards, and added in a few additional items on a few of them too. So here's my first card, which is made up following the basic design that is included with the kit:

I then added in some co-ordinating accessories just to change things up a little on some of my cards - I created some embossed sections using the new Arrows embossing folder and the Hexagon embossing folder:

I also used some punches to create shapes that mirrored the patterns of the die-cut accents to add some interest:

These kits would be great for a beginner or someone who hasn't stamped before, as a gift for someone or even just when time is short and you want to create a whole bunch of cards in one go, but that can be varied such that each is unique. If you would like to buy the Happenings Simply Created Kit or any of the other items I've used on my cards, just click on the links in the table below to go straight to my online store or give me a call if you're local to me and I can place the order for you. We are using these kits in my classes this week and I can't wait to see what my ladies will come up with. I managed to decorate all of cards and still have some embellishments left over to decorate a gift box to hold some of the cards I made - come back tomorrow to see a video tutorial showing how I made it using a new tool that I'm sure you will find useful!

Until then, happy stampin'!


Stampin' Up! Supplies Used:

Table built using Product Table Builder by The Crafty Owl - Independent Stampin' Up! Demonstrator.


Everything is ... Awesome! Lego Movie Punch Art

by Joanne James25. February 2014 10:11

Today I have something special to share with you! As my regular readers know, I  live in a house of Lego! Well, not literally, but Lego is a big part of our family life - we have a massive brick collection and I have a 6 year old whose ambition it is to be a master builder someday. Either that, or a brain surgeon so that he can earn enough money to fund his ever-expanding Lego collection! Last week was half-term here which neatly coincided with the release of the first ever Lego Movie - a set built entirely from Lego that tells the story of the 'ordinary' builder Emmet who is mistaken for the chosen Master Builder and whose destiny is to prevent the world of Lego being glued together by the evil Mr Business. Of course the first of our half-term excursions was to the cinema to watch the new movie and Ben at least was not disappointed - he sat 'glued' to the screen throughout.

I decided to create another Lego punch art card to celebrate the release of the new movie and add to my collection (you can see some of my previous Lego punch art here). Here is my card:

Whilst Emmet is possibly the most ordinary of the characters, my card had to incorporate him as he is central to the movie. I used this week's layout over at The Paper Craft Crew PCCCS081 for my card and split Emmet's catchphrase in the movie, 'Eveything is awesome' across both the banner and the word bubble. I printed the 'Everything is' on my computer and matched up the colour to print it in Pacific Point, then stamped the 'awesome' by partially inking one of the stamps in the 'Yippee Skippee' stamp set. I used lots of different punches to create my minifigure and drew on some of the detail by hand with either my Stampin' Write black marker or my white gel pen and used a piece of pacific Point Brights DSP to add colour to the background without overwhelming the focal point.

I love creating this kind of card, although they really do take an age to make - a real labour of love. It was all worthwhile though when Ben took one look at the finished card and declared it "Awesome!" and promptly burst into Emmet's 'Everything is Awesome!' song from the movie.

Back tomorrow with something a little more traditional; until then, happy stampin'!


Stampin' Up! Supplies Used:

Table built using Product Table Builder by The Crafty Owl - Independent Stampin' Up! Demonstrator.


Tags: , , , , , , ,

Cards | Punch Art | Stamping

You Make Me Happy Sale-A-Bration Class Card

by Joanne James7. February 2014 21:05

Well, that was a week! One of my busiest and I sure am glad it's the weekend. Tonight I thought I would share with you one of the cards we made at my classes this week. All the cards we made featured Sale-A-Bration products that could be yours free with an order of £45 or more. Today's card is another featuring the 'You Make Me Happy' stamp from the 'See Ya Later' stamp set:

We stamped the sentiment onto the centre of our 'sun', which we constructed from layered circles and either triangles created with the new triangle punch or banner pieces using the banner punch (my sample shows triangles). I cut a tiny cloud out of an offcut of silver foil and added it to the front on a dimensional to add interest, and added a strip of This and That washi tape below the embossed panel just to bring a little colour and create definition.

If you would like to be the proud owner of this stamp set, then pop on over to my online store via the product links below to place your order. If you live local to me in Northampton and the surrounding area, why not come to one of my monthly card classes or my weekend project classes? My full class schedule can be found here; you don't need to have any previous knowledge or experience, we are a friendly bunch and all are welcome. Do give me a call if you'd like to know more.

Back tomorrow with another project; unitl then, happy stampin'!


Stampin' Up! Products Used:

Table built using Stampin' Up! Product Table Builder from The Crafty Owl.

Sale-A-Bration Sneak Peeks: Team Swap

by Joanne James19. January 2014 21:09

Once a quarter, my wider upline team get together for a team training day. We craft, we share business tips and ideas and we catch up with friends. It's a fun day devoted to our Stampin' Up! businesses and one of the many benefits of being a part of a wider Stampin' Up! team. One of the important parts of these events is the process of 'swapping'. Everyone prepares a card, scrapbook or 3D sample using current products in line with a chosen theme. Today our theme was the forthcoming Sale-A-Bration campaign; as promised, today I'm sharing the swap I prepared:

This card uses three of the products that you can earn free with a £45 purchase: The Petal Parade stamp set, the Decorative Dots Textured Impressions Embossing Folder, and one of the Sweet Sorbet Designer Series paper designs. I used a 1 1/4" circle punch and my circle framelits to cut out the flowers and mounted them on dimensionals for extra interest.

If you would like to make this card, you have only nine more days to go until Sale-A-Bration is live and these products will be available online or through the Sale-A-Bration mini catalogue - not much longer to wait now! I am already taking party bookings for the Sale-A-Bration period; if you would like to host a party during Sale-A-Bration, then contact me to book a slot. Sale-A-Bration is a great time to join Stampin' Up! too; if you would like to know more about the benefits of becoming a Stampin' Up! demonstrator, then check out the link on the right hand side of my blog page or get in touch for an informal chat; I would be happy to share with you the benefits that being a demonstrator can offer.

Back tomorrow with another project; until then, happy stampin'!


Stampin' Up! Supplies Used:

Table built using Stampin' Up! Product Table Builder from The Crafty Owl.


All Wrapped Up - Simple Christmas Gift Wrapping Ideas

by Joanne James22. December 2013 21:17

Well it's been another busy few days here in the James household with a trip to the movies on Friday, a fun trip iceskating yesterday and swimming, grocery shopping and a pre-Christmas festive family get-together this evening. The big day is almost upon us, but I finally managed to get some photographs taken today in between all my last minute Christmas preparations and today would like to share some of my quick but attractive festive packaging ideas for stocking-fillers and small gifts. Here's the first one - a simple pouch made using the envelope punch board:


I made lots of these in various colours to tie in with the Winter Frost DSP stack to package some little gifts for the lovely ladies who have attended my classes over the past year (I can't tell you what's inside though - it's not Christmas Day yet ;-)! )

The second of my projects is a little stocking filler I made for my daughter - a pair of hairclips decorated with Frosted Finishes Embellishments and packaged in a cute little triangular carton that I made using a sheet of the Winter Frost DSP stack:

I embossed the 'warm wishes' sentiment from the 'Snow Day' stamp set using silver embossing powder and it added a real feel of luxury to the finished packaging. For the clips, I simply adhered a Frosted Finishes Embellishments using Crystal Effects to a couple of standard hair clips.

My last packaging idea that I'm going to share today is one of the lovely little muslin bags, which I stamped with the 'Love and Joy' single stamp and decorated with another Frosted Finishes embellishment, a ribbon tie and a little Dazzling Diamonds for some extra sparkle:

These bags are a great size and perfect for a little sweet treat or a small gift such as nail polish or some candles, or maybe a miniature bottle of a favourite tipple, a pack of playing cards or a micro torch for a more masculine gift.

So some easy ideas to make those little gifts extra special.

I have a date with a very large ironing basket tomorrow evening (the exciting life I lead!), but all being well will be back with another post as I've a few more Christmas-themed things to share and am running out of time in which to do it.

Until then, happy stampin'!


Stampin' Up! Supplies Used:

Table built using Stampin' Up! Product Table Builder from The Crafty Owl.


Non-Christmas Card Alternatives Trio

by Joanne James18. December 2013 22:07

Well, what can I say - a seven day absence from my blog - unheard of!! I know this is a busy time of year and I've certainly no shortage of lovely things to share with you, but my real issue has been keeping up, both with the photography (lots of makes are leaving the house before being photographed!) and blog writing itself. The James juniors have finished school for the Christmas holidays already, and in addition to all of the usual pre-Christmas preparations, I have been having so much fun with them I've had little time for anything else this past week.

No festive project to share today - instead the alternative trio of cards made following the same layout used in my December Christmas card class (you can see the Christmas versions here) but with distinctly non-Christmas card designs. So here they are:

This one uses some of the Print Poetry paper stack that is currently available to buy on the clearance rack, whilst stocks last. The second one:

This one has quite a retro feel, with the colour scheme inspired by the retired Sycamore Street SAB paper - my customers love this paper, so are still looking for ideas and ways to use it. Lastly, the third card featuring a bow made with the Gift Bow Bigz Die:

This card actually uses a couple of the things we used to make the Christmas card version - the Seasons of Style paper stack paper and the 'Wishing You' stamp set and proves that these things can be used for non-Christmas as well as Christmas cards if you use alternative colours.

I liked the way all three of these cards turned out and the fact that they gave me a few cards to add to my stash ready for the year ahead. This really is a quick post from me, but before I go I thought I'd share one festive picture of the masterpiece created by my super-creative children today - our very first gingerbread house, from scratch! We made the house yesterday and they built and decorated it today. I'm pleased to say it's all their own work - I for one, think it's rather impressive:

Complete with gingerbread boy and girl and Christmas tree in the garden and following a considerable 'snowfall', of course! Tomorrow I have a day of present wrapping in store, so with Christmas music and tape in hand will be a woman on a mission!

I will hopefully not leave it so long before my next post; until next time, happy stampin'!


Stampin' Up! Supplies Used: 

Table built using Stampin' Up! Product Table Builder from The Crafty Owl.

Current Promotions

Stampin Cut and Emboss

Save up to 30% off on all your favourite kits from 1 to 31 October! 

Click here to see the current kits available and order yours online today.

Join My Team

It's always a great time to join Stampin’ Up! During October you can get even more in your starter kit! New team members can get £160 worth of products for only £99 + free business supplies + free shipping + all the fun being a part of Stampin’ Up! Stampin' Up! has something for everyone: join my growing team and benefit from my support to enjoy Stampin' Up! however you choose.

If you're interested, call me for a chat to understand how I can help you realise your goals. Alternatively, if you have already decided to sign up and you just can't wait, please click here for the link to the online form where you can sign up and order your starter kit right away! 

Shop Online

Access my online shop 24 x 7, 365 days of the year:

Current October hostess code:

4XPEYCB9

Shop Online

Scrapbooking

Stampin' Up! has introduced a new range of 12x12" scrapbooking product and kit - the full range is now available to purchase online. To download a copy of the new digital Scrapbooking Catalogue click here.

Mini Catalogue

BROWSE THE CATALOGUE

'Tis The Season - the new Stampin' Up! Mini Catalogue is here! For more details and to download your copy click here

2024-25 Annual Catalogue

BROWSE THE CATALOGUE

Click on the image to download your copy of the 2024-25 annual catalogue. For a full list of current SU! supplies, go to my online store. If you would like any help or advice, please drop me a line at joanne@thecraftyowl.co.uk or give me a call on 07773 421446 - I'd be happy to help.

Latest Kits!

Stampin Cut and Emboss

The Christmas Ornaments Kit and Card Keeper Kit are the latest kits in the online store - get yours here!

New Online Exclusives

There are new products available exclusively in the online store from 5 November - check them out here.

About Me

Hi I'm Joanne and live in Northampton and when I'm not looking after my husband and two beautiful children, am an avid crafter with a passion for all things Stampin' Up!

I must confess that I have never been a big rubber stamper - until I discovered Stampin' Up! that is. I love the fact that I can get such great results with co-ordinating stamps, inks, papers and punches - the possibilities are endless! Join me on my stamping journey as I share the things I love and be inspired to create amazing things yourself!

Follow Me

Monthly Newsletter

Box Builder

Click the button above to use Box Buster to create your custom box design using the Envelope Punch Board!

Kits Collection Now Available!

Stampin Cut and Emboss

The new Kits Collection from Stampin' Up! is now available!

Click here to see the current kits available and order yours online today.

I Design For


Stampin' Up Stuff

This is my personal blog and is not endorsed by Stampin’ Up! I hope you find it a plentiful source of ideas and personal inspiration but please don't copy my designs for contest submission or use for classes, publication or sale without express permission.