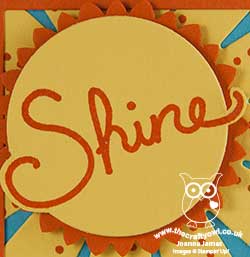
Sending Sunshine Wishes Your Way

by Joanne James15. May 2019 18:00

As promised, I have another quick card that use this week's CAS(E) This Sketch layout:

It's a little more open to interpretation and uses a ton of retired product: Carried Away Sale-A-Bration designer series paper from last year and my Sunburst Thinlits Dies for the sun itself, but is a great sketch to make a fun card that showcases the Sunshine Wishes Thinlits and co-ordinating Sunshine Sayings stamp set that will soon be leaving us to make a cheery card to brighten someone's day:

I'm loving this colour combo and will definitely be using it again. Here it is if you would like to save if for future use too:


Here is the visual summary of the key products used on today's project for you to pin for easy reference:


I love those Sunshine Wishes Thinlits and will be holding on to mine long after they've left the catalogue. Sometimes it's just nice to make a card because you can - and it was definitely good to use us some of my retired paper collection! Enjoy your evening - I'll be back tomorrow with another project. Until then, happy stampin'!


Stampin' Up! Supplies Used:

Table built using Product Table Builder by The Crafty Owl - Independent Stampin' Up! Demonstrator.

Sunburst Sayings and Thinlits Shine It's Your Day

by Joanne James6. March 2016 09:00

Firstly, happy Mothering Sunday to all UK mothers reading this - today is most certainly our day! It's also Sunday and time for a new challenge over at The Paper Players! It's the turn of the talented Sandy to host our challenge this week and she has a great theme for you to play along with:
    PPA-290-Mar03

I was all set to make a rainy day card for today's challenge but I couldn't get the idea in my head to work on paper - so some other time for that card! Instead I decided to use my Sunburst Thinlits and create a bright sunshine card which came together much more like my vision:
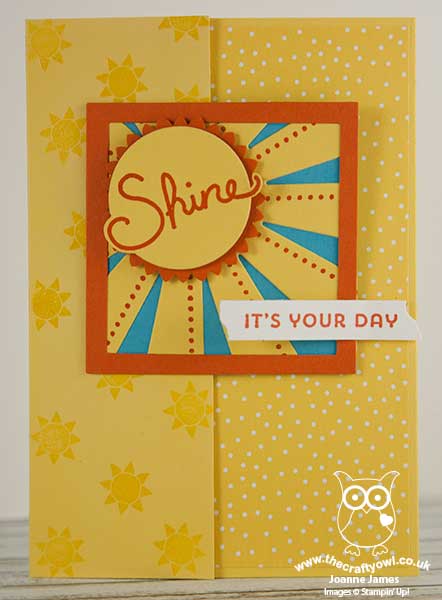
 

I used this week's sketch over at Pals Paper Arts for my layout and created a fun fold card, where the second part of my sentiment acted as a clasp to hold the left-hand panel closed. I used a panel of Daffodil Delight spotted Schoolhouse Designer Series Paper on the right-hand panel and on the left I stamped some sunshines in Versamark and heat embossed them with clear embossing powder. This sunshine is from one of the early limited edition Sale-A-Bration sets, 'Hello' and the good news is that availability of this stamp set has been extended while stocks last. You've still time to snap it up, but you'd better be quick!

For my main square, I used a background of Tempting Turquoise to which I added a Daffodil Delight sunburst, edged with Tangelo Twist. For my sunshine centre, I stamped 'Shine' from the 'Sunburst Sayings' stamp set onto some Daffodil Delight cardstock and fussy cut the outer elements of the sentiment before cutting the remainder with a circle framelit, which allowed my sentiment to overhang. I backed this circle with a mat cut from a 1 3/4" scalloped circle punch, that I punched once then rotated and punched again to create the starburst effect - this is a neat little trick and perfect for this kind of design. It's also a great way to get a second shape from one punch. I then framed the whole square with a Tangelo Twist frame cut using my square framelits. The second part of my sentiment was cut with the washi tape thinlit from the Mini Treat Bag Thinlits set and I adhered this with a dimensional to the right so that it could serve to hold the fold shut. I just love the bright sunshine colours of today's card and the layering of all the elements within the focal square - this will certainly brighten someone's day. The 'Sunburst Sayings' stamp set and Sunburst Thinlit die are another of the great 'bundle and save' offers in the current seasonal catalogue, giving you a saving of 15% when you purchase them together - bonus!

Here's today's visual summary for easy reference:
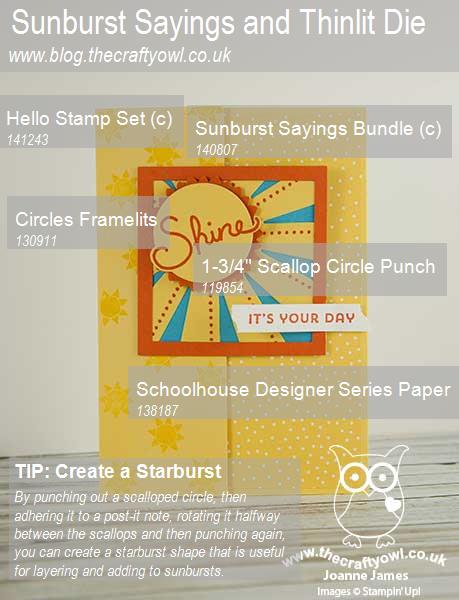
 

Thank you to everyone who has left me a sweet comment or feedback on these new graphics, which have been very well received; they make great Pins too!

Before you reach for your ink and papers, check out what our amazing team has created to inspire you this week:

The Paper Players Design Team
 
 
Here's a quick recap of our challenge rules:
 
1.  Create a new paper project
2.  Upload your creation to your blog with a link back to us and provide a direct link to the post featuring your challenge submission.
3.  Please link your card to no more than four challenges, TOTAL.
4.  Have FUN! 

I look forward to seeing what you create with our theme this week. We are off to basketball this morning with time for a special Mother's Day lunch before venturing out to a birthday party this afternoon. Not quite the restful Mother's Day I had in mind, but life goes on today as always and as my family frequently tell me "Every day is Mother's Day in the James Household!". I have been treated to cards, flowers and gifts today so I am feeling perhaps a little more loved than usual :-) 

I hope you all have an enjoyable Mothering Sunday, whether you are celebrating or are focused on other things today. Back tomorrow with another project; until then, happy stampin'!


Stampin' Up! Supplies Used:

Table built using Product Table Builder by The Crafty Owl - Independent Stampin' Up! Demonstrator.

He Is Risen Sunburst Easter Card

by Joanne James1. March 2016 21:00

Firstly, Happy Saint David's Day to any fellow Welsh bloggers or blog readers! I have had a busy day of classes today, with the first of my technique classes this month this morning and my Project Life memory keeping class this afternoon. I'm not so organised that I had an early blog post for you; my card was made,I just fell asleep at my laptop yesterday evening before I could schedule it! Today's card is for the 300th challenge over at Just Add Ink where they have this sketch as inspiration this week:

JAI #300

I saw this sketch and knew it would be perfect for a card that I've had in mind for a while using my Sunburst Thinlits Die - take a look: 

I wanted to create an Easter card with a sunburst behind a cross; how to make my cross though? I decided to try and make one using a sunburst, by squaring up the edges and cutting away the diagonal sections. Here's a work in progress picture that shows you how I cut it:


I hope that is helpful. I ran my cross through my Woodgrain embossing folder to add some texture and make it stand out against my super-CAS background of So Saffron and Pear Pizzazz. I allowed my sentiment strip to overhang the width of my paper slightly and made my own sentiment using the stamps in the 'Crazy For You' stamp set, masking off letters where not needed until I had my phrase. The Alphabet Rotary Stamp would also allow you to create something similar. I added a gold button, a twist of retired Tangelo Twist satin ribbon and a sprinkling of Pumpkin Pie sequins to finish my card. This is a great Easter card that can be made using entirely non Easter-specific supplies, which is always useful. What do you think of my cross idea? I'd love to know whether you think this works - do leave me a comment with your thoughts below. 

Here's today's visual summary for easy reference:


That's all from me today; I'll be back tomorrow with another project; until then, happy stampin'!


Stampin' Up! Supplies Used:

Table built using Product Table Builder by The Crafty Owl - Independent Stampin' Up! Demonstrator.


You Brighten My Day Layered Sunburst Card

by Joanne James14. February 2016 09:00

Happy Valentine's Day everyone! It's Sunday and time for a new challenge over at The Paper PlayersThis week it is the turn of the queen of die-cuts, the lovely Laurie, to host and she has a colour challenge for you to play along with:


This week's colours are about as far from Valentines as you could possibly get, but this colour palette offers some great opportunities for bright cards on a cold Winter's day. For my card this week I was inspired to use my new Sunburst Thinlits to create a layered sunburst, paired with some patterned cloud paper:

To create my sunburst I cut two sunbursts, one in Daffodil Delight to fit my card panel and the other full size in Tangelo Twist. To get a perfect 'shadow' I cut the orange one into three pieces to give equal shadow lines on each ray, then trimmed the ends to fit flush with the yellow one. I mounted my sunburst onto a piece of Pool Party cloud paper, taken from the Sweet L'il Things designer series paper stack. I stamped my sentiment in Tangelo Twist onto Very Vanilla and layered the circles to create the centrepiece for my sun. Finally, I added a trio of orange Brights sequins to finish. Quite a simple card to look at, but consisting of nine layers in total, each of which adds to the finished look and feel of the card. I love the bright colours of this week's colour palette  -so cheery and sure to brighten everyone's day! 

Before you reach for your ink and papers, check out what our amazing team has created to inspire you this week:

The Paper Players Design Team
 
 
Here's a quick recap of our challenge rules:
 
1.  Create a new paper project
2.  Upload your creation to your blog with a link back to us and provide a direct link to the post featuring your challenge submission.
3.  Please link your card to no more than four challenges, TOTAL.
4.  Have FUN! 

I look forward to seeing what you create with this week's colours. We have a restful day planned today, with a sport-free day as it's the start of the half-term holiday for the James Juniors. Pretty much a whole week of lie-ins - bliss!

Back tomorrow with another project; until then, happy stampin'!


Stampin' Up! Supplies Used:

Table built using Product Table Builder by The Crafty Owl - Independent Stampin' Up! Demonstrator.

Current Promotions

Stampin Cut and Emboss

Save up to 30% off on all your favourite kits from 1 to 31 October! 

Click here to see the current kits available and order yours online today.

Join My Team

It's always a great time to join Stampin’ Up! During October you can get even more in your starter kit! New team members can get £160 worth of products for only £99 + free business supplies + free shipping + all the fun being a part of Stampin’ Up! Stampin' Up! has something for everyone: join my growing team and benefit from my support to enjoy Stampin' Up! however you choose.

If you're interested, call me for a chat to understand how I can help you realise your goals. Alternatively, if you have already decided to sign up and you just can't wait, please click here for the link to the online form where you can sign up and order your starter kit right away! 

Shop Online

Access my online shop 24 x 7, 365 days of the year:

Current October hostess code:

4XPEYCB9

Shop Online

Scrapbooking

Stampin' Up! has introduced a new range of 12x12" scrapbooking product and kit - the full range is now available to purchase online. To download a copy of the new digital Scrapbooking Catalogue click here.

Mini Catalogue

BROWSE THE CATALOGUE

'Tis The Season - the new Stampin' Up! Mini Catalogue is here! For more details and to download your copy click here

2024-25 Annual Catalogue

BROWSE THE CATALOGUE

Click on the image to download your copy of the 2024-25 annual catalogue. For a full list of current SU! supplies, go to my online store. If you would like any help or advice, please drop me a line at joanne@thecraftyowl.co.uk or give me a call on 07773 421446 - I'd be happy to help.

Latest Kits!

Stampin Cut and Emboss

The Christmas Ornaments Kit and Card Keeper Kit are the latest kits in the online store - get yours here!

New Online Exclusives

There are new products available exclusively in the online store from 5 November - check them out here.

About Me

Hi I'm Joanne and live in Northampton and when I'm not looking after my husband and two beautiful children, am an avid crafter with a passion for all things Stampin' Up!

I must confess that I have never been a big rubber stamper - until I discovered Stampin' Up! that is. I love the fact that I can get such great results with co-ordinating stamps, inks, papers and punches - the possibilities are endless! Join me on my stamping journey as I share the things I love and be inspired to create amazing things yourself!

Follow Me

Monthly Newsletter

Box Builder

Click the button above to use Box Buster to create your custom box design using the Envelope Punch Board!

Kits Collection Now Available!

Stampin Cut and Emboss

The new Kits Collection from Stampin' Up! is now available!

Click here to see the current kits available and order yours online today.

I Design For


Stampin' Up Stuff

This is my personal blog and is not endorsed by Stampin’ Up! I hope you find it a plentiful source of ideas and personal inspiration but please don't copy my designs for contest submission or use for classes, publication or sale without express permission.