Two Ways With Avant Garden - Yours Free During Sale-A-Bration

by Joanne James2. February 2017 14:00

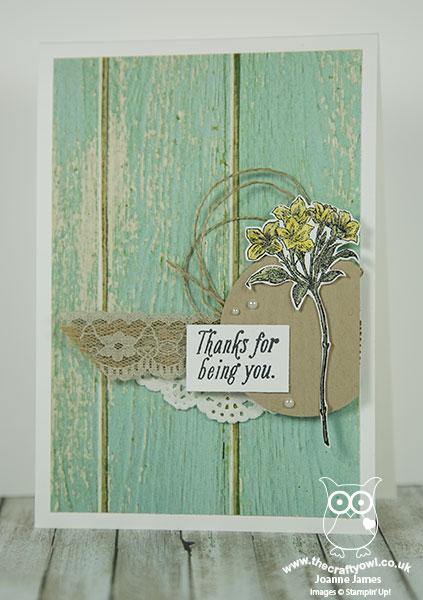
I've had a couple of blog-free days on account of having to juggle a few things around as I have one of my Juniors at home poorly this week. I think they may have given it to me too, but that's a story for another day! To make it up to you I'm sharing not one but two cards today, both using the most popular of the Sale-A-Bration free stamp sets. Here's the first one, a CASE of the card shown on page 5 of the Sale-A-Bration catalogue:


Here's the low-down on the above card:

Botanical Flower - The Avant Garden stamp set contains two very different flower stamps: the flower stem on the above card is a fine line drawing, almost like the ones you find in botanical plant identification books. Here it is simply coloured with a blender pen and my Daffodil Delight and Old Olive watercolour pencils, then fussy cut using my trusty paper snips. The second flower is a much more fluid, almost watercolour effect bloom - this is the one you can see on the card below, which is a CASE of the card on page 4 of the Sale-A-Bration catalogue, with the layout of the banner horizontal instead of diagonal and an alternative colourway. 

Easy Woodgrain - Do you recognise the background on this card? The ladies in my recent Sale-A-Bration class were keen to understand how I had created this background so full of texture; they were very surprised when I pointed out that it was actually one of the patterns in the Serene Scenery Designer Series Paper stack. This pad is choc-full of great patterns and designs, that make light work out of creating interesting backgrounds. So easy, it almost feels like cheating!

Texture Abounds - Whilst the paper adds texture in the pattern, this card has a lovely collage feel with all the other elements of added texture: a woodgrain embossed circle, a strip of burlap ribbon and piece of lace trim, along with a snippet of doily, some linen thread and a sprinkling of pearls. 

Here is the visual summary of the key products used on today's project for you to pin for easy reference:


You can see all of my 'How To' summaries on my 'How To - Tips and Techniques' Pinterest board in case you've missed any. 

Here's the second card using the same stamp set but with a completely different feel:


Here is the visual summary of the key products used on today's project for you to pin for easy reference:


It's no wonder Avant Garden is so popular: lots of creative ways with florals, not forgetting a useful trio of sentiments that work on lots of different types of card. Lots of my customers have already ordered this set; if you're not one of them but it appeals to you, then all you have to do is place an order for £45 or more and you can receive it for FREE! If you are ordering online, simply add the item code (143272) to your shopping basket once you've added your other items and it will add it free of charge. If you are ordering online (it's easy to do: just click on the shopping basket link in the 'Shop Online' basket on the right of this page, or alternatively click on any of the product links in the supply table below) don't forget to add this month's hostess code 4X3KWTZY in order to receive an extra little thank you in the post separately from me. 

So which one of these cards do you prefer? Do let me know in the comments below - I'd love to hear your thoughts.

Enjoy your day and I'll be back tomorrow with another project. Until then, happy stampin'!


Stampin' Up! Supplies Used:

Table built using Product Table Builder by The Crafty Owl - Independent Stampin' Up! Demonstrator.

He Is Risen Sunburst Easter Card

by Joanne James1. March 2016 21:00

Firstly, Happy Saint David's Day to any fellow Welsh bloggers or blog readers! I have had a busy day of classes today, with the first of my technique classes this month this morning and my Project Life memory keeping class this afternoon. I'm not so organised that I had an early blog post for you; my card was made,I just fell asleep at my laptop yesterday evening before I could schedule it! Today's card is for the 300th challenge over at Just Add Ink where they have this sketch as inspiration this week:

JAI #300

I saw this sketch and knew it would be perfect for a card that I've had in mind for a while using my Sunburst Thinlits Die - take a look: 

I wanted to create an Easter card with a sunburst behind a cross; how to make my cross though? I decided to try and make one using a sunburst, by squaring up the edges and cutting away the diagonal sections. Here's a work in progress picture that shows you how I cut it:


I hope that is helpful. I ran my cross through my Woodgrain embossing folder to add some texture and make it stand out against my super-CAS background of So Saffron and Pear Pizzazz. I allowed my sentiment strip to overhang the width of my paper slightly and made my own sentiment using the stamps in the 'Crazy For You' stamp set, masking off letters where not needed until I had my phrase. The Alphabet Rotary Stamp would also allow you to create something similar. I added a gold button, a twist of retired Tangelo Twist satin ribbon and a sprinkling of Pumpkin Pie sequins to finish my card. This is a great Easter card that can be made using entirely non Easter-specific supplies, which is always useful. What do you think of my cross idea? I'd love to know whether you think this works - do leave me a comment with your thoughts below. 

Here's today's visual summary for easy reference:


That's all from me today; I'll be back tomorrow with another project; until then, happy stampin'!


Stampin' Up! Supplies Used:

Table built using Product Table Builder by The Crafty Owl - Independent Stampin' Up! Demonstrator.


It's Most Definitely Not Beginning To Feel A Lot Like Christmas!

by Joanne James24. July 2015 20:38

So as I type this sat in blisteringly hot temperatures (I'm not complaining - the sun is heavenly!) I can't quite believe that today I'm going to share a Christmas card with you. Yes, that's right - a Christmas card!! Today I've been able to get my first look at the new Autumn-Winter seasonal catalogue that will be available to customers September 1st - and all I can say is, my wish list is long!!! I will be sharing more on that in coming weeks once our pre-order period starts, however right now if you can't wait for your copy, then get in touch with me and lets chat about becoming a demonstrator - I would love you to join the 'ooos' and 'aaahs' that I'm having with my current team members as we drool over the catalogue sneak-peek together!

Meanwhile, you may have noticed that Stampin' Up! has reintroduced a permanent line of Christmas stamps and papers in our annual catalogue too - great news for those of us who like to prepare for Christmas all year round! - and some of the stamps included are some favourites from last Christmas, such as the one that features on today's card: Wondrous Wreath. I made this card at our recent team quarterly training session, which was all about making use of what is already avialable to get a jump start on preparing for the festive season. Here's my card:

This card was designed by Monica Gale and is similar in concept to one I designed last season which you can see here. This one is easier to recreate and uses the Woodgrain embossing folder to create the wooden effect on the door. It also features some other products that can now be found in the annual catalogue that are perfect for festive projects: the Bow Builder Punch, the Merry Moments DSP and my favourite Expressions Natural Elements.

That's all the festive fun I have for today - I'm off to get a cooling glass of Sangria after all that typing! Back tomorrow with another project; until then, happy stampin'!


Stampin' Up! Supplies Used:

Table built using Product Table Builder by The Crafty Owl - Independent Stampin' Up! Demonstrator.

Sprinkles of Life Thank You Apple Tree Card

by Joanne James28. June 2015 11:00

It's Sunday and time for our new challenge over at The Paper Players! I really enjoyed our gallery full of summer treats last week; this week should be easier on the waistline though, as the lovely Nance has a great sketch challenge for us:


My card features an altogether more healthy treat this week in the form of apples, on a tree created with the Sprinkles of Life stamp set and co-ordinating tree builder punch:

My card also features three of the five new in-colours: Tip Top Taupe, Cucumber Crush and Watermelon Wonder so I am also linking up with the team over at Fab Friday as their challenge is all about the new in-colours this week. I used Tip Top Taupe for my card base, then adhered a piece of Whisper White to the card front. I embossed another piece of Taupe with my woodgrain textured embossing folder then using my Big Shot and Circles Framelits cut away a partial circle from one side before adhering this on top of the white layer. I stamped the tree trunk in Taupe onto the white panel, then stamped my leaves in Cucumber Crush and my apples in Watermelon Wonder onto Whisper White and punched them out with the co-ordinating tree builder punch. I wanted a full tree so punched three treetops and layered them to create my tree, adding the last one with a dimensional to create some lift. For my banners I used a strip of Watermelon Wonder and a piece of green patterned paper from the Cherry on Top DSP stack, tied with white baker's twine and flagged with the triple banner punch. I stamped my sentiment in white Stazon onto Basic Black and cropped it tightly. I finished with another punched apple, which I covered in Crystal Effects to make it nice and shiny, although it's hard to see in the photo above. The Sprinkles of Life Stamp stamp set is so versatile with so many creative options; not only that, every purchase benefits the Ronald McDonald House Charity too as £2 is donated for every stamp set purchased.

With only three more weeks until the end of the school year, I am needing to make more and more teacher thank you cards, so this one is definitely heading for the teacher pile. Well, an apple for the teacher as the saying goes - or in this case, six!

Before you reach for your ink and papers, check out what our amazing team has created to inspire you this week:

The Paper Players Design Team
 
 
Here's a quick recap of our challenge rules:
 
1.  Create a new paper project
2.  Upload your creation to your blog with a link back to us and provide a direct link to the post featuring your challenge submission.
3.  Please link your card to no more than three challenges, TOTAL.
4.  Have FUN! 

I love a good sketch challenge so I look forward to seeing what you make of this one in the gallery this week. If the weather holds we may manage to squeeze in another weekend BBQ - keep your fingers crossed for me!

Back tomorrow with another project; until then, happy stampin'!


Stampin' Up! Supplies Used:

Table built using Product Table Builder by The Crafty Owl - Independent Stampin' Up! Demonstrator.


Yee Haw Cowboy Birthday Card

by Joanne James30. April 2015 08:05

It's Thursday and time for a new challenge over at Create With Connie And Mary and this week we have a great sketch challenge for you:


My post today is a treat for all my international readers, as I'm using one of the photopolymer sets that is available in the USA and unfortunately not for sale by Stampin' Up! in the UK. Whilst we are moving ever closer together in terms of catalogues, timesales and product ranges with our US colleagues, there are some things that remain USA-specific, such as the special issue sets, Paper Pumpkin and of course their clearance rack and shipping offers are country-specific. I absolutely love the Yee-Haw stamp set though and have been lucky enough to acquire one through one of my US stamping colleagues (thank you LeAnne!) and I decided it was perfect for today's sketch layout - take a look:

I took my colour palette directly from the Colour Coach (such a useful tool!) and on a base of Early Espresso, I matted a piece of Sahara Sand that I had run through my Woodgrain embossing folder and adhered flat side up. For the vertical lines of the sketch, I used three pieces of barbed wire - stamped in Basic Grey onto Basic Grey cardstock and fussy cut out - then topped this with a panel of Pacific Point, stamped in the circle star image in the set. I stamped my main sentiment in Early Espresso onto Whisper White, then topped this with the lasso rope stamped in Cajun Craze onto the same colour cardstock having cut out the middle and fussy cut around the edge. I finished with a 'birthday' banner and a paper-pieced cowboy hat. So lots of fussy cutting on my card today, but so worth it - what a fun card for a Rootin' Tootin' birthday boy!

I'm looking forward to seeing what you come up with using this week's sketch - do check out how the other members of the design team have used it for some great inspiration. I'll be back tomorrow with another project for Friday; until then, happy stampin'!


Stampin' Up! Supplies Used:

  • Woodgrain Textured Impressions Embossing Folder
  • Big Shot Die-Cut Machine
  • Paper Snips
  • Pacific Point Classic Stampin' Pad
  • Pacific Point A4 Card Stock
  • Cajun Craze Classic Stampin' Pad
  • Cajun Craze A4 Card Stock
  • Early Espresso Classic Stampin' Pad
  • Early Espresso A4 Card Stock
  • Sahara Sand A4 Card Stock
  • Whisper White A4 Card Stock
  • Basic Gray Classic Stampin' Pad
  • Basic Gray A4 Card Stock


Tags: , , , , , , , ,

Cards | Stamping

Count Your Blessings Fall Card For The Paper Players

by Joanne James7. September 2014 08:00

Today's card is for this week's challenge over at The Paper Players, where Ann has a 'Happy Fall, Y'all' theme for us this week:


I immediately knew what I was going to do for my fall card this week; I've had my eye on a sheet of the DSP in the Motley Monsters Designer Series paper pack that I thought would be perfect for a fall-themed card, and this week's sketch over at Create with Connie and Mary provided the perfect layout. Here's my card:

This falling leaf paper is actually the top of the sheet that has the little Motley Monsters pattern across the bottom, but by only using the top section this paper is perfect for fall. In fact, of the 12 designs in the pack, half of them can be used for non-Halloween themed projects, so it's definitely worth a look for more than just Halloween. Anyway, I digress!

I took the colours for my card from the DSP, and used Sahara Sand for my base, with a vertical border of Basic Black to edge my piece of leafy DSP. I then cut an oval in Tangerine Tango using my Big Shot and Oval Framelits and embossed this with the Woodgrain embossing folder. I stamped my sentiment from the 'Gratitude For Days' set in Memento Black onto Crushed Curry and layered this on top, then finished with the real focal point of my card, a trio of wooden shapes from the Autumn Wooden Elements set, which I layered and finished off with a black and white baker's twine bow.

A simple card that reminds me of fun afternoons in the park, kicking leaves and collecting conkers on a crisp Autumn day. Do pop by and visit the other Paper Players Design Team blogs - there is some great inspiration for you out there as always this week and they would love you to leave a comment or two.

I'm having a lovely weekend: yesterday Rebecca had a great day in London - Mama Mia The Musical was excellent - and today I am expecting to be truly spoiled as it's my birthday! I am looking forward to a roast dinner with all the trimmings and a day of fun with my family.

Back tomorrow with another project; until then, happy stampin'!


Stampin' Up! Supplies Used:

Table built using Product Table Builder by The Crafty Owl - Independent Stampin' Up! Demonstrator.


Look Up To Father Acrylic Block Technique

by Joanne James12. April 2014 20:45

I've had a lovely day today finishing off my swaps in readiness for our quarterly team training tomorrow. Our swaps always have a theme and this quarter it's 'technique'; I've based my swaps on a card I made for the challenge over at Seize The Sketch this week, which has this great layout:

Here is my card - can you tell what technique I'm showcasing?

I know Father's Day is still a few months away, but I love the sentiment on this stamp and have been keen to use it for the first time. I decided that I would showcase the 'acrylic block & markers' technique on my card: this is where you colour an acrylic block with markers (I used a variety of greens and browns) and then spritz with water (I add a few drops of alcohol to mine so that it dries quicker) then stamp the block onto the paper.

I thought this technique would make a lovely background to the tree stamp and would add a little more interest than just colouring the image with markers directly. Here's a close-up of the stamped background:

Whilst all of my swap cards look the same, each has a slightly different central panel as each time you stamp using a block it comes out differently, making them all unique.

Sticking with the wood theme, I added a panel of Chocolate Chip embossed with the Woodgrain Textured Impressions Embossing Folder and stamped the layer of Crumb Cake beneath this with the Hardwood background stamp. To finish, I added a couple of chevrons as an accent - wooden of course, coloured with my Chocolate Chip Stampin' Write marker pen:


I also incorporated some Old Olive into the mat layers just to give the card a lift and so that it wouldn't appear too 'brown'.

I'm quite pleased with the overall end result - let's hope my team like their swaps tomorrow too!

Back tomorrow with another card; until then, happy stampin'!


Stampin' Up! Supplies Used:

Table built using Product Table Builder by The Crafty Owl - Independent Stampin' Up! Demonstrator.


Horse Punch Art SUO #90

by Joanne James17. February 2014 21:26

Today I've had the most fun day. I was privileged to be invited to run a Crafty Owl birthday party for a 10 year old and her classmates, which was great fun. We made some wall art and they had a fun time punching shapes and using the Big Shot to create their masterpieces. When I run a craft party, I always create a punch art kit for the party bags so that the children can continue the crafty fun at home. For today's party, the birthday girl loves horses so I knew that a pony needed to feature on my card. I had a quick surf on Pinterest for some general inspiration then set to work creating my card. This is what I came up with:

I used a variety of punches to create my card (see full list below) and some Core d'inations cardstock embossed with the woodgrain embossing folder to give texture to my stable door. I've always loved grey horses so made my card with a grey pony, but since my eight year-old informed me that this made it look like a donkey, the kits I made for the party girls all had brown horses to remove any doubt!

The girls loved their kits and I'm sure they will have had as much fun completing them as they did at the party itself. I'm linking today's card up with the challenge over at SUO Challenges where the theme this week is 'Punch Art', so this card fits perfectly.

I ended my day with a trip to the cinema to see the new Lego Movie; it was a great children's movie for half term and fulfilled one of Ben's main aims for the week, so all in all a good day was had by all.

Back tomorrow with another project; until then, happy stampin'!


Stampin' Up! Supplies Used:

Table built using Product Table Builder by The Crafty Owl - Independent Stampin' Up! Demonstrator.

Mini Catalogue

BROWSE THE CATALOGUE

The mini catalogue is now live! Read and download your copy here.

Shop Online

Access my online shop 24 x 7, 365 days of the year:

Current April hostess code:

VDKNV7BH

Shop Online

Join My Team

It's always a great time to join Stampin’ Up! New team members can get £130 worth of products for only £99 + free business supplies + free shipping + all the fun being a part of Stampin’ Up! Stampin' Up! has something for everyone: join my growing team and benefit from my support to enjoy Stampin' Up! however you choose.

If you're interested, call me for a chat to understand how I can help you realise your goals. Alternatively, if you have already decided to sign up and you just can't wait, please click here for the link to the online form where you can sign up and order your starter kit right away! 

Latest Kit!

Stampin Cut and Emboss

The Rock Legend Kit has all you need to make 8 cards with coordinating envelopes. Along with the new Panda Friends Kit, both are available from January 4th for just £14 each - get yours here!

2023-24 Annual Catalogue

BROWSE THE CATALOGUE

Click on the catalogue for a full list of current SU! supplies - if you would like to order any of the items featured, please drop me a line at [email protected] or give me a call on 07773 421446 - I'd be happy to help.

New Online Exclusives

There are new products available exclusively in the online store from 5 March - check them out here.

About Me

Hi I'm Joanne and live in Northampton and when I'm not looking after my husband and two beautiful children, am an avid crafter with a passion for all things Stampin' Up!

I must confess that I have never been a big rubber stamper - until I discovered Stampin' Up! that is. I love the fact that I can get such great results with co-ordinating stamps, inks, papers and punches - the possibilities are endless! Join me on my stamping journey as I share the things I love and be inspired to create amazing things yourself!

Follow Me

Monthly Newsletter

Box Builder

Click the button above to use Box Buster to create your custom box design using the Envelope Punch Board!

Kits Collection Now Available!

Stampin Cut and Emboss

The new Kits Collection from Stampin' Up! is now available!

Click here to see the current kits available and order yours online today.

I Design For


Stampin' Up Stuff

This is my personal blog and is not endorsed by Stampin’ Up! I hope you find it a plentiful source of ideas and personal inspiration but please don't copy my designs for contest submission or use for classes, publication or sale without express permission.