Happy Monday everyone! First things first - an apology for the lack of posts last week; for those of you who have tried to access my blog or my website to access the BoxBuster and Envelope Expert tools between Tuesday and Thursday, I had a website outage that impacted both my blog and website and my email, and didn't manage to get it back online until late Thursday afternoon. I know many of you enjoy free access to my tools, and interruptions to service are far from ideal. I have been experiencing issues of one kind or another since I was hacked last October and it is proving incredibly difficult to maintain a consistent online presence. We are working on it and I would ask for your patience and understanding until these issues are fully resolved. If you are reading this and not already following me on Facebook, I urge you to do so here since this is where I will post updates of outages and such like, so you will at least be the first to know when I am back online. Here's hoping for a better week on the IT front!
Back to today's business; a slight change to my blog schedule and I'm sharing a card for a few challenges but that is born out an important business announcement - take a look:


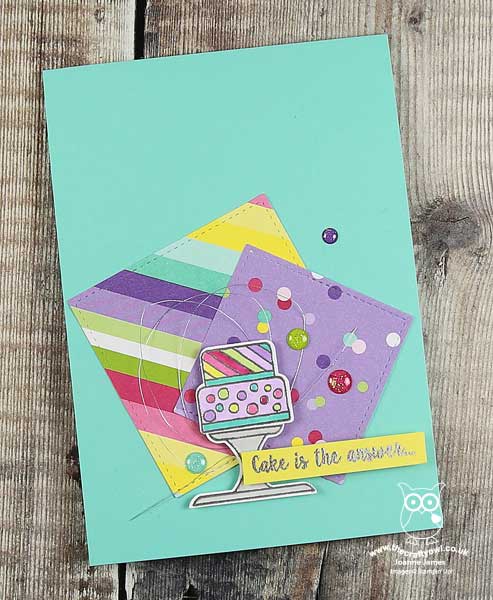
There is a great sketch over at CAS Colours and Sketches that is also perfect to showcase some designer paper for the peeps over at TGIF Challenges. I decided to make a bright and colourful birthday card that also fits with the birthday theme over at SUO Challenges:
Here's the low-down on today's card:
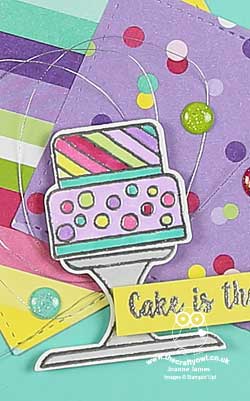
A Piece of Cake - Today's fun cake comes from the 'Piece of Cake' stamp set in the Spring-Summer catalogue; great for birthday cakes and wedding cakes, you can use this set to create a cake for any season or occasion. after all there's always a reason to celebrate! The set also comes with lots of fun sentiment pairs - the reply to the 'cake is the answer ...' that I used on the front of my card is featured on the inside along with my birthday greeting:
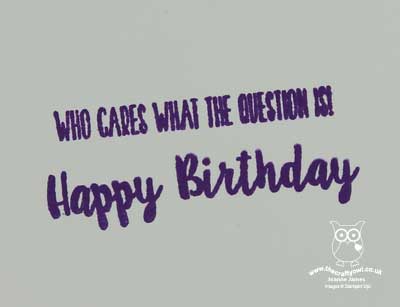
How fun is that?! Sure to raise a smile, whatever the celebration.
How Sweet It Is - I coloured my cake with my Stampin' Blends, inspired by the spots and stripes patterns that I chose to highlight in my DSP squares. These patterns are two of my favourites in the bright and fun 'How Sweet It Is' Product Suite, that feature lots of sweets and candy, perfect to indulge your sweet tooth. they also co-ordinate with another of my favourite accessories, the glitter enamel dots from the main catalogue.
Get It While You Can - The Cake Builder Punch (item 148525) and the Butterfly Duet Punch (item 148523) have proved extremely popular since catalogue launch and sales have exceeded forecasts. Although not currently on backorder, stocks of these products are expected to run out within the next two weeks, after which they will no longer be orderable until back in stock. Whilst both punches are carrying over to the next annual catalogue in June, you are advised to get your orders in for these sooner rather than later. I am placing an order this week if you are local to me and would like to save on postage, jut get in touch. Alternatively, place your order directly online.
Here is the visual summary of the key products used on today's project for you to pin for easy reference:
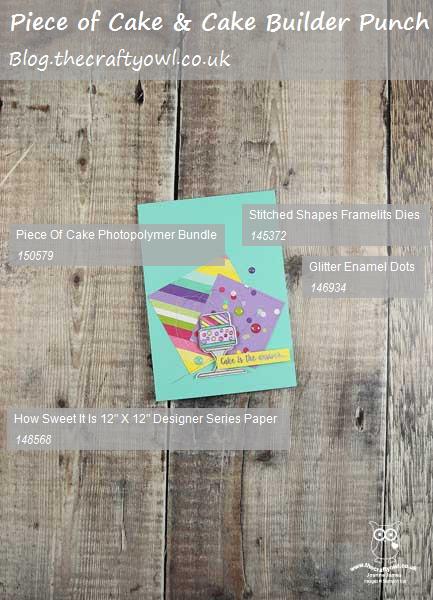
You can see all of my 'How To' summaries on my 'How To - Tips and Techniques' Pinterest board in case you've missed any.
I like this card so much I made a few using the same design, just switching out the background colours - they are so cheery, i'm definitely a predominantly 'brights' girl at heart!
I have a busy work week this week, so need to get cracking. Enjoy your day and I'll be back tomorrow with another project. Until then, happy stampin'!
Stampin' Up! Supplies Used: