Red, Orange, Yellow, Green, Blue!

by Joanne James5. May 2013 21:33

Today's card is one I made a while ago when I was going through my Spring Sampler workout, but lost the photograph so had to take it again. This is a great birthday card for a 'little person' and would work for either a boy or a girl:

This type of card is so easy to make and really lends itself to a stamp set of small single images. Are you wondering how I got the curved edges on the coloured panels? I cut my strips to length and made them slightly narrower than 1 1/4", then fed the end into my 1 1/4" circle punch from the top so that only the end was punched, not a whole circle. I hope this makes sense - as I've tried to explain it I think I should have taken a picture as it would have been much clearer!

Back tomorrow with another project - until then, enjoy your Bank Holiday weekend and happy stampin'!


Stampin' Up Supplies:

Stamps: Spring Sampler

Cardstock: Whisper White, Real Red, Tangerine Tango, Daffodil Delight,  Gumball Green, Tempting Turqouise, Crumb Cake

Ink: Real Red, Tangerine Tango, Daffodil Delight, Gumball Green, Tempting Turqouise

Tools: 1" Circle Punch, 1 1/4" circle punch

Finishing Touches: Sycamore Street Ribbon (Sale-A-Bration - retired)

Tags: , , , , ,

Cards | Stamping

Thoughts of You - Rain or Shine?

by Joanne James4. May 2013 16:05

Well, it might be May, but this is so a day of April showers! After my third trip back out to the washing line to rescue my washing from another downpour, I gave up and resorted to the tumble dryer. Not very eco-friendly I know, but with sports kits that need to be washed, dried and ironed to be back at school on Tuesday, what is a girl to do?!

Given the weather, it seems like a great oportunity to share another of my training day outputs with you:


The Cloudy Day Embossing Folder is a personal favourite of mine, and my 'go to' embossing pattern at the moment - I love the ease with which you can create the cloud effect. A nice pink umbrella, fussy cut with my trusty paper snips - who wouldn't be cheered by one of these on a showery day? - and another Cute Clip, to highlight the sentiment. There's a lot going on around the sentiment - here's a close up view:


This would be a great card to brighten someone's day - I hope it has lifted your spirits too! I'm off to do a quick hour's crafting whilst the house is quiet, as everyone else has gone out to the weekly swimming lesson. Back tomorrow with another project; until then, happy stampin!


Stampin' Up Supplies:

Stamps: Rain or Shine

Cardstock: Lucky Limeade, Pacific Point, Whisper White, Sunshine and Sprinkles DSP

Ink: Basic Grey, Pacific Point

Tools: Cloudy Day Embossing Folder, Scallop Trim Border Punch

Finishing Touches: Basics Rhinestones, 1/4" Stitched Grosgrain Ribbon Basic Grey, Cute Clips

Brights Thank You Card with hand-dyed Filter Paper Flower

by Joanne James30. April 2013 19:56

As promised, today I have a card to match yesterday's lovely Melon Mambo treat holder, made with the Pop 'n' Cuts base. No dresses today, but another of those gorgeous filter paper flowers, this time hand-dyed yellow to really make it 'pop': 

This flower was made using the slightly smaller Floral Frames Framelit; the flowers can be coloured in a number of different ways - to achieve this effect, the edges were sponged with Daffodil Delight ink then the layers sprayed with a homemade mix of alcohol and shimmer spray to encourage the colour to 'bleed' and shimmer slightly. So easy and each time you make one, you get a slightly different look so all your flowers are unique.

The flower definitely takes centre stage here, however the background stamping, rhinestones and cute clip attaching the flag at the top all contribute to making this a great card, and one that perfectly co-ordinates with yesterday's treat holder. Here's a picture of both items together:

Rather lovely! Back tomorrow with another project and exciting news about a special promotion valid for the month of May only. To find out more, make sure you check back tomorrow for the full low-down. Until then, happy stampin'!


Stampin' Up Supplies:

Stamps: Oh, Hello

Cardstock: Melon Mambo, Whisper White, Sunshine and Sprinkles DSP

Ink: Basic Grey, Melon Mambo, Daffodil Delight

Tools: Floral Frames Framelits, Big Shot

Finishing Touches: Basics Rhinestones, 1/4" Stitched Grosgrain Ribbon Basic Grey, Creped Filter Paper, Cute Clips

My First Dress Up Pop Up Card

by Joanne James28. April 2013 20:14

Any of you who saw my Facebook post yesterday will know I am officially 'IN LOVE' with the Dress Up framelits and Pop 'n' Cuts Base in the Spring-Summer catalogue. I've been resisting purchasing them since the catalogue came out - I don't know why, because it really was love at first sight - but having used them at our last training session and spent a fun few hours with my downline Barbara playing fashion designers, I have finally succumbed. I have seen so many great examples of projects made with this set and I'm excited to share these with you in future blog posts.

Today I am going to share a card I made using all three elements: the pop 'n' cuts card base, the dress form and the framelits. So not much stamping today - Big Shot definitely required! I will share some projects later in the week that show how these can be used separately; when used together, they will make a pop up card with a mannequin to be dressed as you wish. For my first card, I used some of my favourite 'More Amore' DSP along with a Pool Party card base. Here's the outside of the card that you see when the card is folded shut:

Then when you open it, the inside looks like this:

How cute is that??! Dressed mannequin, complete with pearls and pretty cardi, in front of a mirror and dresser. What little - or big - girl wouldn't want to get this in the post for their birthday? Here's one last close-up of the mannequin:

This will, I feel, be the first of many such pop-up cards; come back tomorrow to see another use for this great set. Until then, happy stampin'!


Stampin' Up Supplies:

Stamps: One in a Million

Cardstock: Pool Party, Crumb Cake, Very Vanilla, More Amore DSP

Ink: Pool Party

Tools: Pop 'n' Cuts Base, Pop 'n' Cuts Dress Form, Dress Up Framelits, Ovals Framelits, Big Shot, Stamp-a-ma-jig, Small Heart Punch

Finishing Touches: Basics Pearls

Happy Birthday Cupcake!

by Joanne James27. April 2013 20:37

Another birthday card today - this time a quartet of bright and colourful cupcakes:

I made this card a while ago and the layout is a case of a Mary Fish card - I love her clean and simple style - and the Create a Cupcake stamp set and co-ordinating punch make this kind of card really easy. Its also great fun to see how many different cupcake combinations you can make using this set. The punch also makes birthday candles a doddle to create - handy as I have lots of friends (and family!) celebrating 'significant' birthdays this year where large numbers of candles are required. A co-ordinated envelope too makes this card a sweet treat!

Back tomorrow with another project - I've been very busy in my craft room today and have lots of great projects to share this coming week!


Stampin' Up Supplies:

Stamps: Create a Cupcake

Cardstock: Pacific Point, Melon Mambo, Daffodil Delight, Tempting Turquoise

Tools: Cupcake Builder Punch


Tags: , , , , ,

Cards | Stamping

Happy Bird-day Wishes

by Joanne James26. April 2013 20:57

Apologies for my sense of humour, but I just couldn't resist! Today's card is a birthday card that I made for a male friend of mine, but would work equally well as as a female card and features one of the birdies from the Aviary stamp set:

This card was inspired by a Paula Dobson card I saw on Pinterest; I love the two colour design but I felt that the muted Crumb Cake layer needed a solid Island Indigo base card to really bring out the flashes of colour of the owl, sentiment and ribbon trim. Top tip if you fancy recreating this card - use a stamp-a-ma-jig to line up the bird cages; they're not as random as they look!

That's all for today. Back tomorrow with something special - until then, happy stampin'!


Stampin' Up Supplies:

Stamps: Aviary, Sassy Salutations

Cardstock: Island Indigo, Crumb Cake

Tools: Stamp-a-ma-jig

Finishing Touches: Sycamore Street Ribbon (Sale-A-Bration - retired)


Tags: , , , , , ,

Cards | Stamping

Blossom Punch Layered Card

by Joanne James25. April 2013 20:52

Today I thought I'd share another card with you from my recent 'Mixed Bunch' class. I created it after seeing something similar on Pinterest and it made it into the class because I think it's a good example of how you can use a punched shape to create the illusion of a flower without having used the co-ordinating stamp:

I cut a layer of Sycamore Street DSP and scalloped the edge and adhered it to the Island Indigo card base, then cut a further smaller layer out of Pool Party, embossed with the Perfect Polka Dots Embossing Folder and punched out a flower shape from the edge of the cardstock and adhered with dimensionals to reveal the patterned paper underneath. I then used a 7/8" scallop circle with a co-ordinating brad to create the flower centre. A banner sentiment and a bright orange butterfly completed the card.

Back with another card tomorrow - until then, happy stampin'!


Stampin' Up Supplies:

Stamps: Happiest Birthday Wishes (hostess - retired)

Cardstock: Island Indigo, Pool Party, Tangerine Tango, Sycamore Street DSP

Tools: Blossom Punch, Bitty Butterfly Punch, Perfect Polka Dots Embossing Folder, 7/8" Scallop Circle Punch

Finishing Touches: Basics Rhinestones, Designer Printed Brad

Wishing You a Day as Perfect as You Are - Masking Technique

by Joanne James24. April 2013 17:58

I was having a sort out in my craft box and found this card that I actually made in our January demonstrator training session, but haven't yet shared with you. It was designed by Monica Gale and is a great example of how you can use shapes and dies to make your own mask and create some lovely effects. So here is the card:


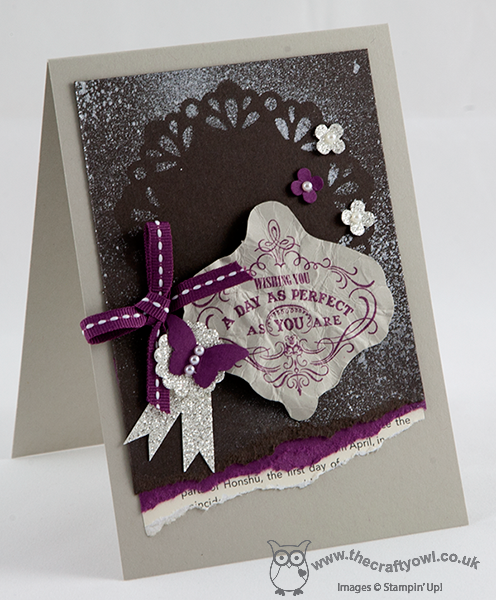
This card is quite different in design to the kind of thing that comes naturally to me - in particular, I had to be almost held down before I could bring myself to crumple the cardstock that has the stamped image on! - yet this, along with the torn edges, give the card a real 'vintage' feel. This card also showcases a great technique - by creating your own mask, you can create an outline image that can give your card a different perspective.

For this card, I made a mask using vellum cardstock and one of the Delicate Doilies Sizzlits. By adding a thin layer of Tombow glue to the back of the shape and allowing it to dry (wait until the glue turns from white to clear in colour), you can create a repositionable mask. This was then placed onto the Early Espresso card and sprayed with Vanilla Shimmer Smooch Spritz. When you then remove the mask, you are left with the mask shape and detail. Another tip to achieve a uniform ripped edge: hold all three sheets of card together and tear, holding one hand steady and tearing the card with the other by pulling towards you. The hints of Rich Razzleberry card and ribbon, along with the sparing use of silver glimmer paper, add a much needed edge to an otherwise quite muted card. The stamp used here is one of this year's Sale-A-Bration stamps from the set Vintage Verses, but this layout would work with lots of other stamps - the ones in the 'From My Heart' set would work particularly well I think.

So not my usual style, but lots of creative food for thought. That's one of the great things about being a Stampin' Up! demonstrator; regular training sessions are great for pushing you out of your stamping comfort zone and encouraging you to try new techniques and ideas. If you would like to benefit from the development resources that Stampin' Up! has to offer, then there's never been a better time to sign up; you can find the full details of the current promotion that runs until May 30th here.

Back tomorrow with another project - until then, happy stampin'!


Stampin' Up Supplies:

Stamps: Vintage Verses (Sale-A-Bration - retired)

Cardstock: Sahara Sand, Rich Razzleberry, Early Espresso, First Edition Specialty Paper, Silver Glimmer Paper

Ink/Stampin' Write Markers: Rich Razzleberry

Tools: Bitty Butterfly Punch, 7/8" Scallop Circle Punch, Itty Bitty Punches

Finishing Touches: Basics Pearls, 1/4"Rich Razzleberry Stitched Grosgrain Ribbon, Vanilla Shimmer Smooch Spritz

Butterfly Brights

by Joanne James23. April 2013 17:38

Today's card is one I made as a commission for a friend of mine, who wanted a 'thoughtful' sentiment and bright blues, yellows and oranges. I love rising to the challenge of working to a specific brief and actually used it as the basis for a number of very different cards. I'll share the others with you some other time, but here's one of them for today:

The sentiment is from a set called 'Word Play' and is the perfect size for one of my oval framelits, which also made creating a frame for it a breeze. I used a strip of striped brights DSP to tie the frame to the card background, then used the Beautiful Wings butterfly embosslits to make a variety of butterflies and really create a strong focal point. I love these butterflies - well, I love all butterflies, but these have lovely textures and are great for using with plain coloured cardstock. A cheery card that meets the brief - job done!

There are lots of other great sentiments in the Word Play set, so I've included an illustration of the whole set below. They are suitable for so many occasions and work for both for cards and scrapbooking.

A quick post from me today - I have a Parents' Association meeting at school to attend, so am rushing out the door. Back tomorrow with another project - until then, happy stampin'!


Stampin' Up Supplies:

Stamps: Word Play

Cardstock: Tempting Turquoise, Daffodil Delight, Tangerine Tango, Whisper White, Brights DSP

Ink/Stampin' Write Markers: Tempting Turquoise

Tools: Ovals Framelits, Beautiful Wings Embosslits

Finishing Touches: Basics Rhinestones

Tags: , , , , , ,

Cards | Stamping

A Fabulous Shoe - or Two

by Joanne James22. April 2013 21:28

Another Monday, another card! Today I thought I would share something a little different: a birthday card featuring the 'Fabulous You' shoe on page 39 of the annual catalogue:

If you're partial to a little colouring-in, this is a great stamp to express your artistic side. I've made a couple of cards with this stamp already and the great thing is you can go with a really simple layout and design and let the colouring do all the talking. The above card has quite a muted palette of lilacs and greens, with just a touch of red and three rhinestones to highlight the sentiment - well, every girl friend deserves a little 'bling' on her birthday, right? - whereas the card below, which I stamped without a sentiment as a sample wedding invitation, has a much brighter feel with a colour palette of pinks, greens, yellows and oranges:

Which one do you prefer? I love using a blender pen to create different shades and effects so that no two shoes are the same; colouring with pens is so theraputic. The next task is to have a go at embossing a shoe - I'm sure it will look equally elegant.

That's all for today - back tomorrow with another project. Until then, happy stampin'!


Stampin' Up Supplies:

Stamps: Fabulous You

Cardstock: Wisteria Wonder, Lucky Limeade, Whisper White, Pear Pizzazz (retired)

Ink/Stampin' Write Markers:  Basic Grey, Wisteria Wonder, Lucky Limeade, Elegant Eggplant, Cherry Cobbler, Whisper White, Melon Mambo, Daffodil Delight, Pumpkin Pie, Pear Pizzazz (retired)

Tools: Stamp-a-ma-jig, Blender Pen

Finishing Touches: Basics Rhinestones

Tags: , , , , , ,

Cards | Stamping

Shop Online

Access my online shop 24 x 7, 365 days of the year:

Current May hostess code:

VDKNV7BH

Shop Online

2024-25 Annual Catalogue

BROWSE THE CATALOGUE

Click on the image to download your copy of the 2024-25 annual catalogue. For a full list of current SU! supplies, go to my online store. If you would like any help or advice, please drop me a line at [email protected] or give me a call on 07773 421446 - I'd be happy to help.

Join My Team

It's always a great time to join Stampin’ Up but during May it's even better! New team members can get £78.25 of new In Color products for FREE! That's in addition to another £130 worth of products of your choice for only £99 + free business supplies + free shipping + all the fun being a part of Stampin’ Up! Stampin' Up! has something for everyone: join my growing team and benefit from my support to enjoy Stampin' Up! however you choose.

If you're interested, call me for a chat to understand how I can help you realise your goals. Alternatively, if you have already decided to sign up and you just can't wait, please click here for the link to the online form where you can sign up and order your starter kit right away! 

Latest Kits!

Stampin Cut and Emboss

The City Sights Kit has all you need to make 8 cards with coordinating envelopes for £20. Along with the new Happy Hollyhocks Kit, a no stamping kit including 9 cards for just £14, both are available from May 1st - get yours here!

New Online Exclusives

There are new products available exclusively in the online store from 5 March - check them out here.

About Me

Hi I'm Joanne and live in Northampton and when I'm not looking after my husband and two beautiful children, am an avid crafter with a passion for all things Stampin' Up!

I must confess that I have never been a big rubber stamper - until I discovered Stampin' Up! that is. I love the fact that I can get such great results with co-ordinating stamps, inks, papers and punches - the possibilities are endless! Join me on my stamping journey as I share the things I love and be inspired to create amazing things yourself!

Follow Me

Monthly Newsletter

Box Builder

Click the button above to use Box Buster to create your custom box design using the Envelope Punch Board!

Kits Collection Now Available!

Stampin Cut and Emboss

The new Kits Collection from Stampin' Up! is now available!

Click here to see the current kits available and order yours online today.

I Design For


Mini Catalogue


The next mini catalogue will be live in September! 

Stampin' Up Stuff

This is my personal blog and is not endorsed by Stampin’ Up! I hope you find it a plentiful source of ideas and personal inspiration but please don't copy my designs for contest submission or use for classes, publication or sale without express permission.