Pretty Petals Punched Butterflies Card

by Joanne James17. April 2016 09:00

It's Sunday and time for a new challenge over at The Paper Players! It's the lovely Sandy's turn to host our challenge this week and she has a great clean and simple challenge for you to play along with:


I was a little pressed for time this week in getting ready for Stampin' Up! Onstage at Telford (also the reason for a lack of blog posts over the last two days) so a clean and simple challenge couldn't have come as a better time! I used this week's sketch over at Mojo Monday for my layout and decided to go with punched rather than stamped butterflies for both impact and speed:

As you can see, today's card really is clean and simple. Here's the low down:

Pretty Petals - I reached for this paper pack to use as the starting point for my card and settled on this rather bold pattern, as I knew I needed only a small amount so wanted it to be impactful. My Pretty Petals paper set the colour combination for my card and provided the perfect backdrop to my sentiment from 'Tin of Cards'.

Can You Keep A Secret? - The DSP has a small amount of Calypso Coral around the flower heads, which I substituted with Watermelon Wonder as I wanted to use the wide satin ribbon in this colour for my banner. Sssh, don't tell - although honestly I think it's impossible to see the difference even up close. Here is the colour palette I used on my card:


A Trio of Punched Butterflies - I used a trio of solid colour butterflies to complete my card, punched using the Bitty Butterfly and Elegant Butterfly punches. I layered one of them and finished them all with pearls as a simple embellishment.

Here is the visual summary of the key products used on today's project for you to pin for easy reference:


You can see all of my 'How To' summaries on my 'How To - Tips and Techniques' Pinterest board in case you've missed any. 

So as you can see, a clean and simple card for this week's butterfly challenge. I'm also linking up with the lovely team over at the Global Design Project where their theme this week is 'nature' and a butterfly definitely qualifies for that!

Before you reach for your ink and papers, check out what our amazing team has created to inspire you this week:

The Paper Players Design Team
 
 
Here's a quick recap of our challenge rules:
 
1.  Create a new paper project
2.  Upload your creation to your blog with a link back to us and provide a direct link to the post featuring your challenge submission.
3.  Please link your card to no more than four challenges, TOTAL.
4.  Have FUN! 


I look forward to seeing your clean and simple cards this week. We are off to basketball today and back to hockey today ...

Back tomorrow with another project; until then, happy stampin'!


Stampin' Up! Supplies Used:

Table built using Product Table Builder by The Crafty Owl - Independent Stampin' Up! Demonstrator.

English Garden In Bloom Friendship Card

by Joanne James22. October 2015 08:05

Today it's time for a new challenge over at Create With Connie and Mary and this week we have a great colour challenge for you:


When I sat down to work on my card this week I realised that all of the challenge colours could be found in the lovely English Garden Designer Series Paper, so it seemed like the perfect opportunity to showcase it. I also used this week's sketch over at Retrosketches as the basis for my layout. Here's my card: 


I used a base of Hello Honey with a mat of Soft Suede, then covered my cardfront with a piece of floral patterned paper featuring all of the colours. I added a 2" circle of Mossy Meadow and cut my banner from a piece of neutral kraft corrugated paper, to add texture and detail without detracting from the pattern. I stamped my sentiment from the 'Garden In Bloom' set in Soft Suede on Whisper White and matted this on a banner of Hello Honey, both of which I punched with my Triple Banner Punch. I considered using the butterfly from this set too as my embellishment, however it was a little too small to really stand out. I decided to go with a simple layered butterfly instead, punched using my Bitty Butterfly and Elegant Butterfly punches, with a couple of strands of gold metallic thread for antennae. To finish, I added a trio of Mossy Meadow enamel dots. This is one of those cards that really is 'all about the paper' - the English Garden papers are so very pretty though, they deserve to take centre stage. 

Do visit the other Design Team members to see how they used this week's challenge colours; there's lots of inspiration over on their blogs too!

Enjoy your day and I'll be back tomorrow with another project; until then, happy stampin'!


Stampin' Up! Supplies Used:

  • Garden In Bloom Photopolymer Stamp Set
  • English Garden Designer Series Paper
  • Soft Suede Classic Stampin' Pad
  • Soft Suede A4 Cardstock
  • Hello Honey A4 Cardstock
  • Mossy Meadow A4 Cardstock
  • Gold Metallic Thread
  • 2" Circle Punch
  • Banner Triple Punch
  • Bitty Butterfly Punch
  • Elegant Butterfly Punch
  • Kraft And White Corrugated Paper


One for the Girls and one for the Boys!

by Joanne James6. September 2015 10:00

It's Sunday and you know what that means: time for a new challenge over at The Paper Players! This week it is the turn of the incredibly talented Sandy and she has a great theme challenge for you:


This is rather timely for me, as both of my Juniors are returning to school to begin a new academic year tomorrow following the long summer break, so it was a great opportunity for me to make a couple of cards to tuck into their schoolbags to wish them a good day. Here's my first card, using this week's Freshly Made Sketches layout:


I made this card for Rebecca - very pink and girly, but hopefully sufficiently grown up for a 10 year old about to embark on her last year of Junior School. This is a big year for her as she will be Head Girl too and whilst she was voted into this role by her peers and I know she will do a great job, she sometimes lacks confidence in herself so a card to remind her that she's amazing (to me at least!) will be just what she needs for day one.

I used a Whisper White notecard and covered the front with a piece of English Garden DSP, then stamped a little panel of flowers with some Old Olive ink and the Cottage Greetings stamp set and coloured them with my Stampin' Write markers. I stamped my sentiment banner in Mossy Meadow onto Pink Pirouette and finished with a baker's twine bow and punched Bitty Butterfly and a few pearls. I also stamped the inside (and remembered to take a photograph of it!):

I couldn't possibly make Rebecca a card without making one for Ben too, so here's my second card which uses the colours over at the Friday Mashup and the sketch over at As You See It:


For this card I used a Crumb Cake notecard base, and stamped the dino footprints from'No Bones About It' in Early Espresso, before adding my sentiment tag complete with an Into The Woods wooden leaf embellishment and a fussy cut Marina Mist triceratops, complete with googly eye. Wondering where the dinosaur's tail went? Well, it continues over the page - look:


Isn't that fun?! The sentiment is from the same set, although I selectively masked it to say 'day' instead of 'birthday' which is more appropriate for my card. The 'No Bones About It' set is just great for boys cards, with so many design possibilities. I love the idea of little surprise notes in the children's school bags and it's definitely something I don't do enough of, so this year I will defintitely be making more of an effort.

Before you reach for your ink and papers, check out what our amazing team has created to inspire you this week:

The Paper Players Design Team
Anne Marie Hile - on leave
 
 
Here's a quick recap of our challenge rules:
 
1.  Create a new paper project
2.  Upload your creation to your blog with a link back to us and provide a direct link to the post featuring your challenge submission.
3.  Please link your card to no more than three challenges, TOTAL.
4.  Have FUN! 

I look forward to seeing what you create for Sandy's theme challenge in the gallery this week.  

Back tomorrow with another project; until then, happy stampin'!

    11709626_10155855871105085_3384290960448386223_n    


Stampin' Up! Supplies Used:

Card One: 

Table built using Product Table Builder by The Crafty Owl - Independent Stampin' Up! Demonstrator.


Card two: 

Table built using Product Table Builder by The Crafty Owl - Independent Stampin' Up! Demonstrator.

Sheer Perfection Vellum - Only 2 More Days To Grab Yours!

by Joanne James30. March 2015 07:00

It's Monday 30th March and that means only one thing - only 2 days left to go until the end of this year's Sale-A-Bration promotion! With this in mind, today's cards features one of the additional products introduced as a free gift when you spend £45 - sheer perfection vellum. I am entering today's card into both the Freshly Made Sketches and Color Throwdown challenges:


 I love this sheer vellum - it is printed with a variety of different patterns that are great for colouring with Stampin' Write markers. The sheet with the butterflies is a favourite, but today I chose one of the floral patterns - here is my card:

I used So Saffron for my base and then used a mat of Pear Pizzazz and a piece of Whisper White beneath my piece of vellum so that my colouring would be true. I coloured the flowers on my vellum piece with So Saffron and highlighted some areas with Daffodil Delight, then coloured the leaves with my Pear Pizzazz Stampin' Write marker. Before adhering my vellum to my base layer, I turned it over and rubbed over the reverse wide with my stylus to create a slightly raised effect when viewed from the front. It's quite difficult to see in the photograph, but adds a nice texture in real life. I finished my card with a banner, stamped in Basic Grey with the sentiment from another Sale-A-Bration free stamp set 'Simply Wonderful', and a layered butterfly, punched with my Elegant Butterfly and Bitty Butterfly punches and using a scrap of retired 'Riding Hood Red' cardstock for my pop of red. A few pearls to finish and done!

This Sheer Perfection Vellum really is lovely; it's such a shame that it's only available for two more days! You still have until 10pm tomorrow night to place an order for £45 and get yours for free - if you shop online with me and use the current code 4AHTZQVW, you will also receive an extra gift from me to say thank you (shipped separately) - so now there's two reasons to shop!

Right - I'm off to make a whole bunch of thank you cards and bag tags for this month's local customer orders - I'm using another Sale-A-Bration freebie this time, the 'For Being You' stamp set - getting inky is always fun and with free product, it's even better!

Back tomorrow with another project; until then, happy stampin'!


Stampin' Up! Supplies Used:

Table built using Product Table Builder by The Crafty Owl - Independent Stampin' Up! Demonstrator.


Project Life-Style Scrapbook Layout

by Joanne James19. April 2014 21:56

Good evening everyone! I hope you are all making the most of the long Easter weekend. I've been busy decorating and making new wall art for Ben's Lego-themed bedroom today. I also got to spend a couple of hours in my craft room, but unfortunately tidying and re-organising rather than creating today. So a quick post from me this evening to share a scrapbook page I made at our team training event last week.

The page was designed by the lovely Bekka Prideaux and is in the style of a Project Life page - i.e. divided into regular sized sections with space for journaling and photos, just like those designed by Becky Higgins, the creator of the hugely successful modern day scrapbooking phenomenon that is Project Life. Here is my page, finished with photos from the Dads, Lads & Lasses camping trip that was held at school last September:

This style of scrapbooking appeals to busy mums like me; I take lots of photographs and need a quick and easy method of presenting them and recording my memories, so I'm thrilled that Stampin' Up! has joined forces with Becky Higgins to produce our very own line of Project Life-themed accessories in the new Annual Catalogue, out in July - read all about it in my earlier post here. As a demonstrator, one of my perks is that I'll be able to get my hands on this and other new and exciting offerings ahead of customers and I can assure you I'll be first in line for this one!

If you'd like to be one of the first to get your hands on Stampin' Up's new range of Project Life accessories, now is a great time to join my team of Stampin' Up! demonstrators. If you're interested, please do get in touch - I would love to share with you the benefits that being a part of my Stampin' Up! team of demonstrators brings.

Back tomorrow with another project; until then, happy stampin'!


Stampin' Up! Supplies Used:

Table built using Product Table Builder by The Crafty Owl - Independent Stampin' Up! Demonstrator.


Life Doesn't Have To Be Perfect Frame

by Joanne James29. March 2014 22:13

A quick (and late!) post from me today - I have one of the busiest weekends ever today and tomorrow. I've been putting the final touches to my class preparation for next week today and have spent the evening at the swimming pool with Rebecca as she was participating in a swimming gala. We are having a real 'girls versus boys' weekend; we each went to our separate swimming pools today (and Granny came along to watch Rebecca for the first time today too) and tomorrow Rebecca and I are travelling to London so that she can take part in an inter-school music festival with the rest of her school choir, whilst the boys have a fun day doing their own thing at home.

Anyway, with all that in mind there will be a couple of quick posts from me over the next couple of days. Today I'm sharing a gift I made for one of my customers who celebrated her birthday recently. If you follow me on Facebook, you will have see this photograph I posted yesterday of a lovely box I made using the Sweet Sorbet papers (yours free with a £45 spend during Sale-A-Bration - only 2 more days to go to plae a Sale-A-Bration order!)and my Box Buster tool and Envelope Punch Board:

Today I thought I would share what was inside - a sweet little box frame:

Just a simple stamped sentiment, decorated with a punched butterfly and a few flowers stamped and punched using the Petite Petals stamp set and co-ordinating punch. A decorated frame makes a lovely gift.

Back tomorrow with a card (or two!); until then, happy stampin'!


Stampin' Up! Supplies Used:

Table built using Product Table Builder by The Crafty Owl - Independent Stampin' Up! Demonstrator.

Smile - It's Your Birthday!

by Joanne James23. March 2014 22:57

Good morning blog readers! It's Monday and the start of another busy week. Today I'm sharing my card for this week's Pals Paper Art challenge. I was thrilled to be a Top 3 winner over at PPA last week with my flowerpot card (if you missed it, you can see it here). This week the Pals have a great sketch by the talented Margaret Moody:

I was initially tempted to use a feature piece of DSP for panel 2, however I had some punched butterflies left over from preparing my weekend Spring banner class and decided instead to use them to create my card. Here it is:

I used a Soft Sky base, then layered a Whisper White panel on Daffodil Delight and carefully aligned my punched butterflies. I finished by stamping the 'Smile' sentiment in Versamark and heat embossing with clear embossing powder onto a panel of So Saffron, which I raised on dimensionals. A simple layout that worked for me and saved my excess butterflies from the scrap box; who else hoards bits and pieces then never goes back to use them on a card, instead punching the shape from a fresh piece of cardstock? Go on, admit it - we've all done it ;-). I loved the mix of brights and subtles on this card and the feeling of spring that it conjures up. 

I'm off to do some work before meeting some friends I haven't seen in a while for lunch. Back tomorrow with another project; until then, happy stampin'!

Stampin' Up! Supplies Used:

Table built using Product Table Builder by The Crafty Owl - Independent Stampin' Up! Demonstrator.


Tags: , , , , , , ,

Cards | Punch Art | Stamping

Spring Banner Class

by Joanne James23. March 2014 18:16

This morning I held one of my weekend project classes. They generally last longer than my monthly card classes and are a great opportunity to do something different and a little more involved. Following a successful class last December to make festive Christmas banners (you can read more about that and see our wonderful creations here), at the request of a few of the ladies who attended I decided to hold one to make a Spring/Easter banner with the other half of our banner kits. I chose a colour scheme that would compliment that of the Burlaps and Blooms wreaths that several of us made at my last weekend project class - you can see my finished wreath here. So here is my completed banner:

I chose to feature the word 'Spring' on my banner, as I am intending to leave it up to decorate for a while, but some of the ladies in my class made one that featured the word 'Easter'. We stencilled our backgrounds and letters using the now retired Build a Banner stencil kit in Daffodil Delight, Tangerine Tango and Pool Party with lettering in Smoky Slate.

The banner is decorated with flowers made with the Spiral Flower Originals Die and punched and die-cut butterflies. Here are some close ups of the individual banner pieces - this is the first piece, with a layered butterfly with a lightly embossed layer and some tiny ones punched out with the Itty Bitty Butterfly punch: 

Here's a close-up of one of the letters, along with a couple of the spiral flowers; a single yellow flower and a two-tone blue flower, finished with some Smoky Slate leaves cut out with the Secret Garden framelits:

This one has a So Saffron single flower and a two-tone one in Tangerine Tango and Crisp Cantaloupe, finished with an extra-large pearl, along with a bitty blue butterfly:

My banner simply served as inspiration and as is often the way with this kind of class, everyone makes theirs slightly differently and adds their own unique touch. If you hop on over to my Facebook page, you will be able to see the finished banner that Julie, one of the lovely ladies who attended the class made - different to mine, yet equally gorgeous!

If you live in Northampton and would like to join any of my card or project classes, check out my schedule of forthcoming classes here or contact me for more information.

Back tomorrow with a card to share; until then, happy stampin'!


Stampin' Up! Supplies Used:

Table built using Product Table Builder by The Crafty Owl - Independent Stampin' Up! Demonstrator.


Happy 70th Birthday Ann!

by Joanne James3. September 2013 21:51

Today I'm sharing a birthday card commission that I made for my sister-in-law's very special Mum, who celebrates her 70th birthday today. I decided to use a combination of some of my favourite of this year's in-colours and the lovely Secret Garden framelits. Here's the finished card:

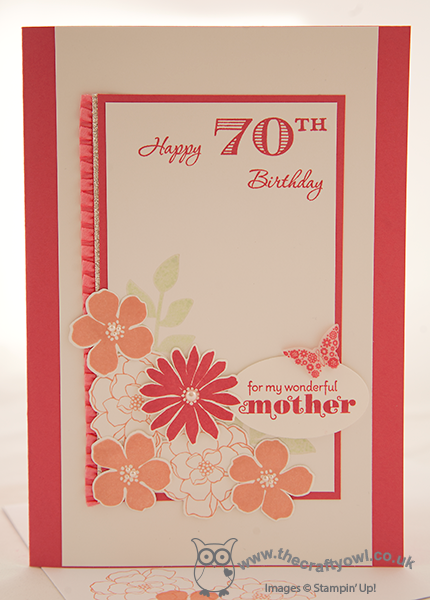
I love the pretty ruffle trim ribbon and added a tiny sliver of silver glimmer paper to add a little sparkle. I must confess to having had a few failed attempts before producing a card that I was really happy with - I needed this card to be 'just right' and am pleased to say I was happy with the finished result. Here's a quick picture of the card I made for Ann to wish her a special 70th birthday: 

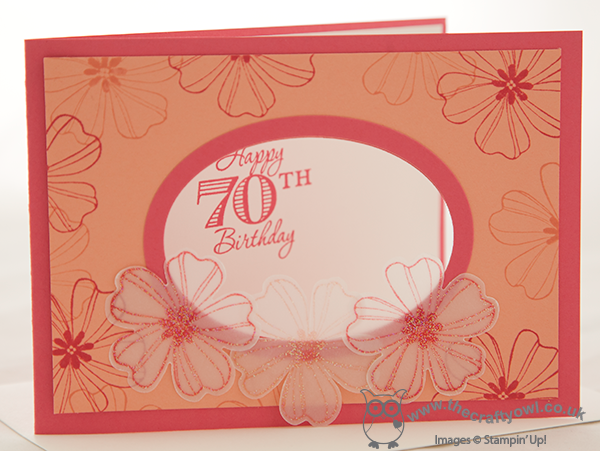
Not the best of photographs, I'm afraid - when flat you can see the sentiment through the aperture cut with an oval framelit - but hopefully good enough to give you an idea. This one uses a similar colour scheme and the Flower Shop stamp set - check out the vellum flowers on the front, which I stamped then heat embossed with Iridescent Ice for a lovely sparkle.

One last thing on my original card: did you notice the little butterfly stamped on vellum that highlighted my label? Here's a close-up:


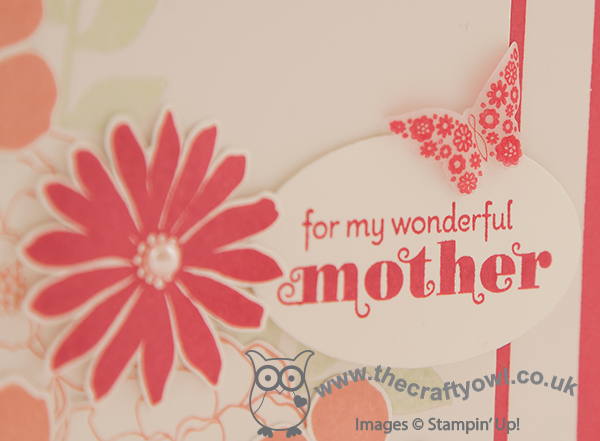
This is one of the butterflies in the Papillion Potpourri stamp set, punched out with the Bitty Butterfly punch - these are the items on offer at 15% off when you buy them together before 30th September - you can read more about this offer here.

Both James Juniors are back at school tomorrow; whilst I'll miss them not being at home, I can't deny that I'm looking forward to getting back into my craft room for a bit more creating - lots to do!

Do come back in the next day or so to see what I've been creating; I'm looking forward to sharing some of my Christmas ideas and September is a month of birthdays for me, so I'll have lots on this front too. Until next time, happy, stampin'!


Stampin' Up Supplies:

Stamps: Secret Garden, Delightful Dozen, Memorable Moments, Papillion Potpourri

Cardstock: Whisper White, Strawberry Slush, vellum

Ink/Stampin' Write Markers:  Strawberry Slush, Crisp Cantaloupe, Pistachio Pudding

Tools: Secret Garden Framelits, Oval Framelits, Bitty Butterfly Punch, Stamp-a-ma-jig

Finishing Touches: Strawberry Slush Stretch Ribbon Trim, Silver Glimmer Paper, Basics Pearls

Butterflies and Best of Christmas!

by Joanne James2. September 2013 20:25

This is a quick post with details of this month's exciting Stampin' Up! offer and the new 'Best of...' set for September. This month's offer is on this great butterfly-themed bundle:


Buy the Papillion Potpourri stamp set and Bitty Butterfly Punch (pages 90/183 of the Annual Catalogue) together before 30th September and receive a 15% discount. If you've been considering purchasing either or both of these items, then this is the promotion for you!

Bundle Item


Description

Catalogue Price

15% Savings Price

Amount Saved!

135311


Butterfly Bundle (Clear-Mount)
Papillion Potpourri Clear-Mount Stamp Set
Bitty Butterfly Punch

£28.20

£23.97

£4.23

135312


Butterfly Bundle (Wood-Mount)
Papillion Potpourri Wood-Mount Stamp Set
Bitty Butterfly Punch

£31.20

£26.52

£4.68

 Secondly, the 'Best of...' set for September is 'Best of Christmas' - a lovely set of four stamps, that includes the little brother of the much-loved and missed 'Dasher':

This set represents great value at £13.95 (clear mount only) and like the other 'Best of..' sets, will be available until 31st March, although the sooner you get this set, the sooner you will be able to get cracking on those Christmas cards!

I will be posting ideas using both of these sets this month, so do check back to my blog in the coming weeks for inspiration. Meanwhile, if you would like to order either, do get in touch and I can place an order for you.

Until next time, happy stampin'!


Tags: , , , , ,

Promotions | Stamping

Mini Catalogue

BROWSE THE CATALOGUE

The mini catalogue is now live! Read and download your copy here.

Shop Online

Access my online shop 24 x 7, 365 days of the year:

Current March hostess code:

S9F2XJJW

Shop Online

Join My Team

It's always a great time to join Stampin’ Up! New team members can get £130 worth of products for only £99 + free business supplies + free shipping + all the fun being a part of Stampin’ Up! Stampin' Up! has something for everyone: join my growing team and benefit from my support to enjoy Stampin' Up! however you choose.

If you're interested, call me for a chat to understand how I can help you realise your goals. Alternatively, if you have already decided to sign up and you just can't wait, please click here for the link to the online form where you can sign up and order your starter kit right away! 

Latest Kit!

Stampin Cut and Emboss

The Rock Legend Kit has all you need to make 8 cards with coordinating envelopes. Along with the new Panda Friends Kit, both are available from January 4th for just £14 each - get yours here!

2023-24 Annual Catalogue

BROWSE THE CATALOGUE

Click on the catalogue for a full list of current SU! supplies - if you would like to order any of the items featured, please drop me a line at [email protected] or give me a call on 07773 421446 - I'd be happy to help.

New Online Exclusives

There will be new products available exclusively in the online store from 5 March - check them out here.

About Me

Hi I'm Joanne and live in Northampton and when I'm not looking after my husband and two beautiful children, am an avid crafter with a passion for all things Stampin' Up!

I must confess that I have never been a big rubber stamper - until I discovered Stampin' Up! that is. I love the fact that I can get such great results with co-ordinating stamps, inks, papers and punches - the possibilities are endless! Join me on my stamping journey as I share the things I love and be inspired to create amazing things yourself!

Follow Me

Monthly Newsletter

Box Builder

Click the button above to use Box Buster to create your custom box design using the Envelope Punch Board!

Kits Collection Now Available!

Stampin Cut and Emboss

The new Kits Collection from Stampin' Up! is now available!

Click here to see the current kits available and order yours online today.

I Design For


Stampin' Up Stuff

This is my personal blog and is not endorsed by Stampin’ Up! I hope you find it a plentiful source of ideas and personal inspiration but please don't copy my designs for contest submission or use for classes, publication or sale without express permission.