Christmas Tea Lights

by Joanne James8. August 2013 09:44

Another week, another late post - I'm loving the summer holidays but when school's out it sure is tricky to keep everything else on track! So today I'm posting nice and early, so that I don't run out of time again!

Today I'm sharing another of the makes from my Christmas workshop that I held last weekend: a lovely set of four tea lights in a handmade box. This workshop was less about the stamping and much more about the scoring - if my ladies weren't proficient with their Simply Scored scoreboard beforehand, they sure are now! So here is our finished box:


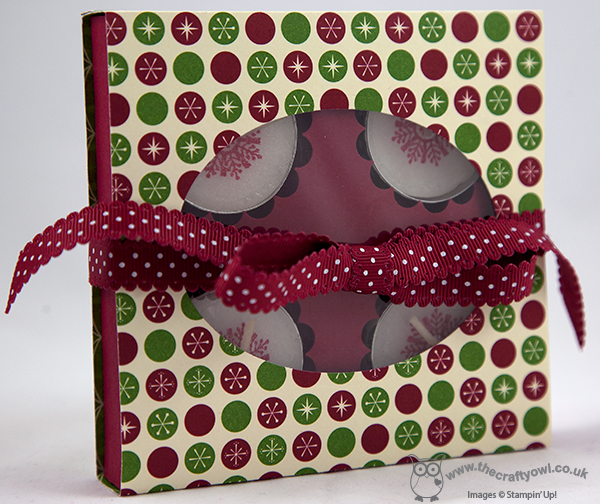
We made a box with a sliding sleeve cover, from which we cut out an oval aperture with the Oval Framelits and backed with a window sheet, to allow a glimpse of our lovely hand-stamped candles inside. Here's a picture of the open box, with a peek at our 'dressed up' tea lights:

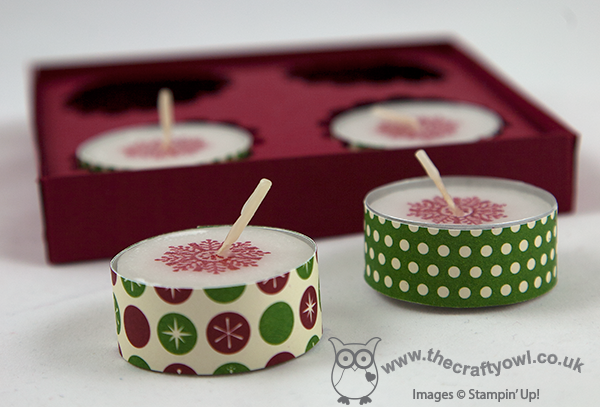
We edged each of them with a strip of DSP; I'll be making more of these when my festive washi tape arrives, as this is perfect for this kind of project. The candle stamping was really easy to achieve and as none of the ladies present had done this before, was a real 'wow' moment for them. I suspect lots of their friends and neighbours will be receiving stamped tea light gift sets for Christmas now that they've learned this clever technique!

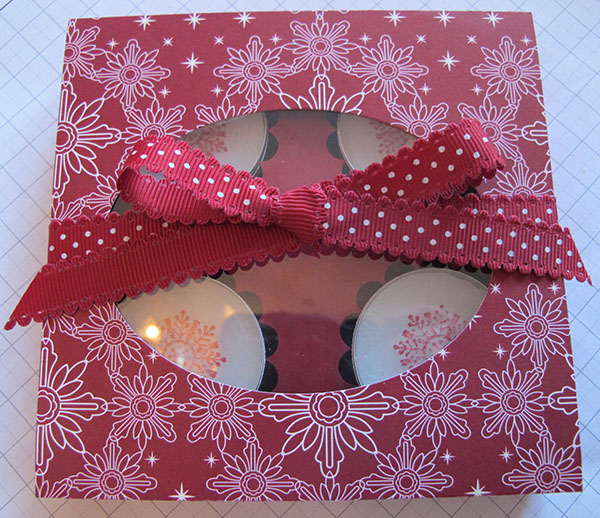
I love this spotted star/snowflake paper from the retired 'Be of Good Cheer' paper set; with so many designs to choose from, we all made different ones though - here's one of the other finished sets made by Kathy during the workshop:

These papers are just so lovely, but don't be too sad that they are now retired; I have had a 'sneak peek' of the new Autumn-Winter seasonal catalogue and can honestly say, you will not be disappointed with this year's offerings!

All being well, I will be back tomorrow with the last of my Christmas workshop projects. I'm off to have a quick spot of making before meeting friends in the park for a picnic - lovely! Until then, happy stampin'!


Stampin' Up Supplies:

Stamps: Four Seasons (hostess - retired)

Cardstock: Cherry Cobbler, Be of Good Cheer Designer Series Paper (retired)

Ink/Stampin' Write Markers: Cherry Cobbler

Tools: Simply Scored, Big Shot, 1 1/4" Circle Punch, 1 3/4" Scallop Circle Punches, Oval Framelits

Finishing Touches: Creped Filter Paper, Window Sheet,  Cherry Cobbler 1/2" Scallop Dots Ribbon (retired)

The Colours of the Rainbow - Filter Paper Technique

by Joanne James20. May 2013 20:36

I thought today I would share a card I made at my last training session which showcases a very cool technique using ink, alcohol and filter paper. Here is the finished card: 

The real focal point of this card, designed by the lovely Monica Gale, is the central rainbow panel, which is so easy to achieve. All you need to do is colour an acetate window sheet using Stampin' Write markers in sections - for this card we used Real Red, Pumpkin Pie, Daffodil Delight, Gumball Green, Midnight Muse and Rich Razzleberry - then spray this liberally with water, or isopropyl alcohol if you want it to dry more quickly, until the ink blends. Once this happens, you simply lay your filter paper (rough side down) onto the ink until it's absorbed, then peel away from the acetate and leave to dry. Once dry, the filter paper can be glued to a piece of white card and cut to size to fit your project.

The result varies depending on the colours used and the shapes drawn onto the acetate, but that's the great thing with a technique like this - a unique output every time. I will be using this on other cards for sure and may even record a short video to demostrate just how easy it is to achieve - watch this space!

Back tomorrow with another project. Until then, happy stampin'!


Stampin' Up Supplies:

Stamps: Rain or Shine, En Francais, Tiny Tags

Cardstock: Basic Grey, Whisper White

Ink/Stampin' Write Markers: Real Red, Pumpkin Pie, Daffodil Delight, Gumball Green, Midnight Muse and Rich Razzleberry

Tools: Jewellery Tag Punch, Creped Filter Paper

Finishing Touches: Basics Rhinestones, 1/4" Stitched Grosgrain Ribbon Basic Grey, Alcohol Shimmer Mist

Tags: , , , , , , , ,

Cards | Stamping

Fashionista Gift Tag Set

by Joanne James3. May 2013 20:49

No stamping today! I have another Dress Up project from last month's quarterly training session: this time a lovely set of gift tags in a nice little pocket holder made using the Pop n' Cuts base again. Here's the outside of the box, decorated with its own dress on a Cute Clip hanger and another of those little filter paper flowers:

Open up the box to reveal a lovely set of dressed mannequin gift tags, each one with its own outfit:

This kind of holder is so easy to make just by adding in a couple of central score lines and box section to hold the tags; it would also make a nice notelet holder. As for the tags - what better way to ensure a gift for someone special is 'all dressed up'? My particular favourite outfit combo is the embossed filter paper sundress with the hot pink patterned bolero cardigan; leave me a comment and let me know which one you prefer, or better still how you would dress yours?

If you would like to get your hands on a gift tag set like the one above, you can do one of three things:

host a party during the month of May - this will be my hostess gift to thank you for booking a party and if you have party sales totally £300 or more, you could use your hostess credits to obtain the Pop 'n' Cuts Card base, Pop 'n' Cuts Dress Form and All Dressed Up framelit and stamps bundle ABSOLUTELY FREE!*

ask me about a class - if I have enough interested crafters, I will run a class featuring the Dress Up framelits and Pop 'n' Cuts base and you can learn how to make this set and more

contact me via [email protected] to place your order today

So many choices - I hope one of them tick's your box and I look forward to hearing from you. Back tomorrow with anohter project - until then, happy stampin'!


*Hostess credits for party sales of £300 totalling £75 (£50 plus £25 bonus if you host a party before May 30th) with one item purchased at 50% discount price


Stampin' Up Supplies:

Cardstock: Marina Mist, Sunshine and Sprinkles DSP

Ink: Basic Grey

Tools: Dress Up Framelits, Big Shot, Itty Bitty Punches, Elegant Bouquet Embossing Folder, Fancy Fan Embossing Folder, Heart Punch

Finishing Touches: Basics Rhinestones, 1/4" Stitched Grosgrain Ribbon Basic Grey, Creped Filter Paper, Cute Clips

Brights Thank You Card with hand-dyed Filter Paper Flower

by Joanne James30. April 2013 19:56

As promised, today I have a card to match yesterday's lovely Melon Mambo treat holder, made with the Pop 'n' Cuts base. No dresses today, but another of those gorgeous filter paper flowers, this time hand-dyed yellow to really make it 'pop': 

This flower was made using the slightly smaller Floral Frames Framelit; the flowers can be coloured in a number of different ways - to achieve this effect, the edges were sponged with Daffodil Delight ink then the layers sprayed with a homemade mix of alcohol and shimmer spray to encourage the colour to 'bleed' and shimmer slightly. So easy and each time you make one, you get a slightly different look so all your flowers are unique.

The flower definitely takes centre stage here, however the background stamping, rhinestones and cute clip attaching the flag at the top all contribute to making this a great card, and one that perfectly co-ordinates with yesterday's treat holder. Here's a picture of both items together:

Rather lovely! Back tomorrow with another project and exciting news about a special promotion valid for the month of May only. To find out more, make sure you check back tomorrow for the full low-down. Until then, happy stampin'!


Stampin' Up Supplies:

Stamps: Oh, Hello

Cardstock: Melon Mambo, Whisper White, Sunshine and Sprinkles DSP

Ink: Basic Grey, Melon Mambo, Daffodil Delight

Tools: Floral Frames Framelits, Big Shot

Finishing Touches: Basics Rhinestones, 1/4" Stitched Grosgrain Ribbon Basic Grey, Creped Filter Paper, Cute Clips

Pop 'n' Cuts Treat Holder

by Joanne James29. April 2013 20:32

I'm back with more Pop 'n' Cuts to share today, but not as a card. As I mentioned yesterday, in the same way that the Dress Up Framelits can be used without the Pop 'n' Cuts base, the base can also be used without the framelits as a structure to make a pocket or treat holder. Here's an example of one such treat holder, designed by the lovely Monica Gale, that I made at my quarterly training session:

How lovely is this? it was so easy to put together: just cut a base using the die and the Big Shot, then emboss the front panel, score in the base lines and punch some ovals for handles, then decorate as desired. We used some strips of Sunshine and Sprinkles DSP and made a gorgeous flower from the filter paper that features on page 7 of the Spring-ummer catalogue. If you haven't noticed this, at £2.75 for 12 sheets it represents great value and each pack has enough to make lots of flowers in all different shapes and sizes. This flower was made with 6 layers of filter paper and the second smallest frameit in the Floral Frames set.

This treat holder would be great to wrap around a cellophane bag of chocolates or a hand-iced biscuit (that's what I'll be using mine for!) as a sweet treat for someone special. Come back tomorrow to see the card I made that co-ordinates with the treat holder that features a 'stepped up' filter paper flower. Until then, happy stampin'!


Stampin' Up Supplies:

Stamps: Friendly Phrases

Cardstock: Melon Mambo, Whisper White, Sunshine and Sprinkles DSP

Ink: Basic Grey

Tools: Pop 'n' Cuts Base, Floral Frames Framelits, Big Shot, Ticket Duo Builder Punch, Large Oval Punch, Vintage Wallpaper Embossing Folder

Finishing Touches: Basics Rhinestones, 1/4" Stitched Grosgrain Ribbon Basic Grey, Creped Filter Paper

Mini Catalogue

BROWSE THE CATALOGUE

The mini catalogue is now live! Read and download your copy here.

Shop Online

Access my online shop 24 x 7, 365 days of the year:

Current April hostess code:

VDKNV7BH

Shop Online

Join My Team

It's always a great time to join Stampin’ Up! New team members can get £130 worth of products for only £99 + free business supplies + free shipping + all the fun being a part of Stampin’ Up! Stampin' Up! has something for everyone: join my growing team and benefit from my support to enjoy Stampin' Up! however you choose.

If you're interested, call me for a chat to understand how I can help you realise your goals. Alternatively, if you have already decided to sign up and you just can't wait, please click here for the link to the online form where you can sign up and order your starter kit right away! 

Latest Kit!

Stampin Cut and Emboss

The Rock Legend Kit has all you need to make 8 cards with coordinating envelopes. Along with the new Panda Friends Kit, both are available from January 4th for just £14 each - get yours here!

2023-24 Annual Catalogue

BROWSE THE CATALOGUE

Click on the catalogue for a full list of current SU! supplies - if you would like to order any of the items featured, please drop me a line at [email protected] or give me a call on 07773 421446 - I'd be happy to help.

New Online Exclusives

There are new products available exclusively in the online store from 5 March - check them out here.

About Me

Hi I'm Joanne and live in Northampton and when I'm not looking after my husband and two beautiful children, am an avid crafter with a passion for all things Stampin' Up!

I must confess that I have never been a big rubber stamper - until I discovered Stampin' Up! that is. I love the fact that I can get such great results with co-ordinating stamps, inks, papers and punches - the possibilities are endless! Join me on my stamping journey as I share the things I love and be inspired to create amazing things yourself!

Follow Me

Monthly Newsletter

Box Builder

Click the button above to use Box Buster to create your custom box design using the Envelope Punch Board!

Kits Collection Now Available!

Stampin Cut and Emboss

The new Kits Collection from Stampin' Up! is now available!

Click here to see the current kits available and order yours online today.

I Design For


Stampin' Up Stuff

This is my personal blog and is not endorsed by Stampin’ Up! I hope you find it a plentiful source of ideas and personal inspiration but please don't copy my designs for contest submission or use for classes, publication or sale without express permission.