Season of Chic Christmas Snowflakes CCS 497

by Joanne James22. November 2022 13:00

It's Tuesday and time for a new challenge over at CAS Colours & SketchesThis week's challenge is a sketch challenge and Cecile has asked that we overlay an image and background element: 


Feel free to flip or rotate the sketch when making your card. For my card today I used my snowflake and 'swoosh' stamps from the 'Season of Chic' stamp set along with some diecut snowflakes cut with the Chic Dies for some winter birthday or Christmas inspiration:


Here's the low-down on today's card:

I added a simple border with my white chalk marker then stamped some tone-on-tone snowflakes stamped in Orchid Oasis to my cardfront, along with a swoosh in Starry Sky for contrast, and complimented this with a white heat-embossed sentiment and some white glimmer diecut snowflakes, trimmed with Opal Rounds:


I added some stamped snowflakes and a greeting to the inside of my card, and carried the detail over to the envelope too:


A card that works for a winter birthday or Christmas - and easy to make too!

Here is the visual summary of the key products used on today's project for you to pin for easy reference:


You can see all of my 'How To' summaries on my 'How To - Tips and Techniques' Pinterest board in case you've missed any. 

Enjoy your day and I'll be back tomorrow with another project. Until then, happy stampin'!


Stampin' Up! Supplies Used:

Table built using Product Table Builder by The Crafty Owl - Independent Stampin' Up! Demonstrator.

Jingle Jingle Jingle in Red and Green PP618

by Joanne James20. November 2022 08:00

Today it's Sunday and time for this week's new challenge over at The Paper Players! It's my turn to host - it's Clean and Simple Week and I've made it festive for you:
       

I am properly in festive card making mode now, so I chose CAS Christmas! Your project can be any kind of Christmas card, as long as it's clean and simple. What do we mean by clean and simple? Your project must:

  • have minimal layers and embellishments
  • have plenty of open space
  • be simple and uncluttered

I used the lovely Kim's sketch over at Freshly Made Sketches this week and in contrast to last week's card, today I'm using the Colour Hues palette of scarlet red and green for a traditional festive affair - take a look:
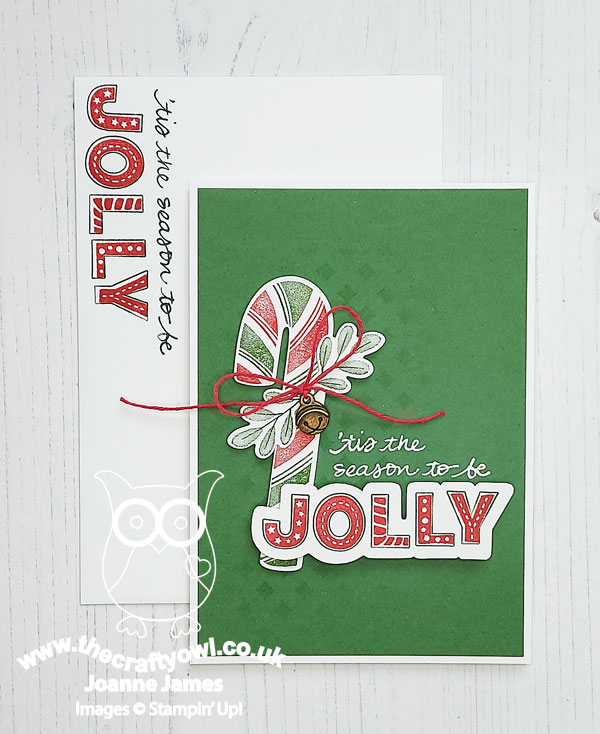
 

Here's the low-down on today's card:

For the vertical element on my card, I stamped and diecut a candy cane using the Sweet Candy canes bundle, creating a two-tone effect by using my Stamparatus and inking first the red sections with sponge daubers, stamping then cleaning my stamp and adding the green stripes. For the horizontal elements, I used a combination of a heat-embossed white sentiment stamped onto my Garden Green card front and the word 'jolly', both from the 'Jingle Jingle Jingle' stamp set, which I stamped in red, outlined in green, and fussy cut and popped up on dimensionals overlapping my candy cane.

I added a couple of simple green sprigs and a flat jingle bell trinket tied with twine to complete my card:
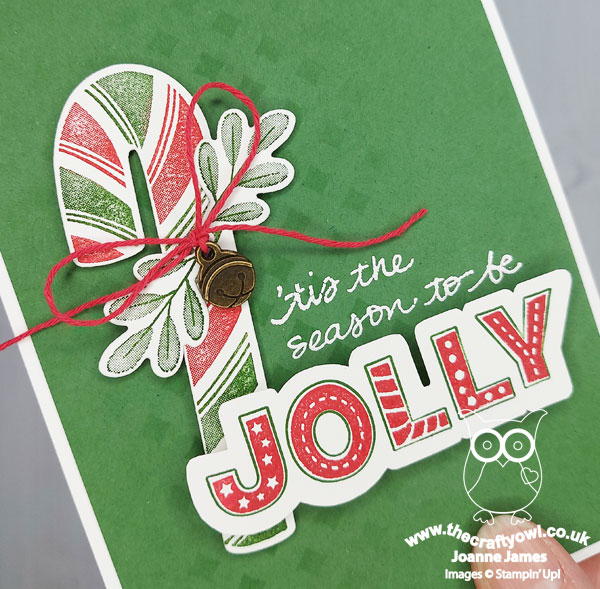
Simple, colourful and fun - and I repeated the sentiment on the envelope too for a little extra pizzazz.

Here is the visual summary of the key products used on today's project for you to pin for easy reference:
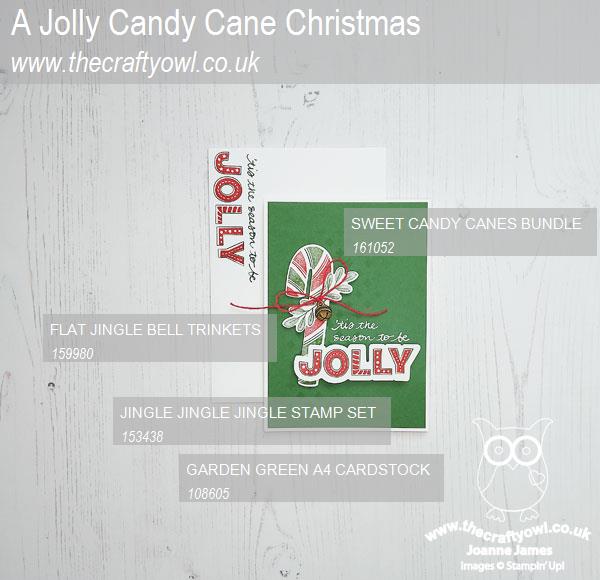
 

You can see all of my Product and 'How To' summaries on my 'How To - Tips and Techniques' Pinterest board in case you've missed any. 

Before you reach for your ink and papers, check out what our amazing team has created to inspire you this week:

Here's a quick recap of our challenge rules:
 
1.  Create a new paper project
2.  Upload your creation to your blog with a link back to us and provide a direct link to the post featuring your challenge submission.
3.  Please link your card to no more than four challenges, TOTAL.
4.  Have FUN!

Enjoy your day; today we are at home with both of the James Juniors spending the day catching up on homework, having spent most of yesterday out on the hockey pitch (one win 8-1, one loss 5-0 - I'll leave you to work out which score belongs to which!) I shll be cooking, ironing and hopefully fitting in a little crafting too (fingers crossed!) I'll be back tomorrow with another project. Until then, happy stampin'!


Stampin' Up! Supplies Used: 
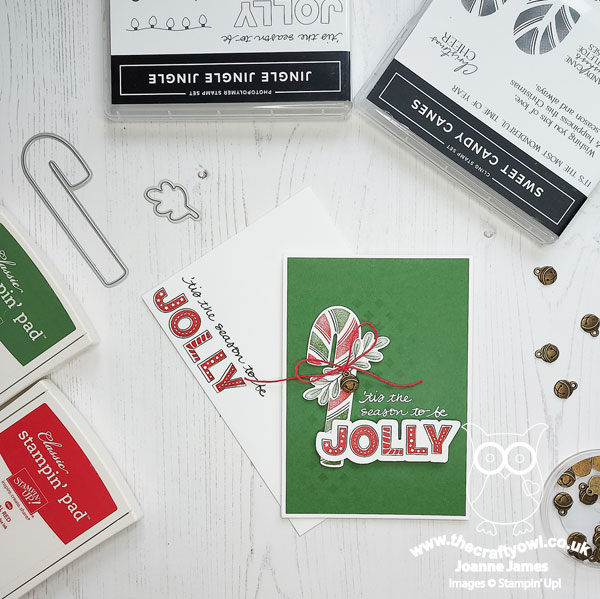
Table built using Product Table Builder by The Crafty Owl - Independent Stampin' Up! Demonstrator.

Horizon Dies Sunset AYSI 288

by Joanne James18. November 2022 13:00

Today I'm sharing my design team card for our new challenge over at As you See It where it's time for a theme challenge chosen by Heather C:


I was really tight on time to create a card for today's challenge so decided to share one that I made earlier in the year that features the retired Horizon Dies that I didn't get around to sharing at the time that sums up the perfect vacation activity - take a look:


 Here's the low-down on today's card:

Watching the sunset - for me there's nothing nicer after a long day relaxing than sitting out on a warm summer evening watching the sun go down over the horizon. My colourful scene is evocative of this and was created by simply layering some of the dies to create my scene, adding some blended ink behind the sun and a simple sentiment to finish:

Isn't that a relaxing scene? I can almost feel the holiday warmth of that setting sun, a ball of fire reflecting on the lake and turning it red. The sentiment of today's card just about sums up my week - and breathe ...

Here is the visual summary of the key products used on today's project for you to pin for easy reference:


You can see all of my 'How To' summaries on my 'How To - Tips and Techniques' Pinterest board in case you've missed any. 

Here's a summary of our challenge rules:

  • Create any card, scrapbooking page, 3D project or packaging project that fits the challenge.
  • Please include the challenge graphic and link back to the challenge in your blog post. Turn off word verification so we can leave you lots of lovely comments. Make sure you link the post not the whole blog to the Linky. Use #AYSIXXX when uploading to a public gallery.
  • If you’re unsure about ‘the rules’, check the details under the Challenge Guidelines tab on the As You See It Challenge homepage.
We look forward to seeing your creations in the AYSI gallery.

Enjoy your day and I'll be back tomorrow with another project. Until then, happy stampin'!


Stampin' Up! Supplies Used:

Table built using Product Table Builder by The Crafty Owl - Independent Stampin' Up! Demonstrator.

Last Call For The Stampin' Up! Annual Catalogue Sale

by Joanne James18. November 2022 13:00


A quick reminder that you have until 10.59pm to place your order online and take advantage of the current annual catalogue sale - happy shopping!


Painted Christmas Country Wreaths TTT188

by Joanne James17. November 2022 15:00

It's Thursday and time for a new challenge over at TicTacToe! It's the turn of Team X to host this week and the lovely Felicita is our featured designer this week. This is the fun board that we are playing along with: 


I have been having a lot of fun with my Cottage Wreaths bundle so decided to take the right hand column and use any shape die, wreath and gold foil/glitter for my card today - take a look:


Here's the low-down on today's card:

I love the sketch over at TGIF Challenges this week and decided that it would be perfect for a little of 'something old, something new' - I layered a stamped and diecut wreath from the Cottage Wreaths bundle over a panel of Soft Sea Foam. embossed with the retired but gorgeous Seasonal Wreath embossing folder. This has so much detail and dimension yet makes a pretty, subtle background. I also added some stamped and diecut holly leaves, red rhinestones and an antique gold foiled bow to my Christmassy Cottage Wreath, along with a fussy cut sentiment:

All of this was against a background of the returning favourite, painted Christmas Designer Series Paper, with a couple of red glimmer borders thrown in. The prettiness doesn't stop there though - I also decorated both the inside of my card, and the envelope - no naked envelopes here:

I'll be sharing this with the lovely ladies over at Just Us Girls where it's trend week and this is the trend Lisa has chosen. I love to decorate an envelope and the inside of my card to co-ordinate with the card front; I think it's a great way to add a finishing detail and I like to think that a patterned envelope makes the recipient smile before they've even opened it. 

Here is the visual summary of the key products used on today's project for you to pin for easy reference:


You can see all of my Product and 'How To' summaries on my 'How To - Tips and Techniques' Pinterest board in case you've missed any. 

A tictactoe board offers so many creative possibilities - how does this week's board inspire you? Why not have a go? We would love to see you in the gallery and who knows - you might be selected for Designer's Choice and be eligible to be a guest designer on a future challenge. 

Enjoy your day; I am heading out to Sixth Form Options Evening with the youngest of the James Juniors at school this evening; this does at least mean dinner out, due to the logistics of trying to get everywhere on time - what a treat! I'll be back tomorrow with another project. Until then, happy stampin'!


Stampin' Up! Supplies Used: 

Table built using Product Table Builder by The Crafty Owl - Independent Stampin' Up! Demonstrator.

The Stampin' Up! Annual Catalogue Sale is Here!

by Joanne James16. November 2022 08:00

Create more by spending less during the Seasonal Sale! Between 15 and 18 November 2022, select products from the 2022–2023 Annual Catalogue will be on sale with the following discounts:

  • 10% off all punches
  • 15% of all stamps (Host stamp sets are not included in this sale)
  • 20% off all dies
  • 20% off all embossing folders
  • 20% off all non-specialty and non-assortment Designer Series Paper

With the season of giving upon us, this is a great opportunity to buy gifts for your fellow crafting enthusiasts, or to stock up on supplies for all your upcoming handmade projects. Remember, this sale is for four days only so don’t miss out! You can order directly in my online store or alternatively if you live local to me, you are welcome to add to my order to save on postage - please get your orders to me by tomorrow evening ready to put through first thing Friday.

If you have a Stampin' Up! wish list, now is the ideal time to share it with me if you haven't already. I can then make sure that any friends or relatives that want to buy you a gift for Christmas purchase exactly what you'd like and yet you will still receive a surprise - a win-win! If you get it to me before the end of the week, you could get even more than you bargained for ;-)

I'll be back with a reminder on Friday - meanwhile, happy shopping!


Christmas Pinecones Clean and Simple CCS 496

by Joanne James15. November 2022 13:00

It's Tuesday and time for a new challenge over at CAS Colours & Sketches. Cecile is hosting this month and she has our second colour challenge of November: 


I usually struggle with colour challenges, but Cecile has chosen some great ones this month - I love them all! For my card today I decided these colours were perfect for another Christmas card - take a look:


Here's the low-down on today's card:

Masked Blending - I started by adding a couple of strips of masking tape to my white card base and using a blending brush, blended my Soft Succulent ink from the corner across my card, fading at the edges. I then removed the masking tape to give a nice border to frame my main focal image. 

Christmas Pinecones and A Blending Trick - I decided these colours would be perfect for some pine needles and pinecones, so I cut some using my Christmas Pinecone Dies and snipped out a section that could be used to fit my corner. I created two-tone colours by adding the same colour ink to deepen the colour on one of the layers - this is a useful trick to create two tones of the same colour easily. I added some puffy snow and some iridescent gems for a little extra detail:


Christmas To Remember - The sentiment on the front of my card comes from the 'Christmas To Remember' stamp set, and I used another from the same set on the inside of my card. I stamped it in Early Espresso to compliment my pinecone detail.

This card does have more detail than I usually choose for a CC&S card, however it is still clean and simple with some clean, white space. 

Here is the visual summary of the key products used on today's project for you to pin for easy reference:


You can see all of my 'How To' summaries on my 'How To - Tips and Techniques' Pinterest board in case you've missed any. 

As a reminder, for our colour challenges, you must use all of the stated challenge colours. You may also use neutral colours; however, the challenge colours should be the most noticeable ones featured on your card. We use Stampin' Up! color names for reference, but you are welcome to use any other companies' products as long as you match the challenge colours as closely as possible.

Enjoy your day. I am spending today with one of my dear crafty friends that I don't get to see often face-to-face and we have lots to catch up on, so I'm really looking forward to it! I'll be back tomorrow with another project. Until then, happy stampin'!


Stampin' Up! Supplies Used:

Table built using Product Table Builder by The Crafty Owl - Independent Stampin' Up! Demonstrator.

Leaves of Holly in Silver and Blue PP617

by Joanne James13. November 2022 08:00

Today it's Sunday and time for this week's new challenge over at The Paper Players! It's the turn of the fabulous Jaydee to host this week and she has a sparkly colour challenge for us to work with:


I thought the icy colours of blue, silver and white would make a pretty Christmas card so I grabbed my Leaves of Holly bundle and used Linda's sketch over at Freshly Made Sketches for my layout (I flipped the main images to suit the shape of my main holly label die) and set to work - take a look at what I came up with:


Here's the low-down on today's card:

I decided to layer a couple of the main holly labels from the Holly Berry Dies, one in dark metallic silver and one in white that I stamped my main greeting on and overlaid them having turned the bottom one through 180 degrees. I added in a selection of holly leaves and foliage behind each, cut from a combination of silver foil and white glimmer paper and interspersed with some blue ones. I created my own piece of variegated blue cardstock by adding three blue inks randomly to a sheet of whisper white cardstock and then diecut a selection of solid and outline leaves from this, overstamping some in Starry Sky ink too - I just love the effect! I added some silver twine and a selection of opal rounds and blue faceted enamel dots to my Starry Sky cardbase, that I had inked around the edges and added some white ink splatters to as a finishing touch:


Aren't those holly leaves just so pretty? I added a second smaller label towards the bottom of my card as per the sketch for the second part of my sentiment - this set has some great combination sentiments which work well with this layout. I also used a larger A5 card base to accommodate my design; I like having a few special, larger cards for close friends and family members at this time of year and this design works perfectly.

Here is the visual summary of the key products used on today's project for you to pin for easy reference:


You can see all of my Product and 'How To' summaries on my 'How To - Tips and Techniques' Pinterest board in case you've missed any. 

How do this week's colours inspire you? I'd love to know what you think of today's non-traditional holly leaves card - do leave me a comment below and share your thoughts.

Before you reach for your ink and papers, check out what our amazing team has created to inspire you this week:

Here's a quick recap of our challenge rules:
 
1.  Create a new paper project
2.  Upload your creation to your blog with a link back to us and provide a direct link to the post featuring your challenge submission.
3.  Please link your card to no more than four challenges, TOTAL.
4.  Have FUN!

Enjoy your day; I spent all day yesterday at the side of the hockey pitch and this morning I'm taking the youngest of the James Juniors to participate in his school army cadets Remembrance Day parade and service - always a spectacular sight and such an important duty, 'lest we forget'. I'll be back tomorrow with another project using some of the leftover pieces from today, so stay tuned. Until then, happy stampin'!


Stampin' Up! Supplies Used: 

Table built using Product Table Builder by The Crafty Owl - Independent Stampin' Up! Demonstrator.

Charming Sentiments Rainbow Birthday Card FF122

by Joanne James11. November 2022 09:00

Today I have my card for the new challenge over at Festive Friday. 


The challenge that we are celebrating this week is 'National Cake Day' which is on 26th November. Remember the fun thing is that at Festive Friday you do not need to actually celebrate the occasion; your goal is to simply use three or more items from the inspiration list on your project. This week I used birthday sentiment, candle and patterned paper and using the current sketch layout over at Atlantic Hearts Sketch Challenge this is what I came up with:


 Here's the low-down on today's card:

Charming Sentiments - For today's card I used both a sentiment and dies from the Charming Sentiments bundle. This is a great sentiment set with dies that cut out each of the sentiments exactly; but did you also know that the dieset has a number of very useful extras, including stars and candles for example? That's where I got the candles from that feature on my card today - so useful, everything you need in one bundle! 

Celebrate Everything - I took the colour scheme for my card today from the stripes in the paper that I featured on the bottom half of my card front, that comes from the 'Celebrate Everything' DSP pack - you know how much I love these papers, right?! I did take a little liberty with the sketch, as my stripes are diagonal rather than straight - but it's clear where the inspiration has come from:


A Surprise Inside - This is a birthday card that's something of a two-in-one - I added a pocket to the inside to hold some money too:


A little extra paper to the envelope flap completes this colourful card that is winging its way to my nephew whose birthday it is next week.

Here is the visual summary of the key products used on today's project for you to pin for easy reference:


You can see all of my 'How To' summaries on my 'How To - Tips and Techniques' Pinterest board in case you've missed any. 

How does our board inspire you? I can’t wait to see what YOU create! For more inspiration, be sure to visit the rest of the Festive Friday Challenge Design team:

Ann Schach
Beth McCullough
Sharon Hashimoto Burkert
Melanie Hungerford
Helen Jennings
Melva Peters
Jaydee
Diane Evans
Joanne James

Enjoy your day and I'll be back tomorrow with another project. Until then, happy stampin'!


Stampin' Up! Supplies Used:

Table built using Product Table Builder by The Crafty Owl - Independent Stampin' Up! Demonstrator.

Fancy Florets Pre-Release Is Now Underway

by Joanne James9. November 2022 21:00

I'm here with news of a new collection that was released at the start of this month, the Fitting Florets Collection. Suitable for any occasion, including Christmas and seasonal celebrations, the sweet Fitting Florets Collection is a great addition to your stamp collection. From colour schemes to sentiments and embellishments to dies, these unique products blend together so that your cards and crafts fit whatever occasion you might need. Send birthday wishes, express your gratitude, or spread Christmas cheer—with so many options to mix and match you’ll be set no matter the celebration all year! 


The Framed Florets bundle is a pre-release that will be included in the 2023 January-April Mini Catalogue. In addition to the bundle, for the duration of the pre-release only, you will also be able to order a number of additional exclusive products, that will be available only while supplies last - an additional festive sentiment stamp set, co-ordinating designer series paper and embellishments - you can see the detail below:

There's also a handy video from the Home Office that shows the product in more detail:

What do you think - pretty right? Also perfect for those of you that love frames and anyone who has been missing ovals since our layering oval dies retired. 

If any of these items appeal to you, click on the images below to go to the online store to purchase. Remember some of these items are whilst stocks last, so don't leave it too late. happy shopping!


Links to the Online Store:

Table built using Product Table Builder by The Crafty Owl - Independent Stampin' Up! Demonstrator.

Shop Online

Access my online shop 24 x 7, 365 days of the year:

Current May hostess code:

3NR3FB9W

Shop Online

2024-25 Annual Catalogue

BROWSE THE CATALOGUE

Click on the image to download your copy of the 2024-25 annual catalogue. For a full list of current SU! supplies, go to my online store. If you would like any help or advice, please drop me a line at [email protected] or give me a call on 07773 421446 - I'd be happy to help.

Join My Team

It's always a great time to join Stampin’ Up but during May it's even better! New team members can get £78.25 of new In Color products for FREE! That's in addition to another £130 worth of products of your choice for only £99 + free business supplies + free shipping + all the fun being a part of Stampin’ Up! Stampin' Up! has something for everyone: join my growing team and benefit from my support to enjoy Stampin' Up! however you choose.

If you're interested, call me for a chat to understand how I can help you realise your goals. Alternatively, if you have already decided to sign up and you just can't wait, please click here for the link to the online form where you can sign up and order your starter kit right away! 

Latest Kits!

Stampin Cut and Emboss

The City Sights Kit has all you need to make 8 cards with coordinating envelopes for £20. Along with the new Happy Hollyhocks Kit, a no stamping kit including 9 cards for just £14, both are available from May 1st - get yours here!

New Online Exclusives

There are new products available exclusively in the online store from 5 March - check them out here.

About Me

Hi I'm Joanne and live in Northampton and when I'm not looking after my husband and two beautiful children, am an avid crafter with a passion for all things Stampin' Up!

I must confess that I have never been a big rubber stamper - until I discovered Stampin' Up! that is. I love the fact that I can get such great results with co-ordinating stamps, inks, papers and punches - the possibilities are endless! Join me on my stamping journey as I share the things I love and be inspired to create amazing things yourself!

Follow Me

Monthly Newsletter

Box Builder

Click the button above to use Box Buster to create your custom box design using the Envelope Punch Board!

Kits Collection Now Available!

Stampin Cut and Emboss

The new Kits Collection from Stampin' Up! is now available!

Click here to see the current kits available and order yours online today.

I Design For


Mini Catalogue


The next mini catalogue will be live in September! 

Stampin' Up Stuff

This is my personal blog and is not endorsed by Stampin’ Up! I hope you find it a plentiful source of ideas and personal inspiration but please don't copy my designs for contest submission or use for classes, publication or sale without express permission.