
Shining Brightly Country Wreath Christmas

by Joanne James26. January 2024 16:00

I've managed to get a little extra cardmaking time this week, but as for writing up my blog posts - not so much! Today I'm taking a departure from the 'new' to share a Christmas card just in time for the January theme challenge over at 52 Christmas Card Throwdown where the theme is wreaths:

Today's card also uses their January sketch layout which I missed, but is perfect for a showcase of a sparkly layered Christmas wreath - take a look:


Here's the low-down on today's card:

I used a piece of the now-retired (but hoarded!) Shining Brightly foiled paper to cover my cardfront and added a banner with a sentiment from 'Brightest Glow' and paired it with a navy and gold layered wreath, with a combination of gold sequin and navy gem 'berries' and a brushed gold bow:


I really love these papers and the colour scheme, so don't be surprised to see me use them throughout the year as I endeavour to play along with the team at 52 Christmas Card Throwdown to keep me on track in my Christmas card making throughout the year. If you don't have these papers though, you could easily change out this paper for an alternative Christmas design and alter the colours of your wreath accordingly.

Here is the visual summary of the key products used on today's project for you to pin for easy reference:


You can see all of my 'How To' summaries on my 'How To - Tips and Techniques' Pinterest board in case you've missed any. 

Just a quick post from me today; I have a basket of ironing to get through before I prepare dinner and get myself ready for this evening's final episode of 'The Traitors' - anyone else out there as hooked as me? I can't wait! Enjoy your evening and I'll be back tomorrow with another project that has an altogether more Spring-like feel. Until then, happy stampin'!


Stampin' Up! Supplies Used:

Table built using Product Table Builder by The Crafty Owl - Independent Stampin' Up! Demonstrator.

Countryside Inn Country Wreath PP659

by Joanne James24. September 2023 08:00

Today it's Sunday and time for this week's new challenge over at The Paper Players! It's the turn of the fabulous Anne Marie to host this week and she has my favourite, a sketch challenge for us to work with:


The weather here has become much more autumnal this week, so I found myself feeling inspired by the beautiful autumn wreath that is bottom left of the Hand Stamped Sentiments inspiration photo and decided to recreate it with the Color Dare colours above (I used my closest colours for all 6) for a pretty autumnal card - take a look:


Here's the low-down on today's card:

I chose a striped pattern from the Countryside Inn designer series paper pack to accentuate the lines of the horizontal panels of the sketch as my starting point, then added my leafy wreath that I diecut using the Country Wreath Dies, with some pumpkins in Smoky Slate and Very Vanilla added from the retired Seasonal Swirls die set:

A fussy cut sentiment from 'Season of Chic', a linen thread bow and a trio of speckled dots complete my card. I had a few leftover bits and pieces so used them to add a little additional decoration to the inside of my card:


I love the softness of the Very Vanilla with the mix of browns and I think they compliment the blues nicely too.

Here is the visual summary of the key products used on today's project for you to pin for easy reference:


You can see all of my Product and 'How To' summaries on my 'How To - Tips and Techniques' Pinterest board in case you've missed any. 

Before you reach for your ink and papers, check out what our amazing team has created to inspire you this week:

Here's a quick recap of our challenge rules:
 
1.  Create a new paper project
2.  Upload your creation to your blog with a link back to us and provide a direct link to the post featuring your challenge submission.
3.  Please link your card to no more than four challenges, TOTAL.
4.  Have FUN!

Enjoy your day; I'm planning on spending my day baking an gardening in equal measure! I'll be back tomorrow with another project. Until then, happy stampin'!


Stampin' Up! Supplies Used: 

Table built using Product Table Builder by The Crafty Owl - Independent Stampin' Up! Demonstrator.

Shining Brightly Navy And Gold Christmas Wreath For FMS600

by Joanne James23. August 2023 12:00

Today I'm sharing a card that is special in more ways than one! It contains a sneak peek of some new Christmas products from the upcoming mini catalogue but more importantly I am a guest with the lovely ladies over at Freshly Made Sketches where the team are celebrating their 600th challenge - wow! I love to play along with their sketches whenever I get the opportunity and I was thrilled to be asked to join them alongside a number of other esteemed guests to celebrate this momentous occasion! This is the sketch we are basing our designs on:


I decided I would create a wreath with the circular element - this is what I came up with:  


Here's the low-down on today's card:

I diecut a couple of Country Wreaths Dies wreaths, one in brushed gold and one in gold foil, and layered them onto a panel of Shining Brightly specialty designer series paper on a Night of Navy card base. This is one of six single-sided foiled designs in Very Vanilla and Night of Navy in the pack - and they are all gorgeous! I heat-embossed my sentiment in gold onto navy cardstock - this is also from a new stamp set called 'Christmas Classics' - and added this to my card, along with a gold twine bow and trio of matt gold sequins:


I also added a little extra stamping from the same set to the inside of my card - check out the corner detail:


I just love the gold and navy colour combination of this card - expect to see lots more in this colourway in the upcoming festive season! 

Here is the visual summary of the key products used on today's project for you to pin for easy reference:


You can see all of my 'How To' summaries on my 'How To - Tips and Techniques' Pinterest board in case you've missed any. 

Be sure to check out the designs from the Freshly Made Sketches Team and the other guest designers this week - there will be some fabulous inspiration there for sure. Thank you and a huge congratulations from me to the team for inviting me to take part in the celebrations - here's to the next 600 challenges!

Enjoy your day and I'll be back on Friday with this week's new challenge over at As You See It. Until then, happy stampin'!


Stampin' Up! Supplies Used:

Table built using Product Table Builder by The Crafty Owl - Independent Stampin' Up! Demonstrator.

Framed and Festive Country Wreaths Slimline Christmas Card

by Joanne James24. November 2022 12:00

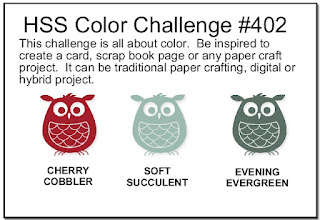
Today I'm sharing a card using the sketch layout over at Sunday Stamps and the Hand Stamped Sentiments colour palette:

    

This is one of those cards that ended up looking nothing like it started out! I had a trio of stamped and diecut wreaths leftover from another project, so thought they would work nicely with the Sunday Stamps sketch. They were too large on a standard cardfront and I couldn't find a background I liked to accompany them, so in the end changed my colour scheme and went slimline and eventually came up with something I rather like - take a look:
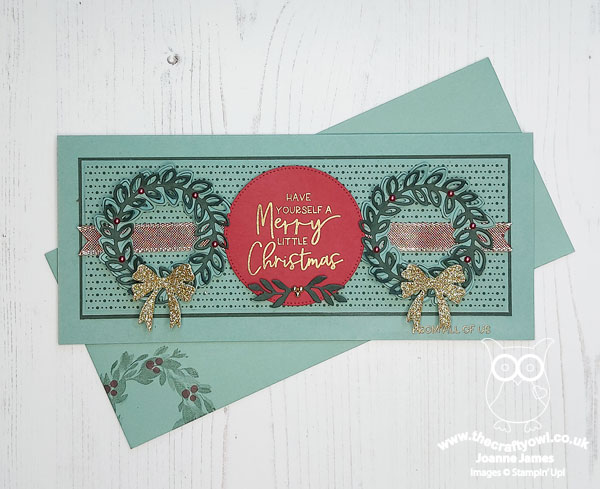
 

Here's the low-down on today's card:

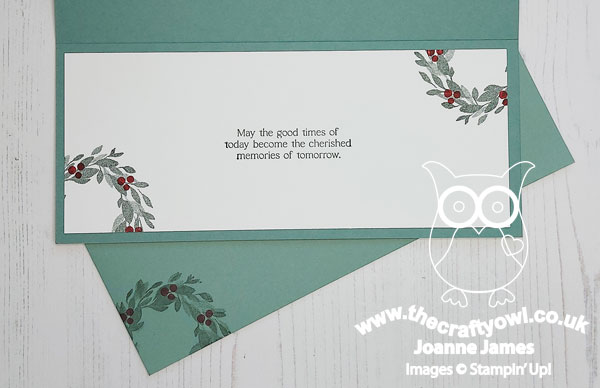
Country Wreaths - I initially restamped my wreaths green-on-green instead of green-on-white, but the stamped detail just got lost so instead I went for a layered wreath using the dicuts only and I like this much more. I added some Cherry Cobbler Festive Pearls and a gold glimmer bow to each, to tie in with my ribbon banner and central sentiment element. I did add some stamped detail to the envelope and inside of my card though:
 

Framed & Festive - Instead of three wreaths, I opted to add a circle with my main sentiment to the centre. My sentiment comes from the limited-time stamp set 'Framed & Festive' that co-ordinates with the Framed Florets bundle currently on early release from the new mini catalogue - I love the big, bold font. I heat embossed it in gold onto Cherry Cobbler cardstock and added a sprig of greenery and some gold pearls to decorate: 
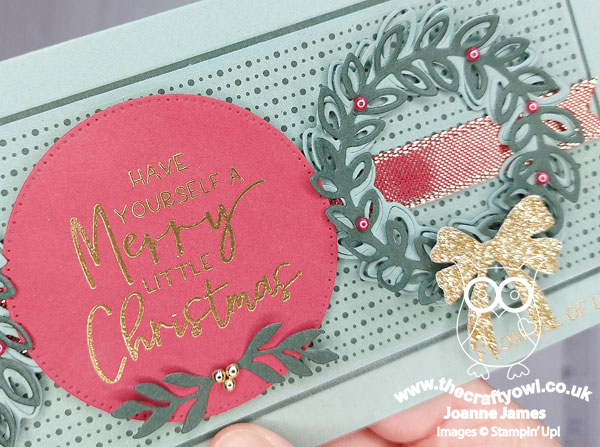
 

I almost ignored the banner detail on the original sketch, but there was the perfect stamp in the set to add a second sentiment part, so I added 'from all of us' heat embossed in gold directly onto the cardbase - you can just see it on the corner of the photo above.

A Neat Lights Aglow Trick - The eagle-eyed amongst you may have recognised that the background pattern I used comes from the Lights Aglow designer series paper pack. This is a 6"x6" paper pack - which is not wide enough for a slimline cardfront. The solution? I actually made my cardfront from two pieces of DSP, with the join running down the centre behind my red sentiment circle. I was careful to cut and line up the pattern perfectly and the presence of the circle means it is super difficult to see the join - if I hadn't just told you it was there, you wouldn't notice ;-). 

Here is the visual summary of the key products used on today's project for you to pin for easy reference:
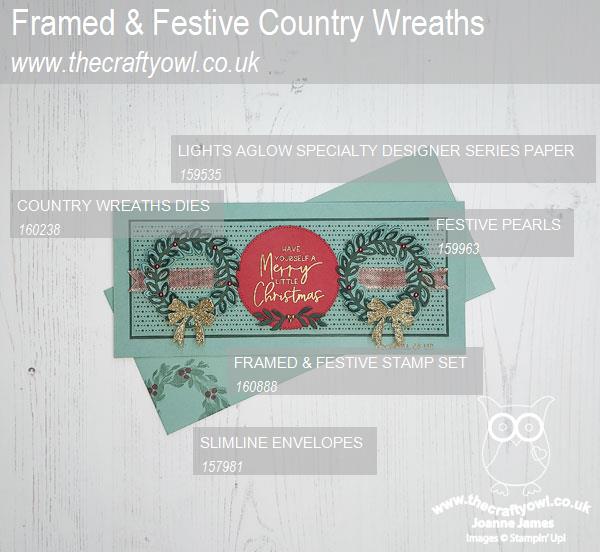
 

You can see all of my 'How To' summaries on my 'How To - Tips and Techniques' Pinterest board in case you've missed any. 

Enjoy your day; the bitter cold winds of winter seem to have arrived in force this week so I am hibernating! I hope you are warm and cosy wherever you are - and to all my American friends and readers, I wish you a wonderful Thanksgiving celebration today. I'll be back tomorrow with another project. Until then, happy stampin'!


Stampin' Up! Supplies Used:
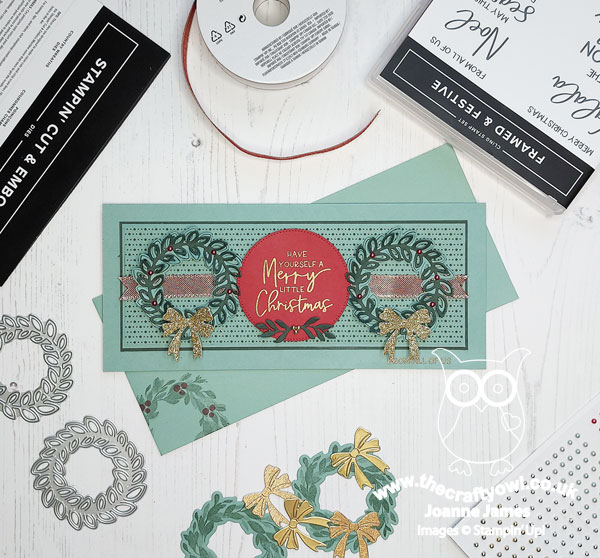
Table built using Product Table Builder by The Crafty Owl - Independent Stampin' Up! Demonstrator.

Painted Christmas Country Wreaths TTT188

by Joanne James17. November 2022 15:00

It's Thursday and time for a new challenge over at TicTacToe! It's the turn of Team X to host this week and the lovely Felicita is our featured designer this week. This is the fun board that we are playing along with: 


I have been having a lot of fun with my Cottage Wreaths bundle so decided to take the right hand column and use any shape die, wreath and gold foil/glitter for my card today - take a look:


Here's the low-down on today's card:

I love the sketch over at TGIF Challenges this week and decided that it would be perfect for a little of 'something old, something new' - I layered a stamped and diecut wreath from the Cottage Wreaths bundle over a panel of Soft Sea Foam. embossed with the retired but gorgeous Seasonal Wreath embossing folder. This has so much detail and dimension yet makes a pretty, subtle background. I also added some stamped and diecut holly leaves, red rhinestones and an antique gold foiled bow to my Christmassy Cottage Wreath, along with a fussy cut sentiment:

All of this was against a background of the returning favourite, painted Christmas Designer Series Paper, with a couple of red glimmer borders thrown in. The prettiness doesn't stop there though - I also decorated both the inside of my card, and the envelope - no naked envelopes here:

I'll be sharing this with the lovely ladies over at Just Us Girls where it's trend week and this is the trend Lisa has chosen. I love to decorate an envelope and the inside of my card to co-ordinate with the card front; I think it's a great way to add a finishing detail and I like to think that a patterned envelope makes the recipient smile before they've even opened it. 

Here is the visual summary of the key products used on today's project for you to pin for easy reference:


You can see all of my Product and 'How To' summaries on my 'How To - Tips and Techniques' Pinterest board in case you've missed any. 

A tictactoe board offers so many creative possibilities - how does this week's board inspire you? Why not have a go? We would love to see you in the gallery and who knows - you might be selected for Designer's Choice and be eligible to be a guest designer on a future challenge. 

Enjoy your day; I am heading out to Sixth Form Options Evening with the youngest of the James Juniors at school this evening; this does at least mean dinner out, due to the logistics of trying to get everywhere on time - what a treat! I'll be back tomorrow with another project. Until then, happy stampin'!


Stampin' Up! Supplies Used: 

Table built using Product Table Builder by The Crafty Owl - Independent Stampin' Up! Demonstrator.

Cottage Wreaths Grateful Gingham PP616

by Joanne James6. November 2022 08:00

Today it's Sunday and time for this week's new challenge over at The Paper Players! It's the turn of the fabulous Claire to host this week and she has a seasonal theme challenge for us to work with:


Giving thanks! With the American holiday of Thanksgiving around the corner, giving thanks is perhaps even more at the forefront of our minds, however this is a theme that works all year round - we always have something to be thankful for, however small. I used Jen's split layout over at Freshly Made Sketches and the first three colours of the Sunday Stamps palette for my card - take a look:


Here's the low-down on today's card:

I used the So Saffron Gingham Cottage designer paper for my split panel background and added my leafy stamped Cottage Wreath across the split. I inked my wreath in So Saffron and added Cajun Craze to it with a sponge dauber for a variegated effect, before adding the twig wreath in Soft Suede (I stamped this off twice first) and cutting it out with the Country Wreaths Dies. I added a simple stamped sentiment to the centre and decorated my wreath with a bow of (retired) Cajun Craze ribbon tied with linen thread, along with a couple of leaves cut from copper foil and a couple of copper metallic dots:

I could have used the diecut bow in the Country Wreaths Dies set to create a 'cleaner' bow detail, but I decided to change things up and use up some of the many rolls of ribbon I have and I must say I love it - it really brings out the autumnal colours. What are you thankful for - who would you give thanks to? Do leave me a comment below or better still, play along with this week's challenge - we would love to have you join us.

Here is the visual summary of the key products used on today's project for you to pin for easy reference:


You can see all of my Product and 'How To' summaries on my 'How To - Tips and Techniques' Pinterest board in case you've missed any. 

Before you reach for your ink and papers, check out what our amazing team has created to inspire you this week:

Here's a quick recap of our challenge rules:
 
1.  Create a new paper project
2.  Upload your creation to your blog with a link back to us and provide a direct link to the post featuring your challenge submission.
3.  Please link your card to no more than four challenges, TOTAL.
4.  Have FUN!

Enjoy your day; I will be preparing for the departure of the eldest of the James Juniors on another trip - her second in three weeks! This time it's a Geography field trip though - muddy fields and rivers call, a far cry from the tourist sights of San Francisco. I'll be back tomorrow with another project. Until then, happy stampin'!


Stampin' Up! Supplies Used: 

Table built using Product Table Builder by The Crafty Owl - Independent Stampin' Up! Demonstrator.

Country Wreath Season's Greetings Memories and More Christmas Card

by Joanne James25. October 2022 11:15

I had a little extra crafty time yesterday so thought I'd pop by to share an extra card that I made with the current Fusion sketch:

When I had my Santa Express Memories and More Cards out on my desk to make this card that I shared with you on Sunday, it occurred to me that one of the large cards would be a great jumping-off point for the Fusion sketch and with just a few extra bits and pieces I could make another quick Christmas card to add to my stash - take a look:


Here's the low-down on today's card:

This is another of those cards where the Memories and More cards take the strain - you can see the 'undressed' card in the corner of the photo at the bottom of this post - I added a simple banner and a wreath cut in Shaded Spruce cardstock using the Country Wreaths Dies, decorated with a bow cut from white velvet paper for a little added texture and some glittery (retired) enamel dot berries (the sequins listed below would make a good current substitute):


I didn't need to do any stamping, as the card had a sentiment already printed onto it - I simply picked out some key colours and shapes (the wreath detail echoes the berry detail on the M&M card) and used those for my banner detail. This is a great way to dress up a simple card base - perfect for a quick card.

Also - did you know that Stampin' Up! sells Basic White Assorted Memories and More Cards and Envelopes in packs of 20, that are sized perfectly to fit memories and More cards? You don't even need to cut anything down to size; bonus! You can find them on page 136 of the Annual Catalogue and they are the perfect addition to your Christmas craft supplies for quick and easy cardmaking. 

Here is the visual summary of the key products used on today's project for you to pin for easy reference:


You can see all of my 'How To' summaries on my 'How To - Tips and Techniques' Pinterest board in case you've missed any. 

Enjoy your day and I'll be back tomorrow with more news. Until then, happy stampin'!


Stampin' Up! Supplies Used:

Table built using Product Table Builder by The Crafty Owl - Independent Stampin' Up! Demonstrator.

Cottage Wreaths Grateful Card Times Two CCS 492

by Joanne James18. October 2022 12:00

It's Tuesday and time for a new challenge over at CAS Colours & Sketches. Michal is hosting this month and it's time for our second colour challenge: 


 For my card today I used the sketch layout over at Try Stamping on Tuesday and used my Country Wreaths bundle to create a thank you card that is great for using up scraps - take a look:


Here's the low-down on today's card:

A Colour Confession - First up - a colour confession! I was feeling totally pleased with myself for having made my card for this challenge much earlier than I usually do, until I went to upload it and realised I had used the wrong colours - I made a card using Pumpkin Pie instead of Michal's chosen Pale Papaya!! So I quickly went and made a duplicate in the correct colours. I had already worked up all my photos though, so I am sharing both with you here. On the upside - you get a two for one and we can have a debate on white card you like best!!


A Liberal Sketch Interpretation - I often get asked how I go about interpreting a sketch when I make a card and today's card is a good example of a less than literal one, so worthy of some explanation! I really liked the offset layers of the TSOT sketch but decided to make both my base and first mat white, so as not to detract from the clean and simple feel of my card. For the third 'layer', I added a selection of strips in the challenge colours and staggered their lengths to add interest; this is a great way to incorporate blocks of colour in a small area and it uses up scraps too, so win-win! I used this as the basis for my neutral-toned wreath, stamped with the 'Cottage Wreaths' set, with white diecut detail behind. I added some additional leaf sprigs and a gingham bow focal point. Finally, those three dots? I added three sequins on my initial card and a trio of gems on my remake but scattered them around my wreath.


This is a stretch from the sketch - but the elements of the sketch are all there. I love sketches - they are a great jumping-off point for a card.

This or That? - Here's a photo of both of my cards - one slightly bolder than the other. Which one is your favourite?


Here is the visual summary of the key products used on today's project for you to pin for easy reference:


You can see all of my 'How To' summaries on my 'How To - Tips and Techniques' Pinterest board in case you've missed any. 

As a reminder, for our colour challenges, you must use all of the stated challenge colours. You may also use neutral colours; however, the challenge colours should be the most noticeable ones featured on your card. We use Stampin' Up! color names for reference, but you are welcome to use any other companies' products as long as you match the challenge colours as closely as possible.

Enjoy your day and I'll be back tomorrow with another project. Until then, happy stampin'!


Stampin' Up! Supplies Used:

Table built using Product Table Builder by The Crafty Owl - Independent Stampin' Up! Demonstrator.

Changing Seasons with Autumn Leaves PP611

by Joanne James2. October 2022 08:00

Today it's Sunday and time for this week's new challenge over at The Paper Players! It's my turn to host this week and I have a timely theme challenge for you to work with:


I chose Changing Seasons and the arrival of Autumn as my theme this week. With cooler temperatures and shorter days already making an appearance here in the UK, it seems appropriate. When I think of Autumn, I think of the changing colours of the leaves and that was the inspiration for my card today - take a look:


Here's the low-down on today's card:

I went with a square card for a change and inspired by a similar layout I'd seen on Pinterest, I created a series of layered circles with my changing colours below and a circle of Crumb Cake above that had a leaf shape cut out with the oak leaf in the Country Wreaths die set, so that the colour showed through the negative space:

My ninth and final circle was  where I stamped my simple sentiment, adding one of the die cut leaves, along with a twine bow and enamel dot as a final embellishment.

Here is the visual summary of the key products used on today's project for you to pin for easy reference:


You can see all of my Product and 'How To' summaries on my 'How To - Tips and Techniques' Pinterest board in case you've missed any. 

I love the range of colours, from greens through to yellows, oranges red and rust - a great showcase of Stampin' Up! cardstock too! What do you think of today's card and what does Autumn mean to you? Do leave me a comment below, as always I'd love you to share your thoughts. Or you could even play along with this week's challenge!

Before you reach for your ink and papers, check out what our amazing team has created to inspire you this week:

Here's a quick recap of our challenge rules:
 
1.  Create a new paper project
2.  Upload your creation to your blog with a link back to us and provide a direct link to the post featuring your challenge submission.
3.  Please link your card to no more than four challenges, TOTAL.
4.  Have FUN!

Enjoy your day; I'll be back tomorrow with another project. Until then, happy stampin'!


Stampin' Up! Supplies Used: 

Table built using Product Table Builder by The Crafty Owl - Independent Stampin' Up! Demonstrator.

Cottage Wreaths Autumn Thank You FF119

by Joanne James30. September 2022 08:00

Today I have my card for the new challenge over at Festive Friday. 


The challenge that we are celebrating this week is 'Farmer's Day' which is on October 12th. Remember the fun thing is that at Festive Friday you do not need to actually celebrate the occasion; your goal is to simply use three or more items from the inspiration list on your project. This week I used gingham, die cut, kraft card and a thank you sentiment, along with the sketch layout over at Hand Stamped Sentiments and the colour palette over at Color Throwdown this week and this is what I came up with:


Here's the low-down on today's card:

Timber Texture - For my base layer, I added some texture to my kraft 'frame' using the Timber 3D embossing folder. I really like the effect of the added texture, which adds to the rudtic feel of my card. 

Cottage Wreath - The star of today's card is the autumn wreath, decorated with acorns (and pumpkins) courtesy of the Cottage Wreaths bundle. There are some great standalone wreath dies in this set, but today I chose to diecut one of the stamped versions, full of leaves. I went neutral and decorated my wreath, before finishing with a gingham bow cut from the Country Gingham DSP pack:


A Throwback Trio - I did use a trio of retired products on today's card - did you spot them all? They were Misty Moonlight cardstock for my layers, a piece of Harvest Meadow DSP for the central panel as the blue design coordinated perfectly and finally my pumpkins were cut using the retired Seasonal Swirls Dies, which I rediscovered when I was hinting for retired pumpkin goodies for the pumpkin speed stamping challenge a couple of weeks ago! Some things will always have a use in the craft space, right?! 

Here is the visual summary of the key products used on today's project for you to pin for easy reference:


You can see all of my 'How To' summaries on my 'How To - Tips and Techniques' Pinterest board in case you've missed any. 

How does our board inspire you? I can’t wait to see what YOU create! For more inspiration, be sure to visit the rest of the  Festive Friday Challenge Design team:

Ann Schach
Beth McCullough
Sharon Hashimoto Burkert
Melanie Hungerford
Helen Jennings
Melva Peters
Jaydee
Diane Evans
Joanne James


Enjoy your day; mine is going to be a busy one and it includes a visit to the hairdressers for an overdue colour. I might be happy to grow old(er) gracefully but go grey in the process - I'm afraid not! I'll be back tomorrow with another quick project. Until then, happy stampin'!


Stampin' Up! Supplies Used:

Table built using Product Table Builder by The Crafty Owl - Independent Stampin' Up! Demonstrator.

Scrapbooking

Stampin' Up! has introduced a new range of 12x12" scrapbooking product and kit - the full range is now available to purchase online. To download a copy of the new digital Scrapbooking Catalogue click here.

Mini Catalogue

BROWSE THE CATALOGUE

'Tis The Season - the new Stampin' Up! Mini Catalogue is here! For more details and to download your copy click here

Shop Online

Access my online shop 24 x 7, 365 days of the year:

Current September hostess code:

JQEHTZGK

Shop Online

2024-25 Annual Catalogue

BROWSE THE CATALOGUE

Click on the image to download your copy of the 2024-25 annual catalogue. For a full list of current SU! supplies, go to my online store. If you would like any help or advice, please drop me a line at joanne@thecraftyowl.co.uk or give me a call on 07773 421446 - I'd be happy to help.

Join My Team

It's always a great time to join Stampin’ Up! New team members can get £130 worth of products for only £99 + free business supplies + free shipping + all the fun being a part of Stampin’ Up! Stampin' Up! has something for everyone: join my growing team and benefit from my support to enjoy Stampin' Up! however you choose.

If you're interested, call me for a chat to understand how I can help you realise your goals. Alternatively, if you have already decided to sign up and you just can't wait, please click here for the link to the online form where you can sign up and order your starter kit right away! 

Latest Kits!

Stampin Cut and Emboss

The Christmas Ornaments Kit and Card Keeper Kit are the latest kits that will be arriving in the online store later this month - get yours here!

New Online Exclusives

There are new products available exclusively in the online store from 3 July - check them out here.

About Me

Hi I'm Joanne and live in Northampton and when I'm not looking after my husband and two beautiful children, am an avid crafter with a passion for all things Stampin' Up!

I must confess that I have never been a big rubber stamper - until I discovered Stampin' Up! that is. I love the fact that I can get such great results with co-ordinating stamps, inks, papers and punches - the possibilities are endless! Join me on my stamping journey as I share the things I love and be inspired to create amazing things yourself!

Follow Me

Monthly Newsletter

Box Builder

Click the button above to use Box Buster to create your custom box design using the Envelope Punch Board!

Kits Collection Now Available!

Stampin Cut and Emboss

The new Kits Collection from Stampin' Up! is now available!

Click here to see the current kits available and order yours online today.

I Design For


Stampin' Up Stuff

This is my personal blog and is not endorsed by Stampin’ Up! I hope you find it a plentiful source of ideas and personal inspiration but please don't copy my designs for contest submission or use for classes, publication or sale without express permission.