You're The Best Teacher Thank You

by Joanne James23. June 2017 19:00

I've had a couple of quiet blog days as I've either been busy in my office creating or single parenting and running around after the James Juniors - there is so much activity with only a few more weeks of this academic year to go. I've finally found time to share: today I've a card I made for this week's challenge over at Less Is More although I'm blogging a little too late to link up. Here's the link though in case it's a theme you'd like more inspiration on:


This week's theme is 'personalise it' - I thought this would be perfect for one of the teacher thank you cards that I will be needing in coming weeks:


Here's the low-down on today's card:

To Personalise Or Not - That is the question! We have some quite strong views on this in the James household, largely influenced by a certain member of our family who seems to live by the motto 'if a name will fit, print it on' so we all have many personalised items, ranging from glasses to boot bags and everything in between. Personalisation is a great way to add a special touch and make something unique for the recipient and if you want to personalise a card, the one thing you will need is an alphabet stamp set. I own a few but my absolute 'go to' alphabet set for this kind of custom greeting is definitely the Labeler Alphabet stamp set. With two fonts, it's both easy to stamp as it's made from photopolymer and also very forgiving if it's not 100% straight. It was therefore right and proper that I used it for Ben's teacher's name, Mr White, on my card.

Thank You Teacher - I used my retired 'Writing Notes' background stamp to create my lined paper base and stamped the star and 'you're the best' sentiment from the Watercolour Words stampset on my card. Such a great set for a simple thank you card. I also added these lovely words from another retired set to the inside of my card:


An Apple For The Teacher - I can't resist adding an apple to any school-related thank you cards; I'm sure no-one brings their teacher an apple these days, but I love the tradition. My apple is from the retired 'Thoughtful Branches' set with a hand-drawn leaf - I just love this set and it will forever sit on my shelf!

Here is the visual summary of the key products used on today's project for you to pin for easy reference:


You can see all of my 'How To' summaries on my 'How To - Tips and Techniques' Pinterest board in case you've missed any. 

We have had a busy day, nicely rounded off with the year 5 class picnic in the park, along with a healthy dose of rounders and football to finish the week. Our weekend is also jam-packed with activity so I'll be back early tomorrow with another project. Until then, happy stampin'!


Stampin' Up! Supplies Used:

Table built using Product Table Builder by The Crafty Owl - Independent Stampin' Up! Demonstrator.

Lemon Lime Twist Eastern Palace

by Joanne James20. June 2017 07:00

Today I'm sharing a card inspired by the photo over at The Paper Craft Crew and the sketch at As You See It:

 Paper Craft Crew Inspiration Challenge 248. Play along at www.papercraftcrew.com #inspirationchallenge #pcc2017 #craft   

I finally succumbed and bought the Eastern Palace Suite at the end of May; I had my classes scheduled through May and June and with lots of other pre-order goodies to play with so I didn't buy early. There are so many fabulous samples out there using this set though, I eventually caved and bought the bundle as I have a group of customers wanting to do a class with it in August. This is the first time I've used it to create this fabulously layered card - take a look:


After making this card, I might officially be in love with the Eastern Palace Suite! Here's the low-down on today's card:

So Many Layers - There are no less than 12 layers on my card today! This is thanks to the detail of the Eastern Medallions Thinlits Dies - this set consists of 14 intricate dies that can be nested and stacked to create an almost infinite collection of shapes and designs, with or without the additional detail of the Eastern Beauty stamp set. 

Stamp A Roundabout - I chuckled when I read Heather's post over at As You See It and her reference to roundabouts! The sketch suggested a curved element around the circles and since the Easter Beauty stamp set is one of the few that has a couple of naturally circular sentiments, I had to use one to create a border for my layered centrepiece, interspersing with a swirl. I stamped directly onto my designer series paper background too - again, something I don't often do, however I think it works on today's card so maybe I should give it a go more often! Check out the other interpretations of Heather's sketch over at AYSI, including those of their new design team members, Teresa Klein and the lovely LeAnne Pugliese, my fellow teamie over at The Paper Players - great additions to the team!

Vibrant Eastern Opulence - Lemon Lime Twist , Dapper Denim and Very Vanilla all feature in the Eastern Palace Specialty Designer Series Paper and as such this a colour combination you see often on projects featuring this suite. I decided to add in some Tempting Turquoise as per the inspiration photo and I love the way even a small amount of it this lifts this colour palette even more - here it is for you to save if you'd like to experiment with it:

Here is the visual summary of the key products used on today's project for you to pin for easy reference:


You can see all of my 'How To' summaries on my 'How To - Tips and Techniques' Pinterest board in case you've missed any. 

Enjoy your day; I have a class this morning followed by Ben's sports day this afternoon. The forecast is another hot one, so don't forget your suncream! I and I'll be back tomorrow with another project. Until then, happy stampin'!


Stampin' Up! Supplies Used:

Table built using Product Table Builder by The Crafty Owl - Independent Stampin' Up! Demonstrator.

Sweet And Sassy Hearts Trifold Card

by Joanne James19. June 2017 13:00

This is my second card for today (you can see my first one here if you missed it). Today's card uses Cecile's sketch over at Freshly Made Sketches:

Before I share my card, I would like to take a moment to give a quick shout to Amy on the FMS team for choosing my card in last week's challenge as her pick for the 'Princess of Clean' (you can see that card here) - thanks Amy, so great to be recognised! This week's sketch was perfect for an idea I had in mind following a crafty conversation with one of my customers recently. Here's my card completely flat: 


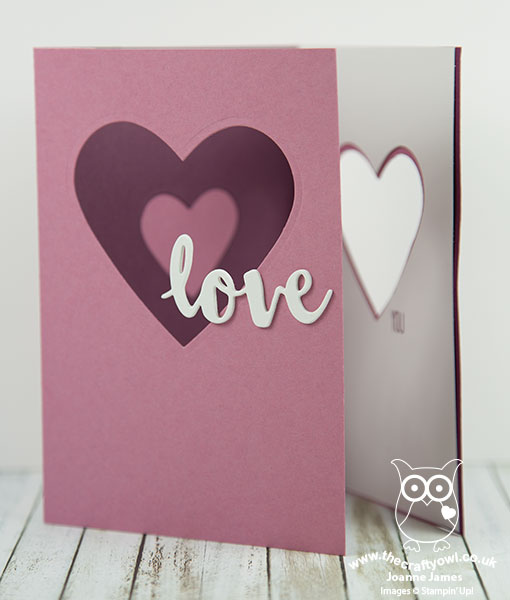
This is not how I normally photograph my cards, but is necessary for you to properly see the similarity to the sketch because this is what it looks like when stood up - because it's a trifold card!


Here's the low-down on today's card:

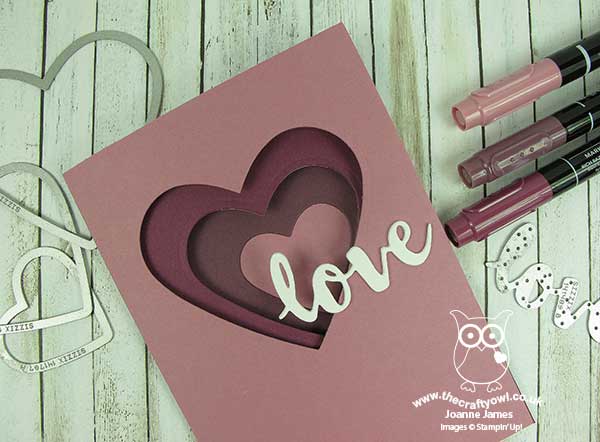
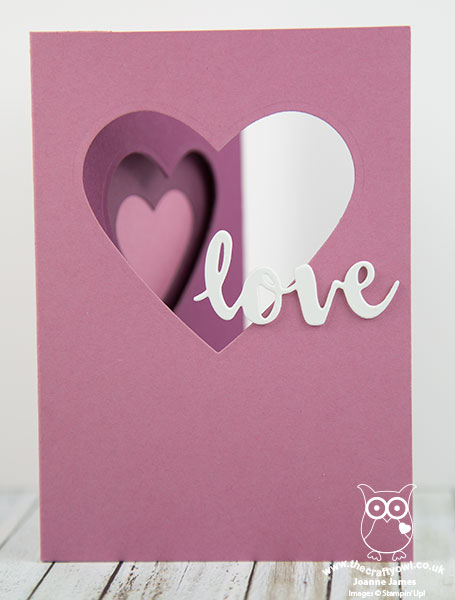
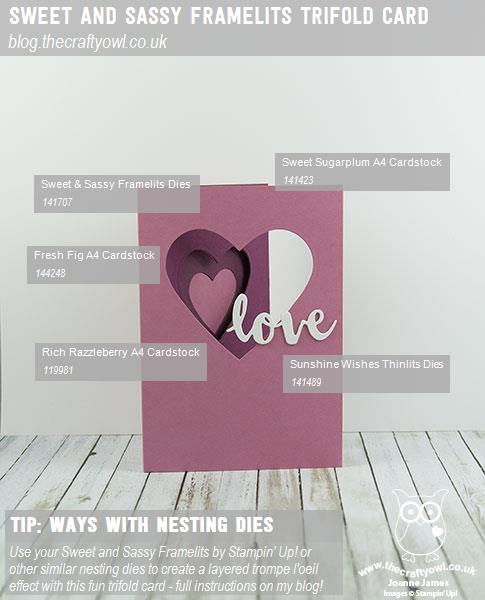
Ways With Nesting Dies - I had a recent conversation with a lovely customer of mine (hello Gill!) who shared with me a trifold card featuring a diamond aperture. I had been thinking about ways to use my range of Stampin' Up!'s shaped layering dies to create a similar effect when Cecile's sketch this week provided me with the perfect opportunity. Whatever your shape of choice, you can either layer them centrally or as I've done here to remian faithful to the sketch by offsetting them slightly, which I personally really like. This card is really simple to create once you've worked out the measurements: for the base, you need a piece of cardstock measuring 14.9cm (5 3/4") by 29.7cm (11 3/4") and scored on the long side at 10.5cm (4") and 21cm (8"), with 3 additional panels (one white) measuring 14.9cm (5 3/4") x 10.2cm (3 7/8"). Here are some other shots to show you what the card looks like when opened:


And this one completely opened:


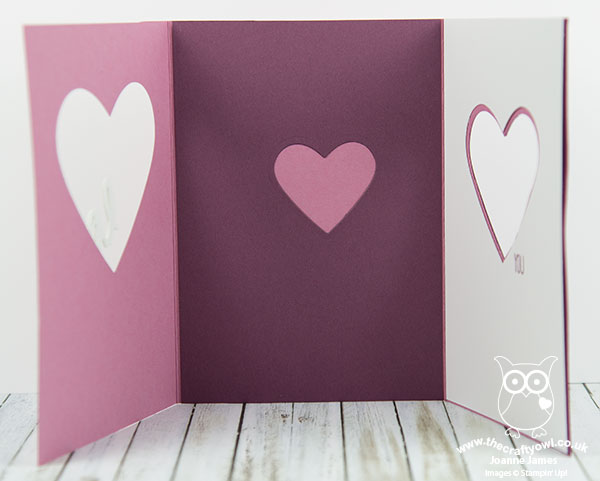
Apertures are created in the outer flaps and the piece that lines the middle section, and the white lining piece, so that each layer of colour can be seen. 

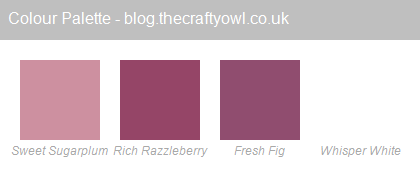
A Purple Trio - I decided to go with purples as opposed to pinks for today's card - I think I've overdosed on Flirty Flamingo of late! - and kept my card pattern-free in order that the diecuts would have maximum impact. Here's my ombre colour palette should you wish to use it on your future projects:


Love And Sunshine Wishes - I finished my card with another diecut, the love from the Sunshine Wishes thinlits set, in white. I cut it from extra thick Whisper White three times, having first added some multipurpose adhesive sheets to the back of the top two pieces of cardstock, for mess-free adhesion - love these! I wanted it to be a little more sturdy as it was only attached to the cardbase on one side. There almost wasn't any stamping - I did add a 'you' on my white panel from Sunshine Sayings, but if you don't have this set or something similar I think it would work fine without. 

I actually really like this card and can see me making a few more using different shapes for other occasions, so thank you Cecile and Gill for the inspiration!

Here is the visual summary of the key products used on today's project for you to pin for easy reference:


You can see all of my 'How To' summaries on my 'How To - Tips and Techniques' Pinterest board in case you've missed any. 

Enjoy your day. It's hot, hot, hot here in the UK so I am enjoying the nice weather from the confines of my office as I prepare for the first of this month's technique classes tomorrow. I'll be back tomorrow with another project. Until then, happy stampin'!


Stampin' Up! Supplies Used:

Table built using Product Table Builder by The Crafty Owl - Independent Stampin' Up! Demonstrator.


A Masculine Bookcase

by Joanne James19. June 2017 06:00

Today I'm sharing a couple of cards with you  - the first one for this week's challenge over at the Color Throwdown that also fits this week's masculine theme at TGIF Challenges (and I've used last week's TGIF challenge sketch again too!):


Lots of the Color Throwdown Design Team cards were inspired by the whale and nautical theme of the inspiration photo, however I decided that the bookshelf itself would be my starting point - take a look:


Here's the low-down on this card:

Bookcase Builder - I used the Bookcase Builder stamp set to stamp a shelf full of objects in the challenge colours and finished with my sentiment stamped in Night of Navy on Lemon Lime Twist for some zing!  A little navy baker's twine and an enamel heart complete my card. 

This card is perfect for my husband in this colourway, although I'm sure when he reads the sentiment he'll be telling me it's one for me, given the quantity of stamps I own!!

Here is the visual summary of the key products used on today's project for you to pin for easy reference:


You can see all of my 'How To' summaries on my 'How To - Tips and Techniques' Pinterest board in case you've missed any. 

Enjoy your day and I'll be back tomorrow with another project. Until then, happy stampin'!


Stampin' Up! Supplies Used:

Table built using Product Table Builder by The Crafty Owl - Independent Stampin' Up! Demonstrator.

Mediterranean Moments #SIP103 #GDP091

by Joanne James18. June 2017 20:00

I had a little time to catch up with my crafting today whilst it was still cool in my craft room so I'm sharing another card with you that fits with the following challenges:


I don't usually combine so many challenges, but having decided on my design using the Stamps Ink Paper sketch that used the scene from the Mediterranean Moments stamp set to include my Vespa scooter 'wheels' for the Global Design Project, I changed my colour scheme at the last minute to one inspired by the photo over at Inspired By All The Little Things and did a little watercolouring - take a look:


Doesn't that vibrant Pacific Point blue really stand out against the pink? A warm, Mediterannean scene with a fun aqua scooter out front - the makings of a fun vacation, perhaps? I added my sentiment from the 'Layering Love' stamp set to finish my card.

Here is the visual summary of the key products used on today's project for you to pin for easy reference:


You can see all of my 'How To' summaries on my 'How To - Tips and Techniques' Pinterest board in case you've missed any. 

Do check out the various challenge galleries for lots of inspiration - especially the wheely great inspiration over at GDP this week!

I'll be back tomorrow with another couple of projects. Until then, happy stampin'!


Stampin' Up! Supplies Used:

Table built using Product Table Builder by The Crafty Owl - Independent Stampin' Up! Demonstrator.

Happy Birthday Gorgeous!

by Joanne James15. June 2017 09:00

Today is a special day in the James household: the eldest of my juniors turns 12. I'm not sure where those years went by, although I do know that what was once my chubby little baby girl is now rapidly turning into a wonderful young woman with thoughts, hopes and dreams. So today I thoughts I would share the birthday card I made for Rebecca - take a look:


When I came to make Rebecca's card, I knew there were a number of things I needed to include: pink, sparkle and a big birthday wish and today's card is the result! Here's the low-down on my card:

Berry Burst: A Grown Up Pink - Whilst Rebecca isn't a girly-girl, she is most definitely a lover of pink! One of the new in-colours, Berry Burst, was my choice of pinks for her card; I think this pink is a rather grown-up pink and perfectly suited to a card for a discerning young lady. It also has some lovely co-ordinating accessories such as the 1/2" Finely Woven Ribbon, which ties beautiful bows.

Move Over Glimmer, There's A Foil Frenzy Going On! - So I had to include a small piece of silver glimmer paper on my card - Rebecca just loves the stuff! - but the real shimmer and shine comes from the new Berry Burst spotty Foil Frenzy kraft cardstock. With bright, colourful designs, this heavyweight foiled kraft cardstock will be perfect for boxes and I can't wait to start constructing, but for today it made a great base for the front of my card. 

Stacked Diecuts Made Easy - For my sentiment I used the new Happy Birthday Thinlit to create my focal point, cutting and stacking three diecut pieces and brushing with clear Wink of Stella for a subtle sparkle before heat embossing with clear embossing powder a further three times. Effort? Yes. Worth it? Totally!  There is a new adhesive that you may not have noticed in the new catalogue that makes light work of stacking and adhering die cuts - the new Multipurpose Adhesive Sheets (page 203 - you are welcome!) are such a timesaver. Simply stick your cardstock to an adhesive sheet before rolling your thinlit through the Big Shot, then you can peel away the backing and your diecut is ready to stick - no mess, no fuss. 

Here is the visual summary of the key products used on today's project for you to pin for easy reference:


You can see all of my 'How To' summaries on my 'How To - Tips and Techniques' Pinterest board in case you've missed any. 

I'm pleased to report that Rebecca's card received the official 'thumbs up', which is really all you can ask for when you're making a card with a special someone in mind.

I'll be back tomorrow with another project. Until then, happy stampin'!


Stampin' Up! Supplies Used:

Table built using Product Table Builder by The Crafty Owl - Independent Stampin' Up! Demonstrator.

Sorry For Everything And Confessions Of A Cardmaker

by Joanne James14. June 2017 20:00

Wednesday already - where is the week going?! I'm late posting my card today as whilst I had it made, I am behind with photographing and have had a busy day today getting ready for a special birthday in the James household - more on that tomorrow! Today I'm sharing a card that I made for the sketch challenge over at TGIF Challengestake a look:


This is one of those layouts that can be used in so many ways - I decided that it was the perfect sketch for me to send a message - take a look:


Here's the low-down on today's card:

Sorry For... Everything - Today's sketch is perfect for a split sentiment, especially one that has an extra-large element such as the 'sorry' here. So here's the thing: I might be a cardmaker, but I am one of the world's worst at getting cards sent on time. It's not for a shortage of cards - I always have lots! - rather, it's because I never have the 'right' card and like to make something specifically with the recipient in mind. Trouble is, my cards then often arrive late or the special card never gets made and a belated card is in order. So this stamp set was made for me! I love the large 'sorry' greeting and then a whole range of additional sentiments that work on a wide range of cards when an apology or sympathy is required. I stamped my 'Sorry' in Cherry Cobbler, then inked up the second part of the greeting with my Cherry Cobbler and Pacific Point Stampin' Write markers and stamped it onto my Blushing Bride Banner. I also added the 'forgive me?' sentiment to the inside, that you can see above at the start of my post.

Birthday Memories - I chose the bold red and white birthday patterned paper from the Birthday Memories designer series paper pack for the background to my card. This paper is bright and has a busy pattern so is the perfect background for my white sentiment panel. 

Make Framelits Your Friend - I added a little birthday present instead of a bow to finish my card - take a close look at my and you'll see it's not stamped though. Fussy cut? No - I used my Birthday Friends Framelits to crop this adorable gift from a sheet of Birthday Memories designer series paper. I love how a number of the framelits cut out not only the images from the 'Birthday Delivery' stamp set but the painted image from the designer series paper. This is the ultimate in co-ordinating suites!

Here is the visual summary of the key products used on today's project for you to pin for easy reference:


You can see all of my 'How To' summaries on my 'How To - Tips and Techniques' Pinterest board in case you've missed any. 

That's all from me - I'll be back tomorrow with another project. Until then, happy stampin'!


Stampin' Up! Supplies Used:

Table built using Product Table Builder by The Crafty Owl - Independent Stampin' Up! Demonstrator.

Glamper Greetings Meets Pick A Pattern

by Joanne James13. June 2017 07:00


I've a quick post today to share a card I made for a friend of mine using another of the Pick A Pattern papers take a look:


Here's the low-down on today's card:

The Glamper Greetings cute caravan set was an annual catalogue carryover from the Autumn-Winter seasonal catalogue. I'm glad it made the cut as I hadn't inked mine up yet - and it pairs beautifully with the new Pick A Pattern designers series paper. I added a little sunshine and grass to my caravan scene, but this just scratches the surface of what can be done with this set - there are so many sweet little images: bunting, pies, flamingoes, bats and balloons with which to decorate your little caravan and a host of sentiments to boot - glamper greetings indeed!

As I went to write my post today I had an 'oops' moment; I had originally made this card with the sketch over at As You See It in mind - then realised I had stuck everything down minus the banner! Too late to rectify and since it's integral to the sketch I'm not going to link up but I'm sharing with you anyway - here's the link to the AYSI sketch so that you can see what I mean. On the upside, it means you get to see more of the patterned paper - yay!

Here is the visual summary of the key products used on today's project for you to pin for easy reference:


You can see all of my 'How To' summaries on my 'How To - Tips and Techniques' Pinterest board in case you've missed any. 

Enjoy your day and I'll be back tomorrow with another project. Until then, happy stampin'!


Stampin' Up! Supplies Used:

Table built using Product Table Builder by The Crafty Owl - Independent Stampin' Up! Demonstrator.

Pick A Pattern Floral Hello Card

by Joanne James12. June 2017 07:00

Happy Monday everyone - a fresh start to a new week! Today I'm sharing a card for this week's challenge over at Freshly Made Sketches:


I kept my card simple with a showcase of some new designer series paper - take a look:


Here's the low-down on today's card:

Pick A Floral Pattern - There are some great patterns in the Pick A Pattern designer series paper pack - an eclectic mix of everything from dinosaurs to mushrooms, cameras to this lovely floral pattern. The thing I love most about this pattern is that the white flowers, with the accents of green and yellow, really balance the brightness of the Flirty Flamingo, which I sometimes find a little intense. Framing in white and Emerald Envy green also helps to tone down the pink too.

Patterns and Pieces - I used the simple 'hello there' sentiment from the co-ordinating stamp set, Patterns and Pieces, for the centre of my floral accent, although I cropped it to a regular circle with my 1 3/8" circle punch rather than the slightly more fluid circle of the stamp itself.

May Flower - I decided that instead of a standard layered circle for my accent, i wanted to create something more in keeping with the flower pattern of the designer series paper. A quick sort through my framelits decided me on one of the framelits in the May Flowers set: whilst not an even-petalled flower, I think it still works to create a flower to ground my sentiment and tie in with my overall clean design. What do you think - does it work for you? I'd be interested to hear your thoughts - do leave me a comment below.

Here is the visual summary of the key products used on today's project for you to pin for easy reference:


You can see all of my 'How To' summaries on my 'How To - Tips and Techniques' Pinterest board in case you've missed any. 

Enjoy your day; I have time at my desk and housework planned. I'll be back tomorrow with another project. Until then, happy stampin'!


Stampin' Up! Supplies Used:

Table built using Product Table Builder by The Crafty Owl - Independent Stampin' Up! Demonstrator.

Daisy Delight And The Daisy Punch Bundle - A No Brainer!

by Joanne James7. June 2017 07:00

Today I've a couple more daisy cards for you - both the same design, just using alternative colourways. Here's the first one, featuring Pool Party, Calypso Coral, Emerald Envy and Gold:


Here's the second card I created using exactly the same stamps and layout, simply changing the colour palette - this time Peekaboo Peach, Wisteria Wonder, Old Olive and Silver:


 Here's the low-down on today's card:

Take A Strip Of Paper - Believe it or not, today's cards started out as a few designer series paper offcuts; literally leftovers from another project! I had been busy creating a bunch of customer thank you cards with full size cardfronts featuring the gorgeous patterns in the Delightful Daisies designer series paper packs to go out with this month's customer orders, and had a whole bunch of narrow strips leftover. I could have thrown them away - instead I used them to create the horizontal lines for my punched flower to rest on and to inspire the colour combinations for the rest of my card. Waste not, want not and all that!

Buy The Bundle - As my blog post title suggests, you could but the Daisy Punch alone - why would you though when you can get the Daisy Delight stamp set with it as a bundle with 10% off into the bargain? For me the bundle really is a no brainer: it has this lovely daisy stamp that I've used here to add detail and colour to your daisy petals and centres and it also comes with a number of other pretty florals that can be coloured or used for a tone-on-tone look as I have here to create my background. There's a couple of thank you sentiment combinations too. So many more creative possibilities and a great price point at £27.75. 

Add A Gem - In addition to some ribbon, I've also added one of the new faceted gems to the centre of each of my daisies - I love the sparkle these add to a card!

Here is the visual summary of the key products used on today's project for you to pin for easy reference:


You can see all of my 'How To' summaries on my 'How To - Tips and Techniques' Pinterest board in case you've missed any. 

Enjoy your day and I'll be back tomorrow with another project. Until then, happy stampin'!


Stampin' Up! Supplies Used:

Table built using Product Table Builder by The Crafty Owl - Independent Stampin' Up! Demonstrator.

Mini Catalogue

BROWSE THE CATALOGUE

The mini catalogue is now live! Read and download your copy here.

Shop Online

Access my online shop 24 x 7, 365 days of the year:

Current April hostess code:

VDKNV7BH

Shop Online

Join My Team

It's always a great time to join Stampin’ Up! New team members can get £130 worth of products for only £99 + free business supplies + free shipping + all the fun being a part of Stampin’ Up! Stampin' Up! has something for everyone: join my growing team and benefit from my support to enjoy Stampin' Up! however you choose.

If you're interested, call me for a chat to understand how I can help you realise your goals. Alternatively, if you have already decided to sign up and you just can't wait, please click here for the link to the online form where you can sign up and order your starter kit right away! 

Latest Kit!

Stampin Cut and Emboss

The Rock Legend Kit has all you need to make 8 cards with coordinating envelopes. Along with the new Panda Friends Kit, both are available from January 4th for just £14 each - get yours here!

2023-24 Annual Catalogue

BROWSE THE CATALOGUE

Click on the catalogue for a full list of current SU! supplies - if you would like to order any of the items featured, please drop me a line at [email protected] or give me a call on 07773 421446 - I'd be happy to help.

New Online Exclusives

There are new products available exclusively in the online store from 5 March - check them out here.

About Me

Hi I'm Joanne and live in Northampton and when I'm not looking after my husband and two beautiful children, am an avid crafter with a passion for all things Stampin' Up!

I must confess that I have never been a big rubber stamper - until I discovered Stampin' Up! that is. I love the fact that I can get such great results with co-ordinating stamps, inks, papers and punches - the possibilities are endless! Join me on my stamping journey as I share the things I love and be inspired to create amazing things yourself!

Follow Me

Monthly Newsletter

Box Builder

Click the button above to use Box Buster to create your custom box design using the Envelope Punch Board!

Kits Collection Now Available!

Stampin Cut and Emboss

The new Kits Collection from Stampin' Up! is now available!

Click here to see the current kits available and order yours online today.

I Design For


Stampin' Up Stuff

This is my personal blog and is not endorsed by Stampin’ Up! I hope you find it a plentiful source of ideas and personal inspiration but please don't copy my designs for contest submission or use for classes, publication or sale without express permission.