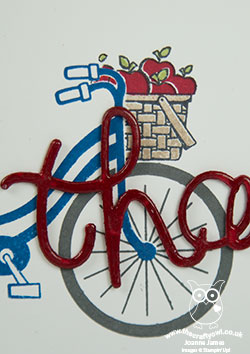
You're The Best Teacher Thank You

by Joanne James23. June 2017 19:00

I've had a couple of quiet blog days as I've either been busy in my office creating or single parenting and running around after the James Juniors - there is so much activity with only a few more weeks of this academic year to go. I've finally found time to share: today I've a card I made for this week's challenge over at Less Is More although I'm blogging a little too late to link up. Here's the link though in case it's a theme you'd like more inspiration on:


This week's theme is 'personalise it' - I thought this would be perfect for one of the teacher thank you cards that I will be needing in coming weeks:


Here's the low-down on today's card:

To Personalise Or Not - That is the question! We have some quite strong views on this in the James household, largely influenced by a certain member of our family who seems to live by the motto 'if a name will fit, print it on' so we all have many personalised items, ranging from glasses to boot bags and everything in between. Personalisation is a great way to add a special touch and make something unique for the recipient and if you want to personalise a card, the one thing you will need is an alphabet stamp set. I own a few but my absolute 'go to' alphabet set for this kind of custom greeting is definitely the Labeler Alphabet stamp set. With two fonts, it's both easy to stamp as it's made from photopolymer and also very forgiving if it's not 100% straight. It was therefore right and proper that I used it for Ben's teacher's name, Mr White, on my card.

Thank You Teacher - I used my retired 'Writing Notes' background stamp to create my lined paper base and stamped the star and 'you're the best' sentiment from the Watercolour Words stampset on my card. Such a great set for a simple thank you card. I also added these lovely words from another retired set to the inside of my card:


An Apple For The Teacher - I can't resist adding an apple to any school-related thank you cards; I'm sure no-one brings their teacher an apple these days, but I love the tradition. My apple is from the retired 'Thoughtful Branches' set with a hand-drawn leaf - I just love this set and it will forever sit on my shelf!

Here is the visual summary of the key products used on today's project for you to pin for easy reference:


You can see all of my 'How To' summaries on my 'How To - Tips and Techniques' Pinterest board in case you've missed any. 

We have had a busy day, nicely rounded off with the year 5 class picnic in the park, along with a healthy dose of rounders and football to finish the week. Our weekend is also jam-packed with activity so I'll be back early tomorrow with another project. Until then, happy stampin'!


Stampin' Up! Supplies Used:

Table built using Product Table Builder by The Crafty Owl - Independent Stampin' Up! Demonstrator.

Stampin' Up! Sneak Peek - Bike Ride For The Paper Players

by Joanne James16. April 2017 10:00

It's Sunday and time for this week's new challenge over at The Paper Players! It's the turn of the amazing LeAnne to host this week and she has a clean and simple challenge for us to work with:
 

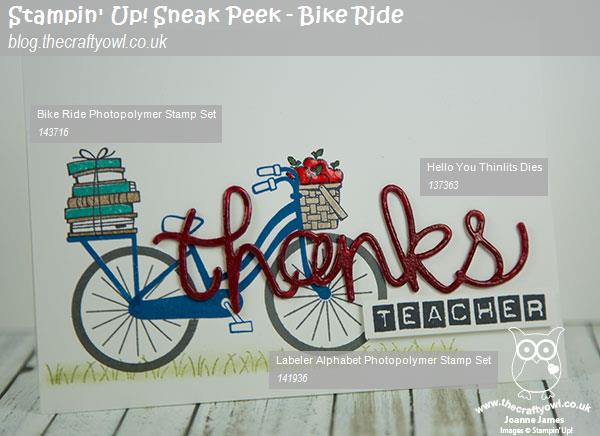
So I couldn't resist sharing a sneak peek of a brand new stamp set with you today - a fabulous two-step stamping set called 'Bike Ride', that I received as part of an all-attendee giveaway at Onstage in Amsterdam last week - take a look:
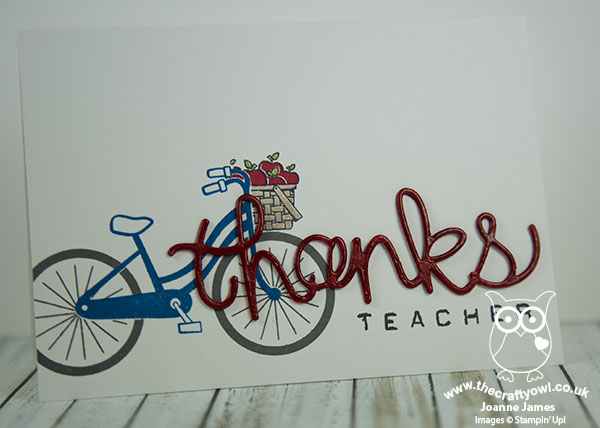
 

Isn't that fun?! Read on for the low-down on today's card:

Demonstrator Perks And A Sneak Peek - One of the best perks about being a Stampin' Up! demonstrator is being able to get your hands on new products before anyone else does! I came home from Onstage last week with some new stamp sets including this fun bicycle stamp set. I was also able to participate in an event-only pre-order which means I am expecting another box of new goodies on Tuesday morning - can't wait! If you are excited by getting your hands on new products early, do get in touch with me about joining my team now so that you can take advantage of these pre-order demonstrator perks too.

A Bike Ride For Teacher - Today's sneak peek is a set called 'Bike Ride'. Such a fun two-step stamp set with lots of little accessories - everything from flowers to apples and books to an adorable puppy dog! You can build endless combinations to make your two-wheeled creations totally unique. The best bit? This set also has some co-ordinating Build A Bike framelits that will make putting your creations together as easy as can be! My CAS card today uses just the stamp set - I created a few masks to enable me to stamp my bicycle as a single layer and adapted the basket to fit the front of my bike. For my first card I stamped my bicycle slightly off the page and added a basket of apples with an overlaid thanks diecut from the retiring 'Hello You' thinlit set (I cut this out 3 times, stacked them and heat embossed with clear embossing powder for added dimension and shine) and the word teacher stamped with my Layered Alphabet set -so useful for custom greetings. 

Teacher Thank You Take Two - I was having so much fun with my set, I created a second card to share with you too! This time I stamped the whole of my bicycle on the card front so that in addition to my basket of apples (accented with my fine tip glue pen) I could add a stack of books to the rear. I also grounded my bicycle with a little sponging and some stamped grass (from the retiring 'Basket Bunch' stamp set) and stamped the word teacher in bold block lettering and cut it out and popped it up on dimensionals for added impact:
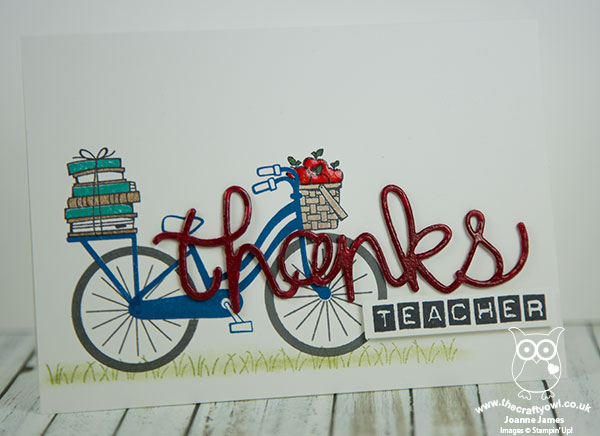
 

I had so much fun playing with this set and making an early start on my teacher thank you cards for the end of next term. I've lots more ideas for this set and I can't wait to get my hands of the framelits when the new catalogue goes live on June 1st! 

Here is the visual summary of the key products used on today's project for you to pin for easy reference:

 

You can see all of my Product and 'How To' summaries on my 'How To - Tips and Techniques' Pinterest board in case you've missed any. 

Before you reach for your ink and papers, check out what our amazing team has created to inspire you this week:

The Paper Players Design Team
 
 
Here's a quick recap of our challenge rules:
 
1.  Create a new paper project
2.  Upload your creation to your blog with a link back to us and provide a direct link to the post featuring your challenge submission.
3.  Please link your card to no more than four challenges, TOTAL.
4.  Have FUN! 

I look forward to seeing your clean and simple creations in the gallery this week. Enjoy the rest of your weekend - we will be either hunting for or eating chocolate as our primary activities today - I think we might need a bike ride later to work some of our calories off! I'll be back tomorrow with another project, also with a travel theme so be sure to tune on for that, Until then, happy stampin'!


Stampin' Up! Supplies Used: 

Table built using Product Table Builder by The Crafty Owl - Independent Stampin' Up! Demonstrator.

SING Movie-Inspired Faux Illuminated Card Using Large Letters Framelits

by Joanne James24. February 2017 20:29

Yay it's Friday! Today I'm sharing a card that I made last week following my half-term visit to the movies with the James Juniors - take a look:


Here's the low-down on today's card:

Movie Inspiration - We had been to the movies to see the fun computer-animated comedy movie 'Sing' (you can read all about that here if you're interested) and with this week's Paper Players challenge in mind (use a sentiment as the focal point on your card) I decided to create something using the movie title image as my inspiration:

Image result

With a daughter who sings and often participates in public performances and examinations, I knew that this would make a great encouragement card for her - I'm sure you can see the similarities.

Love Those Letters - I know I say it every time I use them, but the Large Letters Framelits are so worth the investment - I love them! Buying them during Sale-A-Bration leaves you only £1 away from two free gifts too, what a great time to invest! Here I layered them, cutting one set in red and then tracing the inner line of the framelit with a pencil and fussy-cutting them by hand in order to leave a thin border visible. I also used my Labeler Alphabet for the 'loud' part of my sentiment - a great 'mix and match'. 

Fake Illumination - I used a liberal dose of gold metallic enamel shapes  to create my illuminated letters and heat embossed the starburst from the Kinda Eclectic stamp set to give the illusion of bright lights shining in the background along with a strip of gold glimmer for extra sparkle. The layering and lettering detail made this card less than 'clean and simple', hence the reason why I decided not to use it as my Paper Players card.

I love this card though - just shows that sometimes inspiration can strike in the strangest places. What things inspire you? Do leave me a comment below - I'd love to hear your thoughts.

Here is the visual summary of the key products used on today's project for you to pin for easy reference:


You can see all of my 'How To' summaries on my 'How To - Tips and Techniques' Pinterest board in case you've missed any. 

I'll be back tomorrow with another project. Until then, happy stampin'!


Stampin' Up! Supplies Used:

Table built using Product Table Builder by The Crafty Owl - Independent Stampin' Up! Demonstrator.

Thoughtful Branches Family Tree Home Decor Frame

by Joanne James3. August 2016 10:00

Happy Wednesday everyone! As promised, I have another project today using the limited time stamp set and thinlits bundle 'Thoughtful Branches' - a home decor frame that includes my family tree. As soon as I saw this set I knew it would be perfect for a family tree idea that I've had in mind for a while, so combined with my 'Letters For You' stamp set and co-ordinating Large Letters Framelits I set to work. Here is my finished project:


This is a rather large project - it has a finished frame size of 9" x 19 3/4" - so was something of a challenge to photograph - but I absolutely love it! 

Here's the low-down on today's project:

Letters For You - I recently invested in this letters bundle - 'invested' being the key word here, as at £119.50 the bundle is the most expensive in the catalogue - but so worth it for projects like this one. The set has the whole alphabet along with useful punctuation and just like the Large Numbers Framelits and Number of Years stamp set, it is a set that can be used for so many projects and is timeless - a definite 'keeper'. I stamped my letters in Early Espresso and cut them out using my Big Shot and co-ordinating framelits, then substituted the 'I' in 'FAMILY' with my family tree.

Thoughtful Branches Tree - I stamped and cut out my tree trunk, then in order to create a tree big enough to comfortably accommodate my family members, I cut three treetops and layered them to create a fuller tree. Each one was backed with another base (so I cut 6 tree tops in all) for rigidity and I layered them together for added dimension. 

Family Touches - I stamped the names of each of my family members in black onto Whisper White cardstock using the modern Labeler Alphabet and cut them out by hand, then placed them in my tree in descending order of age and with a couple of birds to identify the parents and the apples identifying my children. Here's a close up of the tree so that you can see all of the elements in more detail:

This took longer to work out and put together than explain - but I am so pleased with the end result and am looking forward to hanging it on the wall. You are so going to want to get the Thoughtful Branches Bundle this month!

Here is the visual summary of the key products used on today's project for you to pin for easy reference:


You can see all of my 'How To' summaries on my 'How To - Tips and Techniques' Pinterest board in case you've missed any. 

I'm linking today's project up with the team over at SUO Challenges where the theme this week is 'Delightful Dies' - the two I've used on this project are definitely firm favourites.

Enjoy your day; I'm off for a bike ride and some fresh air whilst the unpredictable British weather holds! I'll be back tomorrow with this week's new challenge over at Create With Connie and Mary. Until then, happy stampin'!


Stampin' Up! Supplies Used:

Table built using Product Table Builder by The Crafty Owl - Independent Stampin' Up! Demonstrator.

Scrapbooking

Stampin' Up! has introduced a new range of 12x12" scrapbooking product and kit - the full range is now available to purchase online. To download a copy of the new digital Scrapbooking Catalogue click here.

Mini Catalogue

BROWSE THE CATALOGUE

'Tis The Season - the new Stampin' Up! Mini Catalogue is here! For more details and to download your copy click here

Shop Online

Access my online shop 24 x 7, 365 days of the year:

Current September hostess code:

JQEHTZGK

Shop Online

2024-25 Annual Catalogue

BROWSE THE CATALOGUE

Click on the image to download your copy of the 2024-25 annual catalogue. For a full list of current SU! supplies, go to my online store. If you would like any help or advice, please drop me a line at joanne@thecraftyowl.co.uk or give me a call on 07773 421446 - I'd be happy to help.

Join My Team

It's always a great time to join Stampin’ Up! New team members can get £130 worth of products for only £99 + free business supplies + free shipping + all the fun being a part of Stampin’ Up! Stampin' Up! has something for everyone: join my growing team and benefit from my support to enjoy Stampin' Up! however you choose.

If you're interested, call me for a chat to understand how I can help you realise your goals. Alternatively, if you have already decided to sign up and you just can't wait, please click here for the link to the online form where you can sign up and order your starter kit right away! 

Latest Kits!

Stampin Cut and Emboss

The Christmas Ornaments Kit and Card Keeper Kit are the latest kits that will be arriving in the online store later this month - get yours here!

New Online Exclusives

There are new products available exclusively in the online store from 3 July - check them out here.

About Me

Hi I'm Joanne and live in Northampton and when I'm not looking after my husband and two beautiful children, am an avid crafter with a passion for all things Stampin' Up!

I must confess that I have never been a big rubber stamper - until I discovered Stampin' Up! that is. I love the fact that I can get such great results with co-ordinating stamps, inks, papers and punches - the possibilities are endless! Join me on my stamping journey as I share the things I love and be inspired to create amazing things yourself!

Follow Me

Monthly Newsletter

Box Builder

Click the button above to use Box Buster to create your custom box design using the Envelope Punch Board!

Kits Collection Now Available!

Stampin Cut and Emboss

The new Kits Collection from Stampin' Up! is now available!

Click here to see the current kits available and order yours online today.

I Design For


Stampin' Up Stuff

This is my personal blog and is not endorsed by Stampin’ Up! I hope you find it a plentiful source of ideas and personal inspiration but please don't copy my designs for contest submission or use for classes, publication or sale without express permission.