Retro In Symmetry CCS463 Double

by Joanne James29. March 2022 12:00

It's Tuesday and time for a new challenge over at CAS Colours & Sketches. There are 5 Tuesdays in March so we are ending the month with the double: one of our previous sketches and a retired colour combination. For Jeanne's final challenge as hostess she chose the following:  


For my card today I went with a super simple single stemmed flower from the 'In Symmetry' stamp set - take a look:


Here's the low-down on today's card:

I thought the rather retro design of the 'In Symmetry' stamp set suited this bright, rather retro colour palette! I stamped my flower in Watermelon Wonder and Just Jade (my closest substitute to 'Taken With Teal' which is way before my time!) onto a white stitched rectangle and added a Pineapple Punch enamel dot before adding to my Pineapple Punch cardbase:

A sentiment heat embossed in white onto a piece of Watermelon Wonder cardstock completes the front of my card. I added another flower, coloured with my sponge daubers, to decorate the inside of my card:

And that's my card - done! The 'In Symmetry' stamp set is great for bright and colourful floral cards and I will miss having it in my collection when it retires. If you don't have it and it's still on your wishlist, why not hop over to my online store via the link below and pick it up at a 40% discount as part of the Last Chance Products Promotion whilst supplies last - a proper bargain!

Here is the visual summary of the key products used on today's project for you to pin for easy reference:


You can see all of my 'How To' summaries on my 'How To - Tips and Techniques' Pinterest board in case you've missed any. 

As a reminder, for our colour challenges, you must use all of the stated challenge colours. You may also use neutral colours; however, the challenge colours should be the most noticeable ones featured on your card. We use Stampin' Up! color names for reference, but you are welcome to use any other companies' products as long as you match the challenge colours as closely as possible.

Enjoy your day and I'll be back tomorrow with another project. Until then, happy stampin'!


Stampin' Up! Supplies Used:

Table built using Product Table Builder by The Crafty Owl - Independent Stampin' Up! Demonstrator.

Make Way Clouds - Beautiful Rainbow Coming Through!

by Joanne James26. March 2022 12:12

Today I'm sharing a card using the sketch over at Fusion (rotated through 180 degrees):


No bookshelves though - as promised, I've another rainbow card for you - take a look:


Here's the low-down on today's card:

I thought the sketch really lent itself to a rainbow peeking through the clouds, so I added some Pool party patterned 'Sunshine and Rainbows' Sale-A-Bration patterned paper to my card base, then added a split panel with diecut stitched cloud edges cut with the Basic Border Dies. A diecut rainbow coming through the clouds bridges the gap:


A gold heat embossed sentiment and a few enamel raindrops complete my card.

Here is the visual summary of the key products used on today's project for you to pin for easy reference:


You can see all of my 'How To' summaries on my 'How To - Tips and Techniques' Pinterest board in case you've missed any. 

I made this card when I made my Thursday make - here's a photo of both cards together:


I hope you've been enjoying my rainbows in their various guises this week! 

Enjoy your day; I'm off to hockey this afternoon. I'll be back tomorrow with another project. Until then, happy stampin'!


Stampin' Up! Supplies Used:

Table built using Product Table Builder by The Crafty Owl - Independent Stampin' Up! Demonstrator.

In The Moment And A Quick Rainbow For AYSI271

by Joanne James25. March 2022 12:00

Today I'm sharing my design team card for our new challenge over at As you See It where the lovely Heather H had a speed stamping challenge for us:
 

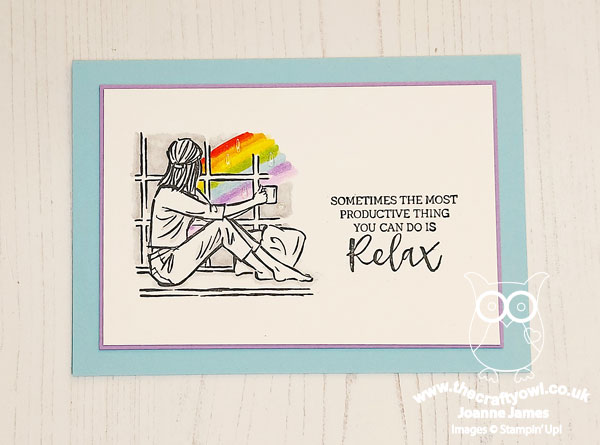
Heather's theme initially had me scratching my head this week, as I have no current stamps that are wellington boots or umbrellas; then I suddenly realised 'staying dry' can be as simple as taking the outside in! That thought led to another and I was away - take a look at what I came up with:
 

Here's the low-down on today's card:

Yes, another rainbow for you today! I still had the 'In The Moment' stamp set out on my desk having prepped for my class using this set earlier this week. In my class, we looked not only at how to colour with Stampin' Blends, along with pencils, Stampin' Write markers and blending tips for each medium, but also different ways in which you can use line drawn images, including ways of colouring beyond the obvious. This card is a 'bonus' for the ladies that attended my class as it looks at another way to colour an image that might not be immediately obvious: here I've focused less on the inside and more on the outside - what can be seen beyond the scene, which in this case is the stormy grey sky and a beautiful rainbow through the window itself.

I used all 10 minutes of my allotted time for this week's speed challenge, first cutting my card base, mat and white pieces and stamping the image and sentiment in Memento Black, using my Stamparatus to get a nice solid image, then I used the remainder of the time to colour my image. I went with a traditional rainbow and coloured it with my Blends, simply drawing in the arch of colour and blending between each to get a smooth-ish finish. I added some clear Wink of Stella to give my rainbow some sparkle and a few clear enamel raindrops to add to the effect:
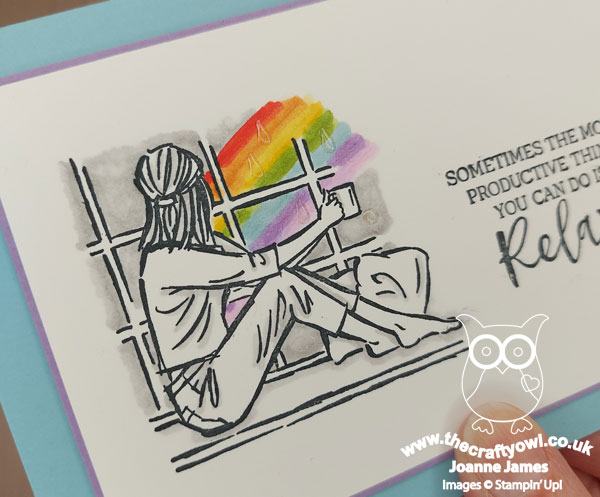
In the interests of time, I coloured the rest of my sky in Smoky Slate and added a few grey highlights to the image of lady, but that was all. I really like the effect - the lack of colour on the main image really draws the eye to the rainbow outside and the pop of colour it adds. 

Here is the visual summary of the key products used on today's project for you to pin for easy reference:
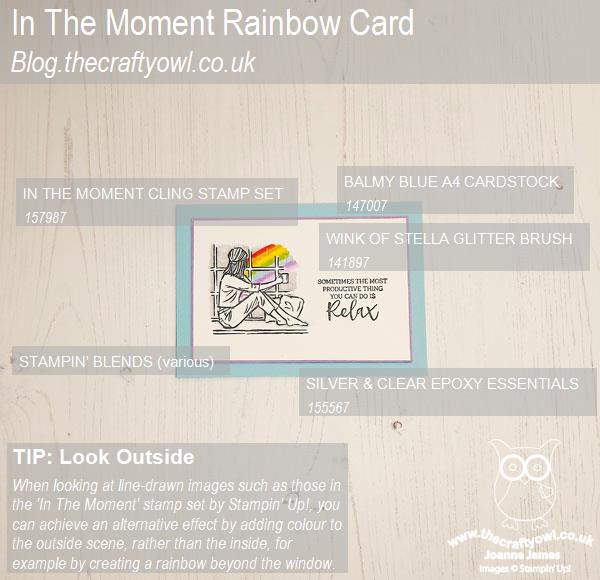
 

You can see all of my 'How To' summaries on my 'How To - Tips and Techniques' Pinterest board in case you've missed any. 

This is my second entry over at The Paper Craft Crew's rainbow colour challenge this week - traditional rainbow colours this time - and another entry for the rain/rainbow challenge over at Global Design Project #GDP335.


Here's a summary of our challenge rules:

  • Create any card, scrapbooking page, 3D project or packaging project that fits the challenge.
  • Please include the challenge graphic and link back to the challenge in your blog post. Turn off word verification so we can leave you lots of lovely comments. Make sure you link the post not the whole blog to the Linky. Use #AYSIXXX when uploading to a public gallery.
  • If you’re unsure about ‘the rules’, check the details under the Challenge Guidelines tab on the As You See It Challenge homepage.
  • In a speed stamping challenge, please time yourself and say in your post how long your card took to complete. 
We look forward to seeing your creations in the AYSI gallery.

I hope you're enjoying my rainbows in all of their various guises this week because - spoiler alert! - I have another rainbow card for you tomorrow! Enjoy your day and I'll be back tomorrow with another project. Until then, happy stampin'!


Stampin' Up! Supplies Used:

Table built using Product Table Builder by The Crafty Owl - Independent Stampin' Up! Demonstrator.

Brilliant Rainbow Dies Clean And Simple TTT154

by Joanne James24. March 2022 18:00

It's Thursday and time for a new challenge over at TicTacToe! It's the turn of Team X to host this week and I am the featured designer this week. This is the fun board that we are playing along with: 


I went across the top row with rainbow/green/diecut as my 3 options and using this week's Try Stamping On Tuesday sketch (no punny sentiment I'm afraid!) set to work and this is what I came up with:


Here's the low-down on today's card:

Sunshine and Rainbows - The colour scheme for today's rainbow card is taken from the (now retired) Sunshine and Rainbows designer paper that was free during Sale-A-Bration; I still have some left so don't be surprised to see it on my projects in the coming weeks/months - I'm hoping it will give you lots of inspiration as to how you can use the paper you earned free too! I love this colour mix; I also used the colours of the paper stripes for the die infills of my rainbow border too, mixing and matching as I went along.

Brilliant Rainbow Dies - I created a rainbow border across my card using the rainbow tag die in the Brilliant Rainbow Dies set; the actual rainbow border in the set was too small and didn't line up with the stripes of my paper, so instead I created my own, layering the tags across my card so that each rainbow covered four vertical stripes. I then added a plain white panel and stamped my sentiment at the very bottom, with a trio of pink hearts as an accent.

Ribbons of Colour - I decided to add a large and showy ribbon bow to my card, pulling colours from the rainbow paper and adding in some sparkly white too for an additional feminine touch. I also added some of the new iridescent rhinestones basic jewels from the mini catalogue. These are just so sparkly and pretty and I love the way they are faceted so take on some of the colour beneath them, which you can see closer on the photo below:


Since rainbows are very much a feature of today's card, I'm also linking up with the Paper Craft Crew (non-traditional colours) and over at Global Design Project #GDP355 where they also have rain/rainbows as their theme.

Here is the visual summary of the key products used on today's project for you to pin for easy reference:


You can see all of my Product and 'How To' summaries on my 'How To - Tips and Techniques' Pinterest board in case you've missed any. 

A tictactoe board offers so many creative possibilities - how does this week's board inspire you? Why not have a go? We would love to see you in the gallery and who knows - you might be selected for Designer's Choice and be eligible to be a guest designer on a future challenge. 

Enjoy the rest of your day; I'll be back tomorrow with another project for this week's new challenge over at As You See it. Until then, happy stampin'!


Stampin' Up! Supplies Used: 

Table built using Product Table Builder by The Crafty Owl - Independent Stampin' Up! Demonstrator.

Last Chance - The List of 2021-22 Retiring Products Has Been Announced!

by Joanne James23. March 2022 19:00

It's here - the list of products that will be retiring from this year's annual catalogue has been announced!

You can see and download the full list of items retiring from the current Annual catalogue in PDF form by CLICKING HERE.

You can see and download the full list of items retiring from the current Annual catalogue in Excel spreadsheet form by CLICKING HERE.

Retiring products are only available WHILE STOCKS LAST, so if you've still items on your wish list from this year's annual catalogue, you need to check the retiring lists and if they're on it put an order in pronto! Don't forget to add this month's online hostess code: RWYP3CVT

If you want to stock up on any of the retiring in-colour items and you haven't already done so, especially re-inkers, I would urge you to do that sooner rather than later as they are always the first things to sell out. 

Hop online to get the latest on stock availability and place your orders. Some retiring items are discounted by up to 50% so these may well be snapped up quickly. 

I will to be back tomorrow with a creative post; until then, happy shopping!

Artfully Layered CAS Slimline Birthday Card CCS462

by Joanne James22. March 2022 12:00

It's Tuesday and time for a new challenge over at CAS Colours & Sketches. This week's challenge is a sketch challenge and Jeanne has asked that we create a slimline card with the following layout: 


Feel free to flip or rotate the sketch when making your card. I chose to use this week's colours over at Just Us Girls for my card - I love the soft green and pink combination, with the added warmth of vanilla. You might have thought this would draw me to florals, but no - today's card is all about the leaves - take a look:


I decided to have my first outing with the beautiful 'Artfully Layered' stamp set and create a cluster of leaves on the corner of my slimline card. The leaves are quite large, so I went with a standard sized slimline (9.5cm x 21cm). I stamped two leaves in Soft Succulent directly onto my card base, one of these going off the edge and for this one I created a stencil and added some some soft Blushing Bride pink ink over the top. To finish I added a layered diecut leaf and a simple birthday sentiment from the same set, along with a trio of three pink enamel dots.

I love the variation in detail of all three leaves:

I also used a few of the other stamps in the set to add a little extra detail to the inside of my card:

And of course the new Slimline Envelopes in the mini catalogue also come in Soft Succulent,  so I had the perfect ready-made envelope all set to go too - bonus!

The Artfully Layered bundle is a new acquisition for me, having been persuaded by all of the wonderful cards I've seen with it, especially those created by my wonderful friend Jan Clothier - you can check out here blog here if you would like to see some of the amazing creations she has made with this set.

Here is the visual summary of the key products used on today's project for you to pin for easy reference:


You can see all of my 'How To' summaries on my 'How To - Tips and Techniques' Pinterest board in case you've missed any. 

Enjoy your day; It's only Tuesday and I am playing catch up already this week, having had my class day yesterday which is always busy. Add in an unscheduled hockey match today and the usual to-do list, piano lessons and the rest it is turning into a busy one! The sun is shining though and spirits are high, so I must get on. I'll be back tomorrow with another project. Until then, happy stampin'!


Stampin' Up! Supplies Used:

Table built using Product Table Builder by The Crafty Owl - Independent Stampin' Up! Demonstrator.

Sports Event Congratulations Pennant Card CCS461

by Joanne James15. March 2022 12:00

It's Tuesday and time for a new challenge over at CAS Colours & Sketches. Jeanne is hosting this month and this week it's a colour challenge: 


I don't know why but these colours really threw me for a loop this week! I spent an age working out how best to use them together on a clean and simple card. In the end I decided to grab some new and as yet unused dies from my shelf and this is what I came up with: 


Here's the low-down on today's card:

Today's card features the new Sporting Event Dies. I actually bought these because there are some great ticket dies in the set, although as I was looking at them I thought I could layer them to make a simple pennant. I added some stars (another useful die in this set) and a diecut #1 button that I popped up on dimensionals:

I added a fun sentiment from 'Happy & Heartfelt' and paired that with another one on the inside, along with a reverse button using the leftover pieces from the front of my card:


This will come in useful when the youngest of the James Juniors (hopefully!) passes his next piano exam. I'm hoping that it might encourage continued practice and playing too, but I won't hold my breath on that front!  Despite the challenge of these colours, I've decided I quite like this colour combo. The rest of the team have made some fabulous cards with it so be sure to check them out! 

Here is the visual summary of the key products used on today's project for you to pin for easy reference:


You can see all of my 'How To' summaries on my 'How To - Tips and Techniques' Pinterest board in case you've missed any. 

As a reminder, for our colour challenges, you must use all of the stated challenge colours. You may also use neutral colours; however, the challenge colours should be the most noticeable ones featured on your card. We use Stampin' Up! color names for reference, but you are welcome to use any other companies' products as long as you match the challenge colours as closely as possible.

Enjoy your day and I'll be back tomorrow with another project. Until then, happy stampin'!


Stampin' Up! Supplies Used:

Table built using Product Table Builder by The Crafty Owl - Independent Stampin' Up! Demonstrator.

Mango Flowering Tulip Fields Thank You AYSI270

by Joanne James11. March 2022 13:00

Today I'm sharing my design team card for our new challenge over at As you See It where the I chose a theme of spring flowers for our challenge this week:


The Stampin' Up! catalogue is great for florals of all kinds and the current mini has a great selection of spring florals in particular. I was a little spoilt for choice! I decided to showcase some of the beautiful Flowering Fields designer series paper covered in bright tulips on my card today - take a look:


Here's the low-down on today's card:

Flowering Fields - The handpainted designs of the Flowering Tulips designer series paper are stunning! Beautifully coloured and sized perfectly for cardmaking. I chose one with a mango-orange colour scheme and used the sketch over at Atlantic Hearts Sketch Challenge for my layout, cutting the paper into three columns. The pattern carries across the panels and the layering adds visual interest to the design. 

Tulips And More - I also used the co-ordinating 'Flowering Tulips' bundle for the remaining details. I tweaked the sketch elements slightly, using the horizontal element to showcase one of the Tulips Dies and added the sentiment to the circle - it's a perfect fit:


A Final Touch - My final addition was some of the check ribbon, that I wrapped around my diecut and tied in a bow. I sometimes feel like I have lots of ribbon that I don't use and this design really lends itself to a bow I think. The colours compliment the busy paper pattern beautifully without overwhelming. 

So what do you think? When you think 'spring flowers', what is the floral set that you reach for? Do join us over in the AYSI gallery with your spring floral creations.

Here is the visual summary of the key products used on today's project for you to pin for easy reference:


You can see all of my 'How To' summaries on my 'How To - Tips and Techniques' Pinterest board in case you've missed any. 

Here's a summary of our challenge rules:

  • Create any card, scrapbooking page, 3D project or packaging project that fits the challenge.
  • Please include the challenge graphic and link back to the challenge in your blog post. Turn off word verification so we can leave you lots of lovely comments. Make sure you link the post not the whole blog to the Linky. Use #AYSIXXX when uploading to a public gallery.
  • If you’re unsure about ‘the rules’, check the details under the Challenge Guidelines tab on the As You See It Challenge homepage.
We look forward to seeing your creations in the AYSI gallery.

Enjoy your day and I'll be back tomorrow with another project. Until then, happy stampin'!


Stampin' Up! Supplies Used:

Table built using Product Table Builder by The Crafty Owl - Independent Stampin' Up! Demonstrator.

Pastel Stencilled Flowers Thank You Card TTT152

by Joanne James10. March 2022 18:00

It's Thursday and time for a new challenge over at TicTacToe! It's the turn of Team X to host this week and the lovely Betty is our featured designer this week. This is the fun board that we are playing along with: 


I went both across the bottom row Diecut/Spring Colours/Floral and down the middle column with Butterfly/CAS/Spring Colours this week, also using the beautiful trio of pastels over at Hand Stamped Sentiments and the layout (but not the colours - I may have another go with some blues next week!) over at Fusion for my fresh thank you card - take a look:


Here's the low-down on today's card:

Flowers Layering Masks - As I said in my earlier post today, I think I am really enjoying experimenting with stencils, and this particular flower stencil in the Butterflies and Flowers Layering Decorative Masks is definitely one of my favourites! Today I incorporated two different coloured flowers, using the same colour to build up the layers on each, before adding leaves. I also added a touch of stencilling to the inside corner of my card:


Pretty Pastels - This is such a pretty spring colour combination that the HSS team chose this week. It just so happens to be the same colour combination I used for my daffodils and tulips Paper Players card earlier in the week too; you can see that card here if you missed it. I used Fresh Freesia for my card base and added a panel of in-color designer paper for a subtle tone-on-tone layer of pattern detail.

Brass Butterflies - To finish my card I added a couple of in-colour gems to my purple flowers and a couple of brass butterflies for a fun extra detail - you can just see the shine as they catch the light on the one on the upper left portion of the photo below:

A simple stamped sentiment from 'Flowing Flowers' in Basic Grey completes today's card.

Here is the visual summary of the key products used on today's project for you to pin for easy reference:


You can see all of my Product and 'How To' summaries on my 'How To - Tips and Techniques' Pinterest board in case you've missed any. 

A tictactoe board offers so many creative possibilities - how does this week's board inspire you? Why not have a go? We would love to see you in the gallery and who knows - you might be selected for Designer's Choice and be eligible to be a guest designer on a future challenge. 

Enjoy your day; I'll be back tomorrow with another project for our new challenge over at As You See It. Until then, happy stampin'!


Stampin' Up! Supplies Used: 

Table built using Product Table Builder by The Crafty Owl - Independent Stampin' Up! Demonstrator.

Cards For Ukraine Clean and Simple Tulips CCS460

by Joanne James8. March 2022 13:00

It's Tuesday and time for a new challenge over at CAS Colours & Sketches. This week's challenge is a sketch challenge and Jeanne has asked that we use a curve and non-geometrical shape in our designs.


Feel free to flip or rotate the sketch when making your card. i did just that today and rotated the sketch through 90 degrees to create a landscape card. If you are a card maker you will undoubtedly have seen the flood of blue and yellow cards in support of #cardsforukraine. The lovely peeps over at Color Hues are having a double challenge in honour of this and are also featuring the colours of the Ukranian national flag in a bonus colour combo for this challenge, so I decided it was time for me to show my support and play along. The sunflower is the national flower of Ukraine and whilst I have one of those cards in the pipeline to share with you in another post, for today's challenge I decided to use the row of tulips in the Tulips Dies set for that wiggly line - take a look:


Here's the low-down on today's card:

This card really is super simple to execute - the effort here was in the planning! A Pacific Point card base, then overlaid a panel of Daffodil Delight for the diecut tulips. I chose to feature a stamped windmill as my non-geometrical shape and stamped it in Pacific Point onto Daffodil Delight, stamping the sentiment from the Flowering Tulips set below it - the words seemed appropriate in the circumstances as the people of Ukraine are most definitely in our thoughts. 


This card is all about the bold blocks of just two colours; it is unusual for there to be no white at all on this card, but having tried a few different things the blue-on-yellow windmill was definitely the way to go - the windmill is much more a part of the landscape and it emulates the horizontal lines of the Ukrainian flag. The only white was for my stamped panel on the inside of my card:


Do you ever use blocks of colour in this way in your crafting? Bold blocks of colour can have a big impact and by avoiding clutter that clean-and-simple feel and 'white space' is preserved. 

Here is the visual summary of the key products used on today's project for you to pin for easy reference:


You can see all of my 'How To' summaries on my 'How To - Tips and Techniques' Pinterest board in case you've missed any. 

As a reminder, for our colour challenges, you must use all of the stated challenge colours. You may also use neutral colours; however, the challenge colours should be the most noticeable ones featured on your card. We use Stampin' Up! color names for reference, but you are welcome to use any other companies' products as long as you match the challenge colours as closely as possible.

Enjoy your day and I'll be back tomorrow with another project. Until then, happy stampin'!


Stampin' Up! Supplies Used:

Table built using Product Table Builder by The Crafty Owl - Independent Stampin' Up! Demonstrator.

Shop Online

Access my online shop 24 x 7, 365 days of the year:

Current May hostess code:

3NR3FB9W

Shop Online

2024-25 Annual Catalogue

BROWSE THE CATALOGUE

Click on the image to download your copy of the 2024-25 annual catalogue. For a full list of current SU! supplies, go to my online store. If you would like any help or advice, please drop me a line at [email protected] or give me a call on 07773 421446 - I'd be happy to help.

Join My Team

It's always a great time to join Stampin’ Up but during May it's even better! New team members can get £78.25 of new In Color products for FREE! That's in addition to another £130 worth of products of your choice for only £99 + free business supplies + free shipping + all the fun being a part of Stampin’ Up! Stampin' Up! has something for everyone: join my growing team and benefit from my support to enjoy Stampin' Up! however you choose.

If you're interested, call me for a chat to understand how I can help you realise your goals. Alternatively, if you have already decided to sign up and you just can't wait, please click here for the link to the online form where you can sign up and order your starter kit right away! 

Latest Kits!

Stampin Cut and Emboss

The City Sights Kit has all you need to make 8 cards with coordinating envelopes for £20. Along with the new Happy Hollyhocks Kit, a no stamping kit including 9 cards for just £14, both are available from May 1st - get yours here!

New Online Exclusives

There are new products available exclusively in the online store from 5 March - check them out here.

About Me

Hi I'm Joanne and live in Northampton and when I'm not looking after my husband and two beautiful children, am an avid crafter with a passion for all things Stampin' Up!

I must confess that I have never been a big rubber stamper - until I discovered Stampin' Up! that is. I love the fact that I can get such great results with co-ordinating stamps, inks, papers and punches - the possibilities are endless! Join me on my stamping journey as I share the things I love and be inspired to create amazing things yourself!

Follow Me

Monthly Newsletter

Box Builder

Click the button above to use Box Buster to create your custom box design using the Envelope Punch Board!

Kits Collection Now Available!

Stampin Cut and Emboss

The new Kits Collection from Stampin' Up! is now available!

Click here to see the current kits available and order yours online today.

I Design For


Mini Catalogue


The next mini catalogue will be live in September! 

Stampin' Up Stuff

This is my personal blog and is not endorsed by Stampin’ Up! I hope you find it a plentiful source of ideas and personal inspiration but please don't copy my designs for contest submission or use for classes, publication or sale without express permission.