
Flowing Flowers Note Of Thanks PP593

by Joanne James29. May 2022 08:00

Today it's Sunday and time for this week's new challenge over at The Paper Players! It's the turn of the fabulous Ann to host this week and since it's the fifth Sunday of the month we have a tic tac toe challenge for you to work with:


I went down the centre of the grid with embossing, floral and rhinestones and decided to take the opportunity to take part in this week's CASE The Designer challenge over at Global Design Project #GDP344 - take a look:


Here's the low-down on today's card:

Copy And Selectively Edit - At GDP they are asking us to CASE one of Charlet Mallet's cards (you can see it on the badge below). I used the same die for my panel, the largest one on the Scalloped Contours die pack, but I switched out my florals for the Flowing Flowers stamp set and whilst I still using purple and green, I went with a more pastel colour palette, and also incorporated some Pool Party blue in the inked splatters and in my cardbase (reflecting the colours of the current Color Dare challenge). I used a heat-embossed white-on-black sentiment from the 'Sending Smiles' stamp set, using one featuring three pieces rather than a repeating word. I finished my cardfront with a sprinkling of iridescent sparkling rhinestones:

Finishing Touches - I carried the stamping through to both the inside of my card and the envelope for a pretty, co-ordinated look: 

This floral image is so easy to stamp and can be easily inked up in different colours using sponge daubers. I spent a lot of time thinking about my card and choosing which elements to incorporate, but it's actually really easy to execute. The design would also work well in a wide range of alternative colour schemes too.

Here is the visual summary of the key products used on today's project for you to pin for easy reference:


You can see all of my Product and 'How To' summaries on my 'How To - Tips and Techniques' Pinterest board in case you've missed any. 

Before you reach for your ink and papers, check out what our amazing team has created to inspire you this week:

Here's a quick recap of our challenge rules:
 
1.  Create a new paper project
2.  Upload your creation to your blog with a link back to us and provide a direct link to the post featuring your challenge submission.
3.  Please link your card to no more than four challenges, TOTAL.
4.  Have FUN!

Enjoy your day; exams are over and the James Juniors are on half-term next week, so we will be spending ours relaxing and doing not very much! I'll be back tomorrow with another project. Until then, happy stampin'!


Stampin' Up! Supplies Used: 

Table built using Product Table Builder by The Crafty Owl - Independent Stampin' Up! Demonstrator.


Measure of Love Clean and Simple CCS 466

by Joanne James19. April 2022 12:00

It's Tuesday and time for a new challenge over at CAS Colours & Sketches. Bhavya is hosting for the month of April and it's time for our second colour challenge of the month: 


I thought these colours would be perfect for a bowl of cherries for a sweet friend - so I grabbed the retiring 'Measure of Love' stamp set and set to work - take a look:


Here's the low-down on today's card:

 A simple bowl of cherries, backed with some Pattern Party black and white gingham and with an added Cherry Cobbler scalloped border detail to finish:


A super clean and simple card!

Here is the visual summary of the key products used on today's project for you to pin for easy reference:


You can see all of my 'How To' summaries on my 'How To - Tips and Techniques' Pinterest board in case you've missed any. 

As a reminder, for our colour challenges, you must use all of the stated challenge colours. You may also use neutral colours; however, the challenge colours should be the most noticeable ones featured on your card. We use Stampin' Up! color names for reference, but you are welcome to use any other companies' products as long as you match the challenge colours as closely as possible.

Enjoy your day and I'll be back tomorrow with another project. Until then, happy stampin'!


Stampin' Up! Supplies Used:

Table built using Product Table Builder by The Crafty Owl - Independent Stampin' Up! Demonstrator.

Pierced Blooms For The Happiest of Birthdays

by Joanne James7. April 2022 15:00

It's Thursday and today's card is for a couple of challenges: 


I used the colour palette over at TGIF Challenges (love those colours!) and the new sketch over at Atlantic Hearts Sketch Challenge for a birthday card to pay homage to a favourite retiring stamp set and some of my most favourite ever dies - take a look:


Here's the low-down on today's card:

Happiest of Birthdays - I used the big sentiment from 'Happiest of Birthdays' front and centre - the size of this greeting really makes a card, with nothing more than some decoration required.

Farewell Pierced Blooms - For said decoration, I used my Pierced Blooms Dies to cut some flowers and leaves and layered them to decorate both the outside and the inside of my card, where I also used another of the sentiments in the set:

Finishing Touches - A strip of contrasting Brights designer paper, some 'retired) sparkly enamel dots and a pair of tiny brushed brass butterflies add some final finishing touches:

Some of my favourite retiring products today though, both of which will be 'keepers' for me; it's not all sad though - I'm sure there will be some great new ones arriving soon!

Here is the visual summary of the key products used on today's project for you to pin for easy reference:


You can see all of my Product and 'How To' summaries on my 'How To - Tips and Techniques' Pinterest board in case you've missed any. 

Enjoy your day; I'll be back tomorrow with another project. Until then, happy stampin'!


Stampin' Up! Supplies Used: 

Table built using Product Table Builder by The Crafty Owl - Independent Stampin' Up! Demonstrator.

Hey Birthday Chick Dancing Spring Chicken PP585

by Joanne James3. April 2022 09:00

Today it's Sunday and time for this week's new challenge over at The Paper Players! It's the turn of the fabulous Ann to host this week and she has a fun theme challenge for you to work with:


Laughter is the best medicine - so true! I had a rummage amongst my stamps for something funny and using Jen T's sketch over at Freshly Made Sketches this week (it's a keeper!) for my layout I set to work. This is what I came up with:


Here's the low-down on today's card:

I actually don't have that many stamps that are out-and-out funny, but plenty that can raise a smile and 'Hey Birthday Chick' is definitely one of them! I love that sentiment 'you're still a spring chicken' so I decided to pair it with the chicken in this set that always looks to me like she's dancing! I added some rainbow glimmer bunting and some stamped confetti, and having coloured my chicken decided to add a ribbon ruffle skirt by running a stitch through a piece of Polished Pink ribbon - doesn't it look as if she's doing the can-can?!

Very 'oo la la'!! What do you think - comical enough to raise a smile? It made me chuckle anyway :-) I added another chicken along with another sentiment from this set to decorate the inside of my card to finish:

'Hey Birthday Chick' and the co-ordinating Birthday Chick Dies are on the retired list, so if they tickle your funny bone and you'd like to add them to your collection, they are currently both available at 50% off - a real bargain! Rainbow glimmer paper is also on the retired list - I am so sad to see this go! Here's hoping there is more glimmer paper on the way in the new annual catalogue ... 

Here is the visual summary of the key products used on today's project for you to pin for easy reference:


You can see all of my Product and 'How To' summaries on my 'How To - Tips and Techniques' Pinterest board in case you've missed any. 

Before you reach for your ink and papers, check out what our amazing team has created to inspire you this week:

Here's a quick recap of our challenge rules:
 
1.  Create a new paper project
2.  Upload your creation to your blog with a link back to us and provide a direct link to the post featuring your challenge submission.
3.  Please link your card to no more than four challenges, TOTAL.
4.  Have FUN!

Enjoy your day; I am mid-way through a 'Mum and son' weekend with the youngest of the James Juniors: we spent yesterday watching Manchester United play at home in Old Trafford, stayed overnight and today we are doing the stadium tour - so we are all about the football, for sure! A lovely way to start the Easter school break though. I'll be back tomorrow with another project. Until then, happy stampin'!


Stampin' Up! Supplies Used: 

Table built using Product Table Builder by The Crafty Owl - Independent Stampin' Up! Demonstrator.

Well Defined And The Meaning Of Christmas AYSI262

by Joanne James29. October 2021 13:00

I'm back with my second card of the day: this time I'm sharing my design team card for our new challenge over at As you See It where it's time for a festive 'fill in the blank' challenge:


I used the sketch over at Try Stamping on Tuesday for my layout and I knew exactly which stamp I needed for today's 'fill in the blank' - take a look:


Here's the low-down on today's card:

Well Defined - This sentiment from the 'Well Defined' stamp set sums up perfectly what Christmas means to me: family. Christmas is the one time of the year when my immediate family is always able to be together - no work, no school, no sport, simply the opportunity to spend quality time which each other and enjoy each other's company. We are often hosting extended family during the festive season, so it tends to be a busy family time and not an especially restful one (not for me, anyway!). Last year's 'lockdown Christmas' was unusually quiet for us, but I didn't enjoy it any less; if anything, I personally enjoyed it even more as I was freed from many of the hostess duties that normally fall to me. That said, a return to normality this year will be welcomed - there is nothing like the presence of family to sum up all that is good about Christmas, for sure.

A Play On Words - I paired my sentiment with some Whimsy and Wonder designer paper featuring gifts - it seemed appropriate given the play on the words 'presence' and 'presents' in the sentiment. i love the non-traditional colour combination of this paper and the iridescent foil detailing - so pretty! 

Scalloped border Detail - I backed my designer paper with a panel of Misty Moonlight that I added a scalloped border to one edge, cut using the Scalloped Contour Dies; it has a subtle pierced edge detail that I love. I also added a sparkly ribbon bow to complete my card:

So what does Christmas mean to you? I would love you to leave me a comment below - better still, make a card and link it up to our gallery during the next 2 weeks!

Here is the visual summary of the key products used on today's project for you to pin for easy reference:


You can see all of my 'How To' summaries on my 'How To - Tips and Techniques' Pinterest board in case you've missed any. 

Here's a summary of our challenge rules:

  • Create any card, scrapbooking page, 3D project or packaging project that fits the challenge.
  • Please include the challenge graphic and link back to the challenge in your blog post. Turn off word verification so we can leave you lots of lovely comments. Make sure you link the post not the whole blog to the Linky. Use #AYSIXXX when uploading to a public gallery.
  • If you’re unsure about ‘the rules’, check the details under the Challenge Guidelines tab on the As You See It Challenge homepage.
  • In a Fill in the Blank challenge, complete the sentence in the Challenge Banner with the phrase that is true for you and create your project using the words you used. Tell us what you said in your blog or on your site.
We look forward to seeing your creations in the AYSI gallery.

Enjoy your day; we have haircuts, lunch out and shopping on the cards today as we continue to enjoy the half-term school break. I'll be back tomorrow with another project. Until then, happy stampin'!


Stampin' Up! Supplies Used:

Table built using Product Table Builder by The Crafty Owl - Independent Stampin' Up! Demonstrator.

A Colourful Biggest Birthday Wish TTT128

by Joanne James26. August 2021 18:00

It's Thursday and time for a new challenge over at TicTacToe! It's the turn of Team X to host this week and our fearless leader Felicita is our featured designer this week. This is the fun board that we are playing along with: 


I loved Felicita's board this week and I could have chosen so many routes! I ended up using this week's Global Design Project #GDP306 sketch for my layout and going diagonally across the board from bottom left to top right with birthday/free/balloon (it also fits the second row of any colour ink/free/any shape die) for a simple and colourful birthday card - take a look:


Here's the low-down on today's card:

Pattern Party - I used a sheet of fun, colourful stripey paper from the Pattern Party host pack as the background for my card - this totally inspired my bright colour scheme today! I love the way this frames my central scalloped panel.

Ombre Biggest Wish - My central panel is cut with one of the Scalloped Contours Dies and I used it to create a focal point ombre 'happy' sentiment overlaid with a fussy-cut birthday, both from the 'Biggest Wish' stamp set. Love these big, bold fonts, that are useful in lots of ways.

What No Penguin? - The balloons I featured on my card are from the 'Penguin Place' stamp set - and yes, not a penguin in sight! When I originally started my card, I was intent on adding one but in the end decided I liked it just like this. I fussy cut my balloons and strings and added them to my panel for a final pop of colour.

Here is the visual summary of the key products used on today's project for you to pin for easy reference:


You can see all of my Product and 'How To' summaries on my 'How To - Tips and Techniques' Pinterest board in case you've missed any. 

A tictactoe board offers so many creative possibilities - how does this week's board inspire you? Why not have a go? We would love to see you in the gallery and who knows - you might be selected for Designer's Choice and be eligible to be a guest designer on a future challenge. 

Enjoy your day; I am taxi service to hockey training this evening -  we are starting to ramp up as the new season approaches! I'll be back tomorrow with another project. Until then, happy stampin'!


Stampin' Up! Supplies Used: 

Table built using Product Table Builder by The Crafty Owl - Independent Stampin' Up! Demonstrator.

Colours And Contours Rainbow Glimmer Congratulations Card PP551

by Joanne James25. July 2021 09:00

Today it's Sunday and time for this week's new challenge over at The Paper Players! It's the turn of the fabulous Ann to host this week and she has my favourite, a sketch challenge for you to work with:


I had so many great ideas for this sketch! I also loved the rainbow of purples, blues and greens on that fabulous bird on the Color Dare inspiration photo, so decided to pair them with the stamp in the Colours & Contours set for a stem of rainbow flowers - take a look:


Here's the low-down on today's card:

Colours and Contours - I coloured the infill stamp of the main flower stem in the Colours & Contours stamp set using my sponge daubers and a trio of blue and purple inks, the cut it out with the co-ordinating die. I added it to a panel cut with one of the Scalloped Contours Dies (and narrowed slightly), having stamped the sentiment directly onto this panel. I added another sentiment and additional flower from the same set to the inside of my card:


Rainbow Glimmer - The rainbow of colours that I used enabled me to use some co-ordinating rainbow glimmer paper for my horizontal strips to compliment flowers. Whilst there's only a little of it visible, I love the addition of that sparkle and glimmer:

Pattern Party - In order to allow my glimmer paper to really stand out, I chose a piece of neutral black and white Pattern Party paper for my background. The Pattern Party paper pack is a hostess reward that you can earn with purchases of £150+ and is such great value with a great variety of patterns and designs too. 

Here is the visual summary of the key products used on today's project for you to pin for easy reference:

You can see all of my Product and 'How To' summaries on my 'How To - Tips and Techniques' Pinterest board in case you've missed any. 

Before you reach for your ink and papers, check out what our amazing team has created to inspire you this week:

Here's a quick recap of our challenge rules:
 
1.  Create a new paper project
2.  Upload your creation to your blog with a link back to us and provide a direct link to the post featuring your challenge submission.
3.  Please link your card to no more than four challenges, TOTAL.
4.  Have FUN!

You can see all of my 'How To' summaries on my 'How To - Tips and Techniques' Pinterest board in case you've missed any. 

Enjoy your day; I will be spending mine cooking and having a lazy day with the family. I'll be back tomorrow with another project. Until then, happy stampin'!


Stampin' Up! Supplies Used: 

Table built using Product Table Builder by The Crafty Owl - Independent Stampin' Up! Demonstrator.
 
This card was a Diamond Winner over at Color Dare this week!


A Party Puffins Pair For The Double CCS 426

by Joanne James29. June 2021 12:00

It's Tuesday and time for a new challenge over at CAS Colours & Sketches. It's Shannon's last challenge this month and since it's the fifth Tuesday of the month we have a double - a trio of retired colours and an old sketch to be used together:


I was struggling to work out what to do with this trio of colours this week, then I had a brainwave - and ended up making not one but two cards! Both of which feature some cute party puffins - here's the first one: 


I substituted Peekaboo Peach for Peach Parfait, as I don't have this colour. I used the peach for my base and added Tangerine Tango banners on both cards, then stamped my puffin and cake onto a scalloped edge diecut piece, incorporating the pink into the icing on my cake and added a heat-embossed sentiment:


I chose another of the puffin images for my second card:


How cute is that little goldfish present he's holding?!


I also added a little detail to the inside of both cards:


So which one of these is your favourite? Here's a photo of them together:


Here is the visual summary of the key products used on today's project for you to pin for easy reference:


You can see all of my 'How To' summaries on my 'How To - Tips and Techniques' Pinterest board in case you've missed any. 

As a reminder, for our colour challenges, you must use all of the stated challenge colours. You may also use neutral colours; however, the challenge colours should be the most noticeable ones featured on your card. We use Stampin' Up! color names for reference, but you are welcome to use any other companies' products as long as you match the challenge colours as closely as possible.

I'm a little late posting today; I have spent the last couple of days recovering form my second Covid jab, which truly knocked me for six. I'm thankfully feeling much better today and am now fully vaccinated, so it was worth it! Enjoy your day and I'll be back tomorrow with another project. Until then, happy stampin'!


Stampin' Up! Supplies Used:

Table built using Product Table Builder by The Crafty Owl - Independent Stampin' Up! Demonstrator.

Loose Flower Flourishes In Colour Gingham Card

by Joanne James14. June 2021 15:58

I've had a super busy day today but I managed to squeeze in a quick 30 minutes of crafting earlier to whip something up for Linda's sketch over at Freshly Made Sketches this week and I've just time to quickly type this and link up under the wire:


I was intrigued by the wide open space and those small circles/dots and having spent best part of the last week mulling over my options this is what I eventually found time to make - take a look:


 Here's the low-down on today's card:

 Whilst the sketch is a guide to be interpreted, I decided to 'stay small' with those dots and use them to showcase the pretty in colour Loose Flower Flourishes in the new catalogue. I paired them with some Fresh Freesia gingham from the Pansy Petals DSP pack and an oldie-but-goodie sentiment from 'Dressed to Impress', which I diecut with one of the new Scalloped Contours Dies and stamped in another of the new in-colours, Polished Pink. I also added a little ribbon behind and another pair of those flower embellishments - how pretty are they, right?! 

Since the front of my card was (relatively) understated, I went big with my sentiment on the inside and chose this one from 'Happiest of Birthdays':

This card was quite quick to put together, which was perfect since I was so strapped for time. It felt good to make just enough time to get it out of my head and onto paper - do you ever feel like that?

Here is the visual summary of the key products used on today's project for you to pin for easy reference:


You can see all of my 'How To' summaries on my 'How To - Tips and Techniques' Pinterest board in case you've missed any. 

Enjoy your day and I'll be back tomorrow with another project for this week's CAS Colours & Sketches challenge. Until then, happy stampin'!

Stampin' Up! Supplies Used:

Table built using Product Table Builder by The Crafty Owl - Independent Stampin' Up! Demonstrator.

A Cut Above Pair For Father's Day AYSI 252

by Joanne James11. June 2021 12:00

Today I'm sharing my design team card for our new challenge over at As you See It where it's time for a theme challenge:


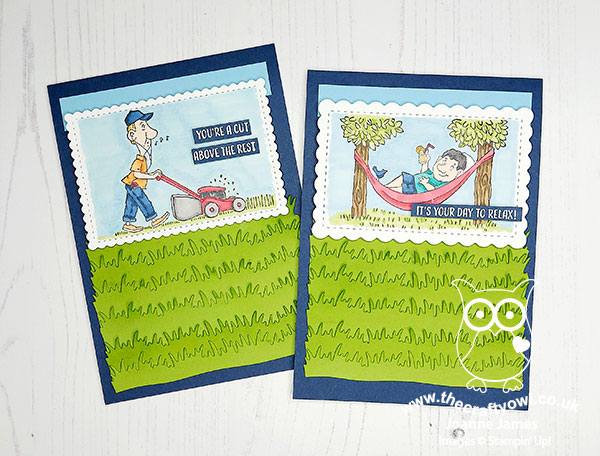
With Father's Day around the corner our masculine theme this week gave me the perfect opportunity to get organised and make my cards. It also allowed me to take some time out of my super-busy week to spend some time relaxing with my Stampin' Blends and indulge in a little colouring. I actually have two cards for you today, featuring each of the main images in the 'A Cut Above' stamp set. Take a look at the first one:
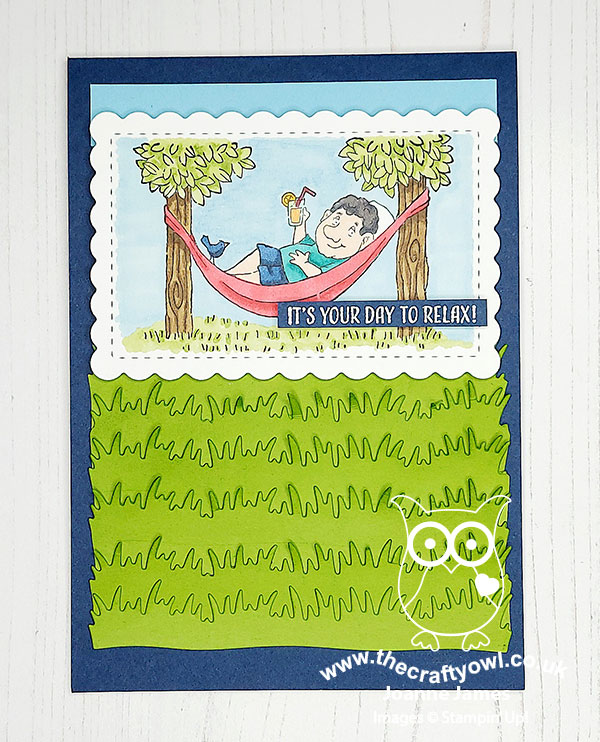
 

This is the card I made for my Dad and I coloured the hair, etc. accordingly - I love how you cam customise when you stamp your own card! And here's the second card I created:
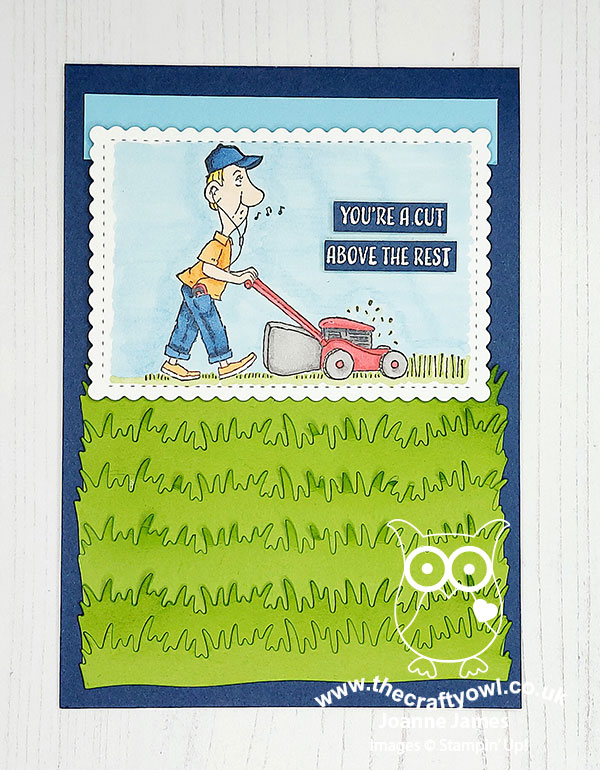
 

Here's the low-down on today's cards:

A Cut Above - Both of my cards today feature images and sentiments from the 'A Cut Above' stamp set, a stand-alone stamp set that features in the January-June mini catalogue and will be retiring at the end of the month. Whilst I'll be sad to see this set go, as I think these images work for lots of recipients, so if this set is on your wish list, snap it up now before it's too late! These images are great to colour - I've listed all of the blends I used in my product table below. I don't profess to be an expert colourist, however I do find it wonderfully relaxing.

A Growing Garden - The layout for my card today was inspired by a TGIF Challenges sketch from a few weeks ago that I didn't play along with, but kept because I thought it would work well with my image panel. I added a strip of sky at the top of my panel, then below my image I added a number of strips of Granny Apple Green grass (cut with a retired Picnic Builders Die - you could also create something similar with fringe scissors or your paper snips if you don't have a grass die) that I had lightly sponged on the tips. Given that both of the images feature grass, I thought this was a fun way to add extra detail. I'm also linking up over at Global Design Project #GDP295 this week where their theme is 'Growing Garden' - I don't know about you, but of all the things in our garden, the grass is definitely the thing that grows the quickest, closely followed by the weeds! During the early summer months, our grass definitely resembles my card:
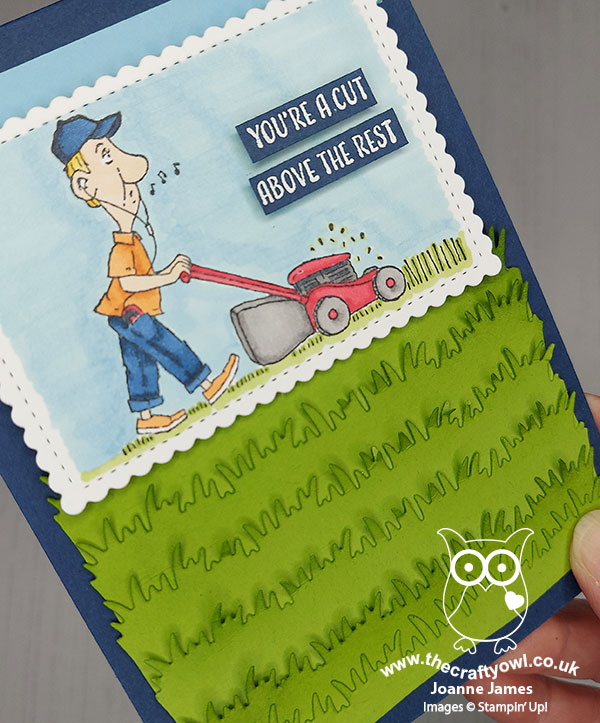
I know my husband will definitely see the funny side of this card - he spends many hours mowing the lawn!

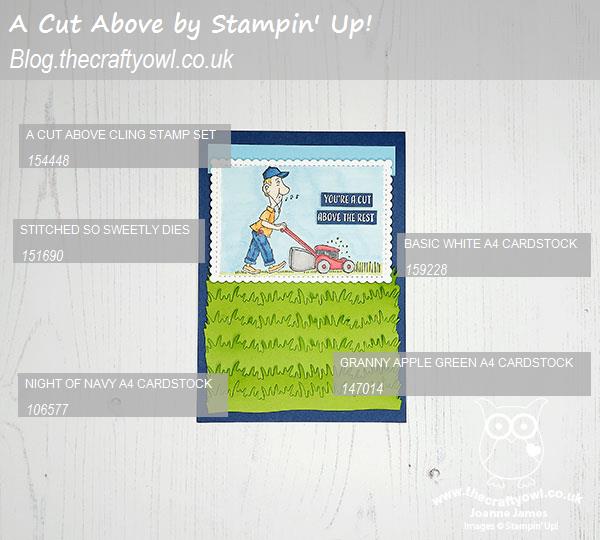
A Die Comparison - The eagle-eyed amongst you will have noticed I used two different stitched scalloped rectangles on my cards. The card above uses one of the stitched rectangles in the Stitched So Sweetly Dies set; the card below uses one of the new stitched rectangles from the Scalloped Contours Dies. You will notice that the scallop detail is much larger on the card below; in addition to this detail, some of the other dies in this new set have cut outs or alternative stitched patterning, in addition to the overall sizes being larger. I wanted to show you the difference on two similar cards so that you can see how the new dies differ:
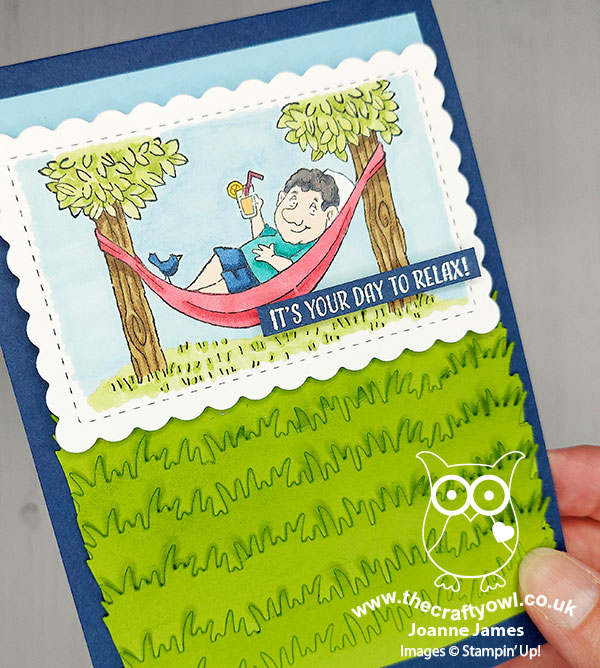
 

Here's both cards together - which one do you prefer? I like them both but would love to hear your thoughts, so do leave me a comment below.
 

The lovely team over at SUO Challenges are asking us to create projects created using markers, so I'll also be linking up over there too.

Here is the visual summary of the key products used on today's projects for you to pin for easy reference:
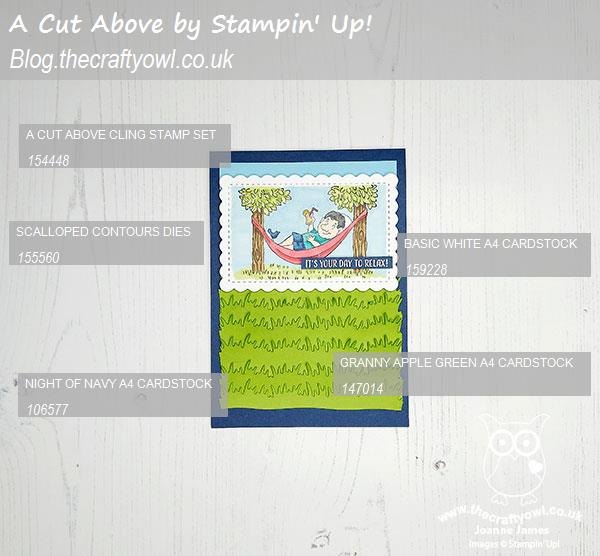
 

 And my second card:
 

You can see all of my 'How To' summaries on my 'How To - Tips and Techniques' Pinterest board in case you've missed any. 

Here's a summary of our challenge rules:

  • Create any card, scrapbooking page, 3D project or packaging project that fits the challenge.
  • Please include the challenge graphic and link back to the challenge in your blog post. Turn off word verification so we can leave you lots of lovely comments. Make sure you link the post not the whole blog to the Linky. Use #AYSIXXX when uploading to a public gallery.
  • If you’re unsure about ‘the rules’, check the details under the Challenge Guidelines tab on the As You See It Challenge homepage.
We look forward to seeing your creations in the AYSI gallery.

Enjoy your day; mine is set to be filled with housework, laundry and all that to the background of my piano being tuned - wish me luck! I'll be back tomorrow with another project. Until then, happy stampin'!


Stampin' Up! Supplies Used:

Table built using Product Table Builder by The Crafty Owl - Independent Stampin' Up! Demonstrator.


Shop Online

Access my online shop 24 x 7, 365 days of the year:

Current May hostess code:

VDKNV7BH

Shop Online

2024-25 Annual Catalogue

BROWSE THE CATALOGUE

Click on the image to download your copy of the 2024-25 annual catalogue. For a full list of current SU! supplies, go to my online store. If you would like any help or advice, please drop me a line at [email protected] or give me a call on 07773 421446 - I'd be happy to help.

Join My Team

It's always a great time to join Stampin’ Up but during May it's even better! New team members can get £78.25 of new In Color products for FREE! That's in addition to another £130 worth of products of your choice for only £99 + free business supplies + free shipping + all the fun being a part of Stampin’ Up! Stampin' Up! has something for everyone: join my growing team and benefit from my support to enjoy Stampin' Up! however you choose.

If you're interested, call me for a chat to understand how I can help you realise your goals. Alternatively, if you have already decided to sign up and you just can't wait, please click here for the link to the online form where you can sign up and order your starter kit right away! 

Latest Kits!

Stampin Cut and Emboss

The City Sights Kit has all you need to make 8 cards with coordinating envelopes for £20. Along with the new Happy Hollyhocks Kit, a no stamping kit including 9 cards for just £14, both are available from May 1st - get yours here!

New Online Exclusives

There are new products available exclusively in the online store from 5 March - check them out here.

About Me

Hi I'm Joanne and live in Northampton and when I'm not looking after my husband and two beautiful children, am an avid crafter with a passion for all things Stampin' Up!

I must confess that I have never been a big rubber stamper - until I discovered Stampin' Up! that is. I love the fact that I can get such great results with co-ordinating stamps, inks, papers and punches - the possibilities are endless! Join me on my stamping journey as I share the things I love and be inspired to create amazing things yourself!

Follow Me

Monthly Newsletter

Box Builder

Click the button above to use Box Buster to create your custom box design using the Envelope Punch Board!

Kits Collection Now Available!

Stampin Cut and Emboss

The new Kits Collection from Stampin' Up! is now available!

Click here to see the current kits available and order yours online today.

I Design For


Mini Catalogue


The next mini catalogue will be live in September! 

Stampin' Up Stuff

This is my personal blog and is not endorsed by Stampin’ Up! I hope you find it a plentiful source of ideas and personal inspiration but please don't copy my designs for contest submission or use for classes, publication or sale without express permission.