Windmill Flowering Tulip Fields Mother's Day Card With Belly Band PP580

by Joanne James27. February 2022 09:00

Today it's Sunday and time for this week's new challenge over at The Paper Players! It's the turn of the fabulous Anne Marie to host this week and she has my favourite, a sketch challenge, for you to work with:


I do love a good sketch and this week I really went to town! I have been making lots of cards with the 'Tulip Fields' bundle as it was the feature bundle for my online class last week and I decided that the layout of Anne Marie's sketch was perfect for a diecut windmill for the central focal point and the beginnings of what turned out to be a rather special card - take a look:


Here's the low-down on today's card:

Many Layers - This is a card of many layers - which means I'm also playing along with the ladies at Just Add Ink this week where I chose 'layers' and patterned paper as my two things. More on patterned paper in a moment, but firstly those layers! I can count 13 on the front of my card alone (not including the band of ribbon!) - and there are even more inside! I used a (retired) stitched oval diecut as a base for my windmill cut using the Windmill dies and added a sentiment combining stamped words taken from 'Art Gallery' and a layered 'amazing' cut using the Amazing Thanks Dies. I attached these to a horizontal band as the focal point for the front of my card.You can see the layered loveliness in more detail below:

A Belly Band Surprise - The layered windmill is in fact attached to a belly band decorated with a strip of DSP, which when removed reveals the beautiful red, pink and white tulips of the Flowering Fields DSP in all it's glory, along with a sentiment made from a combination of some partial stamping from a stamp in the 'Flowering Tulips' stamp set and the word 'Mother's' cut using the Word Wishes Dies:


With Mother's Day here in the UK only a few weeks away, this was a great opportunity to get ahead and make my Mother's Day card. I love that the layered circle greeting sits below the windmill oval of the belly band and is only revealed when the belly band is removed. 

Mother's Day Details - The surprises don't end there though. My card has an additional flap, so when it's opened you see this panel, also decorated with another piece of Flowering Fields DSP and a trio of tulips cut with the Tulips Dies:


 These Tulips Dies are amazing - they create the most amazing dimensional tulips! I cut mine from another pattern in the Flowering Fields DSP pack; it is actually a Petal Pink sky with white and red clouds, but I like the mottled effect that it gives the tulips and they compliment the pattern on the front of the card:


The sentiment, along with the one on the inside of the card is from the retired stamp set 'Strong and Beautiful'. This set is a keeper - the words in this set are so perfect for special female cards. when you open the next flap, the inside panel is revealed. I bordered the edge of the bottom panel with a trio of tulip border dies (I might add another diecut windmill behind these tulips - now that I am looking at it again this panel is a little light on decoration compared to the others):


 And here's a close-up of the innermost panel, decorated with some layered tulips stamped with the 'flowering Tulips' stamp set:


As you can imagine, all those layers make for a bulkier than usual card, so I will be making a custom box-envelope to enclose it in. That's a job for another day though! This kind of card does take a long time to make, but it is worth it - I love the end result and know my Mum will appreciate it too.

Here is the visual summary of the key products used on today's project for you to pin for easy reference:


You can see all of my Product and 'How To' summaries on my 'How To - Tips and Techniques' Pinterest board in case you've missed any. 

Before you reach for your ink and papers, check out what our amazing team has created to inspire you this week:

Here's a quick recap of our challenge rules:
 
1.  Create a new paper project
2.  Upload your creation to your blog with a link back to us and provide a direct link to the post featuring your challenge submission.
3.  Please link your card to no more than four challenges, TOTAL.
4.  Have FUN!

Enjoy your day; we are hoping for another restful Sunday, mainly centred around cooking and eating - we are cooking a Turkish recipe for dinner today for the first time, so that should be fun! I'm also hoping to squeeze in another movie this afternoon - last week's 'Encanto' proved a big hit so this week we might go for 'Sing 2' - hope it's as good as the first one!

I'll be back tomorrow with another project. Until then, happy stampin'!


Stampin' Up! Supplies Used: 

Table built using Product Table Builder by The Crafty Owl - Independent Stampin' Up! Demonstrator.

Blackberry Beauty Three Panel Nature Thank You CCS 439

by Joanne James28. September 2021 13:00

It's Tuesday and time for a new challenge over at CAS Colours & Sketches. Jenny's final challenge this month is a sketch challenge: 


Feel free to flip or rotate the sketch when making your card.

For my card today I decided to feature some designer series paper and went on the hunt for a pattern that lent itself to being split across three panels and accommodating a sentiment. This is where I ended up:


Here's the low-down on today's card:

This design in the Blackberry Beauty specialty designer series paper pack is one of my favourite designs and since all of the pattern is along the outer edges of the paper, it was perfect to cut down for a blank piece behind my sentiment and then two rectangles with pattern below. This paper has beautiful foil detailing, so I decided to add some gold foil mats to my rectangles and behind my sentiment. My 'thanks' is from the Word Wishes die for 'Thanksgiving' where I cut the 'giving' off the end. The dies aren't layered, so I created a gold mat for my diecut by gluing the Early Espresso diecut to gold foil, then carefully trimming around it with my paper snips to leave a layered border: 


The front of my card is stamp-free, so I added some stamping to the inside of my card to remedy that:


Here is the visual summary of the key products used on today's project for you to pin for easy reference:


You can see all of my 'How To' summaries on my 'How To - Tips and Techniques' Pinterest board in case you've missed any. 

Enjoy your day and I'll be back tomorrow with another project. Until then, happy stampin'!


Stampin' Up! Supplies Used:

Table built using Product Table Builder by The Crafty Owl - Independent Stampin' Up! Demonstrator.

Hydrangea Hill Mothers Day Card PP532

by Joanne James14. March 2021 09:00

Today it's Sunday and time for this week's new challenge over at The Paper Players! It's my turn to host this week and I have a colour challenge for you to work with:
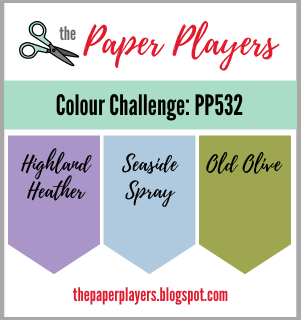
 

Today is Mothering Sunday or Mother's Day here in the UK and I chose my colour palette this week based on the products I wanted to use on the card that I was going to make for my Mum to celebrate this special day, specifically the Hydrangea Hill Mercury Glass Acetate which I was keen to incorporate into my card. I've lots of photos for you today and two versions of my card too, so get ready! Here's the first and original version of my card:
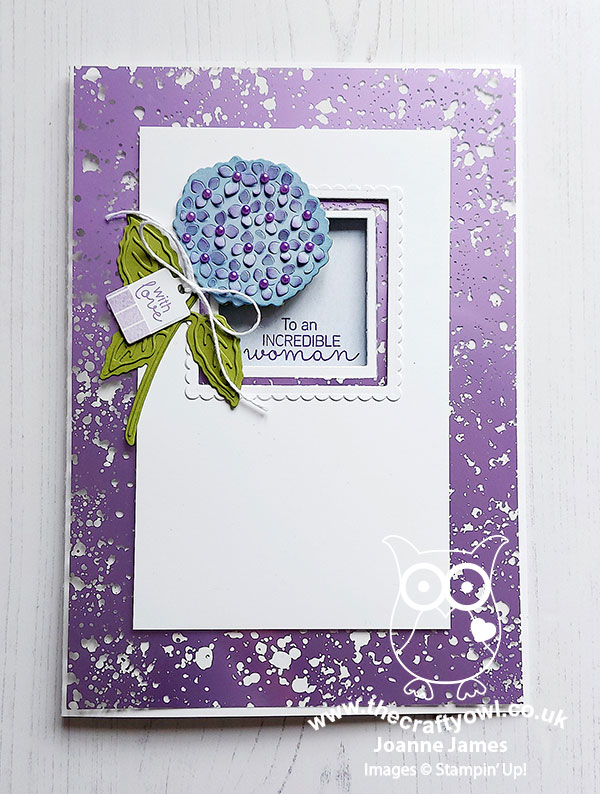
 

Here's the low-down on today's card:

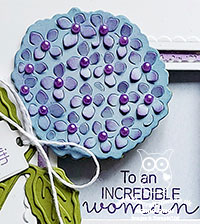
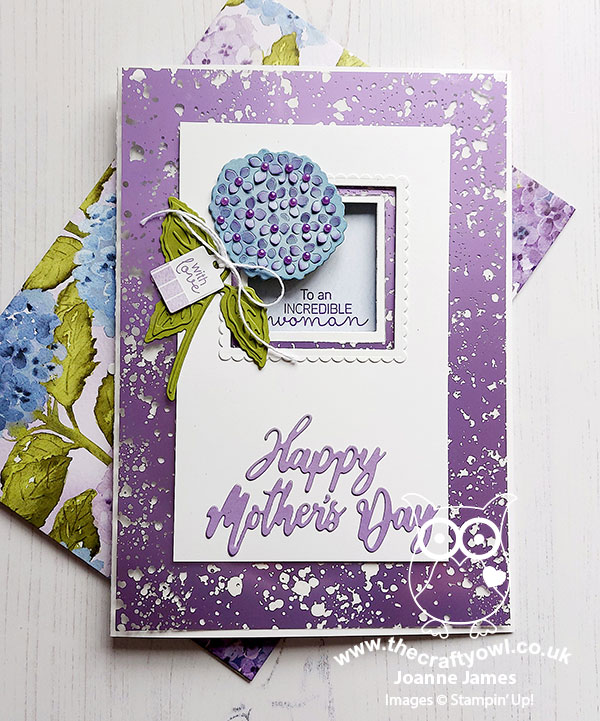
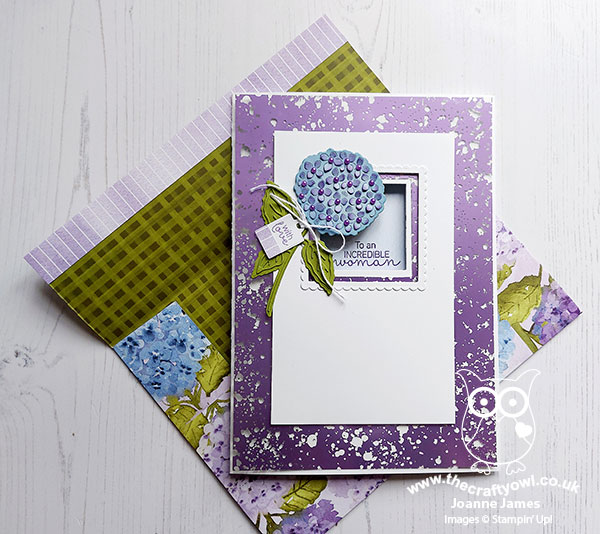
Hydrangea Hill - My Mum is not particularly precious when it comes to flowers or gifts on Mother's Day, but she does appreciate a special card, so her card was the perfect opportunity to showcase the Hydrangea Hill Mercury Glass Acetate in Highland Heather, alongside other elements of the Hydrangea Hill Suite. I love the idea of these coloured foil acetates, but often find them trickier to use in practice. I think they make great frames or backgrounds though, so that's where I started with today's card. Measuring 21cm x 14.9cm (a sheet of folded A4) my card is larger than usual. I created an open window for my stamped sentiment (more on that below) and layered my frame with a scallop-edged border and a beautiful diecut hydrangea. Whilst the card above is my original card, and could actually be used for a special birthday too, I knew my Mum would want to see the words 'Happy Mother's Day' front and centre on her version - ever happy to oblige, I added an additional diecut sentiment in Highland Heather using the Word Wishes Dies to the front of my card:
Layers, Layers - Despite its rather simple appearance, there are lots of layers to my card: the mercury glass acetate and framed sentiment window, along with the layered diecut elements to my flower, cut with the Hydrangea Dies. I also added a twine bow and tag to my floral stem using other elements in the set:
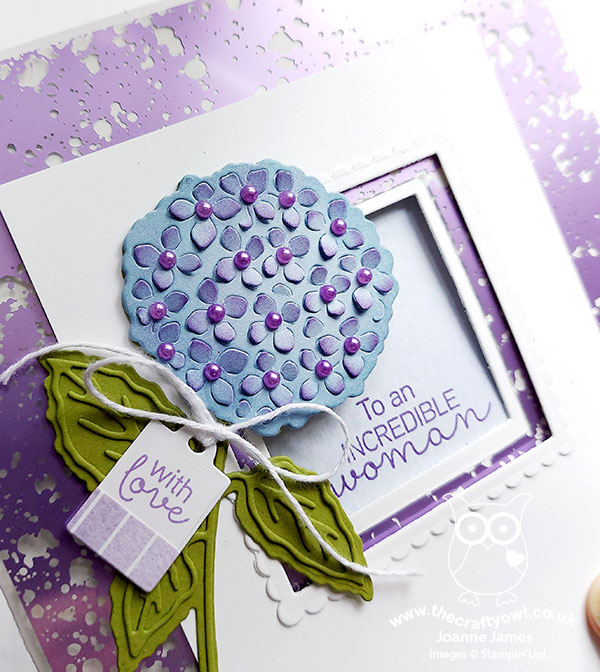
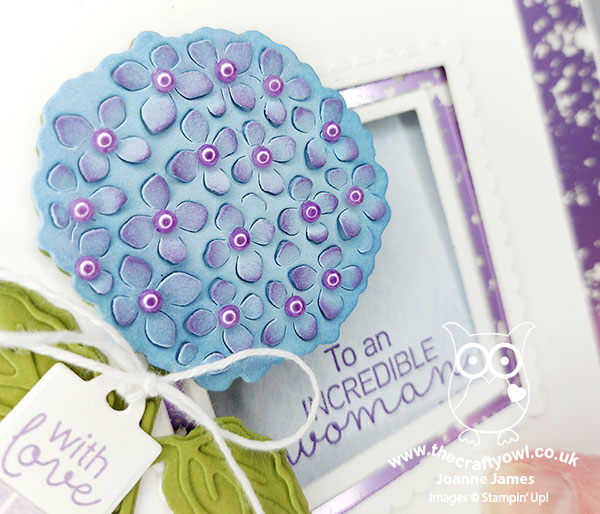
How beautiful is that hydrangea die? I cut it out of Balmy Blue and sponged the edges in the same colour to add depth, then lifted the petal elements and carefully sponged the tips of the petals with Highland Heather to create that two-tone look so often seen with this type of bloom. The suite has some beautiful coordinating pastel pearls, but they were too large for me to decorate the centre of my flowers. Instead, I used my dark Highland Heather Blends marker and coloured some small basic pearl jewels that were just the right size - aren't they so pretty?
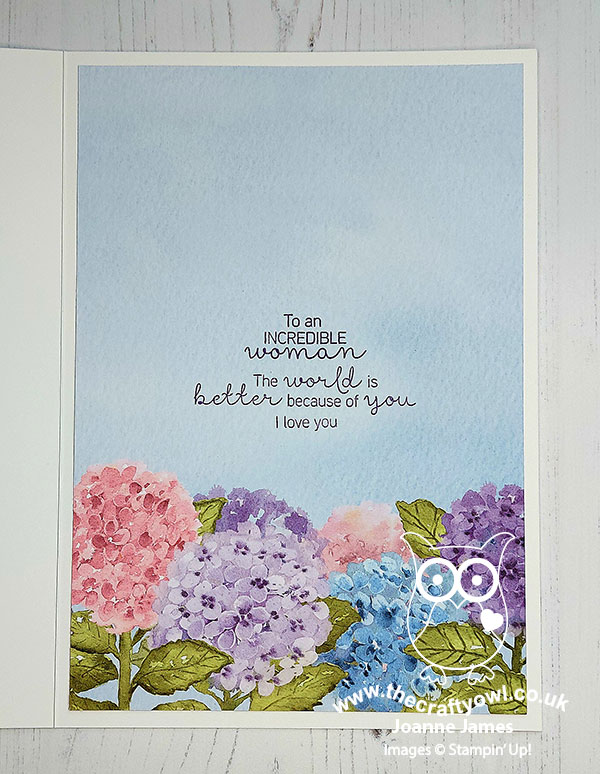
All About The Paper - I couldn't pass up the opportunity to use some of the beautiful Hydrangea Hill papers on my card today. The outside of my card only features the colours of my chosen palette, with a little of the Balmy Blue DSP visible through the window aperture, but the inside of my card also includes a little pink and some Gorgeous Grape on that hydrangea border paper; this paper is so perfect for additional hidden detail on the inside of the card, including my stamped message:
 

I also made a custom envelope from a whole sheet of 12" x 12" DSP, featuring the hydrangea flower heads and with a Highland Heather striped border on the flap:
 

This paper is simply too good not to use! I added a simple stitched scalloped rectangle to the front of the envelope to address it:
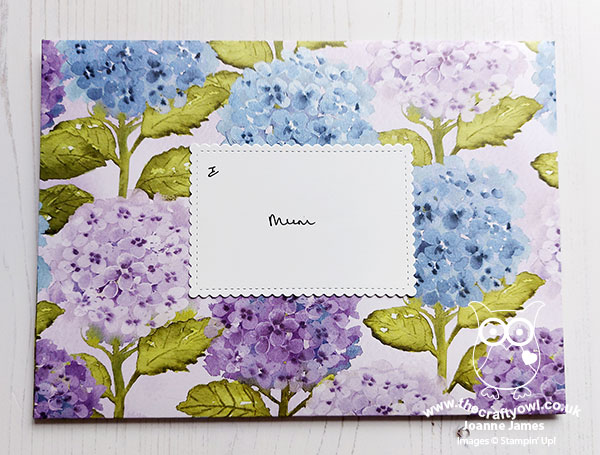
 

My card is going in the mail, so I packed it in a plain white envelope for mailing; I know my Mum will appreciate the extra pretty detail when she opens it though, so the double envelope is so worth it! I haven't seen my Mum in person for 15 months, due to ongoing restrictions in lockdowns and travel between Wales and England, however with the increasing rate of vaccination here in the UK, we shouldn't have too much longer to wait until we can all meet in safety once more.

Here is the visual summary of the key products used on today's project for you to pin for easy reference:
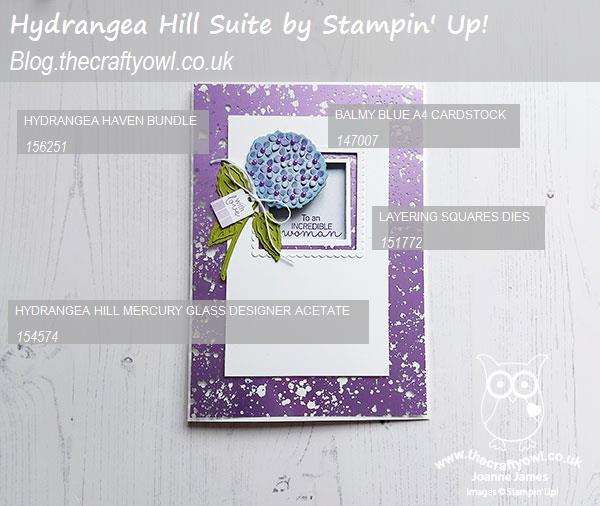
 

You can see all of my Product and 'How To' summaries on my 'How To - Tips and Techniques' Pinterest board in case you've missed any. 

Before you reach for your ink and papers, check out what our amazing team has created to inspire you this week:

Here's a quick recap of our challenge rules:
 
1.  Create a new paper project
2.  Upload your creation to your blog with a link back to us and provide a direct link to the post featuring your challenge submission.
3.  Please link your card to no more than four challenges, TOTAL.
4.  Have FUN!

You can see all of my 'How To' summaries on my 'How To - Tips and Techniques' Pinterest board in case you've missed any. 

I am looking forward to a special lunch cooked for me by my nearest and dearest, along with an afternoon bike ride if the rain holds. This is one of those days of the year that can mean many things to different people, so whether you are with your Mum or your offspring today, or whether you are missing your Mum because of Covid or other reasons, and for those who have perhaps lost a child or for whom motherhood is still to become a longed-for reality, I am thinking of you all and I hope you spend the day in a way that is meaningful to you.

I'll be back tomorrow with another project. Until then, happy stampin'!


Stampin' Up! Supplies Used: 

Table built using Product Table Builder by The Crafty Owl - Independent Stampin' Up! Demonstrator.

Harvest Hello Pumpkin Giving Thanks PP515

by Joanne James1. November 2020 09:00

Today it's Sunday and time for this week's new challenge over at The Paper Players! It's the turn of the amazing Laurie to host this week and she has a theme challenge for you to work with:


I don't have any turkeys in my current stamp collection so decided to go with pumpkins and the overall 'thankful' theme, along with the layout of the inspiration photo over at Inspire.Create, to create my card this week - take a look:


Here's the low-down on today's card:

Harvest Hellos - I used the 'Harvest Hellos' stamp set for my feature pumpkin on today's card, and highlighted the detail with Pumpkin Pie and Calypso Coral Stampin' Blends, before punching out with the Apple Builder Punch. 

Texture, Texture - There's lots of texture on today's card: a woodgrain background courtesy of the In Good Taste designer paper, wooden leaf embellishments, twine, linen braid and the lacy diecut panel from the Stitched Lace Die. Not very post-friendly granted, but the texture and dimension add so much interest and detail:

Word Wishes - For my sentiment, I snipped the word 'thanks' from the 'thanksgiving' die in the Word Wishes set and stacked it on the front of my card, and paired it with the word 'giving' that was masked from the full sentiment that I used inside my card:


I was really pleased with the way this card turned out. I'm also linking up with the team over at SUO Challenges with another entry for their Autumn/Fall challenge.

Here is the visual summary of the key products used on today's project for you to pin for easy reference:


You can see all of my Product and 'How To' summaries on my 'How To - Tips and Techniques' Pinterest board in case you've missed any. 

Before you reach for your ink and papers, check out what our amazing team has created to inspire you this week:

Here's a quick recap of our challenge rules:
 
1.  Create a new paper project
2.  Upload your creation to your blog with a link back to us and provide a direct link to the post featuring your challenge submission.
3.  Please link your card to no more than four challenges, TOTAL.
4.  Have FUN!

You can see all of my 'How To' summaries on my 'How To - Tips and Techniques' Pinterest board in case you've missed any. 

Enjoy your day; we will more than likely be spending the day indoors to once again escape the howling winds and rain - the weather has been dreadful here this week! With continued social distancing a focus during this half term, we resorted to an online escape room game on Friday afternoon; whilst not the same as doing one in person, it was surprisingly good fun. We bought a 3 game package so I think the James' may well be spending the afternoon breaking more codes and solving puzzles against the clock!

I'll be back tomorrow with another project. Until then, happy stampin'!


Stampin' Up! Supplies Used: 

Table built using Product Table Builder by The Crafty Owl - Independent Stampin' Up! Demonstrator.

Tropical Oasis Guitar Thank You Card

by Joanne James25. May 2020 08:00

Happy Bank Holiday Monday to my UK readers and Happy Memorial Day to my USA readers! I'm sure like me you are spending your day differently since we are either still in lockdown or experiencing some form of social distancing, wherever you are. I actually have an online class today featuring the Birthday Jubilee bundle so my post needs to be a quick one. I do have a couple of cards to share with you though. So first up is a card using this week's layout over at Freshly Made Sketches

This layout is very similar to our Paper Players one this week, so I tried to do something different to yesterday's card and grabbed my Tropical Oasis Memories and More Cards for a colourful thank you card - take a look:


Here's the low-down on today's card:

I paired one of the smaller colourful cards with a sheet of the Tropical Oasis paper with a rustic pattern that I embossed with the Coastal Weave Embossing Folder for added texture, then added a layered 'thanks' that I cut down from the word 'Thanksgiving' in the Word Wishes Dies. I stacked the diecut with three pieces in Early Espresso and them one in Whisper White that I offset slightly.

Here is the visual summary of the key products used on today's project for you to pin for easy reference:


You can see all of my 'How To' summaries on my 'How To - Tips and Techniques' Pinterest board in case you've missed any. 

I also have another quick card, it's actually notelet size, that I made using a retired Crumb Cake notelet I found as I was clearing out, along with a discarded Highland Heather mat, for the current challenge over at CASology this week:

As I was sorting through my stamps I cam across this small image in the 'Garden Shed' stamp set that was just perfect both for the challenge and to use up the bits and pieces on my desk:


I simply stamped the image, coloured with my blends, and added some linen thread to finish. 

Enjoy your day and I'll be back tomorrow with another project. Until then, happy stampin'!


Stampin' Up! Supplies Used:

Table built using Product Table Builder by The Crafty Owl - Independent Stampin' Up! Demonstrator.

Pressed Petals Spring Florals For PP483

by Joanne James22. March 2020 09:00

Today it's Sunday and time for this week's new challenge over at The Paper Players! It's the turn of the fabulous Claire to host this week and she has my favourite, a sketch challenge for you to work with:


I had an idea in my head as to what I was going to do with this sketch until I pulled my DSP box off the shelf and saw something that inspired me to go in a completely different direction! I ended up making three cards in one go, two using Claire's sketch. They are all different but do have one thing in common - Pressed Petals Specialty Designer Series Paper. Here's my first card:


The Pressed Petals Specialty Designer Series Paper has photographic images of real pressed petals on one side and one of the sheets in the pack has distinct sectional designs to cut out and use on card fronts, and two of the sections feature floral ovals which I thought would work for Claire's sketch. They also reminded me of Laurel's pretty Inspired By badge this week which comprised of pressed florals so I'm linking my first card up there. I stamped my sentiment in the centre of the wreath (I needed a get well card so used this one from the 'Dandelion Wishes' stampset) and fussy cut it out, mounted it on a panel of Mossy Meadow wrapped with the Magnolia Lane linen ribbon and twine and paired this with a Rococco Rose card base and added a trio of faceted dots to finish.

I decided to make another card using another of the sections, this time switching out the ribbon and adding a stamped and diecut sentiment combo to make an Easter card that is great for the current Just Us Girls challenge where the challenge is to feature shades of blue, green and yellow on your card:


I'm also linking my Easter card up to SUO Challenges where the current theme is Spring.

I created one last card to use up the strip of daisies. I inset it within a split Rococco Rose panel that I popped up on dimensionals and paired it with a sentiment from 'Peaceful Moments', this time using the current InspireCreate sketch rather than Claire's - it was ideal to save this piece from wallowing in my snippets box:


Here is the visual summary of the key products used on today's projects for you to pin for easy reference:


You can see all of my Product and 'How To' summaries on my 'How To - Tips and Techniques' Pinterest board in case you've missed any. 

Before you reach for your ink and papers, check out what our amazing team has created to inspire you this week:

Here's a quick recap of our challenge rules:
 
1.  Create a new paper project
2.  Upload your creation to your blog with a link back to us and provide a direct link to the post featuring your challenge submission.
3.  Please link your card to no more than four challenges, TOTAL.
4.  Have FUN!

Enjoy your day; it's Mother's Day here in the UK but due to our social distancing everyone will be at home in their own houses, which will feel strange. I'm looking forward to being waited on by the James Juniors and Skype calls with the other Mums in our extended family, maybe with some quality jigsaw time too! I'll be back tomorrow with another project. Until then, happy stampin'!


Stampin' Up! Supplies Used: 

Table built using Product Table Builder by The Crafty Owl - Independent Stampin' Up! Demonstrator.

A Celebration of Let It Snow PP465

by Joanne James27. October 2019 09:00

Today it's Sunday and time for this week's new challenge over at The Paper Players! It's the turn of the fabulous Ann to host this week and she has my favourite, a sketch challenge for you to work with:


There were so many ways to go with this sketch - in the end I decided to 'Let It Snow' - in a big way! Take a look:


Here's the low-down on today's card:

My card today is a celebration of the wintery-themed Let It Snow Specialty Designer Series Paper. This collection of cute snowmenwas at the top of my Christmas shopping list; my regular readers know how much I love DSP, and today's card uses not one, not two, not three, but four - yes four! - of the patterns in the pack. I used three of the non-glittery patterns for the layers (it was so hard not to use the sparkly designs on the reverse!) and fussy cut a glittery snowman for my corner embellishment from the fourth (I added some arms using the Snowman Builder Punch).

I added a diecut from 'Word Wishes' for the sentiment on the front of my card, although have a slight confession to make: this was supposed to be red glimmer paper for a touch of festive sparkle to compliment my glittery snowman, however could I find mine anywhere in my crafting square mile? Not a chance! I know I have some, but I couldn't find it anywhere so I resorted to some red foil instead. 

My card doesn't have a stitch of stamping on the front, although I did add a sprinkling of snowflakes and a sentiment from the 'Snowman Season' stamp set on the inside:

I love the combination of cool greens, white and red - it reminds me of candy canes - that feature in this paper pack and one thing is for sure: those glittery snowmen really are as sweet as sugar, and as sparkly too!

Here is the visual summary of the key products used on today's project for you to pin for easy reference:


You can see all of my Product and 'How To' summaries on my 'How To - Tips and Techniques' Pinterest board in case you've missed any. 

Before you reach for your ink and papers, check out what our amazing team has created to inspire you this week:

Here's a quick recap of our challenge rules:
 
1.  Create a new paper project
2.  Upload your creation to your blog with a link back to us and provide a direct link to the post featuring your challenge submission.
3.  Please link your card to no more than four challenges, TOTAL.
4.  Have FUN!

You can see all of my 'How To' summaries on my 'How To - Tips and Techniques' Pinterest board in case you've missed any. 

Enjoy your day; today marks the official start of winter and with that an extra hour in bed - yay! My day will be a quiet one and hopefully I'll be back tomorrow with another project. Until then, happy stampin'!


Stampin' Up! Supplies Used: 

Table built using Product Table Builder by The Crafty Owl - Independent Stampin' Up! Demonstrator.

Country Home Thankful Cards for PP462

by Joanne James6. October 2019 09:00

Today it's Sunday and time for this week's new challenge over at The Paper Players! It's my turn to host this week and I have a seasonal theme challenge for you to work with:


At this time of year our thoughts often turn to giving thanks so I thought this would be a good theme for this week. I created not one but two cards this week, both using the colour combination over at TGIF Challenges. The first one uses this week's Fusion sketch (sketch only). I wanted to use the Country Home set for my cards today; it's one of my favourite sets for autumn thank you cards. For my first card I paired my milk churn of autumn foliage with some of the gorgeous patterned papers from the Woven Threads suite, along with some Grapefruit Grove coloured ribbon and pearls:


I tweaked my sentiment by replacing the stamped word 'happy' with a diecut from the Word Wishes Framelits set for added emphasis and finished my sentiment on the inside of my card:


My second card for Just Add Ink uses one of the other sentiments and foliage arrangements from the same set, this time with a piece of linen effect designer series paper from the Pressed Petals Specialty DSP that I embossed with my Tin Tile Embossing Folder for added texture:


You can see it more closely here, along with the detail on my cotton balls:


In Europe, due to ongoing customs issues we have been unable to obtain the Snowfall Accents Puff Paint on page 19 of the Autumn-Winter catalogue since the catalogue launch, which is a shame as it would be perfect to use on these. This week we learned that this product will not arrive before the catalogue end and as such has now been withdrawn from sale. Never fear though - I have a plan! I created exactly the same effect using some Tombo adhesive and white embossing powder using the same technique I used previously for an aeroplane smoke trail. I even made a video - here it is in case you aren't familiar with this technique and would like to see how it's done:

Give it a try and let me know how you get on and what you use it for - I'd love to see your projects!

Here is the visual summary of the key products used on today's projects for you to pin for easy reference:


You can see all of my Product and 'How To' summaries on my 'How To - Tips and Techniques' Pinterest board in case you've missed any. 

Before you reach for your ink and papers, check out what our amazing team has created to inspire you this week:

Here's a quick recap of our challenge rules:
 
1.  Create a new paper project
2.  Upload your creation to your blog with a link back to us and provide a direct link to the post featuring your challenge submission.
3.  Please link your card to no more than four challenges, TOTAL.
4.  Have FUN!

You can see all of my 'How To' summaries on my 'How To - Tips and Techniques' Pinterest board in case you've missed any. 

Enjoy your day; I am busy with preparations for my upcoming luxury weekend crafting retreat so I will hopefully be spending some time in my craft room ticking a few more jobs off my list, in between the usual weekend homework and a birthday party run for one of the James Juniors tomorrow afternoon. I'll be back soon with another project. Until then, happy stampin'!


Stampin' Up! Supplies Used: 

Table built using Product Table Builder by The Crafty Owl - Independent Stampin' Up! Demonstrator.


Christmas Word Wishes Seasonal Wreath Square Card

by Joanne James16. July 2019 09:00

Firstly an apology if you are here to see the masculine birthday card I promised - I mixed up my days, that one is coming tomorrow! Today I'm sharing a Christmas card for the current challenges over at As You See It and Just Add Ink:


That AYSI recipe took me a little while to work through but I got there in the end and since the JAI girls are looking for seasonal cards of any kind, it works for them too. I pulled out one of my favourite festive items in the annual catalogue that I think is rather overlooked to make today's card - the seasonal wreath embossing folder. Here's my finished card:


Here's the low-down on today's card:

A Seasonal Wreath - This Seasonal Wreath embossing folder really is in my opinion one of the unsung heroes of the Stampin' Up! catalogue; in one run through the Big Shot, you have the basis for a card. I must confess that I have only ever used it on a Christmas card, although the seasonal challenge over at Just Add Ink did get me thinking I should create another three so that I have a wreath for all seasons - so watch this space! I think the detail of the texture is difficult to capture in a photo, but in real life it's beautiful.  

A New Merry Christmas - I've used this wreath before with the Merry Christmas dies from last year's seasonal catalogue (and still available in the current annual) but thought I would use the Merry Christmas words from the new Word Wishes die set, which are smaller in size and sit rather neatly across the middle of the wreath. I heat embossed the lower part of the diecuts with silver embossing powder for a little added interest and to tie in with my decoration, but you could just as easily leave it plain - you can't go wrong with red and green for a perfectly festive colour combo.

Stars and Stripes - I decided to decorate my wreath with some silver retired metallic stars that I found in my box (I have almost run out and wish I had stockpiled a few more of these!), along with some red berries (I punched out the eye on the Elephant Builder Punch) and added a piece of (also retired) Poppy Parade mini striped ribbon tied with some silver metallic thread to finish. There was very little stamping on this card - only the inserts with one of my favourite stamps for inside a Christmas card from Merry Christmas To All:


I went with a square design because I had a 12" x 12" pack of Garden Green and Poppy Parade cardstock left over from the last seasonal catalogue and liked this card so much I decided to cut up the whole pack and mass-produce an entire set of these to make a real dent in my Christmas stash! My husband did think I'd lost to plot when he saw me cutting and embossing not one but more than 20 Christmas cards whilst watching the Wimbledon tennis finals on Sunday, but actually this was a super-easy card to make en-mass from a pack of 12" x 12" (if you would like the measurements, the card base is 6" x 6", the red matt measures 4 1/4" x 4 1/4" (the offcuts were used for the word dies) and the central green square is 4" x 4"), especially as the only stamping was on the inside. I will need to get creative with my stars for the remaining cards - I will probably punch some out of silver glimmer paper, but I am thoroughly chuffed with my efforts!

Here is the visual summary of the key products used on today's project for you to pin for easy reference:


You can see all of my 'How To' summaries on my 'How To - Tips and Techniques' Pinterest board in case you've missed any. 

Enjoy your day and I'll be back tomorrow with another project. Until then, happy stampin'!


Stampin' Up! Supplies Used:

Table built using Product Table Builder by The Crafty Owl - Independent Stampin' Up! Demonstrator.

Tags: , , , , , ,

Cards | Shop Online | Shop Stampin' Up! Online | Stamping

Mini Catalogue

BROWSE THE CATALOGUE

The mini catalogue is now live! Read and download your copy here.

Shop Online

Access my online shop 24 x 7, 365 days of the year:

Current March hostess code:

S9F2XJJW

Shop Online

Join My Team

It's always a great time to join Stampin’ Up! New team members can get £130 worth of products for only £99 + free business supplies + free shipping + all the fun being a part of Stampin’ Up! Stampin' Up! has something for everyone: join my growing team and benefit from my support to enjoy Stampin' Up! however you choose.

If you're interested, call me for a chat to understand how I can help you realise your goals. Alternatively, if you have already decided to sign up and you just can't wait, please click here for the link to the online form where you can sign up and order your starter kit right away! 

Latest Kit!

Stampin Cut and Emboss

The Rock Legend Kit has all you need to make 8 cards with coordinating envelopes. Along with the new Panda Friends Kit, both are available from January 4th for just £14 each - get yours here!

2023-24 Annual Catalogue

BROWSE THE CATALOGUE

Click on the catalogue for a full list of current SU! supplies - if you would like to order any of the items featured, please drop me a line at [email protected] or give me a call on 07773 421446 - I'd be happy to help.

New Online Exclusives

There will be new products available exclusively in the online store from 5 March - check them out here.

About Me

Hi I'm Joanne and live in Northampton and when I'm not looking after my husband and two beautiful children, am an avid crafter with a passion for all things Stampin' Up!

I must confess that I have never been a big rubber stamper - until I discovered Stampin' Up! that is. I love the fact that I can get such great results with co-ordinating stamps, inks, papers and punches - the possibilities are endless! Join me on my stamping journey as I share the things I love and be inspired to create amazing things yourself!

Follow Me

Monthly Newsletter

Box Builder

Click the button above to use Box Buster to create your custom box design using the Envelope Punch Board!

Kits Collection Now Available!

Stampin Cut and Emboss

The new Kits Collection from Stampin' Up! is now available!

Click here to see the current kits available and order yours online today.

I Design For


Stampin' Up Stuff

This is my personal blog and is not endorsed by Stampin’ Up! I hope you find it a plentiful source of ideas and personal inspiration but please don't copy my designs for contest submission or use for classes, publication or sale without express permission.