
Totally Trees Trio

by Joanne James15. September 2016 08:05

Today it's time for a new challenge over at Create With Connie and Mary and this week we have a colour combination for you:
 

This colour combination initially had me stumped as it's not a trio I would necessarily put together. I played around with a few ideas then eventually came up with something using the new Totally Trees set. Here's my card:


Here's the low-down on today's card:

Totally Trees - This modern set of trees is right up my street - it's the kind of stamp set that really appeals to me. It's a two step stamp set, with branches and leaves needing to be stamped and aligned separately. Whilst I used both stamps together to decorate my envelope, for my card I stamped the tree trunks in Soft Suede on a piece of Very Vanilla, then stamped them again onto Emerald Envy and Delightful Dijon cardstock. I then punched out tree tops using my 1 3/8" circle punch and popped them onto dimensionals.

Moroccan Border - I used a piece of Delightful Dijon patterned paper from the Moroccan DSP pack to border my central horizontal panel. Whilst there isn't much it showing, it adds a subtle pattern and interest to the mat, which is then mounted on a further mat of Emerald Envy. I also used a piece of the green and mustard washi tape from the Moroccan pack to decorate the inside of my card. 

Any Colour Embossing - Lastly, in order to allow my sentiment to stand out, I stamped it in Soft Suede then immediately heat embossed it with clear embossing powder. This does darken it a little and the glossy finish helps it stand out more. In case you're wondering which stamp set I took my sentiment from - it's one of the ones that comes with the Watercolour Wishes card kit. 

Here is the visual summary of the key products used on today's project for you to pin for easy reference:


You can see all of my 'How To' summaries on my 'How To - Tips and Techniques' Pinterest board in case you've missed any. 

Do visit the other Design Team members to see what they did with this week's colours; there's lots of inspiration over on their blogs too!

Enjoy your day and I'll be back tomorrow with another project. Until then, happy stampin'!


Stampin' Up! Supplies Used:

Table built using Product Table Builder by The Crafty Owl - Independent Stampin' Up! Demonstrator.

Warmth and Cheer Jolly Reindeer

by Joanne James8. September 2016 08:05

Today it's time for a new challenge over at Create With Connie and Mary and this week we have a sketch for you:


I've been patiently waiting for my Warmth and Cheer DSP stack to arrive as it wasn't available on preorder here in the UK, so as soon as it got here I couldn't resist opening it and using a couple of identical patterns in two different colourways to make my card for today:


Here's the low-down on today's card:

Warmth and Cheer - I'm a big fan of the 6"x6" stacks that Stampin' Up! sells and this one doesn't disappoint. The Warmth and Cheer DSP stack has 24 patterns with everything from sweater patterns to autumnal plaid and Christmas trees to baubles - something for everyone.

My Jolly Friend The Reindeer - I stamped the reindeer from the Jolly Friends stamp set in Memento Black onto Crumb Cake cardstock, before fussy cutting and adorning with a fun knitted bobble hat from the same set. I stamped my hat in Garden Green onto Delightful Dijon cardstock and finished it with a bobble and trim punched in Whisper White and brushed with clear Wink of Stella for sparkle, all punched out with the co-ordinating Jolly Hat Builder Punch. I love it when we have sets that co-ordinate; even better when you can save 10% if you buy the bundle - job done!

Cookie Cutter Christmas - The Jolly Friends set has lots of hats, scarves and accessories to choose from, but no sentiments. I took mine from the the Cookie Cutter Christmas stamp set as I thought it worked well with my papers and fun reindeer and stamped it in black onto a Whisper White banner.

Here is the visual summary of the key products used on today's project for you to pin for easy reference:


You can see all of my 'How To' summaries on my 'How To - Tips and Techniques' Pinterest board in case you've missed any. 

Do visit the other Design Team members to see what they did with this week's sketch; there's lots of inspiration over on their blogs too!

Enjoy your day and I'll be back tomorrow with another project; until then, happy stampin'!


Stampin' Up! Supplies Used:

Table built using Product Table Builder by The Crafty Owl - Independent Stampin' Up! Demonstrator.

Swirly Scribbles Flower Wreath Thank You

by Joanne James1. September 2016 08:05

This is my second post of the the day; if you missed my earlier post that tells you all about the new Stampin' Up! Autumn-Winter Seasonal Catalogue that launches today, click here. Today it's time for a new challenge over at Create With Connie and Mary and this week we have a colour combination for you:


These colours are not quite autumnal and to be honest I'm still firmly in summer mode as far as the weather is concerned, but I decided they would make a nice wreath. Here's my card:

Here's the low-down on today's card:

Swirly Scribbles Wreath - I used the largest 'scribble' in Sahara Sand for my wreath and backed it with some linen thread to break up the coral panel behind. I just love these thinlits - they are so versatile!

Swirly Bird Flowers - I stamped the three different flower designs in the other two challenge colours and used them to decorate the edge of my rustic wreath. I added some in-colour DSP in Peek-a-boo Peach to my card base too, as it really compliments the flowers.

A Thoughtful Banner -  I balanced my wreath with a sentiment from Thoughtful Banners, punched out with the Duet Banner Punch. I actually punched two of the banners so that I could pop up the central section for a little added dimension. A peach ribbon bow finishes my card.

I found this quite a challenging colour combination, as I'm not a big lover to orange on my cards, yet I really like how this one turned out. Ironic that the neutral was the colour I used the least of - go figure!

Here is the visual summary of the key products used on today's project for you to pin for easy reference:


You can see all of my 'How To' summaries on my 'How To - Tips and Techniques' Pinterest board in case you've missed any. 

Do visit the other Design Team members to see what they did with this week's colours; there's lots of inspiration over on their blogs too!

Enjoy your day; I'm having a little break at the seaside but will be back with a post for the new challenge over at The Paper Players on Sunday, if not before (it all depends on my wifi!) Until then, happy stampin'!


Stampin' Up! Supplies Used:

Table built using Product Table Builder by The Crafty Owl - Independent Stampin' Up! Demonstrator.

Perfectly Wrapped In-Colour Thank You Notelets

by Joanne James25. August 2016 08:05

Today it's time for a new challenge over at Create With Connie and Mary and this week we have a sketch for you:


With a birthday in the house recently and a batch of customer orders due I had a whole bunch of thank you cards to make, so I grabbed a pack of Stampin' Up!'s Whisper White Notelets and Envelopes and decided to use today's sketch as the starting point. I am also linking up with Fab Friday where the challenge is to use one or more of the in-colours. Here's my card:


Here's the low-down on today's card:

Perfectly Wrapped - I used the 'Perfectly Wrapped' stamp set on my card today - the flowers were perfect for the sketch and to tie in with the floral in-colour designer series paper that I used for my other punched circle. The larger flower works as the background to my sentiment and a trio of smaller flowers became the 'splatters'. By mounting all three smaller flowers together I could stamp them at the same time, and alternate the angle to stamp twice on the front of the card, but also stamp the inside and the envelopes, without needing to clean my stamp or re-mount. A great tip and time-saver when mass producing!

Touches of Silver - I decided to heat emboss both my sentiment and a border in silver to add some shine and texture to my card, along with a strip of silver glimmer paper, which I placed behind my front circle rather than in front as per the sketch so that it didn't interfere with my sentiment. Creative license :-) I finished my card with a sprinkling of rhinestones.

In Colour Collection - I made my set of thank you cards, featuring each of the 2016-18 In Colours. The card above features Emerald Envy; the selection below shows the remaining colours (from left to right) Flirty Flamingo, Emerald Envy, Dapper Denim, Peekaboo Peach, Sweet Sugarplum. I love them all; which one is your favourite?


Here is the visual summary of the key products used on today's project for you to pin for easy reference:


You can see all of my 'How To' summaries on my 'How To - Tips and Techniques' Pinterest board in case you've missed any. 

This card was all about mass production for me - I made 30 in one go! Stampin' Up!'s Whisper White notelets are perfect for the job too, with no cutting and scoring required. Which colour is your favourite? Do leave me a comment below, I'd love to know.

Do visit the other Design Team members to see what they did with this week's sketch; there's lots of inspiration over on their blogs too!

Enjoy your day and I'll be back tomorrow with another project; until then, happy stampin'!


Stampin' Up! Supplies Used:

Table built using Product Table Builder by The Crafty Owl - Independent Stampin' Up! Demonstrator.

Cookie Cutter Christmas Eskimo Sneak Peek

by Joanne James18. August 2016 08:05

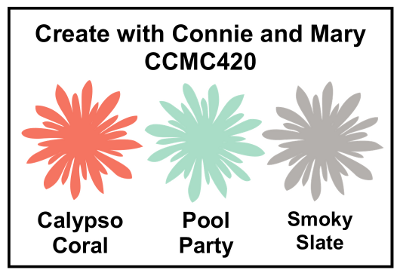
I've had a few blog-free days this week; we are in thick of the summer holidays and I've been spending time with the James Juniors, meeting up with friends, cooking and cycling and more. Crafting time has been limited and blogging time even less so, but I'm not complaining! We've been having fun and enjoying the sunshine and I'm sure that those of you out there in a similar situation understand completely! That said, today it's time for a new challenge over at Create With Connie and Mary and this week we have a colour combination for you:


I also used this week's sketch over at Retrosketches for my layout. I was so tempted to create a Foxy Friends card, given that these colours all appear in the A Little Foxy DSP stack; instead though, I used this paper and broke out one of my preorder Christmas stamps - wahoo! - to make my first card using my new goodies. Here's my card:
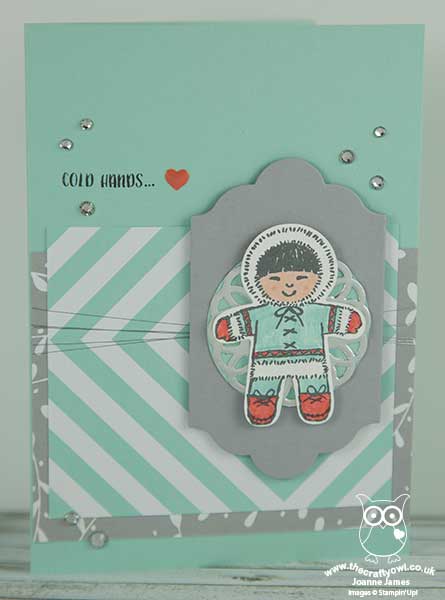
 

How cute is that little chap?! Here's the low-down on today's card:

Cookie Cutter Eskimo - This cute eskimo comes from the Cookie Cutter Christmas stamp set which is part of a bundle with the co-ordinating Cookie Cutter Builder Punch. He comes with a santa, gingerbread man, reindeer and teddy bear too but for today I thought he would look great on my card in his Pool Party outfit with Calypso Coral shoes. It's tricky to see, but I also added a liberal dose of clear Wink of Stella to his fur trim which gives it a lovely shimmer. The sentiment is perfect too: it carries on to the inside of the card with 'warm heartfelt greetings for a very merry Christmas'.

A Little Foxy For The Festive Season - I used two of the papers from the A Little Foxy DSP stack for the layered panels on my card. This is such a versatile pack with lots of great patterns that work all year round, Christmas included!

A Little Sparkle And Shine -  As my card was for Christmas, I took the opportunity to add some touches of silver for a little festive sparkle: a small silver metallic doily behind my eskimo, some silver metallic thread, a liberal sprinkling of rhinestones. Well, if you can't add some sparkle at Christmas when can you add it?!

Here is the visual summary of the key products used on today's project for you to pin for easy reference:
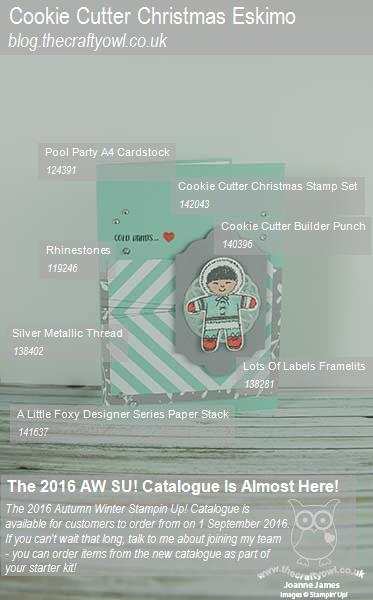
 

You can see all of my 'How To' summaries on my 'How To - Tips and Techniques' Pinterest board in case you've missed any. 

You only have to wait until the 1st of September before you can order this little chap and lots of other goodies from the seasonal catalogue - not long now! If you can't wait, talk to me about joining my team - you are able to order items from the new catalogue immediately as part of your starter kit. I am currently preparing my catalogues to be sent out to my customers; if you don't currently have a demonstrator and would like a copy of the new Autumn Winter catalogue, get in touch with me and I can add you to my list.

Do visit the other Design Team members to see what they did with this week's colours; there's lots of inspiration over on their blogs too!

Enjoy your day and I'll be back tomorrow with another project; until then, happy stampin'!


Stampin' Up! Supplies Used:

Table built using Product Table Builder by The Crafty Owl - Independent Stampin' Up! Demonstrator.

Playful Palette Square Birthday Card

by Joanne James11. August 2016 08:05

Today it's time for a new challenge over at Create With Connie and Mary and this week we have a sketch for you:


For my card today I decided to stick with a square card and to make a big splash of colour with the Playful Palette Suite - take a look:


Here's the low-down on today's card:

Painter's Palette - I created a little easel as the focal point for today's card, with a fun sentiment and paint splatters from the Painter's Palette stamp set. I stamped the frame to the easel twice and cut out the inside of the second one with my Layered Squares Framelits so that I could create a raised frame with added dimension. I also added some tone-on-tone splatter to my card base to tie in with the 

Playful Palette - The papers in the Playful Palette DSP stack are full of bright colours and patterns. I chose a variety of paint-splattered papers for my background panels - all so clashing that they look oddly co-ordinated! 

Ribbon and Glimmer - I added some Peekaboo Peach and Flirty Flamingo ruched ribbons to my card, along with a strip of retired black glimmer paper that was lying in my scrap box. You could of course colour some silver glimmer with black ink if you don't have any black to hand.

A fun card that would work for a male or female - a great standby card for those last-minute birthdays!

Here is the visual summary of the key products used on today's project for you to pin for easy reference:


You can see all of my 'How To' summaries on my 'How To - Tips and Techniques' Pinterest board in case you've missed any. 

Do visit the other Design Team members to see what they did with this week's sketch; there's lots of inspiration over on their blogs too!

Enjoy your day - we are celebrating a birthday in the house today, with young Benjamin reaching the ripe old age of 9 (where did that time go?!) so we will be having a fun day. I'll be back tomorrow with another project; until then, happy stampin'!


Stampin' Up! Supplies Used:

Table built using Product Table Builder by The Crafty Owl - Independent Stampin' Up! Demonstrator.

Flourish Thinlits Notecard

by Joanne James4. August 2016 08:05

Today it's time for a new challenge over at Create With Connie and Mary and this week we have a colour combination for you:


I decided it was time to break out my Flourish Thinlits for my card today - take a look:


Here's the low-down on today's card:

Frame With a Flourish - The Flourish Thinlits were on my 'must have' list when I saw the new catalogue - I think they are just lovely and you can create so many leaf and flower combinations with them, with or without the co-ordinating Flourishing Phrases stamp set. What's more, their detail can provide a great centrepiece, with not a lot else required. Here I cut mine in Mint Macaron and paper-pieced the flower heads in Rich Razzleberry, adding some clear Wink of Stella for shimmer.

Just a Note - I stamped my sentiment, from the Flourishing Phrases stamp set, in Rich Razzleberry in a 2" punched circle. There isn't much of this bright purple on my card, but where it appears it plays an important role: the sentiment, to highlight the flower petals and to create a border for my base. With two strong purple colours, less is definitely more in my book!

Pearls A Plenty - I added some doily behind my sentiment and a piece of Sweet Sugarplum ribbon, with an abundance of large pearls as 'berries' on my flourish. For some reason I rarely use this size of pearl and have an excess of them; luckily for me, they fit the circular berry spots perfectly.

A simple card where the sentiment could be switched out for lots of different occasions. 

Here is the visual summary of the key products used on today's project for you to pin for easy reference:


You can see all of my 'How To' summaries on my 'How To - Tips and Techniques' Pinterest board in case you've missed any. 

Do visit the other Design Team members to see what they did with this week's colours; there's lots of inspiration over on their blogs too!

Enjoy your day; I'm going swimming and then to the park for some outdoor fun! I'll be back tomorrow with another project; until then, happy stampin'!


Stampin' Up! Supplies Used:

Table built using Product Table Builder by The Crafty Owl - Independent Stampin' Up! Demonstrator.

Sunshine Sayings and Wishes

by Joanne James28. July 2016 08:05

Today it's time for a new challenge over at Create With Connie and Mary and this week we have a sketch for you:


For my card today I decided on one of my personal must-have sets from the new catalogue - the Sunshine Sayings stamp set and co-ordinating Sunshine Wishes Thinlit Dies - take a look:


Here's the low-down on today's card:

Sunshine Sayings & Wishes - This is a stamp set and thinlit combination that so appeals to me: easy to use florals, lots of good sentiment combinations and thinlit greetings - my favourite! I stamped the flower in Soft Sky for my background, and overlaid it with a diecut flower in Bermuda Bay and greeting, which I cut out of Whisper White and gave a graduated wash of Melon Mambo with my aquapainter. I also added some Melon Mambo ribbon behind and a trio of enamel dots for additional pops of pink.

Inspired Colour Combo - The colour combination for my card today was inspired by the 'Penned and Painted' samples on page 143 of the annual catalogue. I loved the fresh colours with a pop of pink - feel free to pin it if it's one that appeals to you too:


Playful Backgrounds - For the diagonal lines in the sketch, I used one of the stamps in the 'Playful Backgrounds' stamp set. This set was our all-attendee giveaway at Onstage in April and it is useful for this kind of background stamp detail - a fresh take on 'Gorgeous Grunge', if you will.

Here is the visual summary of the key products used on today's project for you to pin for easy reference:


You can see all of my 'How To' summaries on my 'How To - Tips and Techniques' Pinterest board in case you've missed any. 

Do visit the other Design Team members to see what they did with this week's sketch; there's lots of inspiration over on their blogs too!

Don't forget you've only a few more days to take advantage of the Bonus Days money-off coupon offer - for full details click here.

Enjoy your day and I'll be back tomorrow with another project; until then, happy stampin'!


Stampin' Up! Supplies Used:

  • Sunshine Sayings Clear-Mount Bundle
  • Aqua Painters
  • Whisper White A4 Cardstock
  • Brights Enamel Shapes
  • Melon Mambo 1/8" (3.2 Mm) Stitched Ribbon
  • Pear Pizzazz A4 Cardstock
  • Bermuda Bay A4 Cardstock
  • Melon Mambo Classic Stampin' Pad
  • Soft Sky Classic Stampin' Pad

Bella and Friends Just For You

by Joanne James21. July 2016 08:05

Today it's time for a new challenge over at Create With Connie and Mary and this week we have a colour combination for you:


As I pondered these colours, I decided that another Bella and Friends card was the way to go - Tip Top Taupe seemed like a good colour for a puppy. Here's my card:


Here's the low-down on today's card:

Bella And Friends Just For You - Another of the adorable images in this set, I stamped the puppy and his feathered pal in Archival Black ink and this time coloured them using the challenge colour inks and a blender pen onto Whisper White cardstock. I added a liberal coat of clear Wink of Stella to the balloon, although it's difficult to see the sparkle on the photograph - trust me, it's there!

Swirly Scribbles Background - As I was about to assemble my card, I decided that my base layer looked rather plain. I considered the options for adding interest and settled on creating my own random pattern using the small swirl in the Swirly Bird set, stamping it all over in Mint Macaron for a tone-on-tone look. I for one am pleased with the result! 

Envelope Paper is not just for Envelopes - Are you wondering which designer series paper stack I got my Dapper Denim strip from? Well, the answer would be 'none' as it's actually a piece of the new In Colour Envelope Paper. The great thing is though, whilst it's perfect for envelopes it also makes great designer paper to use on cards. It means your card then is also guaranteed to co-ordinate with your custom envelope should you choose to make one - and why wouldn't you? :-)

Here is the visual summary of the key products used on today's project for you to pin for easy reference:


You can see all of my 'How To' summaries on my 'How To - Tips and Techniques' Pinterest board in case you've missed any. 

Do visit the other Design Team members to see what they did with this week's colours; there's lots of inspiration over on their blogs too!

Enjoy your day and I'll be back tomorrow with another project; until then, happy stampin'!


Stampin' Up! Supplies Used:

Table built using Product Table Builder by The Crafty Owl - Independent Stampin' Up! Demonstrator.

It's Your Day My Foxy Friend!

by Joanne James14. July 2016 08:05

Today it's time for a new challenge over at Create With Connie and Mary and this week we have a sketch for you:


For my card today I headed straight to my Little Foxy suite of products and decided on another card using the cute Foxy Friends set and co-ordinating Fox Builder Punch - I just couldn't resist!


Here's the low-down on today's card:

My Foxy Friend - I know I could have made so many animals with my Foxy Friends stamp set, but the fox won me over again! I stamped him in Calypso Coral and punched all the pieces out separately (I punched the tail backwards, as I still wanted it on the left, although it would have been much easier to stamp and punch the right way around and stick it on the right!) and layered them onto my tree stump, which I cut out by hand.

Toadstools Galore - I chose another of the great patterns from the A Little Foxy DSP stack for my feature panel and used its colour scheme to dictate the mat layers and base colour of my card. I went with a square base as per the sketch in Smoky Slate and left it plain; on reflection I think it could use some texture as it is a rather large expanse of plain cardstock, but I am not unhappy with it! I also added a swathe of Pool Party Satin Ribbon beneath my fox as one of the horizontal banners; I love this satin ribbon and am so pleased we now have it in more colours.

Sunburst Sayings - I went with a simple birthday sentiment from the 'Sunburst Sayings' set, continued on the inside of my card with 'Happy Birthday to you', stamped in Archival Grey directly onto my card base. Nothing too fussy as I think this card would work well as either a male or female card, so wanted to keep it neutral.

The Foxy Friends bundle just has so many creative possibilities! If you haven't bought yours yet, this month would be the perfect time to do so; if you purchase the bundle and a pack of the 'A Little Foxy' Designer Series Paper Stack together you will have spent £45 and so you will earn yourself a £4.50 money-off coupon any purchases next month too - bargain! Just click on the links below to hop on over to my online store to order yours today - and don't forget to add this month's hostess code 63RNATE3 to get a little thank you in the post from me too.

Here is the visual summary of the key products used on today's project for you to pin for easy reference:


You can see all of my 'How To' summaries on my 'How To - Tips and Techniques' Pinterest board in case you've missed any. 

Do visit the other Design Team members to see what they did with this week's sketch; there's lots of inspiration over on their blogs too!

Enjoy your day and I'll be back tomorrow with another project; until then, happy stampin'!


Stampin' Up! Supplies Used:

Table built using Product Table Builder by The Crafty Owl - Independent Stampin' Up! Demonstrator.

Scrapbooking

Stampin' Up! has introduced a new range of 12x12" scrapbooking product and kit - the full range is now available to purchase online. To download a copy of the new digital Scrapbooking Catalogue click here.

Mini Catalogue

BROWSE THE CATALOGUE

'Tis The Season - the new Stampin' Up! Mini Catalogue is here! For more details and to download your copy click here

Shop Online

Access my online shop 24 x 7, 365 days of the year:

Current September hostess code:

JQEHTZGK

Shop Online

2024-25 Annual Catalogue

BROWSE THE CATALOGUE

Click on the image to download your copy of the 2024-25 annual catalogue. For a full list of current SU! supplies, go to my online store. If you would like any help or advice, please drop me a line at joanne@thecraftyowl.co.uk or give me a call on 07773 421446 - I'd be happy to help.

Join My Team

It's always a great time to join Stampin’ Up! New team members can get £130 worth of products for only £99 + free business supplies + free shipping + all the fun being a part of Stampin’ Up! Stampin' Up! has something for everyone: join my growing team and benefit from my support to enjoy Stampin' Up! however you choose.

If you're interested, call me for a chat to understand how I can help you realise your goals. Alternatively, if you have already decided to sign up and you just can't wait, please click here for the link to the online form where you can sign up and order your starter kit right away! 

Latest Kits!

Stampin Cut and Emboss

The Christmas Ornaments Kit and Card Keeper Kit are the latest kits that will be arriving in the online store later this month - get yours here!

New Online Exclusives

There are new products available exclusively in the online store from 3 July - check them out here.

About Me

Hi I'm Joanne and live in Northampton and when I'm not looking after my husband and two beautiful children, am an avid crafter with a passion for all things Stampin' Up!

I must confess that I have never been a big rubber stamper - until I discovered Stampin' Up! that is. I love the fact that I can get such great results with co-ordinating stamps, inks, papers and punches - the possibilities are endless! Join me on my stamping journey as I share the things I love and be inspired to create amazing things yourself!

Follow Me

Monthly Newsletter

Box Builder

Click the button above to use Box Buster to create your custom box design using the Envelope Punch Board!

Kits Collection Now Available!

Stampin Cut and Emboss

The new Kits Collection from Stampin' Up! is now available!

Click here to see the current kits available and order yours online today.

I Design For


Stampin' Up Stuff

This is my personal blog and is not endorsed by Stampin’ Up! I hope you find it a plentiful source of ideas and personal inspiration but please don't copy my designs for contest submission or use for classes, publication or sale without express permission.