A Magical Knight and Baby Bear Valentine

by Joanne James5. February 2018 07:00


Happy Monday everyone! I have a couple of love-themed cards to share today for the challenges over at CASology, Just Add Ink and Freshly Made Sketches


The first one is for CASology and Just Add Ink - when I think 'swoon', I immediately think of a knight in shining armour and the romance that goes with it! Here's mine - take a look:
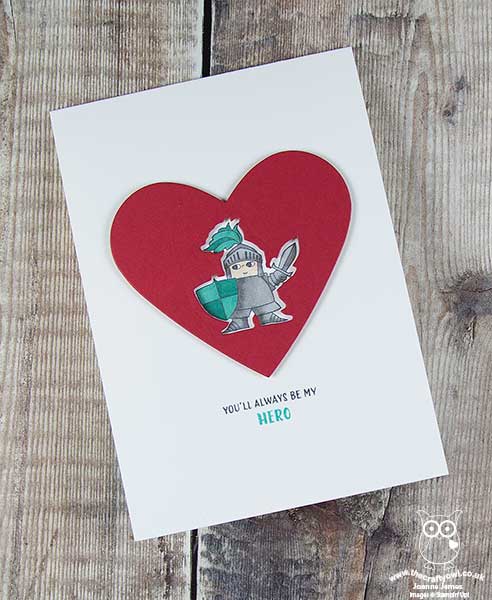
 

Here's the low-down on the first of today's cards:

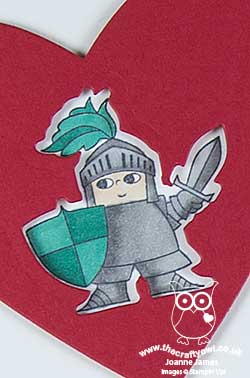
A Magical Knight - I just love the Magical Day stamp set: knights, dragons, mermaids, wizards and a unicorn - what's not to love? I simply stamped my knight in Memento Black onto an extra thick white cardstock base and coloured him in with my Stampin' Blends alcohol markers. 

An Inset Diecut - To add interest to my design, I decided to frame him with a Real Red heart cut with my Sweet and Sassy Framelits. I cut my heart out first, then cut the aperture of the knight's outline using the framelit of his outline from the Magical Mates Framelits set - I then popped my heart up on dimensionals around my stamped knight. 

An Everyday Hero - My sentiment is from the retired stamp set from last year 'Everyday Hero' - perfect for my card! If you don't have this set, you could always recreate the sentiment using the Labeler Alphabet, which would have been my next best 'go to' - no sentiment is out of reach with this one.

Here is the visual summary of the key products used on today's project for you to pin for easy reference:
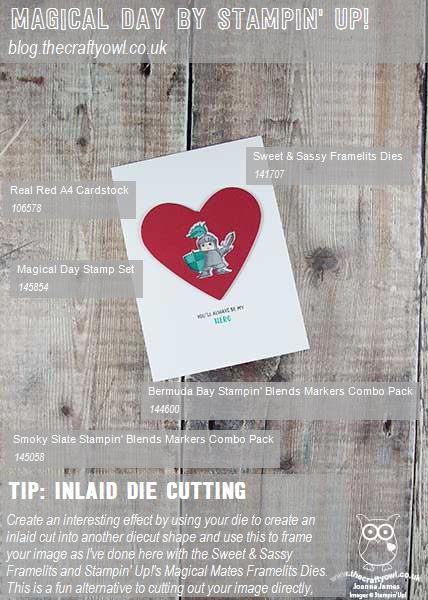
 

You can see all of my 'How To' summaries on my 'How To - Tips and Techniques' Pinterest board in case you've missed any. 

Stampin' Up! Supplies Used:

Table built using Product Table Builder by The Crafty Owl - Independent Stampin' Up! Demonstrator.


My second card today is for Freshly Made Sketches:
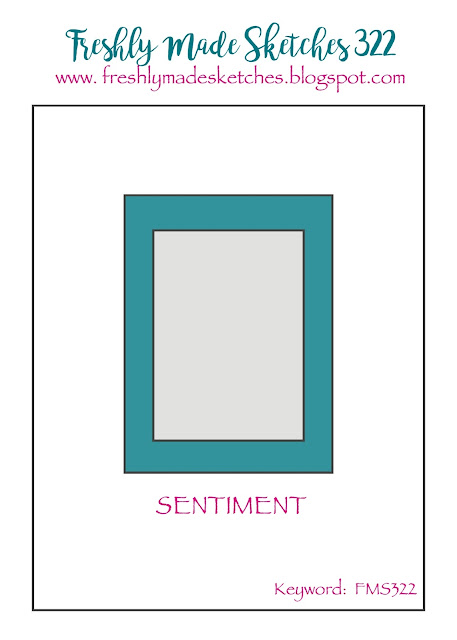
I love a good sketch and I decided this one would be perfect to highlight an annual catalogue set I haven't used in ages - take a look:
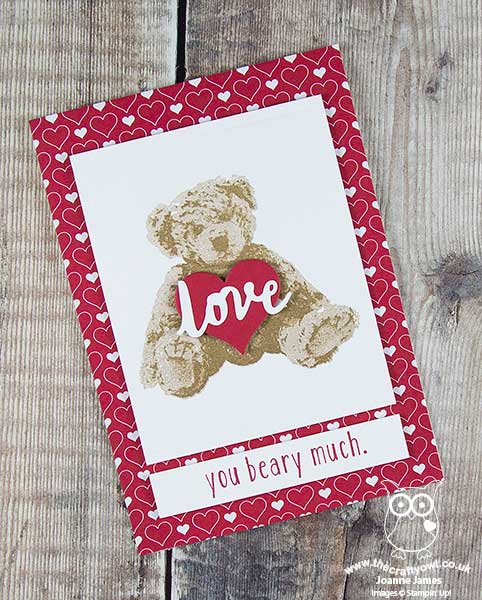
 

Here's the low-down on the second of my cards today:

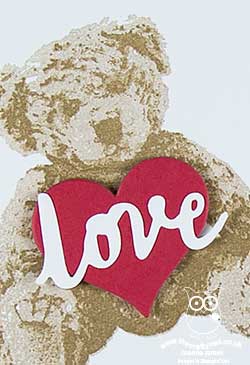
A Baby Bear Valentine - I've only used Baby Bear previously to make new baby cards and whilst I was browsing my catalogue for inspiration remembered he had a sentiment that is perfect for Valentine's Day or simply to send a card full of love too. 'Love you beary much' - both punny and sweet! I stamped my bear in Crumb Cake and Soft Suede for a traditional teddy look.

A Split Sentiment - Whilst my sentiment across the bottom as per the sketch comes from the Baby Bear stamp set, I creatively masked it to omit the word 'Love' as I had other plans for that! I snipped the word 'love' out of the 'lovely' heart diecut in the Lovely Words Thinlits set and mounted it on a Sweet and Sassy red diecut heart for my teddy bear to hold. I'm guessing it could be a cushion or maybe a box of chocolates - here's hoping anyway!

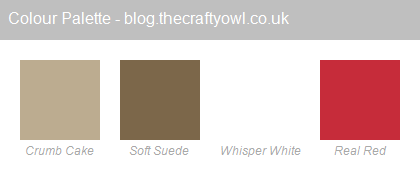
All Heart - With the neutrals of my teddy bear, I wanted some traditional red to add to my 'sending love' card, so I paired my diecut red heart with some retired 'Stacked With Love' retired designer series paper from my stash - only an abundance of red hearts will do! I love this fun colour combination - here it is if you'd like to save it for your future inspiration:
 

Here is the visual summary of the key products used on today's project for you to pin for easy reference:
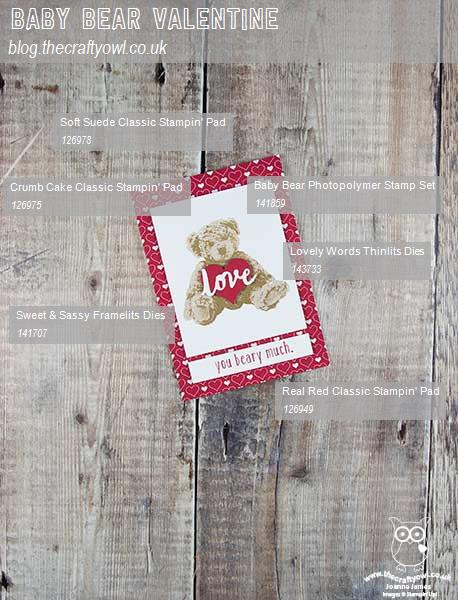
 

You can see all of my 'How To' summaries on my 'How To - Tips and Techniques' Pinterest board in case you've missed any. I'm also linking this card up for my second entry at SUO Challenges - my background definitely has hearts-a-plenty to fit with their theme this week!

Enjoy your day and I'll be back tomorrow with another project. Until then, happy stampin'!


Stampin' Up! Supplies Used:

Table built using Product Table Builder by The Crafty Owl - Independent Stampin' Up! Demonstrator.

Painted With Love Hearts Valentine Card and Co-ordinating Fold Flat Top Heart Box

by Joanne James4. February 2018 09:00

It's Sunday and time for this week's new challenge over at The Paper Players! It's the turn of my lovely and talented friend Claire to host this week and she has a rather timely theme challenge for you to work with:


February at last and Valentine's is on the way! I have both a card and gift box to share with you this week and hearts were definitely on my mind when I started creating - take a look:


Here's the low-down on today's card:

Painted With Love - Whilst I used this week's sketch over at As you See It as the inspiration for the layout for my card today, the Painted With Love papers are most certainly the inspiration for my colour scheme. I couldn't wait to use these colourful papers with their gold foil accents on my project, and carried through the shades of purple and pink to the rest of my card design. Here's my colour palette in case you would like to save it for your future inspiration:


Hearts A Plenty - Both the teams over at CAS-ual Fridays and SUO Challenges are looking for hearts, hearts and more hearts this week. I've used a combination of hearts in all different sizes stamped from the 'Heart Happiness' stamp set and some diecuts using the Sweet and Sassy Framelit Dies, along with a sprinkling of gold metallic heart shapes for my full heart quota.

Love You - My sentiment is a combination of a 'love' diecut from the Sunshine Wishes Framelits and 'YOU' from the Sale-A-Bration 'Celebrate You Thinlits' - I love being able to play around and take bits and pieces from my collection to create the perfect combination. I also added a little stamping to the inside - this lovely stamp from the 'Petal Passion' set: 

I also created a co-ordinating box with a heart fold flat closure in the same paper, perfect to enclose a Valentine's treat - here it is with my card: 


I may well do another blog post on the box - it's very pretty and turned out even better than I hoped it would! Here is the visual summary of the key products used on today's project for you to pin for easy reference:


You can see all of my Product and 'How To' summaries on my 'How To - Tips and Techniques' Pinterest board in case you've missed any. 

Before you reach for your ink and papers, check out what our amazing team has created to inspire you this week:

Here's a quick recap of our challenge rules:
 
1.  Create a new paper project
2.  Upload your creation to your blog with a link back to us and provide a direct link to the post featuring your challenge submission.
3.  Please link your card to no more than four challenges, TOTAL.
4.  Have FUN!

I can't wait to see how you interpret this week's theme and look forward to visiting your blogs this week! Blogland has lots of challenges with love in mind so I think this could be something of a theme around here in coming days! Enjoy the rest of your weekend as it will be over all too quickly. We were out at a swimming gala yesterday and Ben has a basketball tournament today, so it's all go here. I'll be back tomorrow with another project; until then, happy stampin'!


Stampin' Up! Supplies Used: 

Table built using Product Table Builder by The Crafty Owl - Independent Stampin' Up! Demonstrator.

Thanks A Latte With Coffee Cafe

by Joanne James31. January 2018 07:00

Today I'm sharing a card using the sketch over at Fab Friday that also fits the theme over at Fusion:


I decided to break away from the heart shape on the sketch (and turned it through 180 degrees) and decided to give my Coffee Cafe set some love and feature a coffee cup instead, which led me to my second attempt at the current Fusion challenge - take a look:


Here's the low-down on today's card:

Satisfy Your Coffee Craving - Coffee shops are so big right now; even in this nation of tea drinkers, coffee shops are continuing to take the nation by storm. So if you are a fan of the bean, the Coffee Cafe Suite is the perfect way to indulge and satisfy your coffee craving. There is a stamp set with co-ordinating framelits that are available as a bundle and some of the framelits fit the images on the Coffee Break co-ordinating designer series paper. You can also create your own textured coffee collar, as the framelit for this embosses too. The designer series paper has some great themed patterns and some good neutral patterns, such as spots and leaves that work well with other types of product too.  

Thanks A Latte - Always a sucker for a punny sentiment, and partial to a skinny grande latte, this sentiment is perfect for me! I also think it works really well for a gift card holder with a Starbucks gift card inside - and who wouldn't want a coffee and muffin as a treat once in a while? Just sayin' :-) The Coffee Cafe stamp set also has two other sentiments that are perfect to send to a coffee-loving friend.

It's In The Details - The Coffee Cafe Suite also includes some fun corrugated elements - I used one behind my sentiment - that are great for adding a little texture to your projects. My card also features some of the lovely Crumb Cake woven ribbon - no bow on this card though, as I think it will be heading to one or other of the James Juniors teachers, who are both male, so I didn't want it to look too feminine.

Here is the visual summary of the key products used on today's project for you to pin for easy reference:


You can see all of my 'How To' summaries on my 'How To - Tips and Techniques' Pinterest board in case you've missed any. 

Enjoy your day and I'll be back tomorrow with another project. Until then, happy stampin'!


Stampin' Up! Supplies Used:

Table built using Product Table Builder by The Crafty Owl - Independent Stampin' Up! Demonstrator.

Mediterranean Moments Cafe Card

by Joanne James29. January 2018 21:00

Today I'm back with an annual catalogue faithful and sharing a card I made using a set that has been sitting on my shelf rather neglected for a little while, so I thought I would remedy that and enter a couple of online challenges at the same time:


I love the CAS Colours and Sketches sketch this week and then surprised myself by choosing the colours over at Just Add Ink to go with it - take a look:


Here's the low-down on today's card:

Mediterranean Moments - Mediterranean Moments first appeared in last year's Spring-Summer seasonal catalogue and fortunately carried over into the annual catalogue. I love these sketched images, inspired by Million Sales Achiever Susan Nygaard - the one I've used today though is the only one in my set that I've never used before. When I saw this colour combination I wasn't sure what to make of it, despite the lovely design team cards, and then I was flicking through my catalogue looking for something else and suddenly there it was - I could see the green metal cafe chairs and I knew this stamp would be perfect! 

A Little Watercolouring - I decided to stamp my image in Versamark and heat emboss it in white, and ring the changes with a Crumb Cake card base, then give the whole thing a wash of white craft ink before watercolouring with my greens and a little more Crumb Cake ink. This was a good way to incorporate my neutral and allow my greens to blend with each other. I hand-doodled my border using my white gel pen.

A Sentiment Combination - My sentiment combination is a trimmed stamped 'hello' from the 'oh hello' stamp in the Colour Me Happy set, along with the word 'friend' snipped from the Lovely Word Thinlits. A fun pairing that is just right for the intended recipient of my card. 

Here is the visual summary of the key products used on today's project for you to pin for easy reference:


You can see all of my 'How To' summaries on my 'How To - Tips and Techniques' Pinterest board in case you've missed any. 

This post was really meant for tomorrow but I'm putting it live early as I want to catch the CAS Colours and Sketches link up. So for Tuesday - enjoy your day and I'll be back tomorrow with another project. Until then, happy stampin'!


Stampin' Up! Supplies Used:

Table built using Product Table Builder by The Crafty Owl - Independent Stampin' Up! Demonstrator.

Bird Banter Toucan Thank You

by Joanne James29. January 2018 18:00

I've had a busy but hugely productive day today (love days like those!) and am popping in with a quick post from me with a card I made yesterday to squeeze in for this week's challenge over at Freshly Made Sketches


This is such a lovely little sketch from Jen, it seemed a shame not to use it (although I did flip it and use the mirror image so that my bird would be pointing towards my sentiment rather than away from it). I had so much fun with Saturday's Bird Banter card (you can see that card here if you missed it) that I thought I would use the set again this time featuring the colourful toucan - take a look:


Here's the low-down on today's card:

Bird Banter - Today it's the turn of the toucan and his accompanying punny sentiment - these funnies just crack me up! I searched up some images of toucans online before deciding on my colours and then used my Blends to colour him, with the exception of his eye and the top of his beak - I used my Lemon-Lime Twist Stampin' Write marker for that as I wanted to get a real zing of green. I stamped him twice: once directly onto my banner, then again on some scrap cardstock and fussy cut this out. This way I was able to fussy cut out his body only and pop it up onto dimensionals aligned with the banner image, without needing to fussy cut his legs.

A Time-Saving Tip  - Now I love a bit of fussy cutting, but I know that it's not for everyone. Whilst I was happy to fussy cut my toucan and the larger flowers, the tiny ones were too fiddly. Instead I used a small circle punch (my circle punch from the retired Itty Bitty Shapes Punch Pack) and punched them out; much easier and I don't think it loses anything in terms of detail - what do you think?

A Tone-On-Tone Thankyou - I could have stopped there, but instead decided to add a little tone-on-tone stamping to my background panel by stamping the 'thank you so much' stamp from Thankful Thoughts repeatedly to create a customised background that reinforces the sentiment of my card. 

I remembered to stamp and colour my envelope (yay!) and that completes my card. I just love that this set really lends itself to bright colours and fun cards - another one for my stash!

Here is the visual summary of the key products used on today's project for you to pin for easy reference:


You can see all of my 'How To' summaries on my 'How To - Tips and Techniques' Pinterest board in case you've missed any. 

I'll be back tomorrow with another project. Until then, happy stampin'!


Stampin' Up! Supplies Used:

Table built using Product Table Builder by The Crafty Owl - Independent Stampin' Up! Demonstrator.

Flying Home Welcome To Your New Home Card PP378

by Joanne James28. January 2018 09:00

It's Sunday and time for this week's new challenge over at The Paper Players! It's the turn of our wonderful team leader Nance to host this week and she has my favourite, a sketch challenge, for you to work with:


Whether you stay with the circle or use an alternative shape, this is a sketch with many possibilities. I decided to keep with the circle as it was perfect to showcase a new stamp I haven't used yet and have fun with a little colouring - take a look:


I've had a few friends that have either recently moved or are in the process of moving, so I needed to replenish my stock of 'new home' cards and the 'Flying Home' stamp set had the perfect image. Here's the low-down on today's card:

Flying Home - I was lucky enough to receive the 'Flying Home' stamp set at Onstage in November, but had yet to ink it up. This set is perfect for a new home card, or even a new baby card; in fact the whimsical line drawings work for lots of card types. The other great thing about this set is that it is made for colouring. I used my Stampin' Blends to colour in my main image and I stamped the little bird twice so that I could fussy cut one and pop him up on a tiny piece of a dimensional for added lift.

A Petal Garden Colour Combo - I pulled the colours for my stamped image directly from the Petal Garden designer series paper that I used for my background panel and added a co-ordinating ribbon trim too. I love these fresh colours, perfect for spring - here's the colour palette for you to save if you'd like to use it for your future projects:


New Home Congratulations - The 'Flying Home' stamp set is sentiment-free, so I decided to go on the hunt through my other sets for a small sentiment that I could add to my horizontal Pool Party strip. I found the perfect stamp in 'At Home With You'  - and followed up inside my card with 'congratulations'.

Here is the visual summary of the key products used on today's project for you to pin for easy reference:


You can see all of my Product and 'How To' summaries on my 'How To - Tips and Techniques' Pinterest board in case you've missed any. 

Before you reach for your ink and papers, check out what our amazing team has created to inspire you this week:

Here's a quick recap of our challenge rules:
 
1.  Create a new paper project
2.  Upload your creation to your blog with a link back to us and provide a direct link to the post featuring your challenge submission.
3.  Please link your card to no more than four challenges, TOTAL.
4.  Have FUN!

I can't wait to see what you create with this week's sketch and look forward to visiting your blogs this week! Enjoy the rest of your weekend as it will be over all too quickly. I'm hoping to fit in a little more crafty time today along with some precious family time. I'll be back tomorrow with another project; until then, happy stampin'!


Stampin' Up! Supplies Used: 

Table built using Product Table Builder by The Crafty Owl - Independent Stampin' Up! Demonstrator.

A Bird Banter Belated Birthday Card

by Joanne James27. January 2018 21:07

A late and quick post from me today as I managed to grab a little crafting time this afternoon and made a card for a friend of mine that I'm also entering for a couple of challenges:


I loved the sketch over at Fusion and those bright colours at Inspire.Create were perfect for what I had in mind. No coffee cup I'm afraid - my card is all about the apology and right on the money as far as this week's theme over at CASology is concerned - take a look:


Here's the low-down on today's card:

Bird Banter - Please tell me I am not the only cardmaker who frequently forgets birthdays? I mean, my intentions are always good and I have loads of cards on hand, but more often than not one of two things happens: I either don't have the 'right' card for that person on hand and so in taking the time to make it I end up late for the date, or alternatively I simply forget. It's never intentional, I'm just always so busy and I have a dreadful memory for dates and numbers, so they just don't stick. So all that said, Bird Banter is the perfect set for me - specifically, the rather punny sentiments and this one in particular: 'A little birdie told me it was your birthday ... obviously it wasn't an early bird'. How fun is that?! I received this set for free at Onstage, but I have to say it's one I would buy for that sentiment alone - it was (unfortunately) made for me!

A Hint of Stripes - I kept my card bright, clean and simple; I tucked in a little piece of the thin-striped Sale-A-Bration Bubbles & Fizz designer series paper behind my image to add a little interest and pop of blue, to compliment my bright pink background and yellow sentiment banner. 

A Stampin' Blends Tip - I used my Stampin' Blends to colour in my party parrot (the Melon Mambo ones were actually my old Blendabilties) and added a little clear Wink of Stella to his party hat and wing for a little sparkle. I fussy cut a second wing and tail piece and popped them on a dimensional so that I could overlap my sentiment banner slightly. My Stampin' Blends tip for you today is in relation to using them to colour a co-ordinating stamped image onto your envelope: before you begin colouring, place a piece of cardstock inside the envelope; this will prevent ink leaking through to the back of the envelope and spoiling its appearance.

I added one of the other birds along with the other part of the sentiment to the inside of my card - here he is:

Another handsome fella! One thing I do know - this card is on it's way to a friend, yes, whose birthday I forgot last week!

Here is the visual summary of the key products used on today's project for you to pin for easy reference:


You can see all of my 'How To' summaries on my 'How To - Tips and Techniques' Pinterest board in case you've missed any. 

I'll be back tomorrow with my post for this week's new challenge over at The Paper Players. Until then, happy stampin'!


Stampin' Up! Supplies Used:

Table built using Product Table Builder by The Crafty Owl - Independent Stampin' Up! Demonstrator.

Have a Fun Night In With A Lots of Happy Card Kit

by Joanne James22. January 2018 20:00

I've started the week with one of the James Juniors home from school with the dreaded lurgy, so no time to craft 'from scratch' today. Days like this are perfect days to work on a kit though, where all the hard work and prep is done for you. So today I'm sharing not one card but 5 - yes the five different all-occasion card designs that feature in the fabulous new 'Lots of Happy Card Kit' - take a look:


Here's the low-down on this kit:

Lots of Happy, Lots To Love - There's lots to love in this all-inclusive kit: with 4 each of 5 designs, you can create a total of 20 all-occasion cards using the included 'Lots of Happy' stamp set and then colour these using the Watercolour Pencils that are also included in the kit. two of the four pencils that are included are exclusive to this kits and not available with the standard pencil set. Here are each of the 5 designs individually:


A Fun Night In - The Lots of Happy Card Kit is perfect for a fun night in with friends - if ever you needed an excuse to get together on a wintry afternoon or evening and have some fun, this is it! No skill or previous experience necessary, so whether you consider yourself a crafter or a complete novice that just loves to send beautiful handcrafted cards, this kit is for you! The theraputic benefits of colouring are well-known (you can read all about that in my previous post here) - add some refreshments - tea and cake or wine and nibbles, either works! - and a fun night is guaranteed! If you would be interested in hosting a fun evening with friends, do get in touch - I would love to help you to host a night to remember! What's more if you invite 7 friends to participate during Sale-A-Bration - each kit costs £31.50 each - as the hostess you can get your kit for FREE!

And There's More - This fabulous kit also has a refill available, so if you enjoyed it the first time around, you can reuse your stamp set, block, ink and pencils and create even more cards! A refill costs just £19 - that's less than £1 per card, bargain!

Also the lovely people at Stampin' Up! have also produced a video showing this kit in more detail if you'd like a closer look:

Here is the visual summary of the key products used on today's project for you to pin for easy reference:


You can see all of my 'How To' summaries on my 'How To - Tips and Techniques' Pinterest board in case you've missed any. 

I know I often say this when a new kit comes along, but this really is a good one - the end results are so contemporary and pretty, I love it! Contact me to get one for yourself today!

I'll be back tomorrow with another project. Until then, happy stampin'!


Stampin' Up! Supplies Used:

Table built using Product Table Builder by The Crafty Owl - Independent Stampin' Up! Demonstrator.

Clean And Simple Panda Love Notes For The Paper Players PP377

by Joanne James21. January 2018 09:00

It's Sunday and time for this week's new challenge over at The Paper Players! It's my turn to host this week and I have a topical clean and simple challenge for you to work with:


It's almost February and with Valentine's Day around the corner love is definitely in the air, so what better time to send a little love note or two to the one you love? I have a super clean-and-simple card to share with you this week that is also perfect for this week's challenge over at Less Is More - take a look:


Here's the low-down on today's card:

Love You Panda - I couldn't resist using another of these cute little pandas on my card today - this time it had to be the one proudly holding his own little love note, perfect for my theme! I simply stamped him in black, coloured in the heart on his envelope and surrounded him with bright pink love hearts, from the Heart Happiness set. Inside I stamped my sentiment, also from the 'Party Pandas' stamp set, along with another spray of hearts:

And that's it - super simple, super cute!

The Perfect Note - I used one of the new Whisper White Narrow Note Cards for my one-layer love note today - they measure 6.4cm x 11.4cm, small and narrow and the perfect size for a note to tuck into a pocket, lunch box or gift package. 

Painted With Love Envelope Liners - My little note card was so quick and easy to put together, I decided to add another surprise pop of colour with an envelope liner on the flap of my envelopes. I simply punched a whole bunch of circles out of the Painted With Love Specialty Designer Series Paper using my 2" circle punch and adhered them to the inner flap of my envelope. 

I love my little note card so much, I made a whole bunch of them - I used a selection of papers and stamped my pandas both horizontally and vertically, with hearts in each of the colours that feature in the Painted With Love paper - here's a shot of a bunch of them together:


These are perfect for me to slip into the James Juniors' blazer pockets for a surprise note at school; we are also going to make a whole bunch more for the children to share with their friends too - it's nice to let your besties know they are loved too! They really are so simple to make - it's taken me longer to write this blog post that to actually make all of these cards!

Here is the visual summary of the key products used on today's project for you to pin for easy reference:


You can see all of my Product and 'How To' summaries on my 'How To - Tips and Techniques' Pinterest board in case you've missed any. 

Before you reach for your ink and papers, check out what our amazing team has created to inspire you this week:

Here's a quick recap of our challenge rules:
 
1.  Create a new paper project
2.  Upload your creation to your blog with a link back to us and provide a direct link to the post featuring your challenge submission.
3.  Please link your card to no more than four challenges, TOTAL.
4.  Have FUN!

Don't forget the theme is clean and simple this week - so minimal layers and embellishments and lots of white space. I can't wait to see what you create and look forward to visiting your blogs this week! Enjoy the rest of your weekend as it will be over all too quickly. I'll be back tomorrow with another project; until then, happy stampin'!


Stampin' Up! Supplies Used: 

Table built using Product Table Builder by The Crafty Owl - Independent Stampin' Up! Demonstrator.

Party Panda Spinner Card For Fab Friday

by Joanne James17. January 2018 23:00


Another late one I'm afraid as I've been tied (figuratively, not literally!) to my desk all day pushing paperwork. Just time to share a card for the current challenge over at Fab Friday where they have a super-bright colour combo to work with:

I love brights so was really keen to play along with one of my favourite challenges. I figured the best way to use this trio of bold colours was to ensure that I also incorporated plenty of white. I decided to get out my Party Pandas Sale-A-Bration stamp set again and do something I haven't done in a while - take a look:


Yes, it's a fun spinner card - isn't that party panda just the cutest?! I made this card over a week ago but delayed sharing it with you as I made a video tutorial to go with it. I still need to finish editing so will post it here once complete but in the meantime I couldn't not share this cutie! Here's the low-down on today's card:

Get Spinning - Everyone loves the fun element created by adding a spinner - young and old alike! I've made my Sale-A-Bration Party Panda the spinning star of today's card, but this technique works with lots of other stamps too. The panda looks like he was meant to cartwheel though I think! To make the panda spin, you simply attach him to two penny coins (or a dime, or a washer - you get the idea) separated by a dimensional, with the pennies sitting either side of the track. If I've lost you already, come back when I upload the video - all will become clear! 

Creating The Track - I used the Classic Label Punch to create the track for my spinning panda, by repeatedly punching along my cardfront in order to get an extended gap. This is one of the easiest ways to create a spinner track. The key to getting a freely-spinning panda though is to use Stampin' Up!'s foam strips to adhere your front panel to your card base. This ensures the gap is deep enough for the panda to spin freely.

Let's Celebrate - I pulled my sentiment from another of my free Sale-A-Bration sets, Amazing You, and inked up the words in contrasting colours. Such a great sentiment that allows this card to work for all kinds of celebrations, not just birthdays. In fact, I am going to dedicate this one to one of the Fab Friday design team members, the awesome Brian King, who at the time of posting this challenge had announced the day before that he is also joining the design team over at CAS(E) this Sketch, another great challenge blog favourite of mine - way to go Brian! 

I love these bright colours, so perfect for this fun card. Do check out the design team cards over at Fab Friday and the gallery, where there are some amazing and varied entries that will provide great inspiration.

Here is the visual summary of the key products used on today's project for you to pin for easy reference:


You can see all of my 'How To' summaries on my 'How To - Tips and Techniques' Pinterest board in case you've missed any. 

I'll be back tomorrow with another project. Until then, happy stampin'!


Stampin' Up! Supplies Used:

Table built using Product Table Builder by The Crafty Owl - Independent Stampin' Up! Demonstrator.

Current Promotions

Stampin Cut and Emboss

Save up to 30% off on all your favourite kits from 1 to 31 October! 

Click here to see the current kits available and order yours online today.

Join My Team

It's always a great time to join Stampin’ Up! During October you can get even more in your starter kit! New team members can get £160 worth of products for only £99 + free business supplies + free shipping + all the fun being a part of Stampin’ Up! Stampin' Up! has something for everyone: join my growing team and benefit from my support to enjoy Stampin' Up! however you choose.

If you're interested, call me for a chat to understand how I can help you realise your goals. Alternatively, if you have already decided to sign up and you just can't wait, please click here for the link to the online form where you can sign up and order your starter kit right away! 

Shop Online

Access my online shop 24 x 7, 365 days of the year:

Current October hostess code:

9NKXDTTR

Shop Online

Scrapbooking

Stampin' Up! has introduced a new range of 12x12" scrapbooking product and kit - the full range is now available to purchase online. To download a copy of the new digital Scrapbooking Catalogue click here.

Mini Catalogue

BROWSE THE CATALOGUE

'Tis The Season - the new Stampin' Up! Mini Catalogue is here! For more details and to download your copy click here

2024-25 Annual Catalogue

BROWSE THE CATALOGUE

Click on the image to download your copy of the 2024-25 annual catalogue. For a full list of current SU! supplies, go to my online store. If you would like any help or advice, please drop me a line at joanne@thecraftyowl.co.uk or give me a call on 07773 421446 - I'd be happy to help.

Latest Kits!

Stampin Cut and Emboss

The Christmas Ornaments Kit and Card Keeper Kit are the latest kits in the online store - get yours here!

New Online Exclusives

There are new products available exclusively in the online store from 5 November - check them out here.

About Me

Hi I'm Joanne and live in Northampton and when I'm not looking after my husband and two beautiful children, am an avid crafter with a passion for all things Stampin' Up!

I must confess that I have never been a big rubber stamper - until I discovered Stampin' Up! that is. I love the fact that I can get such great results with co-ordinating stamps, inks, papers and punches - the possibilities are endless! Join me on my stamping journey as I share the things I love and be inspired to create amazing things yourself!

Follow Me

Monthly Newsletter

Box Builder

Click the button above to use Box Buster to create your custom box design using the Envelope Punch Board!

Kits Collection Now Available!

Stampin Cut and Emboss

The new Kits Collection from Stampin' Up! is now available!

Click here to see the current kits available and order yours online today.

I Design For


Stampin' Up Stuff

This is my personal blog and is not endorsed by Stampin’ Up! I hope you find it a plentiful source of ideas and personal inspiration but please don't copy my designs for contest submission or use for classes, publication or sale without express permission.