Video Tutorial: Extra Wide Pouches Using the Scalloped Tag Topper Punch

by Joanne James20. February 2014 21:28

Good evening everyone! Today I have a video tutorial to share with you that I prepared a couple of weeks ago that shows you how to make an extra-wide pouch using the Scalloped Tag Topper Punch. Here's the finished extra-wide pouch:

Here is a standard size treat pouch made with the Scalloped Tag Topper Punch - you can find my previous video tutorial on how to make this here:

As you can see, when compared to the standard-size punch, the extra-wide version is about 1" or 2.5cm wider and taller. The video tutorial shows you how to adapt your punch and shares my top tip for a smooth punch every time - go and take a look:


Here are the measurements I used in the video in case you didn't catch them:

Cardstock: 2 3/4" x 7 3/4" or 7cm x 19.5cm

Score at: 3 3/4" and 4" or 9.5cm and 10cm

I hope you found this video tutorial useful - this is such a versatile punch with so many uses beyond a standard tag. The treat pouches make great little wedding favours too.

Back tomorrow with another project; until then, happy stampin'! 

Stampin' Up! Supplies Used:

Table built using Product Table Builder by The Crafty Owl - Independent Stampin' Up! Demonstrator.


Video Tutorial: Treat Pouches using the Scalloped Tag Topper Punch

by Joanne James3. February 2014 21:18

This week is a busy week for me, with a couple of classes and lots more going on. I held my first class of the week today and we had a lot of fun making cards using all of the items that can be yours free with a £45 spend during Sale-A-Bration. I'll share some of these cards with you later in the week (I don't want to spoil things for those ladies that haven't made them yet!) but today I wanted to share a short video tutorial for the first of the projects I've made using the Scalloped Tag Topper Punch. The Scalloped Tag Topper Punch is new in the Spring-Summer seasonal catalogue and, along with its neighbour the Angled Tag Topper Punch, can be used to make easy gift tags and bookmarks in one simple step, as the top is shaped and the hole punched for you in one easy movement. It is an incredibly versatile punch and can be used to create lots more besides.

I have filmed a series of tutorials that show the versatility of these punches and the first of these shows you how to make a basic treat holder. Here are some of the ones I created:

These were for my children as an after-school treat (they always complain I never greet them with sweets at the school gate, so this made a nice change!) and then I also created this more grown-up version:

I think these would make such lovely wedding favours and are so easy to make you could easily put together large quantities with minimal effort. I was inspired by these treat holders made by Mary Fish and adapted mine to suit the chocolate supplies on hand! Also, I have included both metric and imperial measurements in my tutorial, so you can create this treat holder with ease, whichever method you prefer.

So here's the first in my series of Scalloped Tag Topper Punch video tutorials - enjoy!

I hope you found my video useful; if you would like to purchase any of the items featured, please click on the links below and hop on over to my online store or give me a call if you're local to me and would like to save on postage costs. Back soon with news of some product shares that I've put together for those of you who have now had time to browse the new Spring-Summer catalogue and would like a little bit of everything! Until then, happy stampin'!


Stampin' Up! Supplies Used:

Table built using Stampin' Up! Product Table Builder from The Crafty Owl.


Simply Pressed Clay Language of Love Gift Tag Video Tutorial

by Joanne James29. January 2014 20:50

Today I have a little project to show you that is based on something I made using my Flowerfull Heart stamp at the beginning of January, but because I didn't have a voice I wasn't able to shoot a video to show you how to make it! Now that my beloved Flowerfull Heart stamp is no longer available to purchase, I decided to modify my original design and make it using one of the stamps in the new 'Language of Love' set that features in the Spring-Summer seasonal catalogue. I used Stampin' Up!'s Simply Pressed Clay to make an ornamental gift tag embellishment that you could use to decorate a card or package. Here's one on a box with a bow made out of some of the lovely Sale-A-Bration Sweet Sorbet DSP:

Here's a close-up of the tag, where you can really see the detail of the stamp:

These tags really are quite easy to make, although you need to bear in mind it's a two stage process, as you will need to allow time for the clay to dry before you can colour and finish it. Here's a link to my video tutorial that shows you how it's done - it also includes some larger ornamental hearts made with my Flowerfull Heart (I couldn't resist!) - and some useful hints and tips for working with Simply Pressed Clay:


These tags would look beautiful attached to a wedding gift, or could even be an alternative wedding favour. I hope you found today's video tutorial useful and it inspires you to make interesting things with Stampin' Up!'s Simply Pressed Clay - leave me a comment and let me know what you come up with, or better still share a photo of your work on my Facebook Page!

Back tomorrow with another project; until then, happy stampin'!


Stampin' Up! Supplies Used:

Table built using Stampin' Up! Product Table Builder from The Crafty Owl.


It's Here - Time to Sale-A-Brate!

by Joanne James28. January 2014 11:50

Yes it's arrived - Sale-A-Bration, the best time of the Stampin' Up! year begins today!

Sale--Bration runs from today, 28th January until 31 March 2014 and there is so much to celebrate - you can read all about it by clicking on the brochure in the side bar of my blog, but the key things to know are:

FREE GIFTS: For every £45 you spend during Sale-A-Bration, you get a free exclusive Sale-A-Bration gift - and there are 13 to choose from!

MORE FREE GIFTS: Get £25 more to spend on any Stampin' Up! products with a qualifying party*

EVEN MORE FREE GIFTS: If you decide to join Stampin' Up! during Sale-A-Bration, you can choose £150 worth of products for only £99 (instead of the usual £130). All this in addition to a 20% discount on future product purchases, the ability to order new items in advance of everyone else, along with the wider benefits that joining a company such as Stampin' Up! has to offer. Also, if you join my growing team of Stampin' Up! demonstrators, you will receive additional benefits, including a FREE copy of my Product Table Builder software to help you make the most of your online sales opportunities - this is an exclusive benefit to those who sign up to be a part of my team (worth £35). My team is a mix of those who are hobby demonstrators and those who use Stampin' Up! as a business to earn them additional income and are a great bunch - everyone is welcome and I would love you to join us.

The best way to see these products is to attend my February classes, which will feature Sale-A-Bration products, or give me a call on 07773 421446 and arrange to host your very own Stampin' Up! party. To whet your appetite, I made a short video showcasing lots of the Sale-A-Bration products - they look even better close up than in the brochure, so why not click on the link below and take a look:


I hope that got you all excited - don't forget, please get in touch via [email protected] or call me on 07773 421446 if you would like to get your hands on some yourself or click on the links below to hop on over to my online shop! 

Today also sees the launch of the Spring-Summer catalogue, featuring some lovely new products - please check out today's other post for more information on my favourite things!

Lots going on today so back soon with more creative delights; until then, happy stampin'!


Stampin' Up! Sale-A-Bration Products available free with a £45 spend:

Table built using Stampin' Up! Product Table Builder from The Crafty Owl.


*An extra £25 of hostess credits will be earned for all qualifying party sales of £250 or more.


Product Table Builder from The Crafty Owl - Last Chance to Take Advantage of Introductory Discount!

by Joanne James31. December 2013 15:21

I know lots of my lovely blog readers have already purchased and are benefiting from the Product Table Builder application that I developed with my 'Dearly Beloved' (husband!) to help independent Stampin' Up! demonstrators worldwide to create links in their blog posts to the products used in their online DBWS store, and are finding it a great time-saver.

I use it every time I do a product 'make' post - it really takes no time at all. Some of the feedback I've received from happy Stampin' Up! Demonstrator customers includes:


"I LOVE it - well worth the investment!" - Monica Gale, UK

"It's easy peasy ... seriously easy! Amazing value for money!" - Carole Bryson-Wood, UK

"An excellent tool. "- Helen Ding, UK

"Thanks again for your great program!" Sabine, Germany

"The Product Table Builder is a great tool. I'm looking forward to using it on my blog." Dörthe Thiele, Germany

"It's a great program and does exactly what I want to do on my website! Saves a lot of time and very easy! "- Lindsay Tindal, UK

"What a great tool!" Colleen Vassos, Canada


For those of you that either missed my original post or haven't come across it via another SU! demonstrator, here is the link to my YouTube video which shows you what it's all about and just how easy it is to use:


Today is the last day that the Product Table Builder from The Crafty Owl will be available at the introductory price of £20. From tomorrow, it will revert to its standard price of £35. So what are you waiting for - if you fancy a bargain, get shopping today!

Click here for the link to my shop to purchase. Back soon with another creative project; until then, happy stampin'!


Tags: , , , , , ,

Product Table Builder | Promotions | Shop Online

Envelope Card using the Envelope Punch Board and 'How to' Video Tutorial

by Joanne James19. November 2013 20:29

Evening blog readers! I had to do some Christmas shopping today, but managed to squeeze in a quick hour of crafting - still so much to do before I'm ready for my very first Stampin' Up! European Convention in Manchester in 2 days time! I'm very excited (can you tell?!) and am looking forward to spending some quality crafting and partying time with Barbara and Samantha, the two of my team that are accompanying me.

More news of that later in the week, but today I have another video tutorial of you to show you how to make a very simple envelope card using your Envelope Punch Board:

I made a whole bunch of these as thank you cards to pop in with my most recent batch of customer orders; lots of my customers have already bought envelope punch boards, so I'm keen to show them lots of simple and straightforward ways that they can use it for things as well as straightforward envelopes.

Here's a picture of the cards I made, both open and closed:

And here's the link to my YouTube channel to watch the video tutorial if you would like to make your own:


I used Sycamore Street designer series paper for my cards, which is a retired paper but one that is still available currently on the clearance rack for only £3.59 - pop over to my online store by clicking on the image below if you would like to snap some up at this bargain price before its all gone!

Back tomorrow with another project; until then, happy stampin'!


Stampin' Up! Supplies Used:


Merry Mini Card and Custom Envelope using the NEW Envelope Punch Board

by Joanne James4. November 2013 21:26

Today's post features one of the cards that I'm making in my classes this week: it's a 3" x 4" notelet card, with co-ordinating DSP bespoke envelope made with the new Envelope Punch Board. This really is a great piece of kit and can be used for so much besides envelopes, but before we get ahead of ourselves I thought I would shoot a short video to show you just how easy it is to make a simple envelope to fit a card that isn't a 'standard' size.

So here is the card I made:

The card itself is very simple, with some festive washi tape and a small punched square, that has been embossed with the Stylish stripes TIEF and had a little Christmas tree punched out using one of the Merry Minis punch trio. Then a tiny button and twine bow to finish and a simple sentiment and done. The great thing is that with the new envelope punch board a co-ordinating envelope really can be created in minutes - just watch the video below to see how easy it is:


Isn't that great? The ladies at my class today couldn't believe just how easy it was to create a perfect envelope. It was a good job this was our last card of the class, otherwise I think they would have spent the whole afternoon making envelopes and not cards! The envelope board can be used for so much more though; watch out for more videos showing you how to get the most out of this great new tool.

I'm also linking today's card up with the colour challenge over at Create with Connie and Mary, where this week's challenge is to make a card using my featured colours: 

If you would like to be inspired, pop over to their blog and see how other designers have used this colour combination in a variety of different ways. Back tomorrow with another project; until then, happy stampin'!


Stampin' Up! Supplies Used:


The Big Shot Magnetic Platform is Now Available to Order!

by Joanne James13. September 2013 20:30

No post yesterday, but two today to make up for it! Here's the first one. Great news - the Big Shot Magnetic Platform is back and now available to order again!

This is one of the 'unsung heroes' of this year's annual catalogue, although clearly I am not the only one to think so - some 13 weeks worth of stock sold out in about 3 weeks! I'm happy to report that supplies have now been restored, so if you've been eagerly awaiting yours, now's the time to order!

The magnetic platform makes light work of cutting cardstock with framelits; no longer do you need to rely on post-it notes and hope that they hold everything in place. If you would like to see the magnetic platform in action, here's a great video from Stampin' Up that shows you how it works:

If you would like to order a magnetic platform, either contact me or pop over to my online store now to purchase.

Back shortly with another post; until then, happy stampin'!

Tags: , , , , , ,

Catalogues | Shop Online | Video Tutorials

My First Stampin' Up! Online Video Tutorial - How To Mount Stamps

by Joanne James5. April 2013 20:03

Another big news day today - although this is more of a personal milestone for me: I have filmed my first online video tutorial!! Videos are useful for sharing all kinds of tips and techniques and I'm hopeful this will be the first of many.

I decided my first video would be a 'basics' introduction to stamps and in particular how to mount your wood and clear mount stamps, along with some tips and hints to get the best results from clear mount stamps. Whilst this may seem obvious to a seasoned stamper, I've spoken to a few people recently who are new to stamping and this is something that they would definitely have benefited from. So ladies, this is for you!

It also features a quick notecard made using the Petite Curly Label Punch; this punch, previously a Sale-A-Bration item, is now available to purchase in the main catalogue until June 30th. Along with either the Pretty Petites Sale-A-Bration stamp set or the Ciao, Baby! stamp set featured in the Spring-Summer seasonal catalogue, this punch is great for layering with the larger label punch or using on its own to create super quick cards. 

So, here is the link to my video, which is hosted on my YouTube video channel:

Here is a picture of a thank you card I made recently to pop in with a customer order, using the same punch:

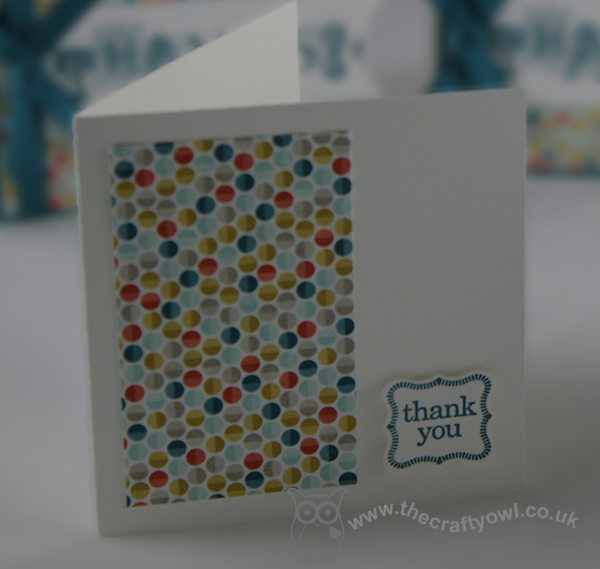
This kind of punch is great if you've got lots of cards to make or just want to add some detail to a 3" square.

Do leave me a comment to let me know what you think of my first video; if there's anything else you would like to see a video tutorial on, then do let me know.

Back tomorrow with more stamping delights - until then, happy stampin'!


Stampin' Up Supplies:

Stamps: Ciao, Baby!, Pretty Petites (Sale-A-Bration - retired)

Cardstock: Whisper White, Regal Rose, Melon Mambo, Pink Pirouette, Pretty in Pink, Sycamore Street DSP (Sale-A-Bration - retired)

Inks: Island Indigo, Melon Mambo

Tools: Petite Curly Label Punch, 1 1/4" Square Punch


Mini Catalogue

BROWSE THE CATALOGUE

The mini catalogue is now live! Read and download your copy here.

Shop Online

Access my online shop 24 x 7, 365 days of the year:

Current April hostess code:

VDKNV7BH

Shop Online

Join My Team

It's always a great time to join Stampin’ Up! New team members can get £130 worth of products for only £99 + free business supplies + free shipping + all the fun being a part of Stampin’ Up! Stampin' Up! has something for everyone: join my growing team and benefit from my support to enjoy Stampin' Up! however you choose.

If you're interested, call me for a chat to understand how I can help you realise your goals. Alternatively, if you have already decided to sign up and you just can't wait, please click here for the link to the online form where you can sign up and order your starter kit right away! 

Latest Kit!

Stampin Cut and Emboss

The Rock Legend Kit has all you need to make 8 cards with coordinating envelopes. Along with the new Panda Friends Kit, both are available from January 4th for just £14 each - get yours here!

2023-24 Annual Catalogue

BROWSE THE CATALOGUE

Click on the catalogue for a full list of current SU! supplies - if you would like to order any of the items featured, please drop me a line at [email protected] or give me a call on 07773 421446 - I'd be happy to help.

New Online Exclusives

There are new products available exclusively in the online store from 5 March - check them out here.

About Me

Hi I'm Joanne and live in Northampton and when I'm not looking after my husband and two beautiful children, am an avid crafter with a passion for all things Stampin' Up!

I must confess that I have never been a big rubber stamper - until I discovered Stampin' Up! that is. I love the fact that I can get such great results with co-ordinating stamps, inks, papers and punches - the possibilities are endless! Join me on my stamping journey as I share the things I love and be inspired to create amazing things yourself!

Follow Me

Monthly Newsletter

Box Builder

Click the button above to use Box Buster to create your custom box design using the Envelope Punch Board!

Kits Collection Now Available!

Stampin Cut and Emboss

The new Kits Collection from Stampin' Up! is now available!

Click here to see the current kits available and order yours online today.

I Design For


Stampin' Up Stuff

This is my personal blog and is not endorsed by Stampin’ Up! I hope you find it a plentiful source of ideas and personal inspiration but please don't copy my designs for contest submission or use for classes, publication or sale without express permission.