by Joanne James25. March 2016 18:57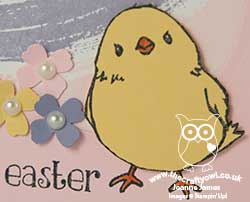
Good Friday blessings one and all! I've spent most of today outdoors making the most of the sunny weather; I met my girlfriends for a run this morning and we went on a James family bike ride this afternoon. No time to craft, but since the forecast is dreadful for the rest of the week I'm sure I'll make up for it! Today's card is for the challenge over at The Friday Mashup. I love this challenge and am sad to read that this one is their last one!

This week you can use the sketch above or create a project with an Easter theme and chicks or bunnies, or mashup and create with both. I went with the latter for this card, although I do have a mashup card planned for a few days time! Here's today's card:
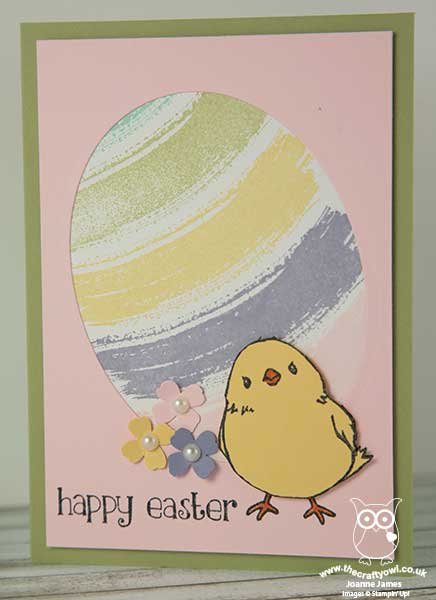
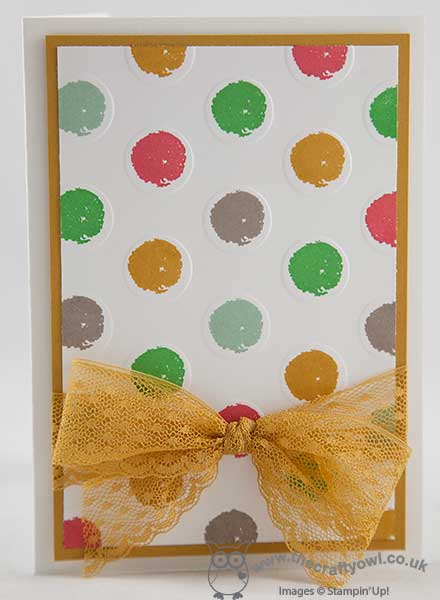
I actually made this card with the ladies at my Coffee and Card session at Bell's in Northampton this week. The key elements of my fun Easter card are as follows:
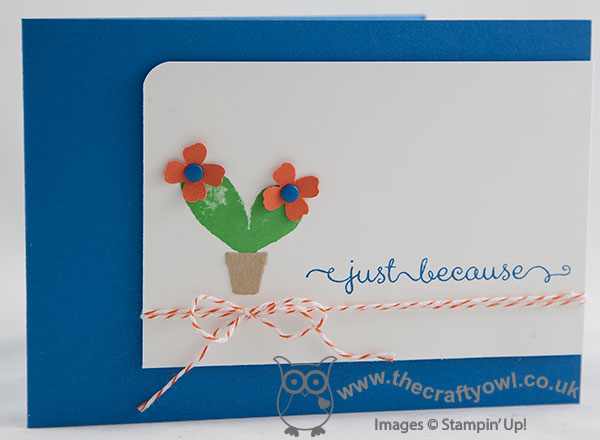
An oval egg - I used my Big Shot and Ovals Framelits to create my fun Easter egg in my layer of Pink Pirouette cardstock. Now I know that technically an egg is more pointed at one end, but without an egg framelit this oval makes a pretty good alternative! Before cutting out my oval, I stamped my chick onto the card. Why? Read on below to find out!
An Easter work of art - To decorate my egg, I cut a second mat of white the same size as my pink layer and stamped the large brushstroke stamp from the 'Work of Art' stamp set in a variety of pastel colours and placed this behind the aperture. The curve of the stamped image adds to the illusion of the egg shape.
A happy chick - The little chick from the 'Honeycomb Happiness' Sale-A-Bration set has been getting lots of use this week as he is perfect for Easter cards. I stamped mine onto So Saffron cardstock, snipped him out with my paper scissors and coloured his beak with my Pumpkin Pie Stampin' Write marker. I didn't fussy cut those fiddly legs though - remember the chick I stamped on the pink layer earlier? Yes, I simply coloured the ones on this layer with my Pumpkin Pie Stampin' Write marker and then lined up my yellow chick with the stamp outline, adhering him with a couple of Stampin' Dimensionals. Clever, right? You have just 6 more days to get your hands on the 'Honeycomb Happiness' stamp set for free with a £45 order; if it's on your wish list, don't leave it too late!
An Easter sentiment courtesy of the 'Easter Lamb' stamp and a trio of Itty Bitty punched flowers completes my card.
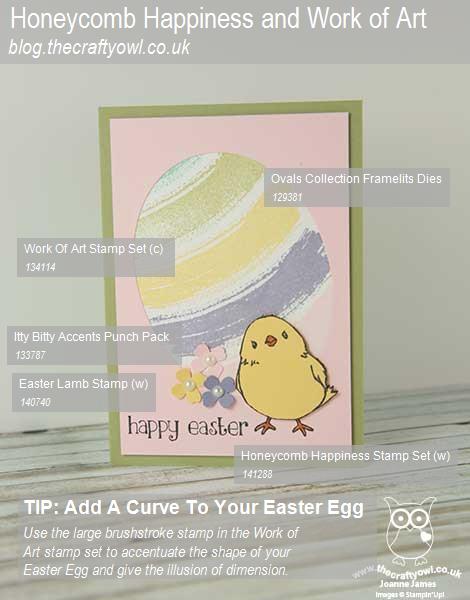
Here's the visual summary of the key supplies used to make today's card for you to save for easy reference:
That's all from me today; if you would like to know more about my drop-in Coffee and Card Sessions, you can read all about it here. We have a short break for Easter then the next one is scheduled for 13th April - I'd love to see you there. I'll be back tomorrow with another project. until then, happy stampin'!
Stampin' Up! Supplies Used:
82b629e8-d2e6-4c0f-8187-1edb4c5b42c8|0|.0|96d5b379-7e1d-4dac-a6ba-1e50db561b04
Tags: Bell of Kingsthorpe, Big Shot, Coffee and Card Drop-in Sessions, Easter, Honeycomb Happiness, Ovals Framelits, Easter Lamb, Work of Art, Sale-A-Bration 2016, Shop Stampin' Up online, Shop online, Stampin' Up, Stampin' Up Card, Stampin' Up Card ideas, Stampin' Up Supplies, Itty Bitty Accents Punch Pack
Cards | Sale-a-bration | Shop Online | Stamping
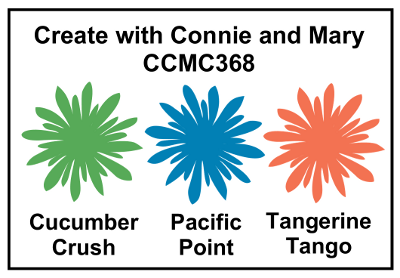
by Joanne James13. August 2015 08:05Today it's time for a new challenge over at Create With Connie and Mary and this week we have a great colour challenge for you:
I actually have two cards for you today. I saw this colour combination and immediately thought of cacti and deserts - yes, really! Here's the first card - can you guess what stamp I used to create my cactus plant?
To create my cacti I used a neat little trick that I saw on Becky Cowley's blog here - using one of the Watercolour Wings butterflies to stamp the cactus shape - isn't that clever?!
I placed my cactus in a flowerpot cut out of kraft cardstock with the Handpicked Framelits and topped it with flowers punched from the Itty Bitty Accents punch, with candy dot centres. To finish my card, I added some Tangerine Tango bakers twine that I had leftover from an old Tag-a-Bag accessory kit (you could use white as an alternative). I'm not sure my cactus on this card is quite as convincing as Becky's version, but I love the idea all the same. It's great when a stamp set offers the flexibility to do more with it than intended - and this one certainly does!
This colour combination appealed to me more than I first thought it would, so having created the above card I then created another - still with my cactus theme, although this card uses the cactus from the 'Yee Haw' set which I understand is now sold out (boo hoo - I love this set!):
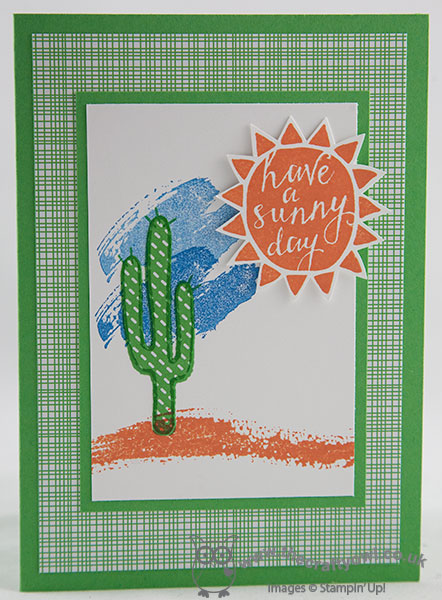
I used Cucumber Crush for my base and two of the co-ordinating DSP patterns in the Cherry on Top stack on my card - one for the mat and the other for my paper-pieced cactus, which is stamped using the 'Yee Haw' stamp set. My sky is stamped using 'Work of Art' in Pacific Point, with the sand in Tangerine Tango using one of the stamps in the Sheltering Tree set. To finish I fussy-cut my bright orange sun from the lovely hostess set, Silhouettes and Script, and popped it up on dimensionals.
Do visit the other Design Team members to see how they used this week's challenge colours; there's lots of inspiration over on their blogs too!
Enjoy your day and I'll be back tomorrow with another project; until then, happy stampin'!
Stampin' Up! Supplies Used:
- Cherry On Top Designer Series Paper Stack
- Cucumber Crush Classic Stampin' Pad
- Cucumber Crush A4 Cardstock
- Pacific Point Classic Stampin' Pad
- Tangerine Tango Classic Stampin' Pad
- Silhouettes & Script Wood-Mount Stamp
- Whisper White A4 Cardstock
- Sheltering Tree Photopolymer Stamp Set
- Work Of Art Clear-Mount Stamp Set
- A Dozen Thoughts Clear-Mount Stamp Set
- Watercolor Wings Photopolymer Stamp Set
- Punch Corner Project Life
- Pacific Point A4 Cardstock
- Handpicked Framelits Dies
- Kraft 12" X 12" Cardstock
by Joanne James3. July 2015 22:03A quick post from me today as I've had a full-on busy day: each of the James Juniors has had a birthday party to attend today, followed by a swimming gala, the first for Ben at this venue. Both had great swims with some great personal best timings, so a god day had by all. Today's trio of cards are another entry for the Fab Friday challenge where in colours are the order of the day:
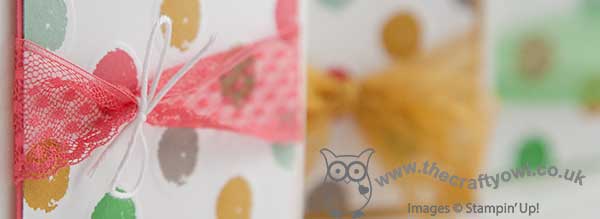
I wanted to create a card that use all five colours and decided to go with a simple design that showed off the fabulous new in-colour lace trim - take a look:
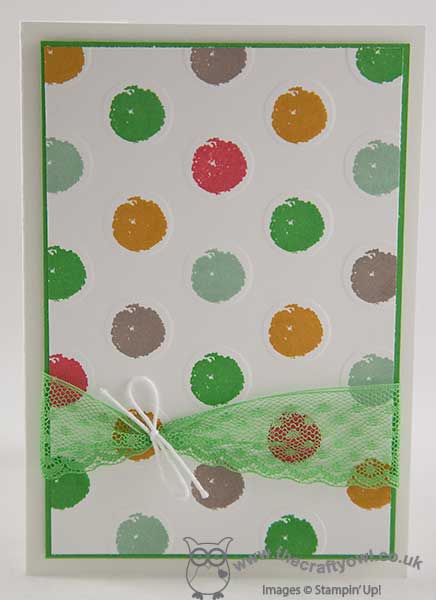
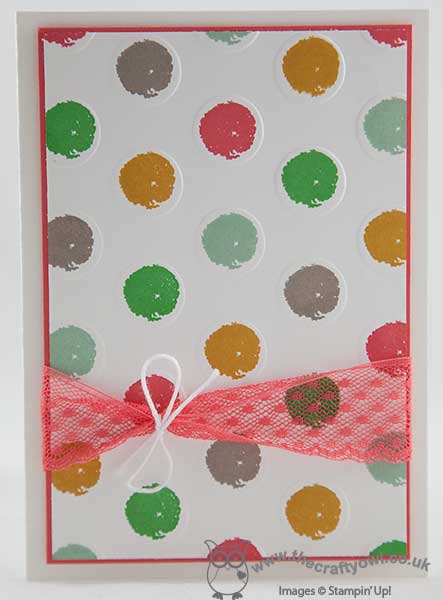
I used a card base of extra thick Whisper White cardstock, matted with an in colour (this one is Cucumber Crush), followed by a Whisper White panel embossed with the Large Dolka Dot Textured Impressions Embossing folder then a random colour pattern of dots using all of the in colours with the spot from the Work of Art stamp set. I finished with a co-ordinating piece of in colour lace trim, tied with a bow of white baker's twine. I wanted to make a couple of cards that were post-friendly and this lace trim is great for a non-bulky trim, however it also makes a beautiful bow - take a look at the Delightful Dijon bow below:
Isn't that just so pretty? I also made a post-friendly version in Watermelon Wonder:
Since the outside is sentiment-free, I wanted to be sure to include one on the inside:
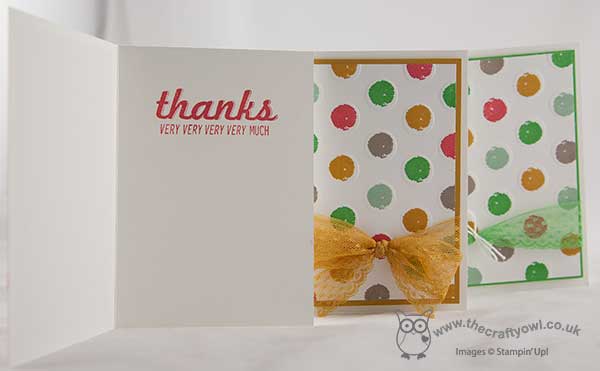
These are thank you cards destined for some of my customers so a big 'thank you' is definitely appropriate! Do you love this year's new in colours? Which one is your favourite? Do let me know in your comments below.
Back tomorrow with a new challenge over at The Paper Players; until then, happy stampin'!
Stampin' Up! Supplies Used:
by Joanne James23. June 2015 22:47I'm late today so a quick blog post from me, but none the less an important one; I finally made a card for the TGIF Challenge Throwdown that doesn't break any rules! It's similar to my first attempt (you can read all about that one here) albeit using a different thinlit and no contraband product from my pantry! Here's a reminder of the basket and pantry items:


Once again I managed to use all of the basket items for my card, along with some of the pantry items - here's my card:
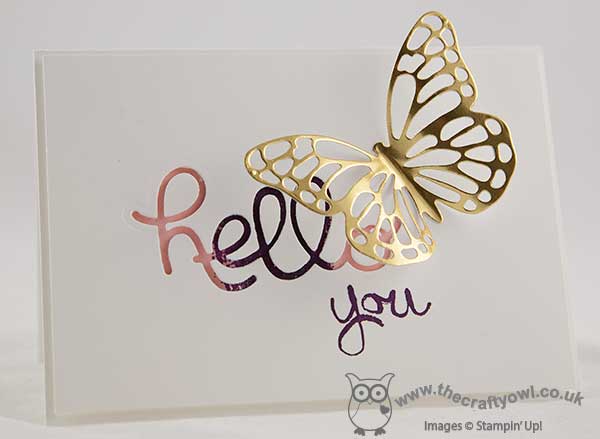
I went with a simple white card base, this time stamped with the smaller, squat Work of Art stamp three times across the middle, then die cut my 'hello' out of a top layer of Whisper White and used the negative space so that the colour swatches show through. I finished my sentiment with the 'you' from Work of Art, and added a larger than life, rather over the top gold thinlit butterfly to finish.
I love using the negative space of thinlits as much as the positive and this sentiment combination reminds me of a particular friend of mine who always says this to me by way of greeting and it never fails to make me smile. The butterfly is such a statement against the clean lines of the rest of the card, yet it looks as if it has just flown in and landed there over the greeting.
Simple, yet not without considerable thought! If you would like to see lots of other ways to use the above product combinations, do pop over to the #TGIFCTD01 page and check out the work of both the design team and the other gallery entrants - there is some great inspiration to be had.
That's me done for today; back tomorrow with another project. Until then, happy stampin'!
Stampin' Up! Supplies Used:
by Joanne James17. June 2015 09:51Mid-week is here - hurrah! Today I'm sharing a card that I set out to make for the TGIF Throwdown Challenge - an intriguing concept where you have to use at least 4 things from a basket of items to make your card whilst also being allowed to use items from the pantry - just like some of the cooking programmes you see on TV! Here is the challenge badge and the basket list:

You have a month to enter so when I sat down at the weekend I thought I would have a go - here's what I came up with using this eclectic mix of products:
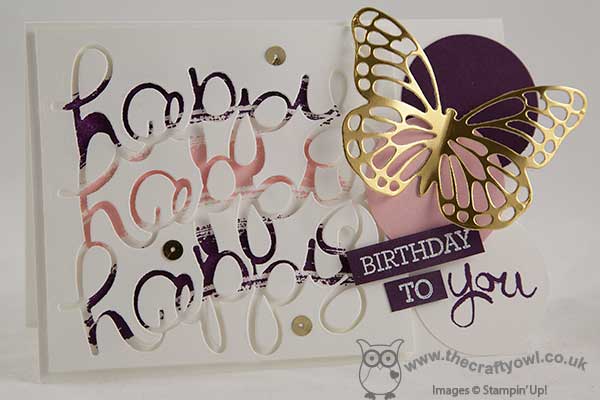
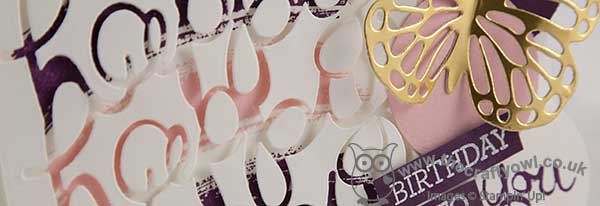
I needed a birthday card for my sister-in-law who celebrated her birthday yesterday so thought these colours would make for a lovely feminine card. You know how much I love the 'Hello You' Thinlit dies and decided to go for a rather ambitious paper-pieced affair, using the negative space of the multiple die cut 'happy' to show the wash of colour from the Work of Art stamp set. I merrily stamped, paper pieced, punched and coloured, adding my showcase gold foil butterfly and finishing my sentiment with the two words from the 'Crazy About You' stamp set and the 'you' from Work of Art, the last of which I punched out with my 1 3/4" circle punch and added a couple of solid colour circles beneath my butterfly to balance the design and finishing with a few gold sequins. My overhanging elements necessitated a bespoke envelope - not troubled by that, as Envelope Expert enabled me to make one of those from some co-ordinating DSP in a jiffy.
So I was feeling suitably pleased with my card and the fact that I'd used not only four but all of the #TGIFCTD01 basket items, when I read yesterday's TGIF blog post and realised I had overlooked one small but important thing when I read the initial challenge post - the pantry items!! Not only do you need to use the basket items, you are restricted in terms of pantry items .... and when I checked before writing this post, I realised my use of the 1 3/4" circle punch, the 'Crazy About you' stamp set to complete my sentiment, white ink and my sequins causes me to step outside the pantry and fall foul of the TGIF challenge rules - oh bother!
As someone who designs for two challenge teams, you would think I would know better!! I won't therefore be linking up with TGIF for the Throwdown Challenge - those guys and gals are strict enforcers of their challenge rules! - but wanted to share my card with you anyway, as I rather like it! I thought it worth sharing the story behind today's card though for the moral of 'if you are going to enter a challenge, make sure you read and understand ALL of the rules before you start' - if any of you reading this have found your card deleted from a challenge gallery without notification, it's probably because you didn't follow the rules :-) I say this as someone who moderates boards, so trust me - I know what I'm talking about! Maybe I'll try and squeeze in another rule-abiding attempt before next week's deadline - watch this space...
Back tomorrow with our new challenge over at Create With Connie and Mary; until then, happy stampin'!
Stampin' Up! Supplies Used:
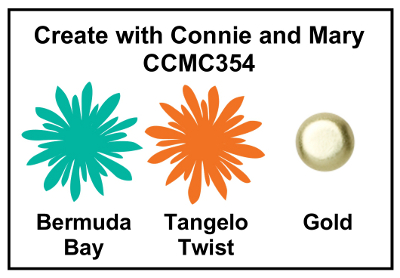
by Joanne James7. May 2015 08:05It's Thursday and time for a new challenge over at Create With Connie and Mary and this week we have a fun colour challenge for you:
I spent a little while bemusing how I was going to use these colours together this week, but once I'd decided my card came together in record time. I decided to go with some super simple punch art this week - take a look:
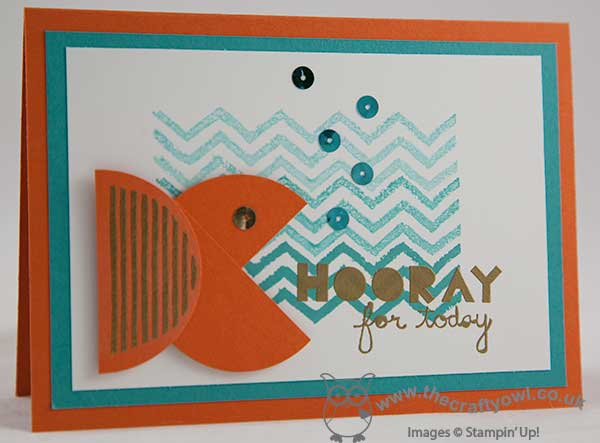
I love the big, bold shapes in the 'What's Your Type' stamp set; not only are they great for creating patterns but they can also be used to create fun objects too. For today's card, I stamped the wavy lines from 'Work of Art' in Bermuda Bay - stamped three times, bottom to top without re-inking to give my water an ombre effect - and stamped my sentiment from the 'Geometrical' stamp set in Versamark and heat embossed it in gold. I then used my 2" Circle punch to cut two circles out of Tangelo Twist cardstock. One of them I cut in half and overlapped by a quarter to create the fish body. The second one I cut in half then stamped the semi-circle lined stamp from 'What's Your Type' stamp set in Versamark and heat embossed this in gold too and glued this to the body piece. I added a single gold sequin to my fish for his eye, then adhered this to my card with a dimensional for some lift. A few Bermuda bay sequins for air bubbles finished off my card. I think this would be a fun birthday card for a toddler - I know my children would have loved it in years gone by!
Do check out what the other CCMC designers have in store for you today - there's a great variety of inspiration to get you going with this colour palette - and we look forward to seeing your entries in the gallery this week!
I'll be back tomorrow with another project; until then, happy stampin'!
Stampin' Up! Supplies Used:
- What's Your Type? Photopolymer Stamp Set
- Work Of Art Clear-Mount Stamp Set
- Geometrical
- 2" Circle Punch
- Embossing Buddy
- Versamark Pad
- Gold Stampin' Emboss Powder
- Heat Tool - Uk Plug
- Whisper White A4 Card Stock
- Gold Sequin Trim
- Bermuda Bay Sequin Trim
- Tangelo Twist A4 Cardstock
- Bermuda Bay Classic Stampin' Pad
- Card Stock A4 Bermuda Bay
by Joanne James3. February 2015 09:34Well, it's Tuesday and we woke to a light dusting of snow outside this morning. Not enough for a 'snow day', much to the children's disappointment and mercifully, unlike last week's flurry, the roads are all gritted so once we were clear of our side street the traffic was flowing freely. It might be winter outside, but today's card is reminiscent of warmer times as I have my card for this week's challenge over at Create With Connie and Mary. This week there is an interesting colour palette to work with, which in itself has a distinct wintery feel:
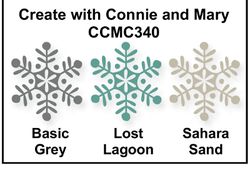
Before I get on to my card today, I would just like to give a little shout out to both Connie and Mary and the rest of the CCMC design team; they really are a super bunch of ladies and hugely inspiring. I love their weekly challenges and play along whenever I can. I have been lucky enough to be chosen as one of their Top 3 Picks from time to time, which is always nice, however I love the colour combos and sketches these ladies come up with and it's great to play along for fun. I didn't manage last week - I had my card all designed, just didn't get enough time at my stamp desk to put it together! - but yesterday I managed to get a few cards made, including my card for this week's challenge so I'm back 'with the program'! I'm also using the sketch from Lesley Croghan's new challenge over at Always Playing With Paper - another great challenge to play along with! Without further ado, here is this week's card:
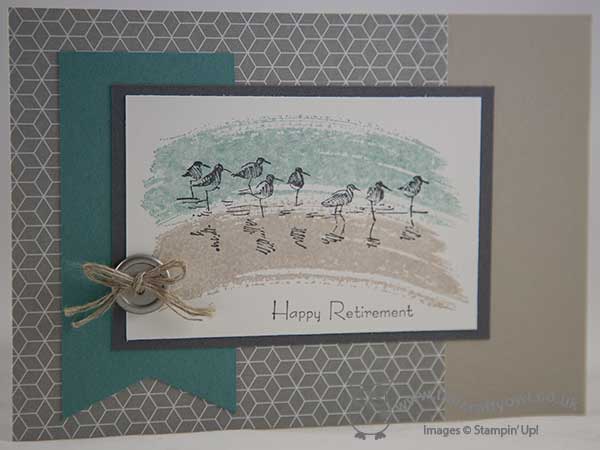
I 'stretched' the sketch as I wanted a landscape orientation for my card, as I decided to feature those little waders from the 'Wetlands' stamp set - definitely my favourite in this set, although they are all lovely to be fair. To 'colour' my image, I used a technique I've seen lots on Pinterest and took the large swoosh from the 'Work of Art' stamp set and stamped it once in Sahara Sand, having stamped off once first, and once in Lost Lagoon, having stamped off twice first, to add just a subtle colouring behind the birds. I switched my sentiment for one from the 'Teeny Tiny Sentiments' stamp set as this card is destined for the Head Groundsman at my children's school, who is retiring at the end of next week, following many years of loyal service. I mounted my image on a piece of Basic Grey and kept my Lost Lagoon flag and Sahara Sand base plain, adding a piece of patterned Basic Grey DSP from the 'Moonlight' DSP stack for background interest. I finished with a little grey metal button, double tied with linen thread, and my card was finished.
I hope you like today's card - I'm off to tackle a mountainous pile of ironing and get a few other chores completed before rewarding myself with a catch up over a cup of tea with a friend I haven't seen in a while this afternoon. Back tomorrow with another project; until then, happy stampin'!
Stampin' Up! Supplies Used:
by Joanne James20. July 2014 08:00Good morning blog readers! Today I'm sharing my card for The Paper Players challenge, where Sandy has chosen monochromatic CAS as the theme this week:

I decided on yellow as the colour for my card this week, with a touch of gold for glamour - here's my card:
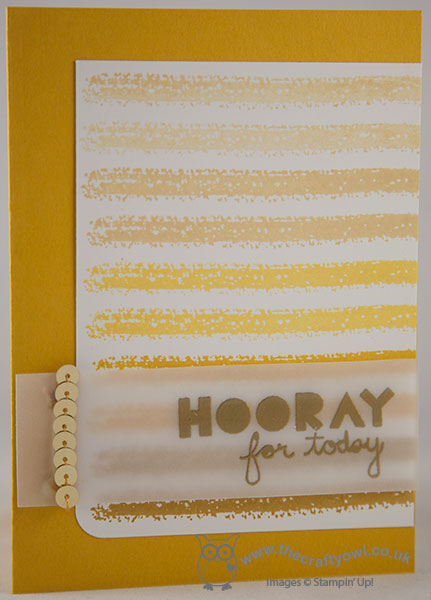
I often choose blues or greens for this type of card, simply because you need a few tonal shades of the same colour for an ombre pattern to be effective, but with the addition of Hello Honey to the Stampin' Up! colour palette, I thought I would have a go with yellows. Yellow is one of my favourite colours and I love how this card turned out. I used Crushed Curry for my card base, then simply cut a panel of Whisper White and stamped the stripe from 'Work of Art' in rows down the length of the panel, starting with So Saffron, then following with Daffodil Delight, Crushed Curry and lastly Hello Honey. I finished with a simple 'Hooray for Today' sentiment stamped in Versamark and heat embossed in gold and popped this up on dimensionals, which are hidden from view under the letters and the strip of gold sequins that finishes this panel.
So there you have it - my clean and simple monochromatic card. I hope you like my card today and that it inspires you to hop on over to the Paper Players challenge blog to check out the other wonderful cards created by the talented design team and join in and upload your challenge creations. The Paper Player challenge takes place weekly, opening on a Sunday at 8am (PST) and closes at noon on Friday (PST). Here's a quick recap of our challenge rules:
1. Create a new paper project
2. Upload your creation to your blog with a link back to us and provide a direct link to the post featuring your challenge submission.
3. Please link your card to no more than three challenges, TOTAL.
4. Have FUN!
We look forward to seeing your colourful creations! Right I'm off to team training for the day today - looking forward to a day of uninterrupted crafting with my team. Back tomorrow with another project; until then, happy stampin'!
Stampin' Up! Supplies Used:
by Joanne James8. July 2014 21:21I've had a fun day today with my monthly card class. Classes take a lot of thought and preparation, but I can honestly say I laugh so much with this fun bunch of ladies it so makes it all worthwhile! Today's class was all about getting to know new stamp sets, colours and tools from the new catalogue and I thought I would share one of the cards we made using the Work of Art stamp set and the new 2014-16 in-colours. Here is the card in question:
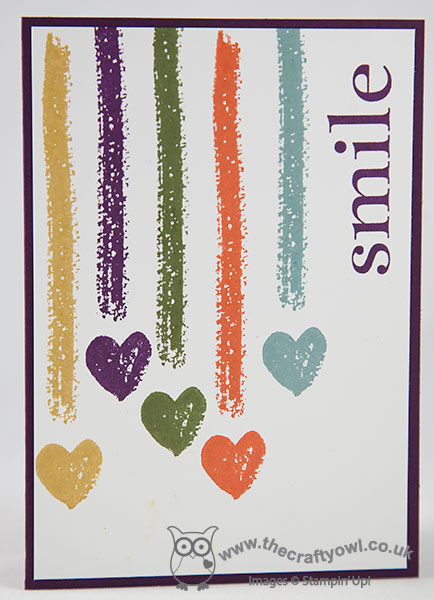
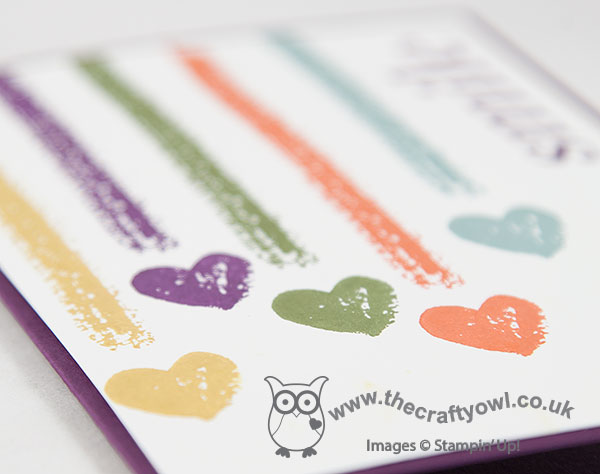
I based the design for my card on one I'd seen on Pinterest using the Gorgeous Grunge stamp set (I didn't pin it though and now can't find the link - apologies!) and coupled the stripe and heart from the Work of Art set with one of my favourite vintage 'Happy Day' stamps (I have a new catalogue 'replacement' for this on order, but I'm not ready to part with this one yet!) Quite a simple design but tricky to line up and make everything look even without loosing the natural 'swiped' look; the main reason I'm sharing it though is because of all the cards we made today, this one not only raised a smile - it had us in stitches! I wish I had taken my camera as there were some lovely variations on the basic idea and everyone using a different colour of base card.
If you live in or around Northampton and would like to join my monthly classes, do get in touch. I am currently looking at expanding my class schedule further, so would love to hear from you if this is something that interests you.
Back tomorrow with this week's Colour Me...! design team card and the Wednesday Weekly Deals; until then, happy stampin'!
Stampin' Up! Supplies Used:
by Joanne James3. July 2014 22:32Good evening all - I've had a busy week so far, most of it out and about so have spent next to no time in my craft room. Good job I have a few things that I've already prepared to share with you! Today I'm sharing one of the cards I made for my new catalogue launch event, featuring the Work of Art stamp set:
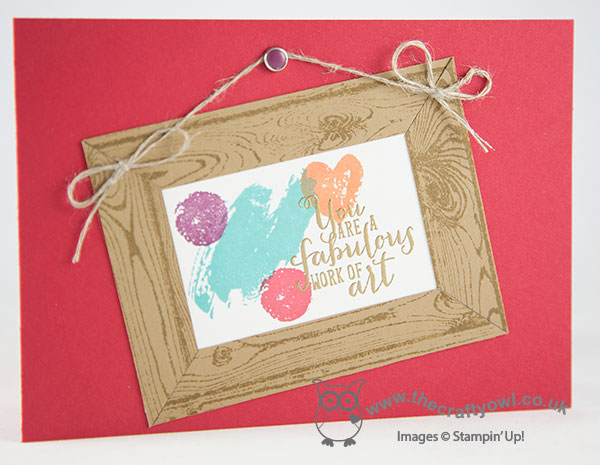
This set, comprising lots of brushstroke-type stamps can be used in lots of different ways and for this card I decided to use it to create my very own 'work of art'. I stamped four of the brushstroke stamps randomly on a piece of Whisper White cardstock, then stamped the sentiment in Versamark and heat embossed in gold. I then stamped the Hardwood stamp in Baked Brown Sugar on a piece of cardstock in the same colour and cut it into strips and created a frame for my picture. I finished off with some linen thread and a candy dot brad to hang it from on my Real Red wall.
Simple enough - but I like it! That's all from me today - a quick post as my bed is calling! Back tomorrow with another project; until then, happy stampin'!
Stampin' Up! Supplies Used: