Thoughtful Branches Autumn Leaf Trio

by Joanne James11. September 2016 10:00

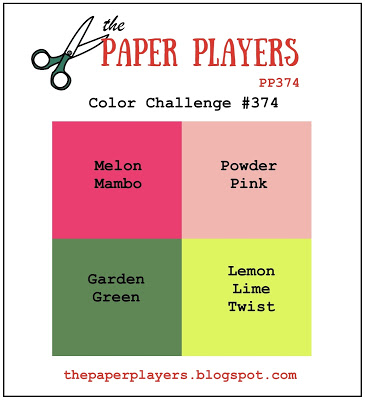
It's Sunday and time for a new challenge over at The Paper Players! It's the turn of my good friend LeAnne to host this week and she has a great set of colours for you to work with:


I used the sketch over at TGIF Challenges for the layout of my card today. These colours screamed 'autumn' to me and I immediately reached for all my leaf sets! This is what I ended up with:  - take a look:


Here's the low-down on today's card:

Thoughtful Branches - I decided to use the leaf from the Thoughtful Branches stamp set as the focal point for my card today, stamped in Crushed Curry and with a little Cajun Craze added with a sponge dauber to create the variegated effect. I cut these leaves out with the co-ordinating Beautiful Branches thinlits dies and also cut out a few of the double-leafed stem in Pear Pizzazz, and snipped off a single leaf from each to place behind my stamped one. I love the pop of colour this diecut leaf adds, along with the addition of texture. Each of my leaf duos was backed with a 1 3/8" punched circle. Don't forget the Thoughtful Branches bundle is still available while stocks last - snap up yours if you haven't already before it's too late!

Petals and Paisleys Houndtooth - The centre panel of my card features another of the Petals and Paisleys Specialty Designer Series Paper designs, this time a Cajun Craze and Very Vanilla houndstooth pattern. This paper exudes warmth and adds interest without detracting from the leaves as the focal point.

Sentiment-Free - Today's card is one of those few that is sentiment-free, on the outside at least. I debated whether or not to run a horizontal sentiment banner across the front of the leaves instead of adding the burlap ribbon behind, or stamping one onto the base frame of the card, but in the end decided against it. I didn't want to disturb the symmetry or form of my leaves so kept with a clean, uncluttered front. This also means that I can add a sentiment of my choice when I come to send my card.

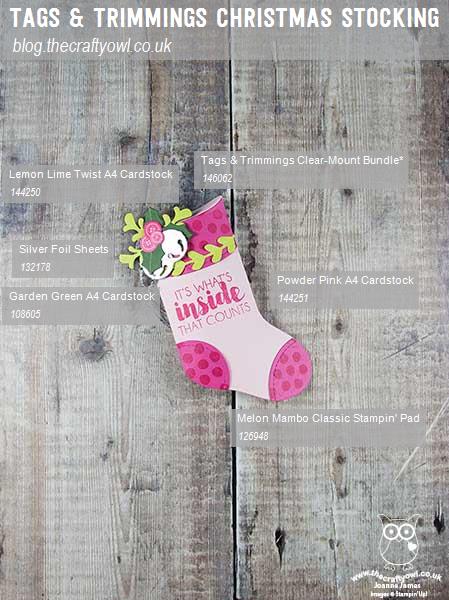
Here is the visual summary of the key products used on today's project for you to pin for easy reference:
 

You can see all of my 'How To' summaries on my 'How To - Tips and Techniques' Pinterest board in case you've missed any. 

Before you reach for your ink and papers, check out what our amazing team has created to inspire you this week:

The Paper Players Design Team
 
 
Here's a quick recap of our challenge rules:
 
1.  Create a new paper project
2.  Upload your creation to your blog with a link back to us and provide a direct link to the post featuring your challenge submission.
3.  Please link your card to no more than four challenges, TOTAL.
4.  Have FUN! 


I look forward to seeing what you create with this week's colours. I'm hoping for better weather today as I have some gardening jobs to see to - yesterday was so miserable, although it didn't dampen the spirits of Ben and his fellow classmates who played in their first rugby match of the season. They managed a 4-4 draw too, so were feeling rather chuffed as they strolled in to their post-match tea! Today also heralds the start of the hockey season an a return to basketball, so sporting weekends are once again about to become the James family norm!

Back tomorrow with another project; until then, happy stampin'!


Stampin' Up! Supplies Used:

Table built using Product Table Builder by The Crafty Owl - Independent Stampin' Up! Demonstrator.

Wondrous Wreath Circular Christmas Card

by Joanne James4. September 2016 10:00

It's Sunday and time for a new challenge over at The Paper Players! It's the turn of the lovely Jaydee to host this week and she has a great theme for you to work with:


What a great theme this week - so many possibilities! I rarely make a circular card, so decided today I would give it a go! I have been on a roll with Christmas cards lately and a circular theme works perfectly for another one - take a look:


Here's the low-down on today's card:

An Oldie But Goodie - The Wondrous Wreath stamp set is a returning seasonal set that is in the current catalogue and is perfect for the theme of this week's challenge. I stamped both layers of leaves in Cucumber Crush, stamping off the base layer once first to achieve the two-tone green. I added some pearls coloured with a red Sharpie for my berries. I used my retired circle framelits to create my card base, using the largest circle. I knew there was a good reason to keep hold of these!

Pinecone Embellishment - My sweet wreath embellishment is made from the new Cherry Cobbler Silky Taffeta Ribbon and some mini pinecone embellishments, tied on with linen thread. I love it when we get a new catalogue - there are always fun new trinkets and charms that are perfect for dressing up projects!

Merry and Bright - My banner is from the new 'Stitched With Cheer' stamp set. I stamped it in Versamark and heat embossed in Copper - I just can't get enough of it! This stamp set is another that co-ordinates with the existing Bunch of Banners framelits dies - always good to get more mileage from existing items you own :-)

Such a fun card! I made a bright green envelope to co-ordinate too using my Envelope Punch Board so this card is officially good to go - another one for my stash.

Here is the visual summary of the key products used on today's project for you to pin for easy reference:


You can see all of my 'How To' summaries on my 'How To - Tips and Techniques' Pinterest board in case you've missed any. 

Before you reach for your ink and papers, check out what our amazing team has created to inspire you this week:

The Paper Players Design Team
 
 
Here's a quick recap of our challenge rules:
 
1.  Create a new paper project
2.  Upload your creation to your blog with a link back to us and provide a direct link to the post featuring your challenge submission.
3.  Please link your card to no more than four challenges, TOTAL.
4.  Have FUN! 


I look forward to seeing what you create with this week's theme.

Back tomorrow with another project; until then, happy stampin'!


Stampin' Up! Supplies Used:

Table built using Product Table Builder by The Crafty Owl - Independent Stampin' Up! Demonstrator.

The Best Things In Life Are Sweet

by Joanne James21. August 2016 10:00

It's Sunday and time for a new challenge over at The Paper Players! It's the super-talented Sandy's turn to host this week and she has a fun theme for you to work with:


I also used this week's sketch over at Freshly Made Sketches for my layout. Ok, so first up - a confession! I was so excited to have some child-free craft time to make my card earlier this week, that I did go a little crazy with my layering and so my card is not maybe as CAS as it should be. That said, I love it too much not to share :-) So - here's my card:


Here's the low-down on today's card:

A Sweet Cupcake - What's sweeter than a cupcake? This delicious triple-time stamped number is so easy to create with the Sweet Cupcake stamp set. The photopolymer stamps make lining up the images a piece of cake (yes, pun intended!) and having mounted my card on a couple of layered circles I used the 'sweet' from the co-ordinating Cupcake Cutouts Framelits to finish my sentiment, which I brushed with clear Wink of Stella for a little shimmer.

Sugar Frosting - Those of you who attended Onstage in April or follow the Facebook page of the Stampin' Up! CEO, Sara Douglas, will have seen her demonstrate this set and finish with some textured frosting. I decided to get creative with my cupcake and give it a go! It was really easy to make - I've included the recipe on my 'How To - Tips and Techniques' image below - an adds an interesting texture and dimension to the third layer of frosting. I went one step further and whilst wet sprinkled my frosting with Dazzling Diamonds to create a really sparkling sugary finish - yum! The photo below shows the dimension of the frosting in more detail:

Almost good enough to eat! Thank you Sara for this fun suggestion to step up our cupcake creations!

Playful Palette-inspired Colour Combo - I used one of the patterns in the Playful Palette designer series paper stack as the starting point for my card today and paired my Sweet Sugarplum, Blushing Bride, Very Vanilla combo with Chocolate Chip - feel free to save this colour combination if it's one that appeals to you:


Here is the visual summary of the key products used on today's project - including the recipe to create your own frosting - for you to pin for easy reference:


You can see all of my 'How To' summaries on my 'How To - Tips and Techniques' Pinterest board in case you've missed any. 

Before you reach for your ink and papers, check out what our amazing team has created to inspire you this week:

The Paper Players Design Team
 
 
Here's a quick recap of our challenge rules:
 
1.  Create a new paper project
2.  Upload your creation to your blog with a link back to us and provide a direct link to the post featuring your challenge submission.
3.  Please link your card to no more than four challenges, TOTAL.
4.  Have FUN! 


I look forward to seeing what you create with this week's theme.

Back tomorrow with another project; until then, happy stampin'!


Stampin' Up! Supplies Used:

Table built using Product Table Builder by The Crafty Owl - Independent Stampin' Up! Demonstrator.

Mondrian-Inspired Colourblock Congratulations Card

by Joanne James14. August 2016 10:00

It's Sunday and time for a new challenge over at The Paper Players! It's my dear friend Claire's turn to host this week and she has a great palette of primary colours for you to work with:

    AYSIChallenge140

These colours are perfect for a back to school project. I actually used these colours for a quick card that I made for this week's sketch challenge over at the As You See It Challenge earlier this week but couldn't link it up as their site is down, so I thought I would instead share it today (edited to add: subsequently back on line now so I've linked):


There is so much you could do with the AYSI sketch, but I found myself constantly returning to the idea that it had all the makings of a Mondrian painting - so I decided to create a clean and simple card in that style. Here's the low-down on today's card:

Mondrian Blocks of Colour - Piet Mondrian is a Dutch painter famous for his modern art using bold blocks of primary colours and white, delineated with black lines. My card is a super-simple card in this style; my fellow PP designer, Hannelie Bester, has also made a card with a Mondrian influence this week that is much more intricate and detailed and if you're a fan of this style of art you should definitely check it out.

Suite Words of Success - This message of success comes from the 'Suite Sayings' sentiment set. I've not used this set in a while, but I've used it many times earlier this year and it's one I was so pleased to see carried over from the Spring-Summer seasonal catalogue into the annual. This modern font was the perfect fit for my card today.

Perpetual Stars - Rather than leave my sentiment just black on white, I did break with my colour blocking slightly to add a burst of bright yellow stars to add to the celebratory feel. I used the star stamp from the Perpetual Calendar stamp set for this - such a useful set with lots of small stamps that are perfect for small details. 

I know lots of students expecting GCSE exam results this year, so I thought this would make a great exam success card. Maybe one that would work for a boy too - not too 'pretty'!

Here is the visual summary of the key products used on today's project for you to pin for easy reference:


You can see all of my 'How To' summaries on my 'How To - Tips and Techniques' Pinterest board in case you've missed any. 

Before you reach for your ink and papers, check out what our amazing team has created to inspire you this week:

The Paper Players Design Team
 
 
Here's a quick recap of our challenge rules:
 
1.  Create a new paper project
2.  Upload your creation to your blog with a link back to us and provide a direct link to the post featuring your challenge submission.
3.  Please link your card to no more than four challenges, TOTAL.
4.  Have FUN! 


I look forward to seeing what you create with our colours this week.

Back tomorrow with another project; until then, happy stampin'!


Stampin' Up! Supplies Used:

Table built using Product Table Builder by The Crafty Owl - Independent Stampin' Up! Demonstrator.

Serene Scenery Sunshine

by Joanne James31. July 2016 10:00

It's Sunday and time for a new challenge over at The Paper Players! It's the turn of the lovely Laurie to host this week and she has a fun tic-tac-toe board challenge for us to play along with:


I have been rather time-pressed this week - the joys of school summer holidays! - so although I knew what I wanted to do with today's challenge, it took me some time to find the time to get to my desk to make it! For my card this week I decided to go with the middle column of Laurie's card and create something that was reminiscent of warm, sunny summer days, with the help of this week's sketch over at Global Design Project - take a look:


Here's the low-down on today's card:

A Serene Scene Indeed - I chose to use a piece of the beautiful Serene Scenery designer series paper for my card today. The photographic images in this paper stack are just so beautiful, they really don't need much other than a sentiment to finish a card. Inspired by nature, there are several images that feature sunshine in this pack and for this card I decided to go with this grassy field, with its warm summer glow. I made my card larger than usual (the finished card measures 14.9cm x 21cm) as I wanted to feature as much of this beautiful paper as possible.

Sunshine Says It All - I used a 'sunshine' diecut sentiment from the Sunshine Wishes die set to finish my card. I toyed with adding the rest of my sentiment using the Sunshine Sayings stamp set to the front of my card, but decided to stamp it inside instead as I really wanted to keep the front as clean as possible. I will let you into a little secret though: in hindsight it should be set a little more to the left, so that it doesn't get as absorbed into my white mat layer, but with no time to go back and start again I'm going to have to live with it! Sshhh - don't tell ;-)

Sunny Honey - The eagle-eyed amongst you will notice that my card base looks a little light for the Delightful Dijon that this paper stack co-ordinates with; the mustard yellow made my card look more autumnal than summery, so I took a piece of my retired in-colour cardstock in Hello Honey to get the colour I was looking for. It always help to stockpile a little retired cardstock for such instances - and I know I'm not the only one! I finished with a sliver of Old Olive cardstock and some Delightful Dijon ribbon for my banners, and a Classy Designer Button threaded with Old Olive baker's twine.

Here is the visual summary of the key products used on today's project for you to pin for easy reference:


You can see all of my 'How To' summaries on my 'How To - Tips and Techniques' Pinterest board in case you've missed any. 

Before you reach for your ink and papers, check out what our amazing team has created to inspire you this week:

The Paper Players Design Team
 
 
Here's a quick recap of our challenge rules:
 
1.  Create a new paper project
2.  Upload your creation to your blog with a link back to us and provide a direct link to the post featuring your challenge submission.
3.  Please link your card to no more than four challenges, TOTAL.
4.  Have FUN! 


Family calls so I'm off to get back to having fun of the non-crafting kind! One last thing: don't forget today is the last day that you can take advantage of the July Bonus days offer; if you are placing an order online, make sure you use this month's hostess code 63RNATE3 when prompted to get a little thank you in the post from me. This hostess code will be closing tonight at 8pm, so be sure to get your orders in before then. I look forward to seeing what you create with Laurie's board this week.

Back tomorrow with another project; until then, happy stampin'!


Stampin' Up! Supplies Used:

Table built using Product Table Builder by The Crafty Owl - Independent Stampin' Up! Demonstrator.

Hoping Your Day Goes Swimmingly By The Shore Nautical Card

by Joanne James24. July 2016 10:00

It's Sunday and time for a new challenge over at The Paper Players! It's the turn of my sweet friend LeAnne to host this week and she has my favourite, a sketch challenge for us to play along with:


This is one of those sketches that has so many possibilities and when I sat down with my sketch book I came up with about six different cards straight off, there were just so many choices! In the end I decided to go with the soft and nautical By The Shore suite to create a rather fishy card today - take a look:


Here's the low-down on today's card:

Under The Sea - My regular readers will know that the James' are a family of keen swimmers and scuba divers, so this was never going to be a set I could pass up for long! Fishes, seaweed, bubbles, an anchor, shells and starfish, along with some great sentiments and rope/border stamps - a veritable underwater cornucopia. I used the main sentiment on my card today, inked up using my Stampin' Write marker to easily incorporate each of the three colours that feature most strongly in this suite and cut out with my circle framelits and used the seaweed in Mint Macaron to add a little background interest, stamping off once first to give a paler colour. I used an all-blue angel fish (if there is such a thing!) as my embellishment element as per the sketch, popping it up slightly higher than my sentiment circle. Here is today's colour combination should you wish to save it to use again too:


By The Shore - The By The Shore Designer Series paper has some wonderful patterns, including two sheets of ombre in coral and denim blue. The Calypso Coral ombre worked perfectly for my card base, and I also used a piece with a circular pattern for my vertical banner - it reminded me of bubbles, in an abstract way, so it co-ordinates with the other elements of my card.

Nautical Details - In addition to my sentiment and fish, I added a few other nautical details: I stamped a trio of starfish on my card base directly onto the ombre paper, added some pearls and finally a sailor's reef knot in vanilla baker's twine around my horizontal banners. This adds a lot of dimension to my card, making it a little un-post friendly, but I like the added texture and detail it gives so I will just save this card for someone closer to home.  

Here is the visual summary of the key products used on today's project for you to pin for easy reference:


You can see all of my 'How To' summaries on my 'How To - Tips and Techniques' Pinterest board in case you've missed any. 

I love this fun set and just know I will get tons of use from it. The lovely Linda Callaghan also used this set this week - her card is beautiful and quite different to mine so be sure to check it out for additional nautical inspiration.

Before you reach for your ink and papers, check out what our amazing team has created to inspire you this week:

The Paper Players Design Team
 
 
Here's a quick recap of our challenge rules:
 
1.  Create a new paper project
2.  Upload your creation to your blog with a link back to us and provide a direct link to the post featuring your challenge submission.
3.  Please link your card to no more than four challenges, TOTAL.
4.  Have FUN! 


I look forward to seeing what you create with our sketch this week.

Back tomorrow with another project; until then, happy stampin'!


Stampin' Up! Supplies Used:

Table built using Product Table Builder by The Crafty Owl - Independent Stampin' Up! Demonstrator.

Simple Watercolouring With Bella And Friends

by Joanne James17. July 2016 09:00

It's Sunday and time for a new challenge over at The Paper Players! It's the turn of the lovely Jaydee to host this week and she has a clean and simple challenge for us to play along with:


As I was working through trying to get my cards done before my impending vacation, I was grateful for Jaydee's choice of clean and simple theme this week - watercolouring. For my card this week I decided to use my new 'Bella and Friends' stamp set and create a truly 'clean and simple card. Take a look: 


Here's the low-down on today's card:

Bella and Friends - Ok, so hands up who doesn't think this cute puppy dog set is adorable?! As my regular readers will know I am not really a pet person and so I don't have many of those kinds of stamps (read the trouble that got me into in this post earlier in the year!). With the retirement of my beloved 'Giggle Greetings', I needed an animal stamp - and the minute I saw this stamp set, I was in love! The cute puppy dog so reminds me of my brother-in-law's dog Ollie and he was the colour inspiration for my puppy today - a mix of Soft Suede and Delightful Dijon. This set is perfect for colouring, whether with an aquapainter or markers, and is also great for clean and simple cards. I like it so much, I may even be tempted to purchase the 'Pretty Kitty' cat equivalent too!

Have aquapainter, will watercolour - My favourite way to colour images like this is to use my aquapainters. I simply stamped the image in Stazon onto watercolour paper, and got right to it! I coloured the images then added a little Soft Sky and Wild Wasabi for the landscape and was done. This kind of card is good for the soul - whether it takes minutes or hours, I find colouring with my aquapainters wonderfully theraputic. How about you?

Clean and Simple - This card ticks all the boxes for a clean and simple card: minimal layers and embellishments, one simple focal image focused on one third of the card and easy to recreate - yay! 

Here is the visual summary of the key products used on today's project for you to pin for easy reference:


You can see all of my 'How To' summaries on my 'How To - Tips and Techniques' Pinterest board in case you've missed any. 

Before you reach for your ink and papers, check out what our amazing team has created to inspire you this week:

The Paper Players Design Team
 
 
Here's a quick recap of our challenge rules:
 
1.  Create a new paper project
2.  Upload your creation to your blog with a link back to us and provide a direct link to the post featuring your challenge submission.
3.  Please link your card to no more than four challenges, TOTAL.
4.  Have FUN! 


I look forward to seeing your clean and simple watercoloured creations this week. I'm off for another day of fun in the sun!

Back tomorrow with another project; until then, happy stampin'!


Stampin' Up! Supplies Used:

Table built using Product Table Builder by The Crafty Owl - Independent Stampin' Up! Demonstrator.

Blooms and Wishes For The Paper Players

by Joanne James10. July 2016 10:00

It's Sunday and time for a new challenge over at The Paper Players! It's the turn of our fearless leader the awesome Nance to host this week and she has a colour challenge for us to play along with:


For my card this week I decided to use this week's Freshly Made Sketches sketch and took my inspiration from the Blooms and Bliss suite to create my card today:


Here's the low-down on today's card:

Blooms and Bliss Colour Combo - The trio of colours chosen by Nance for today's challenge all appear in the Blooms and Bliss Suite and in particular the designer series paper of the same name, so I was drawn here for the starting point for today's card. Having ooh-ed and ahh-ed at the whimsical floral patterned papers, I eventually settled upon this rather bold, mostly Island Indigo, patterned paper for the base of my card. This pattern is great for a background as it doesn't interfere with the detail of the focal image and the watercolour-like flecking adds a softness to this otherwise strong colour.

Blooms and Wishes - I decided to create a randomly stamped floral panel as the focal point for my card, featuring each of the challenge colours and using the co-ordinating Blooms & Wishes stamp set to create an almost watercoloured effect. I used a combination of both first and second generation stamping for each of the colours to add depth and overlapped the flowers slightly too. This is the only place where there is any Sweet Sugarplum on my card, yet it performs an important role: without it the card would be perfectly co-ordinated, but rather flat. The addition of the warm lilac tones prevents this card from being too 'cold' and clinical I think. I finished with my sentiment stamped in Island Indigo onto Mint Macaron cardstock, for an additional burst of strong colour.

A Simple Oval - I don't use ovals all that often on my cards, but since the sketch asked for one here I thought I would follow it literally and do think it makes a pleasant change from squares or circles and is the perfect shape for my florals. I left it frameless to enable the white to really stand out against the background and added nothing more than a few pearls for a subtle embellishment. 

The Blooms and Bliss suite is such a pretty set of co-ordinating products, with plenty of scope for artistic expression.

Here is the visual summary of the key products used on today's project for you to pin for easy reference:


You can see all of my 'How To' summaries on my 'How To - Tips and Techniques' Pinterest board in case you've missed any. 

Before you reach for your ink and papers, check out what our amazing team has created to inspire you this week:

The Paper Players Design Team
 
 
Here's a quick recap of our challenge rules:
 
1.  Create a new paper project
2.  Upload your creation to your blog with a link back to us and provide a direct link to the post featuring your challenge submission.
3.  Please link your card to no more than four challenges, TOTAL.
4.  Have FUN! 


I look forward to seeing what you create with Nance's colour combination this week.

I am looking forward to a day of rest and relaxation in the sun today and some quality family time. Back in the next day or so with another project; until then, happy stampin'!


Stampin' Up! Supplies Used: 

Table built using Product Table Builder by The Crafty Owl - Independent Stampin' Up! Demonstrator.

A Little Foxy Festive Reindeer

by Joanne James3. July 2016 09:00

It's been a busy week with blogging every other day I'm afraid as there is just so much happening in the James household. Rebecca gave a sterling performance as Dorothy in the Wizard of Oz on Thursday and whilst Friday evening was a relatively quiet one, I did not manage a post! Yesterday I did manage to finish my preparations for next week's classes and make a few more cards, so onwards and upwards as the saying goes! 

Today it's Sunday and time for a new challenge over at The Paper Players! It's the turn of the lovely Sandy to host this week and she has a festive themed challenge for us to play along with:


Christmas in July - now that is what I call organised! For my card this week I decided to use my Foxy Friends bundle again - this time to create a cute reindeer for my Christmas card. I also used this week's Mojo Monday sketch and the Color Throwdown colour palette for my creation:


Here's the low-down on today's card:

A Little Foxy Festive Reindeer - As I mentioned last week, the 'Foxy Friends' stamp set makes all kinds of cute baby critters and woodland animals - including a festive reindeer. Aren't those little antlers just adorable?

Lots of Labels - I decided to frame my stamped reindeer with a double mat in Real Red and Chocolate Chip using the Lots of Labels framelits. These framelits are great for layering and create a little more interest than a standard rectangle.

Red-Nosed Rudolf - I have used a number of retired products on my card today: the red button, the circle framelits to cut the background circle and the paper that I used for it (it's so vintage I don't even remember its name!) but since the background paper has a lovely glittery red polka dot pattern, I decided I did need to use one of my new favourite embellishments to finish my card in style: a Real Red Enamel Shape circle - the perfect finishing touch for my reindeer's nose!

I just love the versatility of this stamp set; that coupled with my first Christmas card of the year I think makes this a worthy card! Here is the visual summary of the key products used on today's project for you to pin for easy reference:


You can see all of my 'How To' summaries on my 'How To - Tips and Techniques' Pinterest board in case you've missed any. 

Before you reach for your ink and papers, check out what our amazing team has created to inspire you this week:

The Paper Players Design Team
 
 
Here's a quick recap of our challenge rules:
 
1.  Create a new paper project
2.  Upload your creation to your blog with a link back to us and provide a direct link to the post featuring your challenge submission.
3.  Please link your card to no more than four challenges, TOTAL.
4.  Have FUN! 

I look forward to seeing your Christmas creations in the gallery this week.

It is another big day in the James household today: Ben was selected for the Northamptonshire county allstars under-10s basketball team and he has his first match against Oxfordshire this afternoon. It's a big deal as he is one of only 12 children selected across the whole of the county - and we are all going to cheer him on for his match. Wish him luck!

Back tomorrow with another project; until then, happy stampin'!


Stampin' Up! Supplies Used:

Table built using Product Table Builder by The Crafty Owl - Independent Stampin' Up! Demonstrator.

What Does The Fox Say? Foxy Friends

by Joanne James26. June 2016 09:00

It's Sunday and time for a new challenge over at The Paper Players! Thank you to everyone who joined us for our 300th anniversary celebrations last week - there were some fabulous cards in the gallery and it's your support for our challenge that keeps us going. Congratulations to all those who were winners in our grab bag prize draw - I'm looking forward to sending mine out to someone soon!

It's my turn to host again this week and I have my most favourite of all challenges, a sketch, for to play along with:


For my card this week I decided to go with some of my favourite new items from the new annual catalogue - the Little Foxy Suite:


Here's the low-down on today's card:

More Than A Little Foxy - So I'm in love with this cute fox! The 'Foxy Friends' stamp set makes all kinds of cute baby critters and woodland animals - I think this fox is just the sweetest. The fact that he comes with a co-ordinating punch - I used it here to punch out his head for extra dimension - is a bonus and the co-ordinating paper stack makes this suite a force to be reckoned with. 

Layered Layers - My card today is all about the layers. Whilst my sketch looks quite simple, I used a total of 9 separate layers on my card. In addition to my mats and patterned papers, I used the new Layering Circles Framelits to create the surrounds for my woodland scene, added to which partial diecutting of the uppermost circle and the masked stamping of the fox, tree stump and trees, adds further depth and the illusion of even more layers.

What Does The Fox Say? - I thought this would make a fun sentiment for my card today, easily created using the Labeler Alphabet, which is perfect for bespoke sentiments and cut out with the Project Life Cards and Labels Framelits. I highlighted the word 'Fox' in Calypso Coral with the solid letters and added an enamel heart too. Oh and my fox - he says "Happy Birthday!" in case you were wondering :-)

Here is the visual summary of the key products used on today's project for you to pin for easy reference:


You can see all of my 'How To' summaries on my 'How To - Tips and Techniques' Pinterest board in case you've missed any. 

Before you reach for your ink and papers, check out what our amazing team has created to inspire you this week:

The Paper Players Design Team
 
 
Here's a quick recap of our challenge rules:
 
1.  Create a new paper project
2.  Upload your creation to your blog with a link back to us and provide a direct link to the post featuring your challenge submission.
3.  Please link your card to no more than four challenges, TOTAL.
4.  Have FUN! 


I look forward to seeing what you create with my sketch this week. I have a day of sewing in store with some last minute guard costumes to make for Rebecca's school production of the Wizard of Oz this week, so my day will involve much green fur fabric - wish me luck!

Back tomorrow with another project; until then, happy stampin'!


Stampin' Up! Supplies Used:

Table built using Product Table Builder by The Crafty Owl - Independent Stampin' Up! Demonstrator.
 

Mini Catalogue

BROWSE THE CATALOGUE

The mini catalogue is now live! Read and download your copy here.

Shop Online

Access my online shop 24 x 7, 365 days of the year:

Current April hostess code:

VDKNV7BH

Shop Online

Join My Team

It's always a great time to join Stampin’ Up! New team members can get £130 worth of products for only £99 + free business supplies + free shipping + all the fun being a part of Stampin’ Up! Stampin' Up! has something for everyone: join my growing team and benefit from my support to enjoy Stampin' Up! however you choose.

If you're interested, call me for a chat to understand how I can help you realise your goals. Alternatively, if you have already decided to sign up and you just can't wait, please click here for the link to the online form where you can sign up and order your starter kit right away! 

Latest Kit!

Stampin Cut and Emboss

The Rock Legend Kit has all you need to make 8 cards with coordinating envelopes. Along with the new Panda Friends Kit, both are available from January 4th for just £14 each - get yours here!

2023-24 Annual Catalogue

BROWSE THE CATALOGUE

Click on the catalogue for a full list of current SU! supplies - if you would like to order any of the items featured, please drop me a line at [email protected] or give me a call on 07773 421446 - I'd be happy to help.

New Online Exclusives

There are new products available exclusively in the online store from 5 March - check them out here.

About Me

Hi I'm Joanne and live in Northampton and when I'm not looking after my husband and two beautiful children, am an avid crafter with a passion for all things Stampin' Up!

I must confess that I have never been a big rubber stamper - until I discovered Stampin' Up! that is. I love the fact that I can get such great results with co-ordinating stamps, inks, papers and punches - the possibilities are endless! Join me on my stamping journey as I share the things I love and be inspired to create amazing things yourself!

Follow Me

Monthly Newsletter

Box Builder

Click the button above to use Box Buster to create your custom box design using the Envelope Punch Board!

Kits Collection Now Available!

Stampin Cut and Emboss

The new Kits Collection from Stampin' Up! is now available!

Click here to see the current kits available and order yours online today.

I Design For


Stampin' Up Stuff

This is my personal blog and is not endorsed by Stampin’ Up! I hope you find it a plentiful source of ideas and personal inspiration but please don't copy my designs for contest submission or use for classes, publication or sale without express permission.