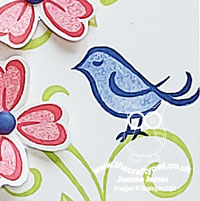
Simple Stamping With In Colours And Sentimental Swirls

by Joanne James30. May 2022 08:00

Happy Monday everyone! Today I'm sharing a card that uses the sketch layout over at Hand Stamped Sentiments that showcases four out of the 5 new in-colours - perfect for the challenge over at Colour Inkspiration CI#122 too:

    May be an image of text that says "Sweet Sorbet intts Parakeet Party COLOUR InSPRTN #122 CHALLENGES aht Tahitian of Tide 3 least at Choose Orchid Oasis n Starry Sky"

I decided to start the week with some #simplestamping using a set that is perfect for the beginner stamper and the banner on the HSS layout was the ideal place to showcase it - take a look:


Here's the low-down on today's card:

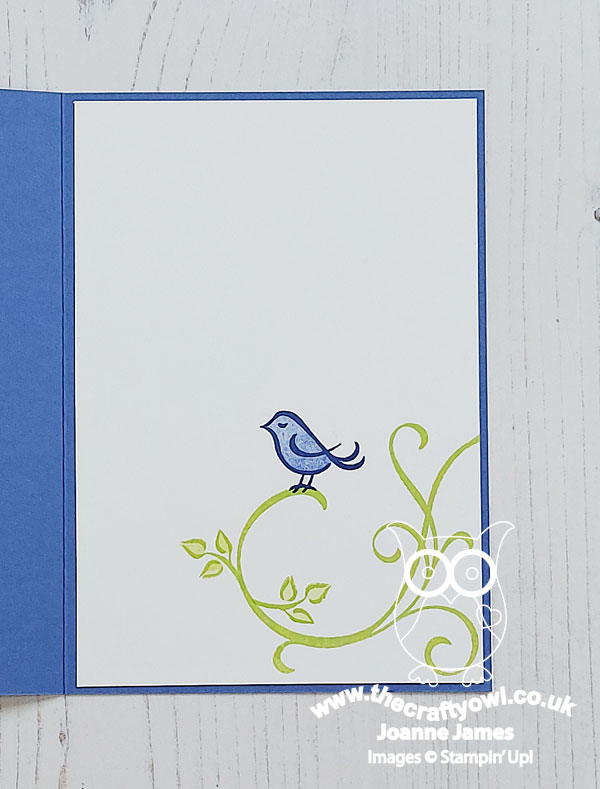
Sentimental Swirls The 'Sentimental Swirls' stamp set was inspired by our very first £1m sales achiever in the UK, Sam Hammond. It comprises a basic swirl, with additional swirls, leaves, flowers, a bird, a butterfly and some simple, sentiments perfect for the most popular types of cards - birthdays, thank yous and general hellos. The set has endless creative possibilities and as it's photopolymer, it's really easy to line up the images or the infills. I created a leafy swirl that fills my banner and stamped a bird onto one of the vines, before adding my flowers and sentiment separately. I also added a little extra decoration to the inside of my card:
 

Step It Up With Punch Co-ordination - Sentimental Swirls is great for one layer stamping, but it's also easy to step up your designs by using the Flowers and Leaves punch from the annual catalogue, which punches out one of the flowers in the set. That's what I did on my card, adding some Orchid Oasis enamel dots to the centres and curving the petals slightly with my bonefolder before adding my flowers to my card:
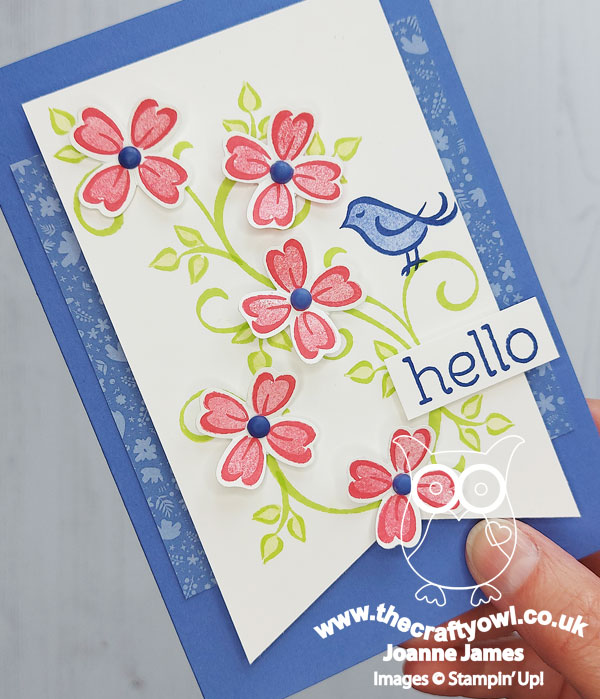
 

I used a panel of in-colour designer series paper in a floral design behind my banner for a touch of extra detail.

An Added Extra - I also used this set for some thank you cards to pop in with some recent customer orders and for the bag tags. The smaller flower in the set also co-ordinates with the flower of the (now retired) Strawberry Builder Punch - you can see that on the tags below:
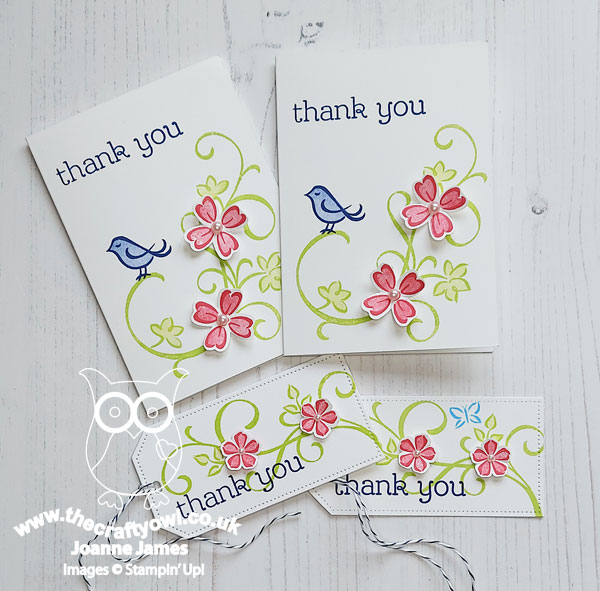
 

So if you already have this punch in your collection, you will have even more creative possibilities available to you with this set.

Here is the visual summary of the key products used on today's project for you to pin for easy reference:
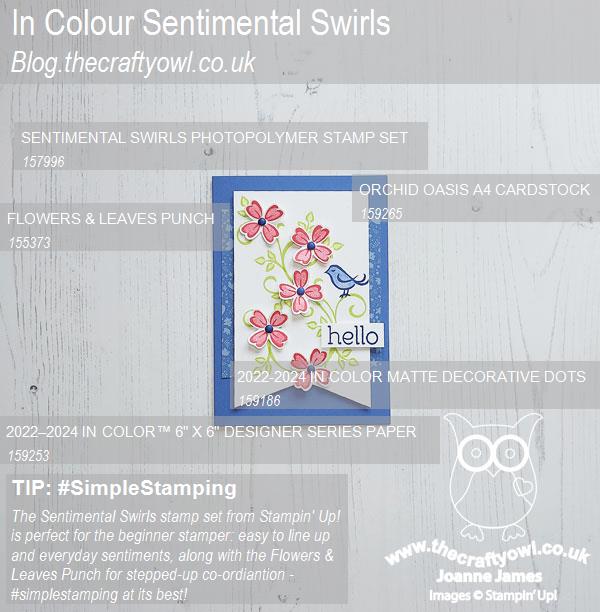
 

You can see all of my 'How To' summaries on my 'How To - Tips and Techniques' Pinterest board in case you've missed any. 

Sentimental Swirls is such a great set for simple cards that can be easily stepped up by adding in a punch (or two). It's in the January-June mini catalogue and whilst I've had it since I made my pre-order, I haven't shown it on my blog until now - which is a shame, as it's a great set that didn't carry over to the new annual catalogue, so you only have until the end of June to get your hands on it. The good news though is that on Wednesday this stamp will hit the Last-Chance list so you will be able to pick it up for just £14.70 - that's a 30% discount on the catalogue price, bargain!

I love the way that the in-colours coordinate so well together too; today's card features all of them except Tahitian Tide (you can glimpse a butterfly in this colour on one of my tags if you need a quick fix!)
 

A quick reminder that the current joining promotion that features an in-color kit in addition to the £130 of product of your choice - and all for £99 - closes tomorrow. Read all about it here if you'd like a reminder - I would love to welcome you to my team. Alternatively, I still have places left in my current in-colour club - details on the same link above.

Enjoy your day and I'll be back tomorrow with another project. Until then, happy stampin'!


Stampin' Up! Supplies Used:

Table built using Product Table Builder by The Crafty Owl - Independent Stampin' Up! Demonstrator.

Strawberry Builder Punch Gnome Art PP568

by Joanne James21. November 2021 08:00

Today it's Sunday and time for this week's new challenge over at The Paper Players! It's the turn of the fabulous Laurie to host this week and she has a fun Clean and Simple challenge for you to work with:


I couldn't resist another crack at Kim's fabulous layout over at Freshly Made Sketches this week and paired with the colours over at Color Dare (I added Cherry Cobbler red as my fourth colour) for today's card - take a look:


Here's the low-down on today's card:

I started out planning today's card with some trepidation; whilst I still have my retired 'Gnome for the Holidays' stamp set, I have no other current gnome stamp sets. I decided though that I would rise to the challenge and embark on trying to create one using some current supplies to fashion some gnome punch art. A quick perusal of Pinterest, I chose a cute cuddly gnome to base my design on, grabbed some current supplies and tools and set to work! I used the largest of the skinny Christmas trees from the Christmas Tree Dies and my Strawberry Builder Punch to make my gnome. I used some offcuts of Peaceful Place designer paper for my gnome body and the top horizontal strip above my sentiment, along with some Snowy White Velvet Paper for his beard and moustache for some subtle texture and a matt dot for his nose. A piece of snowflake behind and a tiny one on his hat, along with a sentiment from 'Penguin Place' complete my clean and simple gnome card:

I created a basic crib sheet so that you can see the main elements of my gnome and how I trimmed them, in case you fancy having a go at making one yourself - feel free to save this for future use:

I based the design of my punch art gnome on one of the ones in the retired 'Gnome For The Holidays' stamp set, which I stamped on the inside of my card for added decoration:

 As you can see, I decided I liked this card so much I made another - I think these little gnomes are rather cute, even if I say so myself!

I think I did a pretty good job of meeting the 'clean and simple' brief too - remember in addition to featuring a gnome (or elf, or fairy!) on your card it should also be clean and simple:

  • minimal layers
  • little/no embellishments
  • lots of clean white space (no pattern)
Here is the visual summary of the key products used on today's project for you to pin for easy reference:


You can see all of my Product and 'How To' summaries on my 'How To - Tips and Techniques' Pinterest board in case you've missed any. 

Before you reach for your ink and papers, check out what our amazing team has created to inspire you this week:

Here's a quick recap of our challenge rules:
 
1.  Create a new paper project
2.  Upload your creation to your blog with a link back to us and provide a direct link to the post featuring your challenge submission.
3.  Please link your card to no more than four challenges, TOTAL.
4.  Have FUN!

You can see all of my 'How To' summaries on my 'How To - Tips and Techniques' Pinterest board in case you've missed any. 

Enjoy your day; mine is shaping up to be a rather uneventful one - here's hoping anyway! I'll be back tomorrow with another project. Until then, happy stampin'!


Stampin' Up! Supplies Used: 

Table built using Product Table Builder by The Crafty Owl - Independent Stampin' Up! Demonstrator.
 
Edit: This card was a WINNER! Kim chose me as her Queen of Clean for FMS512 - woohoo!
 

Sweet Strawberry Thank You Card FMS490

by Joanne James19. June 2021 20:37

Happy Saturday - it's the weekend! Today I'm sharing a card inspired by Jen B's layout over at Freshly Made Sketches:

I had the Sweet Strawberry bundle out on my desk, so thought I'd combine a little something old with something new for today's card - take a look:


Here's the low-down on today's card:

Sweet Strawberries - I used the Sweet Strawberry stamp set and Strawberry Builder Punch as the focus for my card today, retaining Jen's circle and using it as a base for a couple of punched strawberries and leaves.  I also added a little additional decoration inside my card:

Something Old - My 'something old' is the Berry Blessings DSP that I used, that was one of the free gifts with Sale-A-Bration earlier this year. I used if for my card base and stitched rectangle, and also punched my strawberries from the paper. Don't you just love this bold red and green combo?

Something New - My 'something new' is the checked embossing folder I used on my white panel. This check reminds me of picnic baskets so I thought would work well with the summery strawberries! Not that there's much chance of a picnic here at the moment - our beautiful sunny weather has been replaced with torrential rain all day yesterday!

Here is the visual summary of the key products used on today's project for you to pin for easy reference:


You can see all of my 'How To' summaries on my 'How To - Tips and Techniques' Pinterest board in case you've missed any. 

Enjoy your evening and I'll be back tomorrow with another project. Until then, happy stampin'! 

Stampin' Up! Supplies Used:

Table built using Product Table Builder by The Crafty Owl - Independent Stampin' Up! Demonstrator.

Sweet Strawberry Thank You Card

by Joanne James22. March 2021 14:30

I've had a busy start to my week, with a run and a class featuring the beautiful 'Friends are like Seashells' bundle. Today I have a couple of blog posts, the first one using the sketch over at Hand Stamped Sentiments:


Such a great sketch! I decided to switch out the square for a circle to soften the edges and feature some yummy-looking strawberries and the Sweet Strawberry bundle - take a look:


Here's the low-down on today's card:

I cut up some of my Sale-A-Bration Berry Delightful DSP for my focal cluster of strawberries and blossoms, punching out the shapes with my Strawberry Builder Punch - I just love the easy watercoloured look of these papers, and added some tone-on-tone stamping of additional blossom and leaves from the Sweet Strawberry stamp set in Granny Apple Green onto my Soft Sea Foam base and blended in some extra Soft Sea Foam ink with my blending brush, before running through my Subtle Embossing Folder for some added light texture. I embossed my sentiment in white onto a contrasting Real Red banner, adding some twine and pearls to finish.


Here is the visual summary of the key products used on today's project for you to pin for easy reference:


You can see all of my 'How To' summaries on my 'How To - Tips and Techniques' Pinterest board in case you've missed any. 

I'm also liking today's card up over at SUO Challenges where they have the theme of 'sweet things - food and drink'. These strawberries definitely look good enough to eat, which will have to do for a few months yet until the real thing comes into season here in the UK in mid June.

Enjoy your day; I'm off on the school run but I'll be back later with another card from my crafty weekend endeavours! Until then, happy stampin'!


Stampin' Up! Supplies Used:

Table built using Product Table Builder by The Crafty Owl - Independent Stampin' Up! Demonstrator.

Sweet Strawberry and Berry Blessings Birthday Wishes For PP525

by Joanne James24. January 2021 09:00

Today it's Sunday and time for this week's new challenge over at The Paper Players! It's my turn to host this week and I have my favourite, a sketch challenge for you to work with:


I chose a simple layout for my sketch so that it give lots of creative licence. I decided to take the opportunity to break out another new bundle, or two bundles in fact. Today's card is all about the berries - take a look:


Here's the low-down on today's card:

Sweet Strawberry - Today's starting point was the strawberry that I used to anchor my sentiment - courtesy of the Sweet Strawberry stamp set. The set comes complete with two-step stamps for a berry, flower, leaf and stem, in addition to a selection of varied sentiments. Interesting fact for you: did you know that technically, a strawberry is not actually a berry at all? Botanists call the strawberry a "false fruit," or a pseudocarp. A strawberry is actually a multiple fruit which consists of many tiny individual fruits embedded in a fleshy receptacle. Who knew?! I also used the stamps to decorate the inside of my card:


Strawberry Builder Punch Tip - A stamp set with a co-ordinating punch is always great for quick embellishments and whilst I've shared this tip with you before, I thought it worth reminding you of a great way to save even more time with a builder-type punch. Create a mask using a piece of cardstock with all of the pieces punched out as a guide to stamp the individual pieces. This way, when you put the stamped cardstock into the punch, all of the images are aligned and punch out perfectly - check out the photo below to see what I mean:


Berry Blessings - What could be better than one berry bundle? Well, two of course! One of this year's Sale-A-Bration freebies with a £90 purchase is the Berry Blessings bundle, comprising the Berry Blessings stamp set that features the sentiment on the front of my card along with the Berry Delightful DSP, full of great berry patterns and coloured ginghams and plaids. These bundles co-ordinate perfectly with each other and if you have one, you are probably going to want the other too - check out the hand-painted look below:


This is the first card I've made with these bundles, but they won't be the last - there lots more berries, patterns and colours to choose from!

Here is the visual summary of the key products used on today's project for you to pin for easy reference:


You can see all of my Product and 'How To' summaries on my 'How To - Tips and Techniques' Pinterest board in case you've missed any. 

Before you reach for your ink and papers, check out what our amazing team has created to inspire you this week:

Here's a quick recap of our challenge rules:
 
1.  Create a new paper project
2.  Upload your creation to your blog with a link back to us and provide a direct link to the post featuring your challenge submission.
3.  Please link your card to no more than four challenges, TOTAL.
4.  Have FUN!

You can see all of my 'How To' summaries on my 'How To - Tips and Techniques' Pinterest board in case you've missed any. 

IEnjoy your day; we are forecast snow here in the UK today; the James Juniors are very excited, although I'm not sure it will be enough to build a snowman - I'll update you tomorrow! I'll be back then with another project. Until then, happy stampin'!


Stampin' Up! Supplies Used: 

Table built using Product Table Builder by The Crafty Owl - Independent Stampin' Up! Demonstrator.

Current Promotions

Stampin Cut and Emboss

Save up to 30% off on all your favourite kits from 1 to 31 October! 

Click here to see the current kits available and order yours online today.

Join My Team

It's always a great time to join Stampin’ Up! During October you can get even more in your starter kit! New team members can get £160 worth of products for only £99 + free business supplies + free shipping + all the fun being a part of Stampin’ Up! Stampin' Up! has something for everyone: join my growing team and benefit from my support to enjoy Stampin' Up! however you choose.

If you're interested, call me for a chat to understand how I can help you realise your goals. Alternatively, if you have already decided to sign up and you just can't wait, please click here for the link to the online form where you can sign up and order your starter kit right away! 

Shop Online

Access my online shop 24 x 7, 365 days of the year:

Current October hostess code:

4XPEYCB9

Shop Online

Scrapbooking

Stampin' Up! has introduced a new range of 12x12" scrapbooking product and kit - the full range is now available to purchase online. To download a copy of the new digital Scrapbooking Catalogue click here.

Mini Catalogue

BROWSE THE CATALOGUE

'Tis The Season - the new Stampin' Up! Mini Catalogue is here! For more details and to download your copy click here

2024-25 Annual Catalogue

BROWSE THE CATALOGUE

Click on the image to download your copy of the 2024-25 annual catalogue. For a full list of current SU! supplies, go to my online store. If you would like any help or advice, please drop me a line at joanne@thecraftyowl.co.uk or give me a call on 07773 421446 - I'd be happy to help.

Latest Kits!

Stampin Cut and Emboss

The Christmas Ornaments Kit and Card Keeper Kit are the latest kits in the online store - get yours here!

New Online Exclusives

There are new products available exclusively in the online store from 5 November - check them out here.

About Me

Hi I'm Joanne and live in Northampton and when I'm not looking after my husband and two beautiful children, am an avid crafter with a passion for all things Stampin' Up!

I must confess that I have never been a big rubber stamper - until I discovered Stampin' Up! that is. I love the fact that I can get such great results with co-ordinating stamps, inks, papers and punches - the possibilities are endless! Join me on my stamping journey as I share the things I love and be inspired to create amazing things yourself!

Follow Me

Monthly Newsletter

Box Builder

Click the button above to use Box Buster to create your custom box design using the Envelope Punch Board!

Kits Collection Now Available!

Stampin Cut and Emboss

The new Kits Collection from Stampin' Up! is now available!

Click here to see the current kits available and order yours online today.

I Design For


Stampin' Up Stuff

This is my personal blog and is not endorsed by Stampin’ Up! I hope you find it a plentiful source of ideas and personal inspiration but please don't copy my designs for contest submission or use for classes, publication or sale without express permission.