Pumpkin Thankful Seasonal Wreath for AYSI 213

by Joanne James8. November 2019 12:00

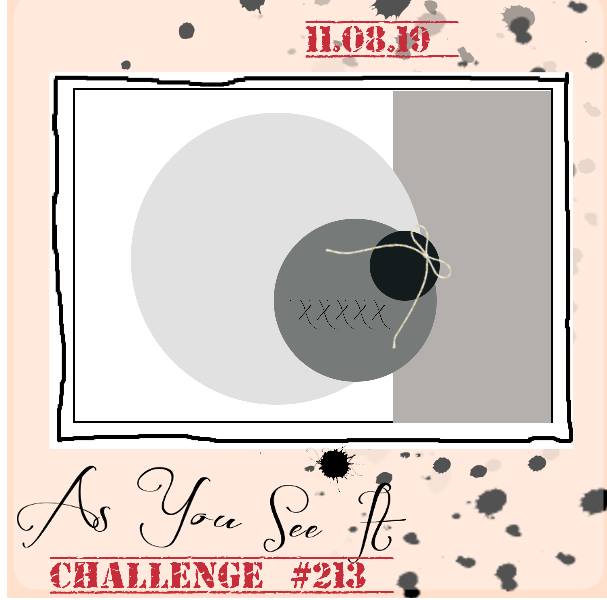
Today I'm sharing my design team card for our new challenge over at As You See It where it's time for my favourite, a sketch challenge:
       RRCB 123

 I considered a number of options before settling on using this week's muted palette over at Color Throwdown to create an autumnal thank you card - take a look:
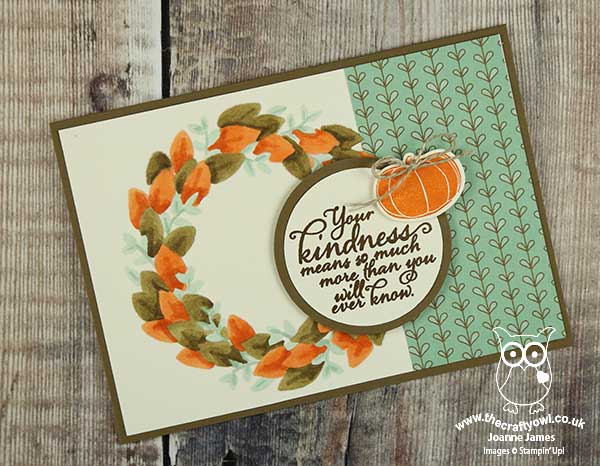
 

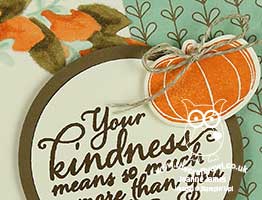
The sketch gave me the opportunity to do something that I've been wanting to try for a while with my Seasonal Wreath embossing folder. I'm also linking up with the Retro Rubber Challenge since they currently have an 'anything goes' theme. I am making a concerted effort to use up more of my retired papers and give some old favourite stamp sets some love so their theme this week is perfect: my card uses a piece of left over retired DSP and a bunch of products that are all more than a year old - read on to see just how old! Here's the low-down on today's card:

A Blended Embossed Wreath - The Seasonal Wreath is in my 'top 5' of favourite embossing folders, especially for Christmas cards. I've had mine since it was launched in 2018 and I do feel it's one of those annual catalogue 'unsung heroes' - lost in the pages at the back of the book, buried amongst the other patterns, but it's great for quick cards and works for all seasons depending on how you decorate/embellish it. I usually use it as a straight forward emboss, but I wondered what it would look like if I coloured it. I decided to try Blends in the first instance and I actually quite like the effect. It isn't as easy to see the dimension from a distance, but even in just three colours I think it gives it a new look.  

Thanks and Appreciation - The sentiment on my card comes from probably my most favourite fall stamp set ever: Painted Harvest. I've had this stamp set since it's launch in 2017 and I can't ever imagine parting with it. Such wonderful thankful sentiments and sunflower stamps that are pretty much foolproof to use and look fabulous in a wide variety of colour combinations. The best thing about it is this set features in the current Stampin' Up! annual catalogue and is still available to purchase :-) The other stamp I've used on my card today is my orange pumpkin embellishment; this stamp is from one of my old sets, 'Pick A Pumpkin', also from 2017 but now retired. I held onto this set and the co-ordinating Patterned Pumpkin Thinlits as they contain some nice pumpkin shapes that work for both fall and Halloween-themed cards alike.

Other 'Oldie but Goodies' - Other items that I've used on today's card that I've had for longer than I can remember are the circle punches I used to layer my sentiment and that piece of Paisley and Posies DSP, which is from Autumn-Winter 2016 - not that I'm a hoarder of patterned paper or anything ...!

I debated whether to add anything else to this card, but decided to leave it 'as is' and allow the wreath to take centre stage. I am enjoying experimenting a little this week and with this card it certainly felt good to use up some bits and pieces, albeit just a few - not sure I made enough of a dent to justify a shopping spree!

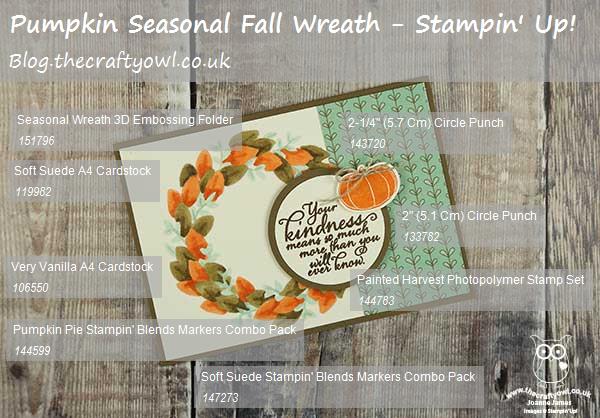
Here is the visual summary of the key products used on today's project for you to pin for easy reference:
 

You can see all of my 'How To' summaries on my 'How To - Tips and Techniques' Pinterest board in case you've missed any. 

Do check out the cards by the other members of the As you See It design team - we have all interpreted the sketch differently so there is a ton of creative inspiration!

Enjoy your day; I have a date with the ironing basket before heading out on the swim run this evening. What are your plans for the weekend? We are having a split one in the James household: the girls are at home looking forward to a weekend full of hockey, GCSE coursework and crafting, whilst the boys are on the school rugby tour to York via Nottingham. Hopefully the pitches won't be too waterlogged to play - I am looking forward to unpacking the kit bags on Sunday already!!

I'll be back tomorrow with another project. Until then, happy stampin'!


Stampin' Up! Supplies Used:

Table built using Product Table Builder by The Crafty Owl - Independent Stampin' Up! Demonstrator.

Knot Good Giraffe Get Well Soon Card for AYSI210

by Joanne James27. September 2019 13:00

I've been a busy bee this week with not much opportunity for blogging, but never fear! Today I'm sharing my design team card for our new challenge over at As you See It where it's time for a recipe challenge:


I went around the houses on this one for a while before I managed to come up with an idea that incorporated each of the elements, however I got there eventually with the help of the troubled giraffe from the 'Back On Your Feet' set - take a look:


Here's the low-down on today's card:

Back On Your Feet - I decided to feature the knotty giraffe from the 'Back On Your Feet' set on my card today. Perfect for a get well card, or even someone who's having a rough time of it, this comical giraffe and punny sentiment is sure to raise a smile. A simple stamp and colour with my Stampin' Blends and he was complete. The one thing that I was struggling to incorporate on this week's card was a diecut then I had a lightbulb moment (yes, sometimes it does happen!!) I used one of the dies from the Animal Friends Thinlits to create a giraffe-patterned background to tie in with my tag. Sorted!  

A Delightful Tag - I used the new Delightful Tag Topper Punch to create the tag that features my giraffe today. My trusty Scalloped Tag Topper Punch is one of my most-used punches - great for gift wrapping, customer bag tags and cards alike. Don't worry, this punch hasn't been replaced - I just added to it with another, slightly more fancy-topped one. If you don't have a tag punch, you should really consider investing in one - they will make creating your Christmas tags super quick and easy.

And The Rest Makes Three - Some stamped and punched leaves, Crumb Cake Nature's Twine and my punny sentiment (one the inside of my card it says "Hope things get better soon.") cropped with a rectangle stitched shape finish off this week's recipe board - and my card!

Here is the visual summary of the key products used on today's project for you to pin for easy reference:


You can see all of my 'How To' summaries on my 'How To - Tips and Techniques' Pinterest board in case you've missed any. 

I do love giraffes and learned lots about them when I visited South Africa on safari many years ago. Did you know you can tell whether they are a girl or a boy by the amount of hair on the end of their horns? Females usually still have hair, whereas males' horns are usually bare from wrestling with each other for the affections of said females. I wonder if this is also the reason for premature balding in males?! 

On that quizzical note I look forward to seeing what you make with this week's recipe challenge when I visit your blogs. Enjoy your day and I'll be back tomorrow with another project. Until then, happy stampin'!


Stampin' Up! Supplies Used:

Table built using Product Table Builder by The Crafty Owl - Independent Stampin' Up! Demonstrator.

Seasonal Leaves And Autumn Plaid For PP458

by Joanne James8. September 2019 09:00

Today it's Sunday and time for this week's new challenge over at The Paper Players! It's the turn of the fabulous Ann to host this week and she has a rather seasonal colour challenge for you to work with:


It has turned unseasonably cold here in the UK this week and the falling temperatures, combined with Ann's warm colour palette immediately turned my thoughts to Autumn leaves and warm and cozy check blankets, both of which inspired my card today - take a look:


Here's the low-down on today's card:

Autumn Plaid - I chose Crumb Cake as my neutral of choice (I didn't count the Very Vanilla since I took white or vanilla as a given!) and used it as the base to create a cosy strip of plaid to tie together the main colours on my card. I used the plaid stamp from the new 'Tiny Keepsakes' stamp set for my plaid; I could have used the 'Buffalo Check' background stamp but the plaid stamp in the 'Tiny keepsakes' set has a smaller check that worked better for my design. I stamped it in Merry Merlot, then added plaid lines with my Cajun Craze and Pretty Peacock Stampin' Write markers.

Seasonal Skeletal Leaves - For the focal decoration of my card, I cut three skeleton leaves using the Seasonal Layers Framelits in each of the main challenge colours, and tucked them in loosely behind my sentiment and swirl of burlap on a stitched rectangle of Very Vanilla. This die set is another perennial favourite of mine and I'm so glad it stayed in the annual catalogue this year - these framelits, along with the co-ordinating 'Colourful Seasons' stamp set, has served me well and I have used both many times, for all sorts of projects. 

Harvest Thanks - I took one of my favourite sentiments for this type of card, from the'Painted Harvest' stamp set, stamped it in Merry Merlot onto Very Vanilla and added this to a banner cut using the Lakeside Framelits, along with a couple of Pretty Peacock faceted dots to anchor it to my finished card.

Here is the visual summary of the key products used on today's project for you to pin for easy reference:


You can see all of my Product and 'How To' summaries on my 'How To - Tips and Techniques' Pinterest board in case you've missed any. 

Before you reach for your ink and papers, check out what our amazing team has created to inspire you this week:

Here's a quick recap of our challenge rules:
 
1.  Create a new paper project
2.  Upload your creation to your blog with a link back to us and provide a direct link to the post featuring your challenge submission.
3.  Please link your card to no more than four challenges, TOTAL.
4.  Have FUN!

You can see all of my 'How To' summaries on my 'How To - Tips and Techniques' Pinterest board in case you've missed any. 

Enjoy your day; I have no big plans today and am looking forward to continuing to enjoy my birthday weekend! I'll be back tomorrow with another project. Until then, happy stampin'!


Stampin' Up! Supplies Used: 

Table built using Product Table Builder by The Crafty Owl - Independent Stampin' Up! Demonstrator.

Wishing You Well Thanksgiving Wreath PP417

by Joanne James4. November 2018 09:00

Today it's Sunday and time for this week's new challenge over at The Paper Players - yay! It's the turn of my wonderful friend Claire to host this week and she has a timely theme challenge for you to work with that I know she would love you to play along with:


I know that Claire loves Thanksgiving and whilst it isn't something we celebrate here in the UK, the underlying theme of being grateful and thankfulness is one we should all celebrate. I used both the sketch layout and photo inspiration over at Fusion and CASual Fridays as starting points for today's card: warm autumn leaves and wood textures feature heavily on my card this week - take a look:


Here's the low-down on today's card:

Textured Layers -  I wanted to create texture on my card and did something quite unusual for me: used not one, but two embossing folders on my background panels. To recreate the grey weatherboard effect, I used my Simple Stripes embossing folder on a panel of Smoky Slate. For my feature panel, I used a piece of Wood Textures Designer Series Paper and added further texture by running this through my Pinewood Planks embossing folder. I love the effect this gives - it adds so much interest and detail.

A Wreath of Twigs and Leaves - I stamped the wreath from the Wishing You Well stamp set in Early Espresso onto a stitched circle of Very Vanilla and punched out the middle using my 1 1/4"  circle punch, so that more of the textured wood panel could be seen. I coloured a selection of pearls in various sizes with my Pumpkin Pie, Daffodil Delight and Cajun Craze Blends markers to suggest leaves and then added a trio of actual leaves cut with my Seasonal Layers Thinlits to frame my sentiment (I sponged the edges of the leaves to add depth).

Something For The Thanksgiving Table - When I started my card, I wanted to create a wreath like the one in the Fusion inspiration photo. I made a wreath in autumnal colours using my sprig punch that I really loved, but when it came to adding it to my card, it was a little too bulky so I went back to the drawing board. I didn't want my punched wreath to go to waste though, so instead I attached it to a band of Very Vanilla stamped with my Buffalo Check stamp in Crushed Curry, added a banner sentiment and a braided linen twine bow and made a napkin ring - perfect for the Thanksgiving table. Here's a photo of my finished napkin ring:


I'm linking my napkin ring up with the ladies over at SUO Challenges where they are looking for home decor items for the Thanksgiving table. This was so easy to make yet really effective - you could make a while bunch of these to decorate the Thanksgiving table in a relatively short space of time. 

Here is the visual summary of the key products used on today's project for you to pin for easy reference:


You can see all of my Product and 'How To' summaries on my 'How To - Tips and Techniques' Pinterest board in case you've missed any. 

Before you reach for your ink and papers, check out what our amazing team has created to inspire you this week:

Here's a quick recap of our challenge rules:
 
1.  Create a new paper project
2.  Upload your creation to your blog with a link back to us and provide a direct link to the post featuring your challenge submission.
3.  Please link your card to no more than four challenges, TOTAL.
4.  Have FUN!

You can see all of my 'How To' summaries on my 'How To - Tips and Techniques' Pinterest board in case you've missed any. 

Enjoy your day; it is the last day of the James Juniors' half term and there is hockey to be played along with a little down time before the return to school tomorrow. I'll be back here tomorrow with another project. Until then, happy stampin'!


Stampin' Up! Supplies Used - For the card: 

Table built using Product Table Builder by The Crafty Owl - Independent Stampin' Up! Demonstrator.
 

Stampin' Up! Supplies Used - For the napkin ring: 

Table built using Product Table Builder by The Crafty Owl - Independent Stampin' Up! Demonstrator.

Painted Harvest For The Paper Players PP414

by Joanne James14. October 2018 09:00

Did you miss me? A whole week since I last blogged: having been nurse to the men of the James household the week before, they thoughtfully shared their bugs with the girls and for the latter part of this week Rebecca and I have been suffering and feeling decidedly under the weather with streaming colds. Combined with trying to make the final preparations for my residential craft weekend next week, it's left no time for blogging. Luckily for you it's Sunday, so I've put my box of Kleenex to one side and squeezed in a little creative time for this week's new challenge over at The Paper Players! It's the turn of the wonderful Jaydee to host this week and she has an autumnal colour challenge for you to work with:


I immediately thought of sunflowers when I saw Jaydee's colour palette and decided to combine with the challenge over at The Card Concept and use the sketch over at CAS Colours and Sketches and got my paper snips out to do a little fussy cutting - take a look:


Here's the low-down on today's card:

Painted Harvest Sunflower - Painted Harvest has been sat on my shelf and not been used for a long while, so today's card sets out to make amends. I used the mix of Crushed Curry, Cajun Craze and Mossy Meadow to create my layered bloom and double-stamped leaves and then fussy cut my flower to add dimension and interest, whilst using my leaf punch to make easy work of the leaves, adding some braided linen trim to finish. 

Customised Buffalo Check - This is my first outing for the fabulous Buffalo Check background stamp that I used for my features panel on the right, which I decided to customise from the off and having stamped it in Cajun Craze on Very Vanilla, I added a line of Mossy Meadow and a line of Crushed Curry either side of this with my Stampin' Write markers to create a more colourful plaid. I can see that this is a stamp that is going to get a lot of use - so many creative possibilities!

So Subtle Texture - After stamping on my sentiment, I ran my Crushed Curry card base through the Big Shot with my Subtles Dynamic Textured Impressions Embossing Folder for added texture. It is subtle, for sure, but I am loving the additional detail that this embossing folder gives to otherwise plain backgrounds. I also stamped this sentiment from the Painted Harvest set on the inside to complete my card:


Here is the visual summary of the key products used on today's project for you to pin for easy reference:


You can see all of my Product and 'How To' summaries on my 'How To - Tips and Techniques' Pinterest board in case you've missed any. 

Before you reach for your ink and papers, check out what our amazing team has created to inspire you this week:

Here's a quick recap of our challenge rules:
 
1.  Create a new paper project
2.  Upload your creation to your blog with a link back to us and provide a direct link to the post featuring your challenge submission.
3.  Please link your card to no more than four challenges, TOTAL.
4.  Have FUN!

I can't wait to see what you create with this week's colours and look forward to visiting your blogs this week! Enjoy the rest of your weekend as it will be over all too quickly. We will be focusing all our efforts on beating the lurgy that has descended upon us in the hope that next week is a slightly more productive one! I'll be back soon with another project; until then, happy stampin'!


Stampin' Up! Supplies Used: 

Table built using Product Table Builder by The Crafty Owl - Independent Stampin' Up! Demonstrator.

Painted Harvest Triple Fold Card

by Joanne James15. November 2017 22:00

Today I'm just popping by with a quick blog post to share a quick card with you - the last of my cards from my technique class featuring the Painted Harvest bundle earlier this month. Our final card is a real showcase of the fabulous Painted Autumn designer series papers in the form of a triple fold card - take a look:


Continuing with our 'thankful' theme, the triple fold design of this card showcases the gorgeous Painted Autumn papers, with five different panels of paper on the main Very Vanilla folded section and a sixth on the belly band that holds it closed. There is a hidden circle on the inside of the back panel on which to write your greeting and the belly band is decorated with another of those lovely sunflowers and another of the sentiments in the Painted Harvest set. I can't find my photo of the card when open, showing the inside - if I manage to track it down in my backed up projects I'll come back and update this post. In the meantime, I'm sure you get the idea!

Here is the visual summary of the key products used on today's project for you to pin for easy reference:


You can see all of my 'How To' summaries on my 'How To - Tips and Techniques' Pinterest board in case you've missed any. 

If you've enjoyed the outputs of this class, I have a similar one featuring the Delightful Daisy Suite on Monday 4th December with a couple of spaces left - you can see the full details here. Contact me for more information or to book your place - I would love you to join us!

Don't forget 9PM tomorrow is the first opportunity you will have to go online and reserve the new Stamparatus stamp positioning tool - you can read all about it here. I'll be back tomorrow with another reminder and hopefully a creative project too. Until then, happy stampin'!


Stampin' Up! Supplies Used:

Table built using Product Table Builder by The Crafty Owl - Independent Stampin' Up! Demonstrator.

Painted Autumn Suite Collage Card

by Joanne James7. November 2017 06:00


I'm back with another of the cards made at yesterday's technique class featuring the Painted Autumn Suite, which also uses the current sketch over at The Paper Craft Crew:

 Play along with the Paper Craft Crew for Square Sketch Challenge 266. The challenge starts November 1st and ends November 7, 2017 at 1 PM EST. Visit the blog at www.papercraftcrew.com to check out the design team samples and to submit your project. #papercraftcrew #papercrafting #sketchchallenge #color #playalong #imakecards #cardmaker #diy #sendacard #craft #stampinup #cardchallenge #papercraft #bigshot #rainydayfun #designteam #becreative #artsandcrafts #hobby #snailmail #createeveryday #crafttherapy #creativelifehappylife #pcc2017

I love the fact that the sketch had lots of bits and pieces which allowed me to use lots of the items in the Painted Autumn Suite:


Here's the low-down on today's card:

Painted Autumn Patterns - I decided to use the panel to feature a piece of the gorgeous Painted Autumn DSP that I hadn't used previously. I hope you, like me, stocked up on this paper when it was part of the 'buy 3, get 1 free' offer -  the designs really are beautiful. I took my inspiration from the swirly leaves and branches of the paper and using the sketch built my design from there.

All About Texture - This card is full of elements that add texture: ribbon, burlap, enamel dots, punched leaves, touches of nature elements, punched border - all of which add to the loose, collage feel. 

Realistic Planks - The background panel is embossed with the Pinewood Planks Textured Impressions Embossing Folder. This 3D, dynamic folder creates deep and realistic dimensional embossed impressions that look just like the grain of pinewood planks - the perfect way to add interest to my background without detracting from the other elements.

I'm also linking up with the gals over at SUO Challenges today where they currently have a 'thankful' theme going on. 

Here is the visual summary of the key products used on today's project for you to pin for easy reference:


You can see all of my 'How To' summaries on my 'How To - Tips and Techniques' Pinterest board in case you've missed any. 

I am managing an early post today as I have an all-day Christmas stamp-a-stack and then I'm out talking to a local women's group about festive packaging this evening. I hope you have a great day; I'll be back tomorrow with another project. Until then, happy stampin'!


Stampin' Up! Supplies Used:

Table built using Product Table Builder by The Crafty Owl - Independent Stampin' Up! Demonstrator.

Painted Harvest Eclipse Thank You Card

by Joanne James6. November 2017 21:30

It's Monday and the start of another week - only 7 weeks to go until Christmas! I'm not counting down today though; Today I'm sharing a card that I made with the ladies in the second of my technique classes this month that also fits a new(ish) challenge that has appeared in blog land - the TicTacToe Challenge:


I went across the top row for my Painted Harvest thank you card - take a look:


Here's the low-down on today's card:

Large Letter Eclipse - Eclipse cards that use a word raised out of a background are everywhere right now and so on-trend, i thought it was about time I shared one with you. What a great opportunity to use those Large Letter Framelits again - these framelits really are so worth the investment! I went with a wide, thinner card than usual that is just right to fit my 'thanks'.

Painted Harvest - I created my sunflower background using a repeating pattern of bright sunflowers; my chosen colours are Crushed Curry and Peekaboo Peach and I think the latter most certainly adds a vibrancy to this card - the letters really 'pop' against those sunflowers.

A Split Sentiment - I decided to use a split sentiment to really tie my raised letters into the theme of my card: on my small cut oval I partially stamped one of the sentiments from the Painted Harvest set that says 'gather together & give thanks', omitting the 'thanks' and selectively inking the remaining portion, so that my raised letters complete the sentiment. 

Here is the visual summary of the key products used on today's project for you to pin for easy reference:


You can see all of my 'How To' summaries on my 'How To - Tips and Techniques' Pinterest board in case you've missed any. 

I hope your day was a productive one; the ladies in today's class all produced some fabulous creations! My next class in December is using the Delightful Daisy bundle - for more details check out the event on my Facebook page here and get in touch to book your place. I'll be back tomorrow with another project using the Painted Harvest stamp set. Until then, happy stampin'!


Stampin' Up! Supplies Used:

Table built using Product Table Builder by The Crafty Owl - Independent Stampin' Up! Demonstrator.

Painted Harvest Christmas Wreath CAS Card

by Joanne James11. October 2017 20:51

Wednesday already?! Just time for a really quick share of another clean-and-simple Christmas Wreath using the Painted Harvest stamp set that I made with some ladies in a Christmas card class a couple of weeks ago:


Here's the low-down on today's card:

A Christmas Wreath - Today's Painted Harvest stamp set Christmas wreath uses the largest of the petal stamps, stamped once in Wild Wasabi then rotated through 180 degrees before inking and stamping again in Garden Green over the top. This gives a much fuller, more dimensional wreath than the one on Monday's card. I then used the small dot stamp to stamp my Real Red berries.

Painted Autumn - I added a narrow strip of Painted Autumn designer series paper to my card; I love that the reverse side of our papers often feature a more neutral design, such as these watercoloured stripes, that lend themselves to more than just autumn/fall projects. Some of the ladies in my class used the leafy pattern on the reverse of this strip and I must say that looked great too. I'm so happy the Painted Autumn papers are included in the 'buy 3, get 1 free' offer on designer series paper this month too - all the more reason to stock up!

Season's Greetings - Today's card features a big, bold sentiment from the 'Snowflake Sentiments' set, perfect for today's card and not a snowflake in sight!

Here is the visual summary of the key products used on today's project for you to pin for easy reference:


You can see all of my 'How To' summaries on my 'How To - Tips and Techniques' Pinterest board in case you've missed any. 

Hopefully I'll be back tomorrow with another project. Until then, happy stampin'!


Stampin' Up! Supplies Used:

Table built using Product Table Builder by The Crafty Owl - Independent Stampin' Up! Demonstrator.

Painted Harvest Christmas Wreath Card

by Joanne James9. October 2017 13:00


Happy Monday everyone! Today I'm sharing a card that is actually a Christmas card but uses the Painted Harvest stamp set - take a look:


Here's the low-down on today's card:

A Christmas Wreath - The Painted Harvest stamp set really is so versatile: stamped in festive green, either singly or using both stamps, it's easy to change the look from a sunflower to a Christmas wreath. You can then either use the small dot stamp to stamp your berries or a few Real Red enamel dots as I've done here; finish with a bow of Quilted Christmas ribbon and there you have it - a simple Christmas wreath. I am featuring the Painted Harvest bundle at my monthly stamp class on Monday 6th November; this is a popular class with space now limited. If you would like to join me to explore this stamp set, do get in touch and book your place before it's too late!

Gorgeous Gingham - I backed my stitched square with a panel of Gardden Green gingham, one of the patterns in the Quilted Christmas designer series paper. This 6" x 6" paper stack has some fabulous designs both for Christmas and beyond. I also backed my DSP with a piece of extra thick Whisper White for added stability. I'm partial to a nice gingham to add a classic touch to my projects and the stack includes a Real Red gingham too - gorgeous!

Merry Christmas - My teeny-tiny sentiment is stamped in red onto Whisper White so that the words are in relief - can you tell what stamp set it comes from though? You might be surprised - I cropped it from one of the banner stamps in the Brightly Lit Christmas stamp set. I've circled it on the image below:


This stamp set is one of those reduced by 15% to for World Card Making Day until tomorrow and will also feature in its bundle at my Brightly Lit Christmas class on Tuesday 24th October. You can find full details of my classes on my Facebook page or on my website here. The important thing is to always look at all the stamps in your collection - you may find the perfect sentiment in the most unexpected if places!

Here is the visual summary of the key products used on today's project for you to pin for easy reference:


You can see all of my 'How To' summaries on my 'How To - Tips and Techniques' Pinterest board in case you've missed any. 

Enjoy the rest of your day and I'll be back tomorrow with another project. Until then, happy stampin'!


Stampin' Up! Supplies Used:

Table built using Product Table Builder by The Crafty Owl - Independent Stampin' Up! Demonstrator.

Mini Catalogue

BROWSE THE CATALOGUE

The mini catalogue is now live! Read and download your copy here.

Shop Online

Access my online shop 24 x 7, 365 days of the year:

Current March hostess code:

S9F2XJJW

Shop Online

Join My Team

It's always a great time to join Stampin’ Up! New team members can get £130 worth of products for only £99 + free business supplies + free shipping + all the fun being a part of Stampin’ Up! Stampin' Up! has something for everyone: join my growing team and benefit from my support to enjoy Stampin' Up! however you choose.

If you're interested, call me for a chat to understand how I can help you realise your goals. Alternatively, if you have already decided to sign up and you just can't wait, please click here for the link to the online form where you can sign up and order your starter kit right away! 

Latest Kit!

Stampin Cut and Emboss

The Rock Legend Kit has all you need to make 8 cards with coordinating envelopes. Along with the new Panda Friends Kit, both are available from January 4th for just £14 each - get yours here!

2023-24 Annual Catalogue

BROWSE THE CATALOGUE

Click on the catalogue for a full list of current SU! supplies - if you would like to order any of the items featured, please drop me a line at [email protected] or give me a call on 07773 421446 - I'd be happy to help.

New Online Exclusives

There will be new products available exclusively in the online store from 5 March - check them out here.

About Me

Hi I'm Joanne and live in Northampton and when I'm not looking after my husband and two beautiful children, am an avid crafter with a passion for all things Stampin' Up!

I must confess that I have never been a big rubber stamper - until I discovered Stampin' Up! that is. I love the fact that I can get such great results with co-ordinating stamps, inks, papers and punches - the possibilities are endless! Join me on my stamping journey as I share the things I love and be inspired to create amazing things yourself!

Follow Me

Monthly Newsletter

Box Builder

Click the button above to use Box Buster to create your custom box design using the Envelope Punch Board!

Kits Collection Now Available!

Stampin Cut and Emboss

The new Kits Collection from Stampin' Up! is now available!

Click here to see the current kits available and order yours online today.

I Design For


Stampin' Up Stuff

This is my personal blog and is not endorsed by Stampin’ Up! I hope you find it a plentiful source of ideas and personal inspiration but please don't copy my designs for contest submission or use for classes, publication or sale without express permission.