Today I'm sharing my design team card for our new challenge over at As You See It where it's time for my favourite, a sketch challenge:
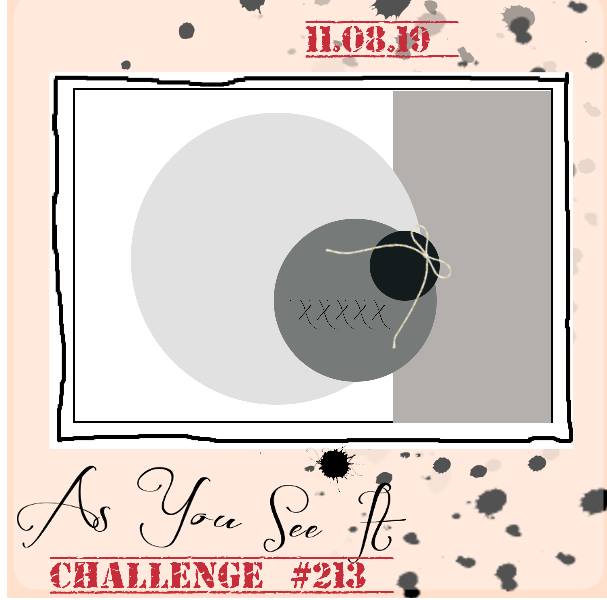


I considered a number of options before settling on using this week's muted palette over at Color Throwdown to create an autumnal thank you card - take a look:
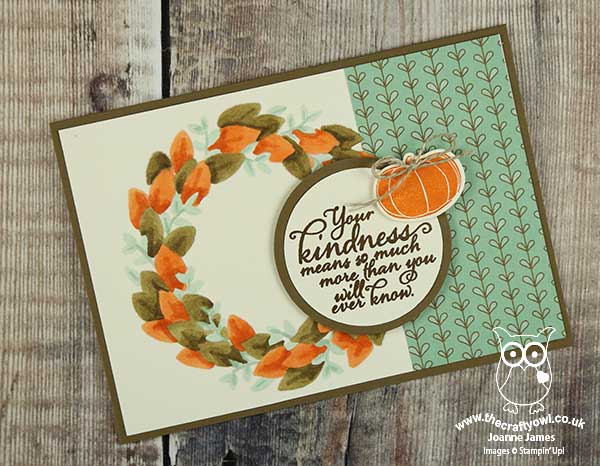
The sketch gave me the opportunity to do something that I've been wanting to try for a while with my Seasonal Wreath embossing folder. I'm also linking up with the Retro Rubber Challenge since they currently have an 'anything goes' theme. I am making a concerted effort to use up more of my retired papers and give some old favourite stamp sets some love so their theme this week is perfect: my card uses a piece of left over retired DSP and a bunch of products that are all more than a year old - read on to see just how old! Here's the low-down on today's card:
A Blended Embossed Wreath - The Seasonal Wreath is in my 'top 5' of favourite embossing folders, especially for Christmas cards. I've had mine since it was launched in 2018 and I do feel it's one of those annual catalogue 'unsung heroes' - lost in the pages at the back of the book, buried amongst the other patterns, but it's great for quick cards and works for all seasons depending on how you decorate/embellish it. I usually use it as a straight forward emboss, but I wondered what it would look like if I coloured it. I decided to try Blends in the first instance and I actually quite like the effect. It isn't as easy to see the dimension from a distance, but even in just three colours I think it gives it a new look.
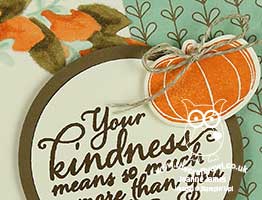
Thanks and Appreciation - The sentiment on my card comes from probably my most favourite fall stamp set ever: Painted Harvest. I've had this stamp set since it's launch in 2017 and I can't ever imagine parting with it. Such wonderful thankful sentiments and sunflower stamps that are pretty much foolproof to use and look fabulous in a wide variety of colour combinations. The best thing about it is this set features in the current Stampin' Up! annual catalogue and is still available to purchase :-) The other stamp I've used on my card today is my orange pumpkin embellishment; this stamp is from one of my old sets, 'Pick A Pumpkin', also from 2017 but now retired. I held onto this set and the co-ordinating Patterned Pumpkin Thinlits as they contain some nice pumpkin shapes that work for both fall and Halloween-themed cards alike.
Other 'Oldie but Goodies' - Other items that I've used on today's card that I've had for longer than I can remember are the circle punches I used to layer my sentiment and that piece of Paisley and Posies DSP, which is from Autumn-Winter 2016 - not that I'm a hoarder of patterned paper or anything ...!
I debated whether to add anything else to this card, but decided to leave it 'as is' and allow the wreath to take centre stage. I am enjoying experimenting a little this week and with this card it certainly felt good to use up some bits and pieces, albeit just a few - not sure I made enough of a dent to justify a shopping spree!
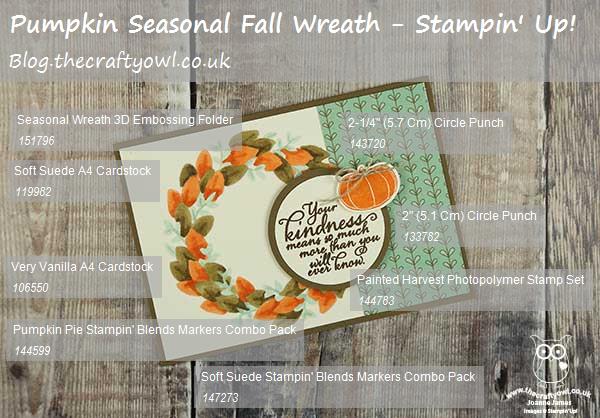
Here is the visual summary of the key products used on today's project for you to pin for easy reference:
You can see all of my 'How To' summaries on my 'How To - Tips and Techniques' Pinterest board in case you've missed any.
Do check out the cards by the other members of the As you See It design team - we have all interpreted the sketch differently so there is a ton of creative inspiration!
Enjoy your day; I have a date with the ironing basket before heading out on the swim run this evening. What are your plans for the weekend? We are having a split one in the James household: the girls are at home looking forward to a weekend full of hockey, GCSE coursework and crafting, whilst the boys are on the school rugby tour to York via Nottingham. Hopefully the pitches won't be too waterlogged to play - I am looking forward to unpacking the kit bags on Sunday already!!
I'll be back tomorrow with another project. Until then, happy stampin'!
Stampin' Up! Supplies Used: