Honeycomb Happiness Pop-Up Chick Card

by Joanne James27. March 2016 10:00

It's Sunday and time for a new challenge over at The Paper Players! It's the turn of the talented LeAnne to host our challenge this week and she has my favourite type of challenge, a sketch, for you to play along with:

    PPA-293-Mar24

As it's Easter Sunday today, for my card this week I decided to make one last Easter card to share with you, using this week's colours over at Pals Paper Arts. I'm also linking up with the Friday Mashup again as I've used the theme part of their challenge (Easter and chicks or bunnies - read on and all will become clear!) Here is the front of my card:


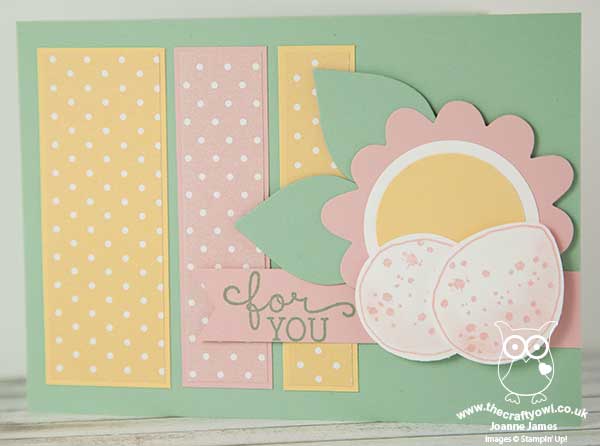
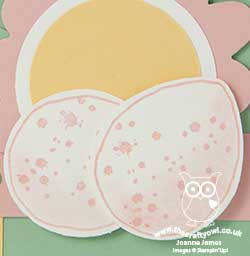
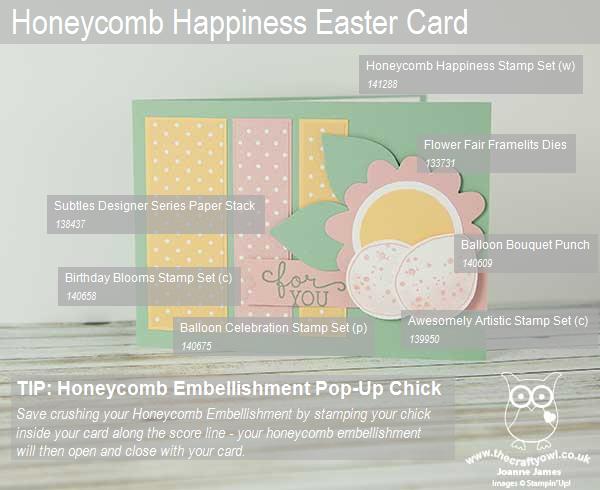
Simple enough: some polka dot panels, alongside an oversize flower made with 1 1/2 and 1 3/4 circle punches and the Flower Fair Framelits as a backdrop to my pair of Easter eggs. The eggs themselves are using a tip picked up from Cindy Schuster on the Stampin' Up! corporate blog (you can see her card here) where she used the balloon punch to create Easter Eggs (I stamped mine first using the outline in the 'Balloon Celebration' set and used the grunge stamp in 'Awesomely Artistic' for my mottled effect).

The best bit for me about today's card is the inside, take a look:

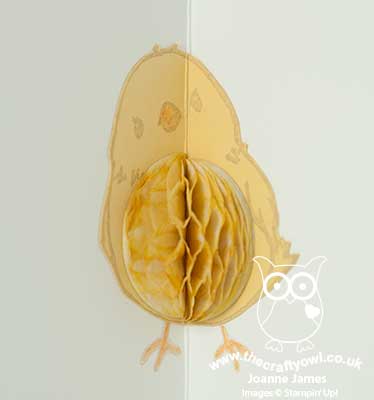
Having wrestled with myself every time I went to stick one of the Honeycomb embellishments to the front of my card, knowing that it would mean either a box needed to send it or risk the embellishment being crushed (I'm still suffering post-traumatic stress from having watched Shannon West uncerimoniously squash one on the front of a card whilst on stage at Onstage Live in Brussels last November!!) , I decided that there was a perfect way around it - use it on the inside! I stamped my chick from the 'Honeycomb Happiness' Sale-A-Bration stamp set on the inside of my card along the central score line, paper-pieced him with another stamped on So Saffron card, then added my honeycomb embellishment (I spritzed one of the white ones in So Saffron). I also stamped my Easter greeting from the 'Suite Sayings' stamp set on the inside of my card on the left-hand panel:


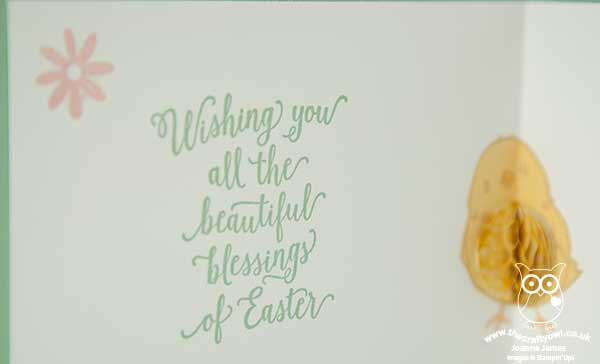
Isn't that just the cutest?! I am so happy with how this turned out! I can now use my Honeycomb Embellishments with a clear conscience!

Here is the visual summary of the key products used on today's project for you to pin for easy reference:

You can see all of my 'How To' summaries on my 'How To - Tips and Techniques' Pinterest board in case you've missed any.  

Before you reach for your ink and papers, check out what our amazing team has created to inspire you this week:

The Paper Players Design Team
 
 
Here's a quick recap of our challenge rules:
 
1.  Create a new paper project
2.  Upload your creation to your blog with a link back to us and provide a direct link to the post featuring your challenge submission.
3.  Please link your card to no more than four challenges, TOTAL.
4.  Have FUN! 


I look forward to seeing what you create with this week's sketch. We have a rare sport-free day today. We are looking forward to our Easter egg hunt (likely to be indoors if the weather forecast is correct!), a leisurely lunch and an afternoon eating too many chocolate eggs whilst watching a good movie!

Back tomorrow with another project (or two!); until then, happy stampin'!


Stampin' Up! Supplies Used:

Table built using Product Table Builder by The Crafty Owl - Independent Stampin' Up! Demonstrator.

Work of Art Easter Egg and Honeycomb Happiness Chick

by Joanne James25. March 2016 18:57

Good Friday blessings one and all! I've spent most of today outdoors making the most of the sunny weather; I met my girlfriends for a run this morning and we went on a James family bike ride this afternoon. No time to craft, but since the forecast is dreadful for the rest of the week I'm sure I'll make up for it! Today's card is for the challenge over at The Friday Mashup. I love this challenge and am sad to read that this one is their last one!

This week you can use the sketch above or create a project with an Easter theme and chicks or bunnies, or mashup and create with both. I went with the latter for this card, although I do have a mashup card planned for a few days time! Here's today's card:

I actually made this card with the ladies at my Coffee and Card session at Bell's in Northampton this week. The key elements of my fun Easter card are as follows:

An oval egg - I used my Big Shot and Ovals Framelits to create my fun Easter egg in my layer of Pink Pirouette cardstock. Now I know that technically an egg is more pointed at one end, but without an egg framelit this oval makes a pretty good alternative! Before cutting out my oval, I stamped my chick onto the card. Why? Read on below to find out!

An Easter work of art - To decorate my egg, I cut a second mat of white the same size as my pink layer and stamped the large brushstroke stamp from the 'Work of Art' stamp set in a variety of pastel colours and placed this behind the aperture. The curve of the stamped image adds to the illusion of the egg shape.

A happy chick - The little chick from the 'Honeycomb Happiness' Sale-A-Bration set has been getting lots of use this week as he is perfect for Easter cards. I stamped mine onto So Saffron cardstock, snipped him out with my paper scissors and coloured his beak with my Pumpkin Pie Stampin' Write marker. I didn't fussy cut those fiddly legs though - remember the chick I stamped on the pink layer earlier? Yes, I simply coloured the ones on this layer with my Pumpkin Pie Stampin' Write marker and then lined up my yellow chick with the stamp outline, adhering him with a couple of Stampin' Dimensionals. Clever, right? You have just 6 more days to get your hands on the 'Honeycomb Happiness' stamp set for free with a £45 order; if it's on your wish list, don't leave it too late!

An Easter sentiment courtesy of the 'Easter Lamb' stamp and a trio of Itty Bitty punched flowers completes my card. 

Here's the visual summary of the key supplies used to make today's card for you to save for easy reference:


That's all from me today; if you would like to know more about my drop-in Coffee and Card Sessions, you can read all about it here. We have a short break for Easter then the next one is scheduled for 13th April - I'd love to see you there. I'll be back tomorrow with another project. until then, happy stampin'!


Stampin' Up! Supplies Used:

Table built using Product Table Builder by The Crafty Owl - Independent Stampin' Up! Demonstrator.


He Is Risen Sunburst Easter Card

by Joanne James1. March 2016 21:00

Firstly, Happy Saint David's Day to any fellow Welsh bloggers or blog readers! I have had a busy day of classes today, with the first of my technique classes this month this morning and my Project Life memory keeping class this afternoon. I'm not so organised that I had an early blog post for you; my card was made,I just fell asleep at my laptop yesterday evening before I could schedule it! Today's card is for the 300th challenge over at Just Add Ink where they have this sketch as inspiration this week:

JAI #300

I saw this sketch and knew it would be perfect for a card that I've had in mind for a while using my Sunburst Thinlits Die - take a look: 

I wanted to create an Easter card with a sunburst behind a cross; how to make my cross though? I decided to try and make one using a sunburst, by squaring up the edges and cutting away the diagonal sections. Here's a work in progress picture that shows you how I cut it:


I hope that is helpful. I ran my cross through my Woodgrain embossing folder to add some texture and make it stand out against my super-CAS background of So Saffron and Pear Pizzazz. I allowed my sentiment strip to overhang the width of my paper slightly and made my own sentiment using the stamps in the 'Crazy For You' stamp set, masking off letters where not needed until I had my phrase. The Alphabet Rotary Stamp would also allow you to create something similar. I added a gold button, a twist of retired Tangelo Twist satin ribbon and a sprinkling of Pumpkin Pie sequins to finish my card. This is a great Easter card that can be made using entirely non Easter-specific supplies, which is always useful. What do you think of my cross idea? I'd love to know whether you think this works - do leave me a comment with your thoughts below. 

Here's today's visual summary for easy reference:


That's all from me today; I'll be back tomorrow with another project; until then, happy stampin'!


Stampin' Up! Supplies Used:

Table built using Product Table Builder by The Crafty Owl - Independent Stampin' Up! Demonstrator.


Wildflower Fields Meets Suite Sayings

by Joanne James26. February 2016 23:08

Yay it's Friday! My day feels like it's been a long one and I am looking forward to the weekend for sure! Today I have a card for this week's challenge over at Retrosketches which also fits the bill for the new challenge over at As You See It:

   AYSIChallenge125

I decided to make another Easter card, this time using some of my Sale-A-Bration Wildflower Fields designer series paper and the lovely Easter sentiment in the 'Suite Sayings' stamp set:

I used extra-thick Whisper White for my card base and added alternating strips of the bold flower patterned papers for my background. I tweaked the sketch slightly in as much as I used the central panel to showcase my sentiment, which broke up the detail of the busy paper, and chose Blackberry Bliss and Hello Honey for my ink, mats and ribbon colours. I embellished with a few flowers punched with my Petite Petals and Blossom Bunch punches and a retired Hello Honey button. This is the first stamp I've used in my 'Suite Sayings' stamp set; this is such a versatile set with a great variety of sentiments - I think this Easter one is my favourite though.  

Here's today's visual reference showing the key supplies used to make today's card:


That's all from me today; back tomorrow with another project. Until then, happy stampin'!


Stampin' Up! Supplies Used:

Table built using Product Table Builder by The Crafty Owl - Independent Stampin' Up! Demonstrator.


Happy Easter From The Friends & Flowers Easter Bunny!

by Joanne James25. February 2016 08:05

Today it's time for a new challenge over at Create With Connie and Mary and this week we have a great sketch for you:


I decided to create a fun Easter card today using the new 'Friends and Flowers' stamp set that co-ordinates with the returning Festive Flower Builder punch - take a look:


This is a great stamp set with lots of pieces that enable you to make bunnies, fish, flowers and more! It's so easy to punch out the various bits and pieces for easy creation with the co-ordinating punch; my Festive Flower Builder Punch got a real work out before Christmas (do a search on it or the 'Reason For The Season' stamp set here on my blog to see the many projects I've created using it) so I'm glad I get to use it with another co-ordinating stamp set too. I simply stamped the bunny face and ears in Smoky Slate on a piece of Whisper White cardstock, added a little Blushing Bride pink using my Stampin' Write markers and punched out (using the 1 3/8" circle for the face). I added a Bow Paper Clip embellishment to one ear for added 'cute' factor and bordered my sentiment panel with two thin strips of blushing Bride glimmer paper - a little glimmer goes a long way! The sentiment is the one you'll find with the 'Easter Lamb' stamp - I simply masked my stamp so that I would only get the words and not the image - which I stamped in Versamark and heat embossed in white for added gloss.

Lastly, do you recognise the pretty pastel paper I used for my background layer? It's actually from the It's My Party paper stack. Whilst this is a pack with lots of bold patterns and colours, the presence of Mint Macaron and Sahara Sand in the colour combination means there are some hidden pastel gems in there too, so be sure to check it out.  

Here's today's visual summary for easy reference:


Do visit the other Design Team members to see how they interpreted this week's sketch; there's lots of inspiration over on their blogs too!

Enjoy your day and I'll be back tomorrow with another project; until then, happy stampin'!


Stampin' Up! Supplies Used:

  • Friends & Flowers Wood-Mount Stamp Set
  • Festive Flower Builder Punch
  • Easter Lamb Wood-Mount Stamp
  • Blushing Bride Glimmer Paper
  • Bow Paper Clips Embellishments
  • Smoky Slate Classic Stampin' Pad
  • Blushing Bride Classic Stampin' Pad
  • Blushing Bride A4 Cardstock
  • Mint Macaron A4 Cardstock
  • Whisper White A4 Cardstock
  • It's My Party Designer Series Paper Stack
  • 1-3/8" Circle Punch
  • Embossing Buddy
  • Versamark Pad
  • White Stampin' Emboss Powder
  • Heat Tool (Uk)

Happy Easter Bunny Card

by Joanne James5. April 2015 18:00

A quick extra post today to share my last Easter card with you - you can see my earlier post for The Paper Players here. I made this one using this week's Deconstructed Sketch for my layout and am also linking up with the 4 Crafty Chicks where the challenge is Easter and The Friday Mashup where their challenge is to use 'Easter Critters' on your card (I chose not to mashup with their colours):


I have yet to share a Cheerful Critter card with you, so since today is Easter Sunday it seemed like a good opportunity:

I decided on some simple layering in Sahara Sand, Soft Sky and Wisteria Wonder, with the main frame embossed with the Perfect Polka Dots Embossing Folder to echo the dots on the bunny's top. I coloured my bunny with the now discontinued Wisteria Wonder and Soft Sky Blendabilities and the bunny itself with a Sahara Sand marker and blender pen. I used two of the stamps from the 'Crazy About You' stamp set to create my custom sentiment. Lastly, I added a double bow in Soft Sky seam binding ribbon to finish my rather girly and feminine-looking card. 

Before I go, I just thought I would share a quick photo of my very own Easter bunnies in the garden this morning, sporting some fun props we made from a variety of punches and dies:


Cute, aren't they?! That really is all from me today; back tomorrow with antoehr project. Until then, happy stampin'!


Stampin' Up! Supplies Used:

Table built using Product Table Builder by The Crafty Owl - Independent Stampin' Up! Demonstrator.


Easter Egg Hunt Basket with the Berry Basket Bigz Die

by Joanne James5. April 2015 10:00

It's Sunday - my favourite day of the blogging week! It's time for a new challenge over at The Paper Players and this week the lovely Jaydee has a fun theme for us:

Use any die cut on your project - boy did I deliberate over this! I use die cuts all the time and my Big Shot is my crafting best friend, but what to share? I made several cards, all trying to showcase different aspects of dies and diecuts, but none of them were working for me; I think I was trying too hard! After much deliberating I decided to share a 3D project instead and since it's Easter Sunday today what better than an Easter basket made with the Berry Basket Bigz Die, along with some cute little tags all ready for today's Easter egg hunt:

The basket itself is really easy to make using the die: I made mine out of So Saffron cardstock with a Pink Pirouette trim and handle, and having stamped some eggs on the basket using my Subtles Stampin' Write markers, I finished my completed basket with a couple of pink bows punched from the Bow Builder punch and a stamped tag tied on with some Marina Mist chevron ribbon. I then used my Big Shot, Handpicked framelit dies and my Alphabet rotary stamp to make a whole bunch of tags ready to place around the garden for our Easter egg hunt today - here are just a selection:

I made them out of coaster board, so that they would be extra-strong and added coloured punched out arrows to some of them to add to the fun.

There are some great projects from the Design Team this week - do pop by their blogs and take a look:

The Paper Players Design Team
 
Here's a quick recap of our challenge rules:
 
1.  Create a new paper project
2.  Upload your creation to your blog with a link back to us and provide a direct link to the post featuring your challenge submission.
3.  Please link your card to no more than three challenges, TOTAL.
4.  Have FUN! 

I hope you like today's project - there are so many different dies to choose from, I can't wait to see what you come up with for your cards and projects in our gallery this week. I'm off to play Easter bunny and follow the James juniors around the garden collecting eggs, then attempt to persuade them to not eat them all before lunch! Back tomorrow with another project; until then, happy stampin'!


Stampin' Up! Supplies Used:

Table built using Product Table Builder by The Crafty Owl - Independent Stampin' Up! Demonstrator.


Fun Children's Easter Projects using the Stampin' Up! Curvy Keepsake Box Thinlit Die

by Joanne James3. April 2015 22:26

It's Good Friday already so I thought it was about time I shared with you some of the fun Easter projects that I've been making with my children and their friends in recent weeks. Both James Juniors love to craft and Rebecca especially likes the opportunity to spend some time in my craft room whenever she can. At the start of the Easter holidays, we had a big group of their friends round and spent a fun morning making these cute Easter treat boxes using one of my favourite products, the Curvy Keepsake Box Thinlit Die:

I couldn't resist creating some Easter themed containers using this die, further to the popularity of my Christmas ones - you can see my tips on using this thinlit die in my Stampissimo video with Paula Gorry from Stampin' Up! here.

The girls made cute bunnies - I've seen lots of different versions floating around Pinterest, but for mine I decided to use my Flower Fair framelits to create the ears and the various pieces from my trusty Owl Builder punch for the face, along with some strands of split white jute ribbon for his whiskers and some added detail with a Smoky Slate marker and my white gel pen.

The boys made these cute Easter chicks:

The boys were slightly younger, so we went with something a little less complicated with less small pieces required for the face.

In addition, everyone also made a little Easter bag, inspired by this one created by Brian King and using this fabulous little tutorial by Val Moody to create the basic bag shape:

We kept things simple with some tone-on-tone stamping using the 'For Peep's Sake' Easter-themed stamp set and a little tag made with the handpicked framelits. These little bags are so easy to make and the perfect size for your mini Easter eggs. Everyone chose their own colours - here's a couple of pictures I took on the day of some of the children's finished projects:


Not many 'action' photos I'm afraid - just too much going on. It was a busy few hours of crafting with 16 children taking part, but they were all so well behaved and thoroughly enjoyed making some great treat boxes to take home. I have another easy Easter-themed project to share with you tomorrow, so do pop back then if you're in need of some last minute Easter inspiration. Until then, happy stampin'!


Stampin' Up! Supplies Used:

For the rabbit box:

Table built using Product Table Builder by The Crafty Owl - Independent Stampin' Up! Demonstrator.


For the chick box:

Table built using Product Table Builder by The Crafty Owl - Independent Stampin' Up! Demonstrator.


For the Mini Egg Bag:

Table built using Product Table Builder by The Crafty Owl - Independent Stampin' Up! Demonstrator.


Flower Fair Easter Bunny

by Joanne James29. March 2015 20:52

Good evening blog readers - I am sneaking in an extra post today - you can see my earlier Paper Players post here - to make up for my lack of one yesterday. I had my card ready and had fully intended to write up my post last night, when I got back from taking both James juniors to their swimming gala, however the swim meet was really busy and we didn't get home until much later than usual and I was beyond writing anything other than gibberish at that point! 

So this card is for a couple of challenges: I used the sketch only over at Fusion and the colours from Colour Q this week:


I love this week's Colour Q palette, so perfect for an Easter card, which I still need a few more of. This card is something I've been playing around with for a while. My daughter had a colouring book for Christmas that was full of animals, made from patterns, and I wondered if I could make an abstract bunny using floral images. I've had a few attempts, and this is my favourite so far:

I used Wisteria Wonder for my base and mat layer, embossing this with the large polka dot embossing folder, then cut an oval using my Big Shot and Oval Framelits, having partially cut the ears with the leaf shapes from the Flower Fair framelits first and allowed them to overhang. I then stamped the various flower stamps from the Flower Patch set to make an abstract face, with ears, eyes and nose.

So, opinion in our house is divided over this card: both James juniors recognised it as a rabbit immediately; my abstract art is however lost on my husband, who thinks this is just a bunch of random flower patterns! Either way, with the addition of some Wisteria Wonder chevron ribbon and a bow, I like it! Do leave me a comment and let me know what you think to my unusual creation.

Back tomorrow with another project; until then, happy stampin'!


Stampin' Up! Supplies Used:

Table built using Product Table Builder by The Crafty Owl - Independent Stampin' Up! Demonstrator.


Hello Easter For The Paper Players

by Joanne James29. March 2015 10:00

It's Sunday and time for a new challenge over at The Paper Players and this week my good friend and talented papercrafter Claire has a fun tic-tac-toe challenge for us:


I decided to go with the first vertical line - yellow, die-cut and flowers (or in my case, flower!) - and this week's sketch over at Pals Paper Arts:

I am still in need of a few Easter cards, so I thought those five circles on the sketch would make some cute Easter chicks, bright yellow and chirpy. I decided on the chick trio from the 'For Peep's Sake' stamp set but I needed five chicks, not three. My solution? I stamped the first two chicks on the right, then masked the outer chicks and just masked the central one, lining up with my stamp-a-ma-jig, then lastly stamped the two chicks on the left, masking off the one I didn't need. I stamped the chicks again a few times on some scrap cardstock, twice in Melon mambo and once in Bermuda Bay, and fussy cut out the eggshells and adhered them on top of the ones on my card. I punched a Bermuda Bay flower using the flower punch from the Itty Bitty Accents Punch Pack and added a Melon Mambo candy dot for the centre. lastly, I added my die cut 'hello'; this might seem a little odd in the context of an Easter card, but it is destined for the mail and someone I don't get to see in person, so combined with the inside greeting works just fine. 

I hope you like my card today.  There are some great cards from the Design Team this week - so many different ways of combining the elements of the grid. Do pop by their blogs and take a look:

The Paper Players Design Team
 
Here's a quick recap of our challenge rules:
 
1.  Create a new paper project
2.  Upload your creation to your blog with a link back to us and provide a direct link to the post featuring your challenge submission.
3.  Please link your card to no more than three challenges, TOTAL.
4.  Have FUN! 

I look forward to seeing your tic-tac-toe combinations in our gallery this week. Back tomorrow with another project; until then, happy stampin'!


Stampin' Up! Supplies Used:

Table built using Product Table Builder by The Crafty Owl - Independent Stampin' Up! Demonstrator.


Mini Catalogue

BROWSE THE CATALOGUE

The mini catalogue is now live! Read and download your copy here.

Shop Online

Access my online shop 24 x 7, 365 days of the year:

Current April hostess code:

VDKNV7BH

Shop Online

Join My Team

It's always a great time to join Stampin’ Up! New team members can get £130 worth of products for only £99 + free business supplies + free shipping + all the fun being a part of Stampin’ Up! Stampin' Up! has something for everyone: join my growing team and benefit from my support to enjoy Stampin' Up! however you choose.

If you're interested, call me for a chat to understand how I can help you realise your goals. Alternatively, if you have already decided to sign up and you just can't wait, please click here for the link to the online form where you can sign up and order your starter kit right away! 

Latest Kit!

Stampin Cut and Emboss

The Rock Legend Kit has all you need to make 8 cards with coordinating envelopes. Along with the new Panda Friends Kit, both are available from January 4th for just £14 each - get yours here!

2023-24 Annual Catalogue

BROWSE THE CATALOGUE

Click on the catalogue for a full list of current SU! supplies - if you would like to order any of the items featured, please drop me a line at [email protected] or give me a call on 07773 421446 - I'd be happy to help.

New Online Exclusives

There are new products available exclusively in the online store from 5 March - check them out here.

About Me

Hi I'm Joanne and live in Northampton and when I'm not looking after my husband and two beautiful children, am an avid crafter with a passion for all things Stampin' Up!

I must confess that I have never been a big rubber stamper - until I discovered Stampin' Up! that is. I love the fact that I can get such great results with co-ordinating stamps, inks, papers and punches - the possibilities are endless! Join me on my stamping journey as I share the things I love and be inspired to create amazing things yourself!

Follow Me

Monthly Newsletter

Box Builder

Click the button above to use Box Buster to create your custom box design using the Envelope Punch Board!

Kits Collection Now Available!

Stampin Cut and Emboss

The new Kits Collection from Stampin' Up! is now available!

Click here to see the current kits available and order yours online today.

I Design For


Stampin' Up Stuff

This is my personal blog and is not endorsed by Stampin’ Up! I hope you find it a plentiful source of ideas and personal inspiration but please don't copy my designs for contest submission or use for classes, publication or sale without express permission.