by Joanne James8. August 2015 22:11I'm here with a quick post featuring the next Christmas card I promised featuring the Lots of Joy stamp set that can be found in the annual catalogue. I used this week's sketch over at The Paper Craft Crew as my starting point for this card:

Again I combined the stamp set with some of the Merry Moments DSP, this time choosing the lovely plaid pattern that echoes the pattern of the tree:
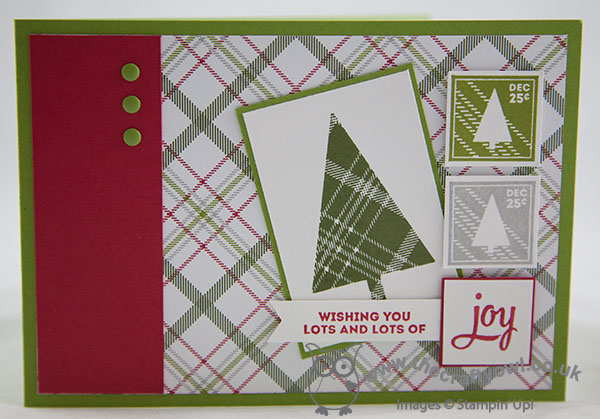
I used the fun postage stamp-style stamp for two of my three squares down the side, so easily punched out with the 1" square punch, with the final one featuring the second part of my sentiment - I selectively inked the sentiment twice and then banner-cut the other piece and layered it underneath. Lovely traditional Christmas colours on this card and I think the plaid gives it quite a modern feel.
That's all from me today - come back tomorrow when we will have a new challenge over at The Paper Players and the lovely Claire will be the hostess. Until then, happy stampin'!
Stampin' Up! Supplies Used:
by Joanne James24. July 2015 20:38So as I type this sat in blisteringly hot temperatures (I'm not complaining - the sun is heavenly!) I can't quite believe that today I'm going to share a Christmas card with you. Yes, that's right - a Christmas card!! Today I've been able to get my first look at the new Autumn-Winter seasonal catalogue that will be available to customers September 1st - and all I can say is, my wish list is long!!! I will be sharing more on that in coming weeks once our pre-order period starts, however right now if you can't wait for your copy, then get in touch with me and lets chat about becoming a demonstrator - I would love you to join the 'ooos' and 'aaahs' that I'm having with my current team members as we drool over the catalogue sneak-peek together!
Meanwhile, you may have noticed that Stampin' Up! has reintroduced a permanent line of Christmas stamps and papers in our annual catalogue too - great news for those of us who like to prepare for Christmas all year round! - and some of the stamps included are some favourites from last Christmas, such as the one that features on today's card: Wondrous Wreath. I made this card at our recent team quarterly training session, which was all about making use of what is already avialable to get a jump start on preparing for the festive season. Here's my card:
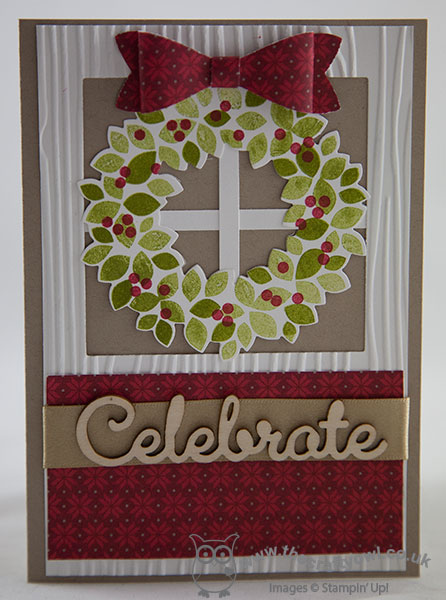
This card was designed by Monica Gale and is similar in concept to one I designed last season which you can see here. This one is easier to recreate and uses the Woodgrain embossing folder to create the wooden effect on the door. It also features some other products that can now be found in the annual catalogue that are perfect for festive projects: the Bow Builder Punch, the Merry Moments DSP and my favourite Expressions Natural Elements.
That's all the festive fun I have for today - I'm off to get a cooling glass of Sangria after all that typing! Back tomorrow with another project; until then, happy stampin'!
Stampin' Up! Supplies Used:
44657e38-9e97-4f1e-9f91-b6095206178e|0|.0|96d5b379-7e1d-4dac-a6ba-1e50db561b04
Tags: Expressions Natural Elements, Merry Moments, Woodgrain TIEF, Wondrous Wreath, Wonderful Wreath Framelits, Stampin' Up, Stampin' Up Card, Stampin' Up Card ideas, Stampin' Up Supplies, Shop online, Shop Stampin' Up online, join my team, join Stampin' Up, Christmas
Cards | Join My Team | Stamping
by Joanne James28. December 2014 10:00Today I wanted to share with you a fun punch art card that I made for a special little girl for Christmas featuring the adorable snowman Olaf from the Disney movie 'Frozen'. I've made a few of these but never blogged one - so here's the most recent one that I made:
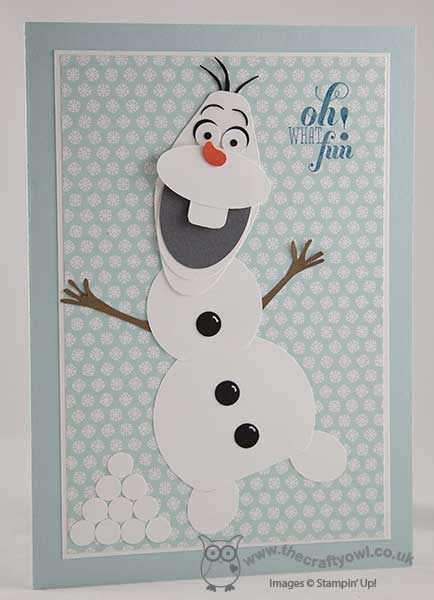
I most certainly can't take the credit for the Olaf punch art itself; to create mine, I always follow the excellent instructions by Michelle Suit - you can watch her video tutorial on how to create your own Olaf here. He is actually rather straight forward - the real key is using the Gift Bow Bigz die to get the right shape for his head. If you are a fan of Disney and like to create punch art every once in a while, I recommend you check out Michelle's blog Suitably Stamped - she really is a whizz!
On this occasion, I kept the design of my card really simple and used a piece of Nordic Noel DSP for the snowflake background and just added a pile of snowballs and a retired sentiment, which I stamped in Island Indigo directly onto the DSP. I have more of these to make this month, as I am the official party planner for a special birthday girl later this month who is having a Frozen-themed celebration; there is clearly no sign of the Frozen phenomena dying down any time soon!
And now to my special announcement! As my regular readers will know, I was asked to join the lovely ladies over at The Paper Players challenge blog back last July for a 3 month guest designer stint. This was then extended to a 6 month stay, which I completed with the last challenge of the year earlier this month. This has always been one of my favourite challenges to play along with and I was delighted to be asked to guest with this talented and creative bunch and equally sad to leave them. So imagine my delight when I got a call asking if I would like to return - as a permanent member of their design team!! Woohoo! I am thrilled that these ladies think so much of me that they would want me to join them on a permanent basis and I am so looking forward to creating with them through 2015 and beyond. Our first post of 2015 will be next Sunday, so do pop back then to join us for some fresh design inspiration!
As for me, I am hoping to be back with you tomorrow with another project; until then, happy stampin'!
Stampin' Up! Supplies Used:
5109cb95-113b-4260-bda9-a61674524f9b|0|.0|96d5b379-7e1d-4dac-a6ba-1e50db561b04
Tags: Christmas, Disney, Frozen, Punch Art, Gift Bow Bigz L Die, circle punch, Nordic Noel, Shop online, Stampin' Up, Stampin' Up Card, Stampin' Up Card ideas, Stampin' Up Supplies
Cards | Punch Art | Stamping
by Joanne James21. December 2014 20:33Sunday already?! Where are the days going??! I have been busy with my Christmas preparations and my focus has been on gift packaging these last few days, along with a few special Christmas cards. Most are going out of the door before they are even photographed though! Today I wanted to do a quick post to share a snowflake paper wreath that I made recently for a friend of mine:
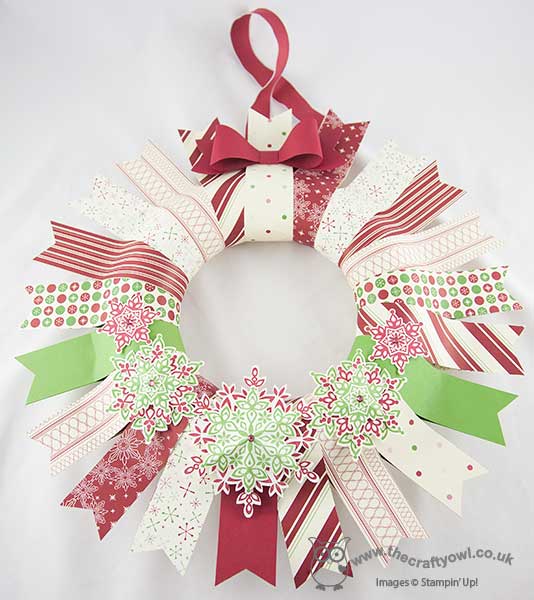
It uses a whole bunch of retired product - the paper is from a couple of years ago (I can't even remember what it was called) and is decorated with snowflakes made from stamping Cherry Cobbler and Gumball Green on Very Vanilla carstock using the Festive Flurry stamp set, that I then cut out using the Big Shot and co-ordinating framelits and finished with a paper bow made using my Gift Bow Bigz Die.
My friend specifically wanted this paper pattern as she wanted her wreath to co-ordinate with other festive pieces she had - as such I had to include a few pieces of solid colour cardstock just to enable me to get all the way around the wreath base; I am now officially out of this DSP pattern! I am going to make another of these wreath types at some point as I think it's really effective, although will probably choose a more traditional blue/silver colour scheme with my snowflakes. It was also quite easy to achieve: about 22 strips of DSP measuring 12" x 1 1/4", adhered to a styrofoam wreath and then the ends flagged.
That's all from me today - back soon with another project when time allows. Until then, happy stampin!
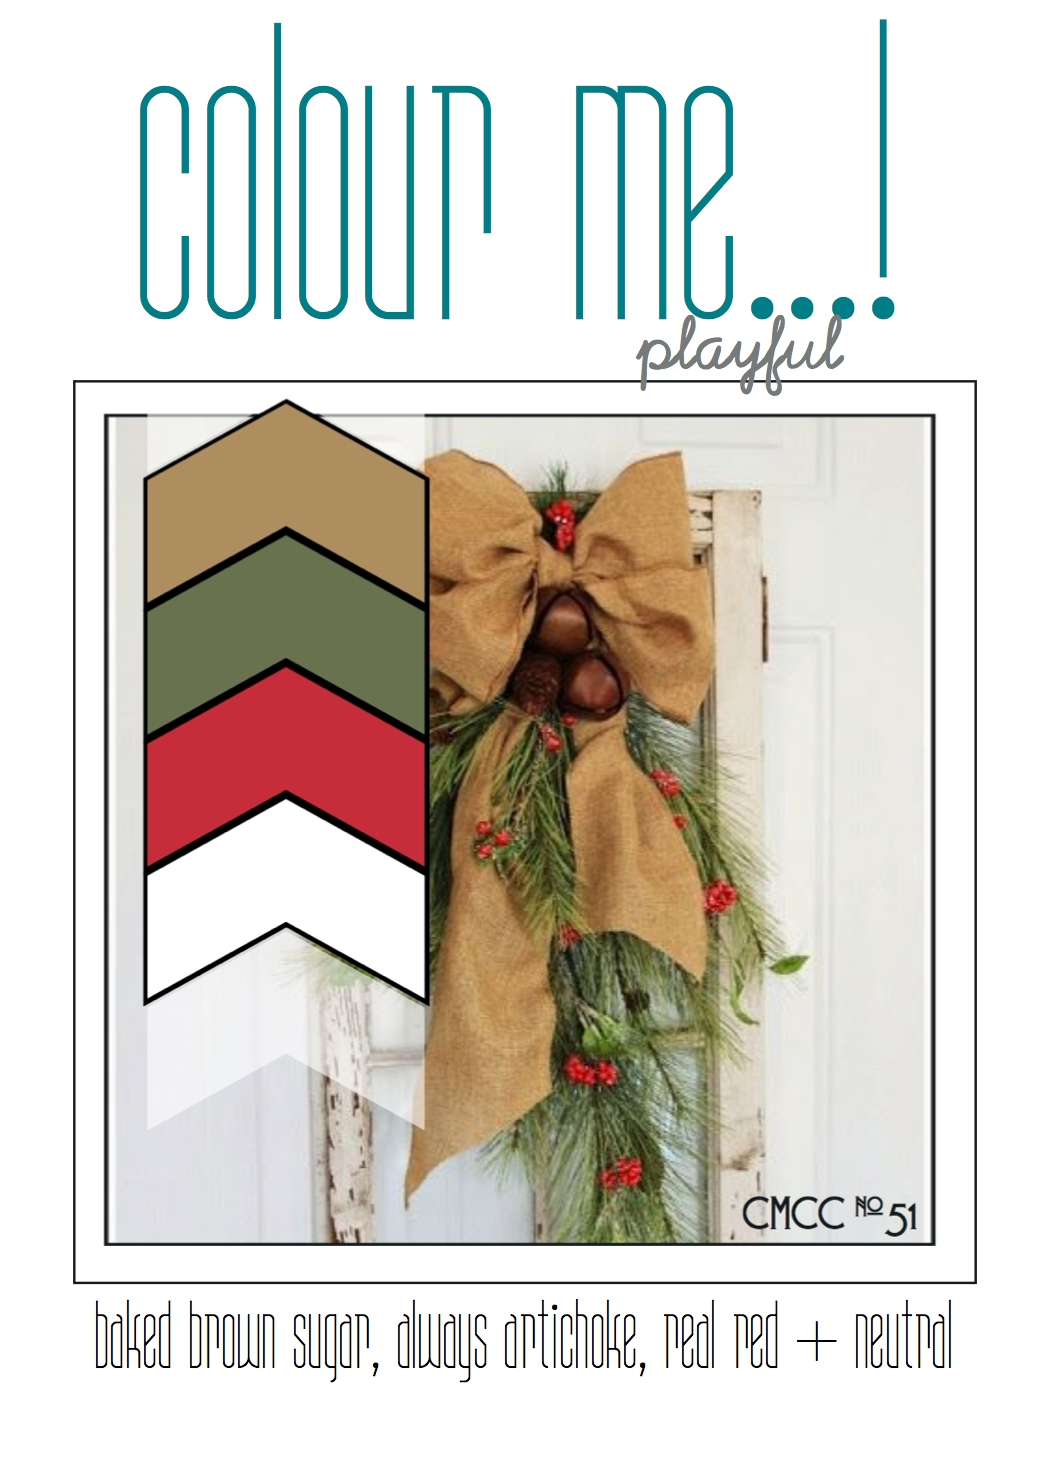
by Joanne James17. December 2014 09:30It's Wednesday and time for my last challenge as a designer over at Colour Me...! It has been a great 6 months working with these lovely ladies and the various colour palettes week on week and I would like to say a big 'thank you' to Tara and Hayley for the opportunity and to my fellow designers, Claire Broadwater, Julia Altermann and Sherrie Mannion and the various monthly guest designers for their collective inspiration. So we are ending the year with a playful colour palette with a distinctive festive feel:
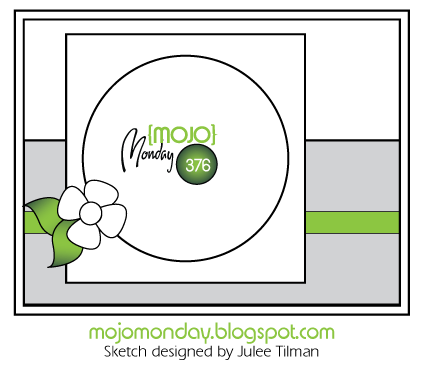
I used this week's sketch over at Mojo Monday as the inspiration for the layout of my card and decided to stick with the festive feel of our inspiration photo to make another Christmas card:
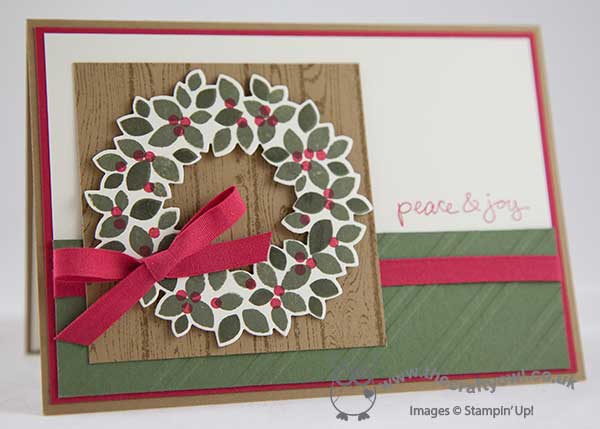
I used Baked Brown Sugar for my base with a mat of Real Red, then a split panel of Very Vanilla and Always Artichoke, the bottom layer of which I embossed with the Stylish Stripes TIEF. I stamped my Good Greetings sentiment onto the vanilla layer in red (this set is now available on the Year End Closeouts Clearance Rack if you want to pick up a bargain!). I stamped a piece of Baked Brown Sugar with the Hardwood stamp to create the background for my wreath, then stamped my wreath in Always Artichoke with red berries and cut it out with my wreath framelits and popped it up on a couple of dimensionals. To finish, I added a ribbon and bow in Real Red Cotton Ribbon.
Feel free to leave a comment on today's card, before hopping over to check out the amazing cards by the rest of the Colour Me...! team:
We look forward to seeing your playful creations - what does this palette inspire you to create?
Back tomorrow with another project; until then, happy stampin'!
Stampin' Up! Supplies Used:
8b2fffcb-a48f-4827-972a-8c4d72487220|0|.0|96d5b379-7e1d-4dac-a6ba-1e50db561b04
Tags: Christmas, Good Greetings, Wonderful Wreath Framelits, Wondrous Wreath, Shop online, Stampin' Up, Stampin' Up Card, Stampin' Up Card ideas, Stampin' Up Supplies, Clearance Rack, Colour Me...!, Hardwood
Cards | Stamping
by Joanne James10. December 2014 10:00It's Wednesday and this week's challenge over at Colour Me...! is one of my favourites - we have a beautiful striking colour combination for you to work with:
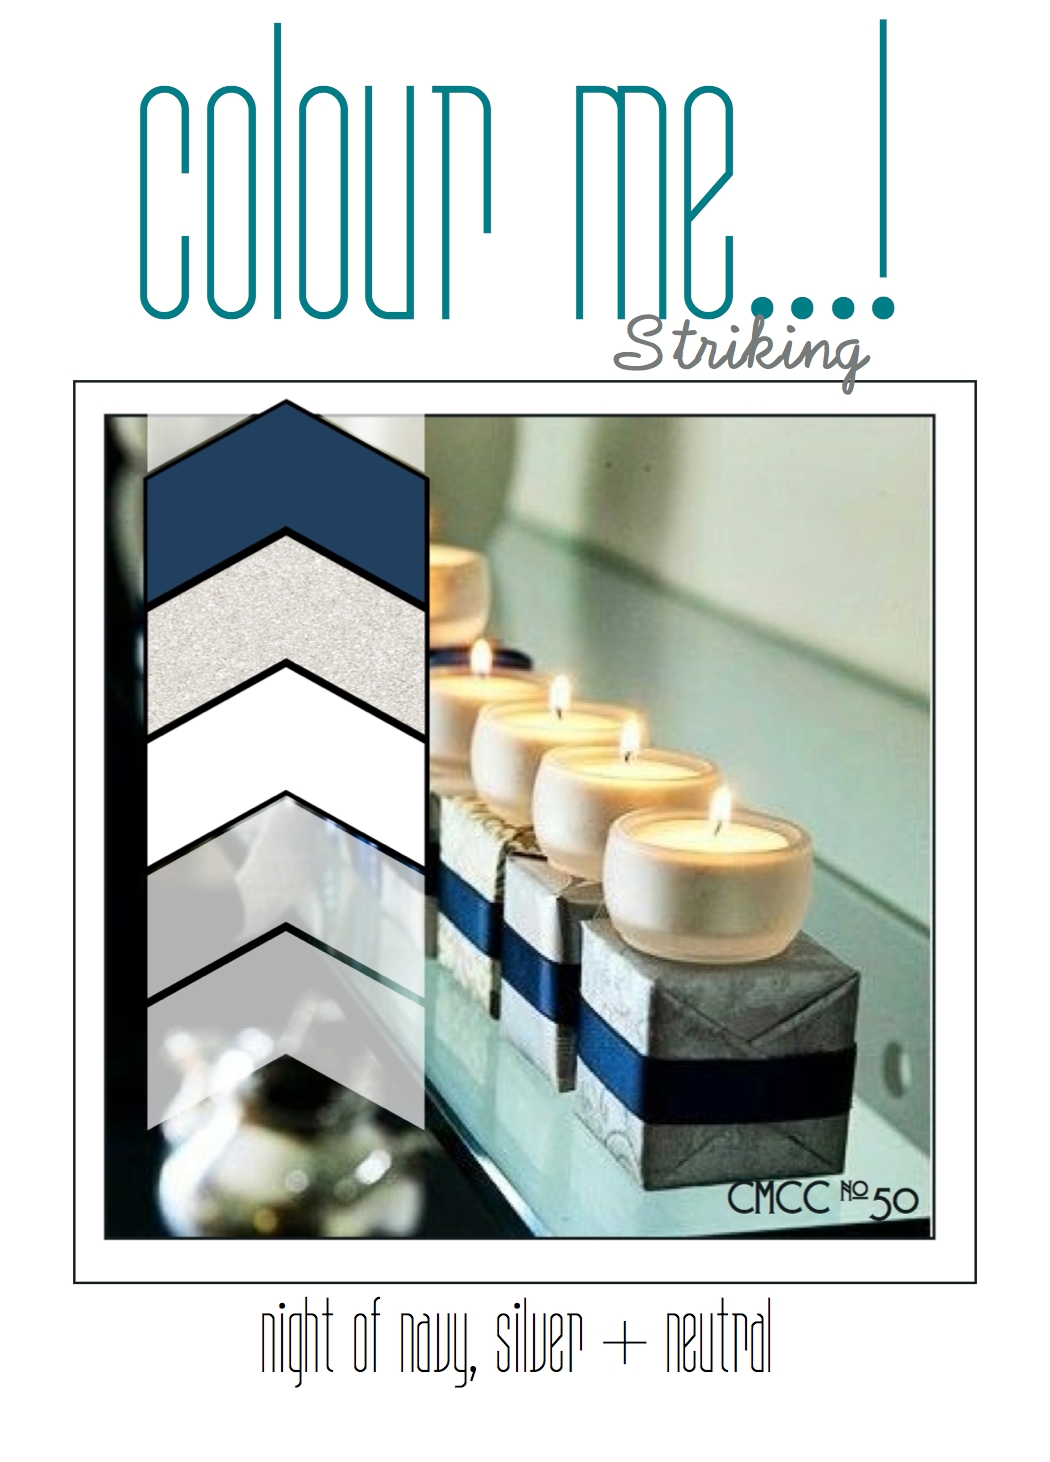
Night of Navy and Silver - such a great pairing for Christmas cards. I immediately knew what I wanted to create with this week's colour combination - a star shaker card. Here it is:
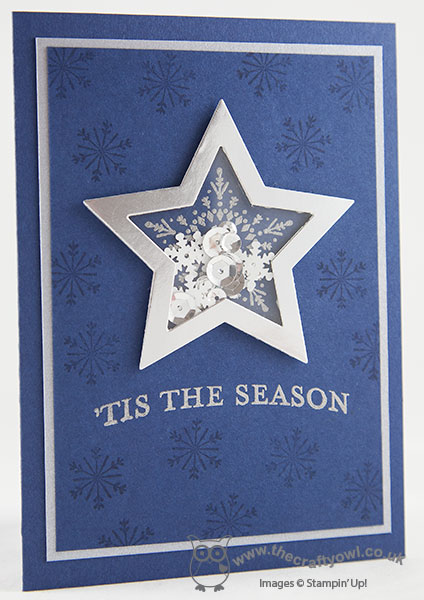
When I uploaded my Design Team card this week, I can see I wasn't the only one who thought stars were a good idea - you know what they say about great minds thinking alike though, right? I created a layered panel of Night of Navy and Brushed Silver on a Night of Navy base, then stamped the large snowflake and sentiment in Versamark and heat embossed in silver. I then stamped the small snowflake all over the front of my card in Versamark to give a subtle background pattern. Lastly, I created a star shaker frame using silver foil, a piece of window sheet and some dimensionals and after placing a mixture of Frosted Sequins in the centre, attached my frame to the background.
I love shaker cards and really don't make them often enough; after all, they are such fun. Feel free to leave a comment on today's card, before hopping over to check out the amazing cards by the rest of the Colour Me...! team:
We look forward to seeing your striking creations - what does this palette inspire you to create?
Back tomorrow with another project; until then, happy stampin'!
Stampin' Up! Supplies Used:
by Joanne James8. December 2014 07:00A nice early post from me this morning as I'm trying desperately to be organised this week as I have the busiest week ahead! It is the last week of the school term before the James Juniors break up for Christmas, so we have a week of pantomimes, parties and performances to look forward to. Not to mention a marathon baking session to ensure there are tasty treats for teachers gifts by the end of the week!
Today's card uses the sketch layout over at The Deconstructed Sketch and this week's colour palette over at Pals Paper Arts:

I'm still making Christmas cards and today's square card features a combination of old and new product. Here is my card:
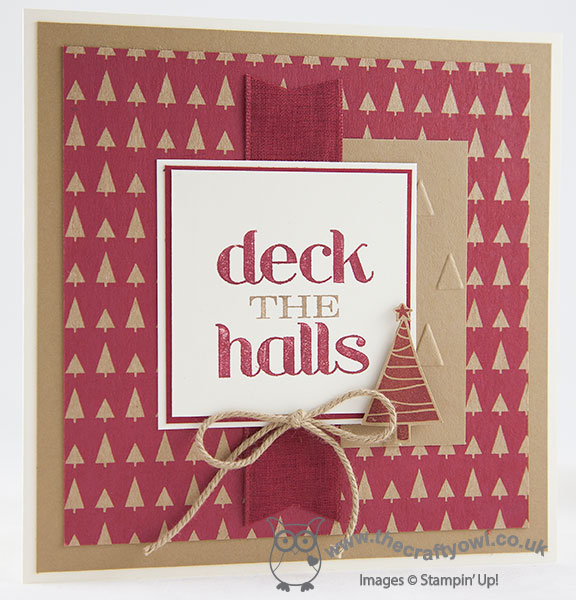
I love those Under the Tree kraft DSP papers and this red Christmas tree pattern is one of my favourites. I matted a piece of it on a square of Baked Brown Sugar and a mat of Very Vanilla. I embossed a piece of Baked Brown Sugar with the On Point embossing folder for some added texture then added a piece of ribbon for the vertical strip. I used the retired 'deck the halls' stamp for my sentiment as I wanted something nice and square, coloured with my Stampin' Write markers and matted on a piece of Cherry Cobbler and another piece of Very Vanilla. I used a piece of Baked Brown Sugar thick baker's twine for the bow. I used the Christmas tree from the Project Life December Wonder stamp set in place of my tab, and also moved it to the other side in relation to the sketch layout. A tab as well as the tree didn't look right, nor did a tab without it or putting the tree on the left. So I switched it - crafter's prerogative!
Hope you like today's card - this is a colour combination I can see myself using again before Christmas comes!
Back tomorrow with another project; until then, happy stampin'!
Stampin' Up! Supplies Used:
by Joanne James5. December 2014 20:54
Friday already - where did that week go??! Before I get onto today's card, I just want to make sure you're aware that Stampin' Up!'s clearance rack has been updated with year end closeouts. There are lots of bargains to be had, so why not pop across to my online store and treat yourself - don't forget to support my business by using this month's hostess code TXNVEUX2 when you place your order.
Now onto today's card! This is another card I made with this week's colours over at Colour Me..!; I wanted to see if a sky scene card would work in Smoky Slate rather than a navy blue - here's my card:
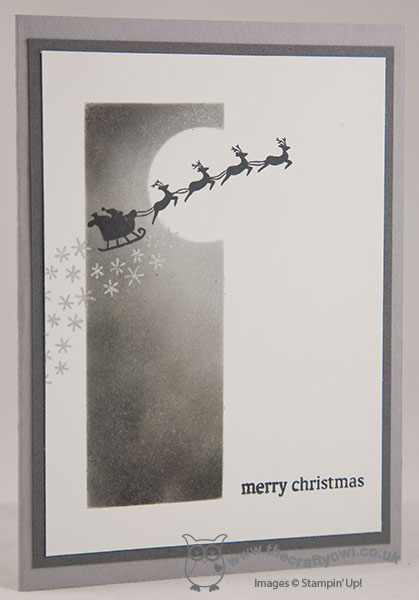
I used a mat of Basic Grey on my Smoky Slate card base and then on my focal panel of Whisper White, I sponged a panel using Smoky Slate and Basic Grey inks, having masked off a circle for the moon using a post-it note. I also used some metallic silver Encore ink to add a sparkle to the sky, which you can just about see in the photograph and gives a very pretty sheen in real life. I then stamped Santa and his reindeer from the Holiday Home set using Memento black ink across the moon and sky and added a trail of silver stars in Encore silver ink behind. Lastly, I added a simple sentiment from the same set.
A simple card using just one stamp set and a grey colour palette that I think works quite well. I'm sure it would work in blues too; if I can find the time to experiment, I'll have a go and share some other time!
Back soon with another project; until then, happy stampin'!
Stampin' Up! Supplies Used:
by Joanne James3. December 2014 07:00 
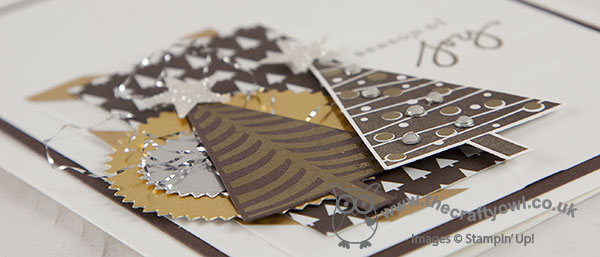
Welcome to my first creative post of the day! Following my selection as Featured Stamper for this card using the above challenge colours over at Color Throwdown a couple of weeks ago, the lovely ladies over there have invited me to be a guest designer for this week's challenge - yay! As if that wasn't enough, just look at the lovely colours and inspiration photo we had to work with:
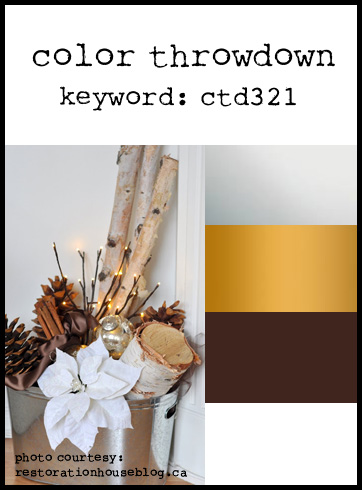
I had to go with something Christmassy and I found the mix of textures in the inspiration photo provided me with the starting point for my card. So this is what I came up with:
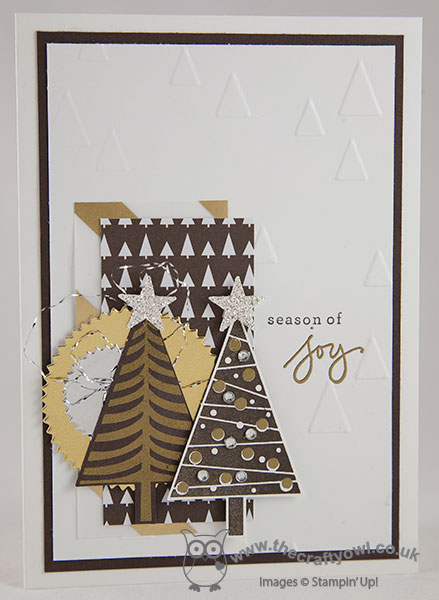
I used Whisper White for my base and layered this with a mat of Early Espresso, then another piece of Whisper White, having first embossed this piece with my On Point embossing folder. I then created a little 'corner collage', comprising some gold striped vellum, a piece of tree-patterned DSP from the 'Trim The Tree' stack, a gold and snaller silver foil starburst circle, and then two Christmas trees - one stamped in Versamark and heat embossed in gold on Early Espresso cardstock and the other stamped in Early Espresso on Whisper White, with the baubles heat embossed in gold and a few silver rhinestones added for extra sparkle. A couple of silver glimmer paper stars top the trees and I looped some silver thread removed from some silver baker's twine behind them. To finish, I stamped my sentiment in between the embossed area in Early Espresso and Versamark heat embossed in gold. Collage-style cards are not my usual thing, but I must confess I enjoyed getting slightly carried away with this card and am really pleased with the result.
Do pop over to the Color Throwdown blog to see what the other designers have created using this colour palette; these ladies do a great job each week and would I'm sure appreciate your visit. I for one will be stalking the gallery with interest!
Back shortly with today's third post! Until the, happy stampin'!
Stampin' Up! Supplies Used:
df70faee-acae-439b-bd50-2ff22182b1d7|0|.0|96d5b379-7e1d-4dac-a6ba-1e50db561b04
Tags: Christmas, Festival of Trees, Endless Wishes, On Point TIEF, Trim The Tree, Embossing, Shop online, Stampin' Up Supplies, Stampin' Up Card ideas, Stampin' Up Card, Stampin' Up, Starburst Framelits, Big Shot
Cards | Stamping
by Joanne James1. December 2014 09:30It's official - today is the first of December, the countdown to Christmas has begun! Day one of the advent calendar has been opened, Charlie the Elf has made his return (pictures on my Facebook page later!) and the start of two of the busiest weeks in the school calendar before the end of term. Before I get to today's card, I just wanted to remind you of the current Stampin' Up! joining offer that ends tomorrow morning - you can read the full details here, but in a nutshell you can sign up for £74.25 and receive £130 worth of products of your choice and 5% cashback on all orders placed during December, not to mention the additional benefits of joining my wonderful team! Why not treat yourself to a bundle of Stampin' Up! goodness as an early Christmas present? Call me if you would like to chat more or better still, click here to sign up today!
Onto today's card - this one uses this week's sketch over at Freshly Made Sketches, where the simple sketch from Jen offers so many creative possibilities:

I decided to go with crisp subtles today - here is my card:
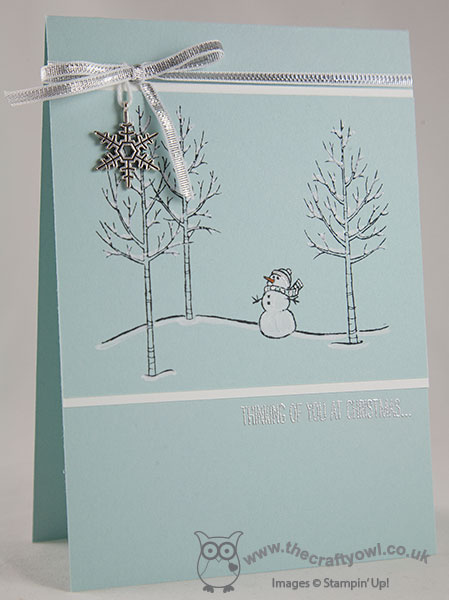
I used Soft Sky for my base and image panel, and matted the panel onto a piece of Whisper White. I stamped a little scene in Memento Black using my 'White Christmas' stamp set, being careful to only partially stamp the horizon line so that I could overlay my snowman in the same layer. By using Soft Sky as my base, I could use my white chalk marker to colour my snowman and add detail to my scene on the trees and ground. With the exception of some Pumpkin Pie marker for the snowman's nose and some detail added to his scarf and hat with my silver marker pen, there is no other colour introduced to my scene. I stamped my sentiment in Versamark and heat embossed it in silver and added a thin silver ribbon and bow trim with a snowflake embellishment to finish. This is such a simple card, yet the silver elements add a subtle shimmer in real life that make it quite pretty.
That's all from me today - I have lots of jobs to do so need to get cracking! Back tomorrow with another project; until then, happy stampin'!
Stampin' Up! Supplies Used:
d2549880-e1a5-4719-9930-f4d0d38ea328|0|.0|96d5b379-7e1d-4dac-a6ba-1e50db561b04
Tags: Cashback Offer, Christmas, Earn Free Product, Earn Extra income, join Stampin' Up, join my team, Shop online, Stampin' Up, Stampin' Up Card, Stampin' Up Card ideas, Stampin' Up Supplies, White Christmas
Cards | Stamping