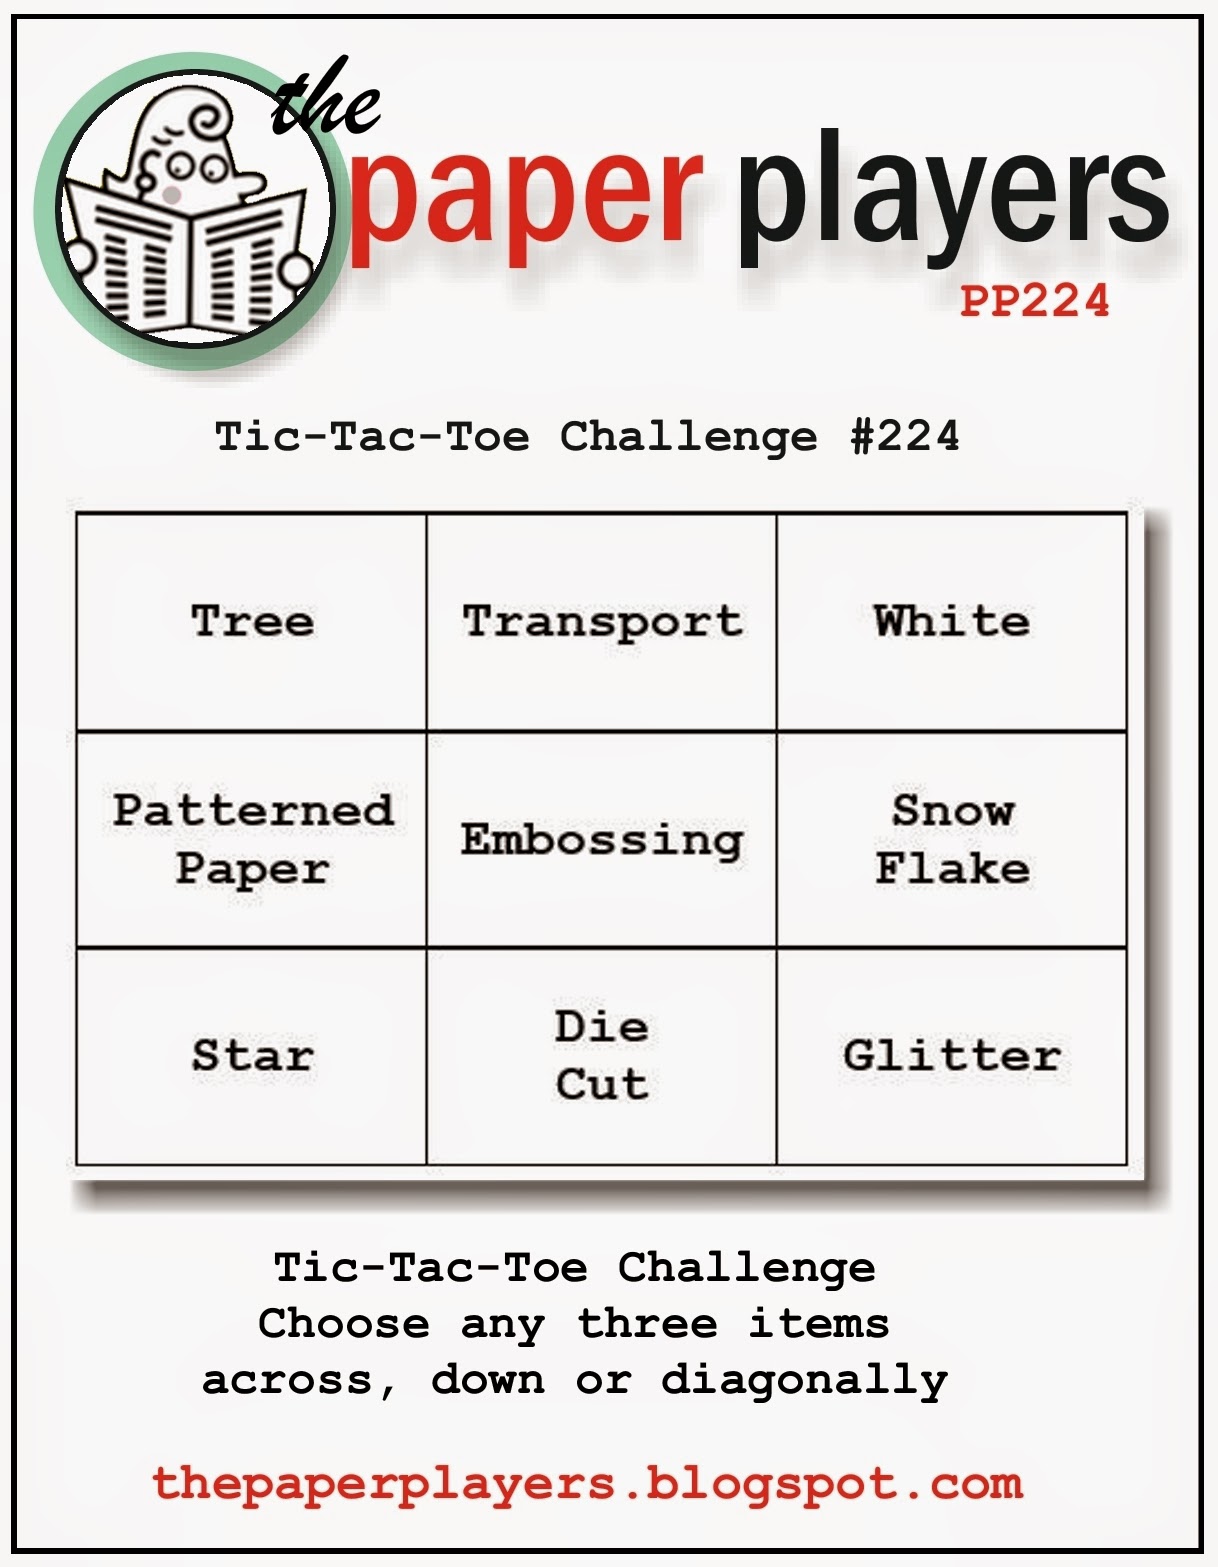
by Joanne James30. November 2014 07:00It's time for a new challenge over at The Paper Players today and this week the lovely Jaydee has a fun tic-tac-toe challenge for us:
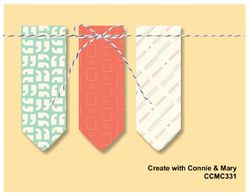
I'm linking up today's card with Merry Monday where the challenge is to use red, green and white on a Christmas card, and Create with Connie and Mary where they have the following sketch layout:

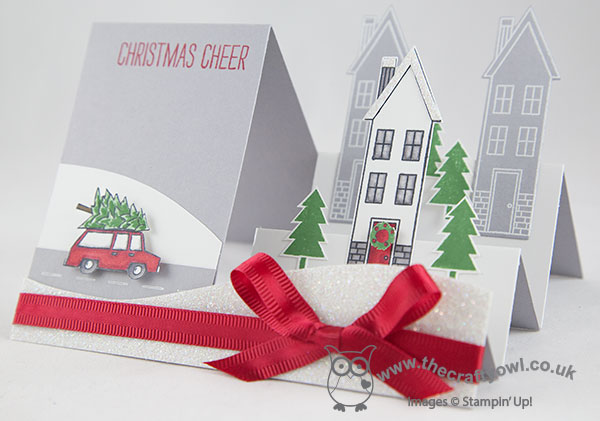
When considering Jaydee's grid I was drawn to the top horizontal line - tree, transport and white - although I ended up completing two more lines too (see if you can work out which ones!). One of the reasons I purchased the 'White Christmas' stamp set was for that cute little car and this is the first time I've used it! Here is my card:
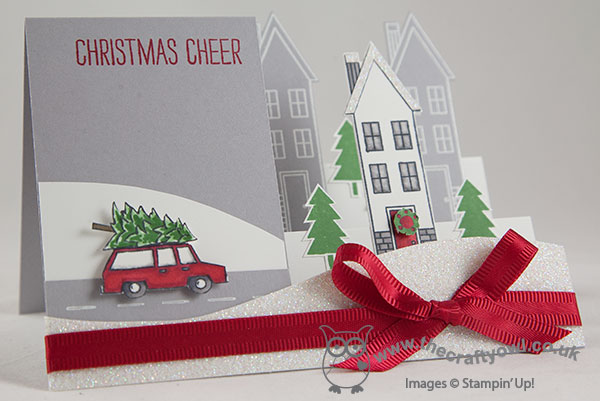
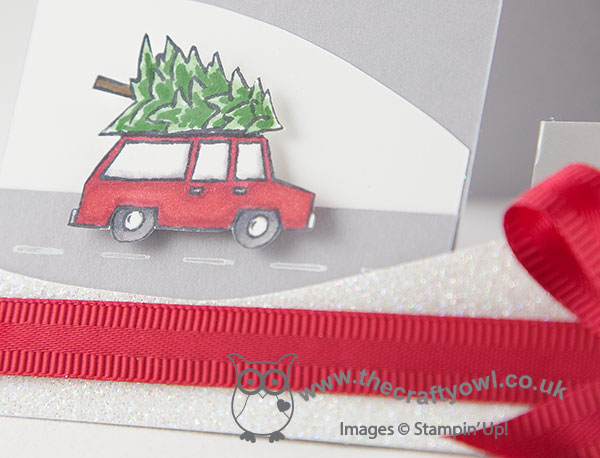
I took some artistic licence with the sketch and turned it upside down and made it into a side stepped card - I think you can see all the elements though. I used Smoky Slate for my card base and having made my folds, I began to customise it. For the main panel, I added a Whisper White snow drift and a road for my car to travel along, then stamped my car, complete with Christmas tree, in Memento Black onto Whisper White, coloured with my Blendabilities and Stampin' Write markers and fussy cut it out and popped it up on dimensionals:
For my stepped side, I added a snow drift of dazzling diamonds glimmer paper at the front, along with a bold satin bow. The house that is the destination for the travelling Christmas tree is on the layer behind, again coloured with Blendabilities and decorated with a mini wreath and some glimmer snow, and a few fir trees. The layer at the rear has a couple more trees and two more houses, this time in Smoky Slate and stamped in Versamark and heat embossed in white, as these houses are in the background of the scene. Here are a couple of additional views from this side of the card:
Here's a close up of the houses:
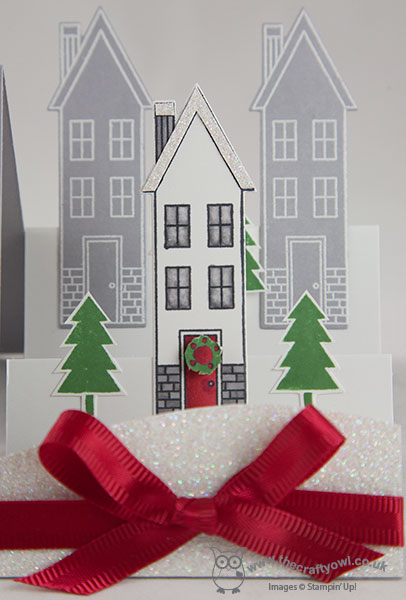
This was a fun card to create and the Holiday Home houses and co-ordinating framelits work really well on a stepped card. This week's tic tac toe challenge offers lots of opportunities to be creative, so be sure to share your creation with us at The Paper Players! Check out what the other designers did as well:
Back tomorrow with another other project; until then, enjoy the rest of your weekend and happy stampin'!
Stampin' Up! Supplies Used:
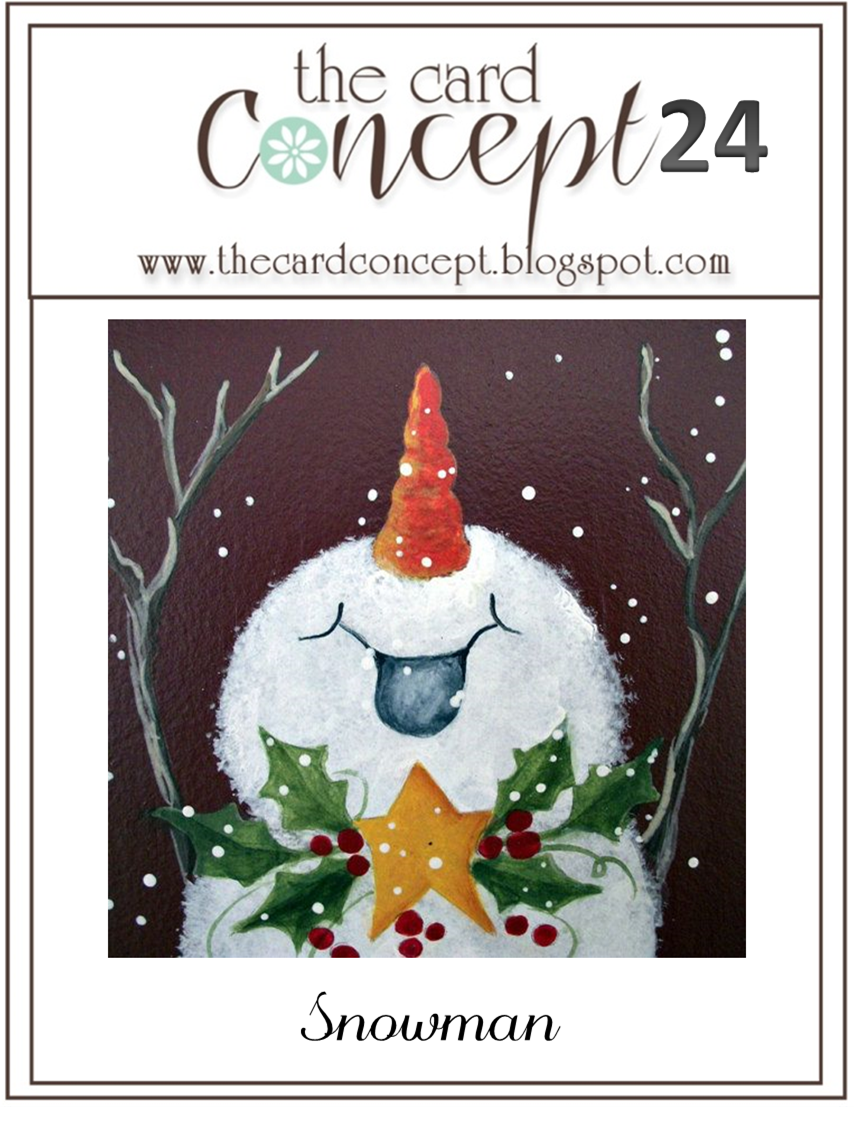
by Joanne James28. November 2014 21:09It's Friday and the end of the working week - hurrah! Today's card is a triple challenge card; it's not often that happens! I'm using the sketch over at Retrosketches, with this week's Color Throwdown colour palette and the tag and snowman mean it also fits with the challenge over at The Card Concept (clean and layered):
I didn't intentionally set out to create a tag card, but as I was working with the sketch and colour palette, I thought a tag would look quite cute. Here is my card:
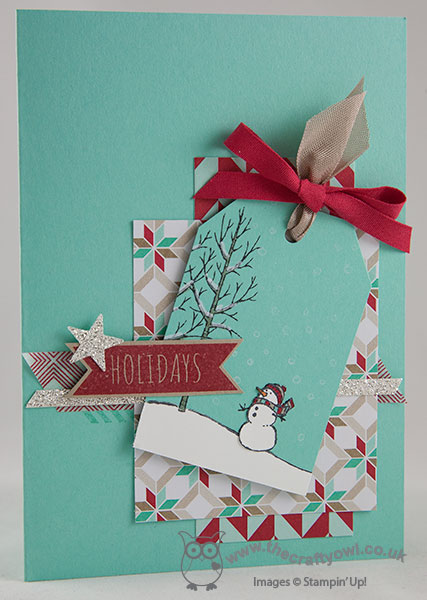
I used Coastal Cabana for my base, stamped one of the Gorgeous Grunge stamps in the same colour across the front and edged this with some red Beach House washi tape. I then layered a couple of pieces of now-retired DSP stack (the colours were perfect for this card and although this was a Spring/Summer paper stack, this pattern has always reminded me of snowflakes), some silver glimmer paper and then my tag. I punched my tag using the angle tag topper punch from Coastal Cabana cardstock, stamped the tree from the 'White Christmas' stamp set onto the tag then stamped it again onto a piece of Whisper White and paper-pieced the snowscape and snowman onto it. I coloured the tree with my Crumb Cake Stampin' Write marker and added some snow with my chalk pen, then added some detail to the snowman with my markers and stamped some snow across the rest of the tag with white kraft ink. I finished my tag with some Crumb Cake seam-binding ribbon and Real Red cotton ribbon tied in a bow, and stamped my Holidays' sentiment in Real Red onto Crumb Cake cardstock and adhered this to my tag, along with a silver glimmer star.
Hope you like today's card; I have a busy weekend of fun and frolics planned, so an early night in store for me!
Back tomorrow with another project; until then, happy stampin'!
Stampin' Up! Supplies Used:
by Joanne James27. November 2014 11:21Yesterday evening I was at a Stampin' Up! event where demonstrators got a 'sneak peek' of what's in store for Sale-A-Bration; all I'm going to say at this point is boy do you all have something to look forward to, and I highly recommend you consider asking for a Stampin' Up! gift voucher from your nearest and dearest for Christmas (contact me for details!) and hold back some of your January Sales budget to take advantage, as you are not going to miss it!!
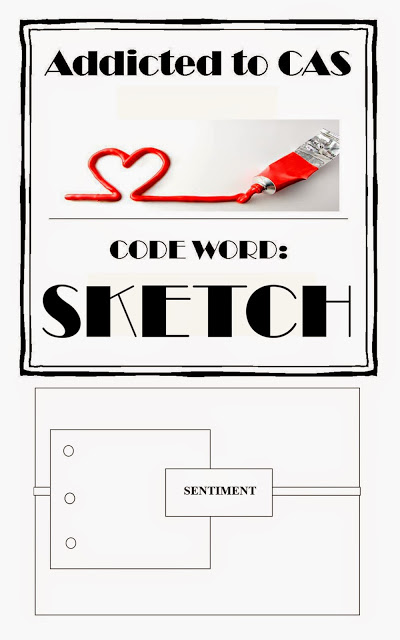
Today though I am back onto Christmas cards with another to share with you, having had a few days break. Well, it is now officially 'the season' I think! I used this week's sketch over at Addicted to CAS for my card today where the team are celebrating their second birthday - congratulations! - and which was designed with the theme over at Less is More in mind.
Now the theme this week is 'Jingle All the Way' and you would think that this card from earlier in the week might be a more appropriate fit, but the lovely ladies over at Less is More went on to say "we would like to see some reference to any of these things.... bells, reindeer, Santa, elves, stockings, presents, decorations, Christmas songs/music/instruments... in fact anything Christmassy!" and I immediately took this as the opportunity to bring my Dasher stamp out of retirement to create a card with a reindeer on it. Well, Christmas wouldn't be Christmas unless he made at least one appearance on a card this season, after all it's almost tradition! So here is my card:
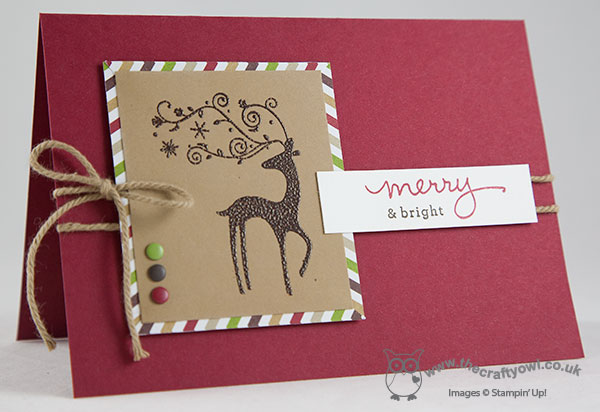
I used Cherry Cobbler for my base and stamped my reindeer in Versamark on a piece of Baked Brown Sugar and heat embossed it in Early Espresso embossing powder to give it a lovely rich sheen. I matted this piece on a base of last year's Season of Style DSP stack, which I cut into pieces and mounted with mitred corners as the pattern was actually a chevron, but I wanted it to be diagonals going around the frame (I hope that makes sense when you look at the photograph, it just seems difficult to explain!)I then popped this piece onto my base using dimensionals, so that I could run a couple of loops of Baked Brown Sugar thick baker's twine around the base beneath it. I used my tiny hole punch to put a couple of semi-circle grooves in each side so that the twine would rest in them and stay in position - a useful tip if you're creating this type of card. To finish, I added my sentiment stamped from 'Endless Wishes' and a trio of candy dots to balance the main image.
I hope you like today's card and before I go would like to give a big shout out to Chrissie, Sarah and Anne over at Less is More, both for recognising this card in their top 3 of the recent one layer challenge but also for their tireless dedication to commenting on the cards in the LIM gallery and for their general helpfulness and constructiveness; I think my CAS style has improved a lot with their input, so I for one am grateful!
That's all from me today; I'm off out for lunch with a friend (a rare treat!) and then back to finish some work before the school run! Back tomorrow with another project; until then, happy stampin'!
Stampin' Up! Supplies Used:
by Joanne James24. November 2014 09:25Happy Monday everyone! Hope you all had lovely weekends; mine was busy as always, with a Stampin' Up! party on Friday night, followed by the usual weekend of sport and a morning stood out in the driving rain watching my first rugby match yesterday (hockey is definitely a cleaner game!) Other highlights of my weekend included reaching the bottom of my ironing basket (to be celebrated!) and the addition of a new pet to the James household - Olivia the goldfish has joined Goldie, who was feeling lonely following the recent departure of Fishy.
So, onto today's card! Today I have a clean and simple card for this week's challenge over at Freshly Made Sketches, where Cindy has another great sketch for us:
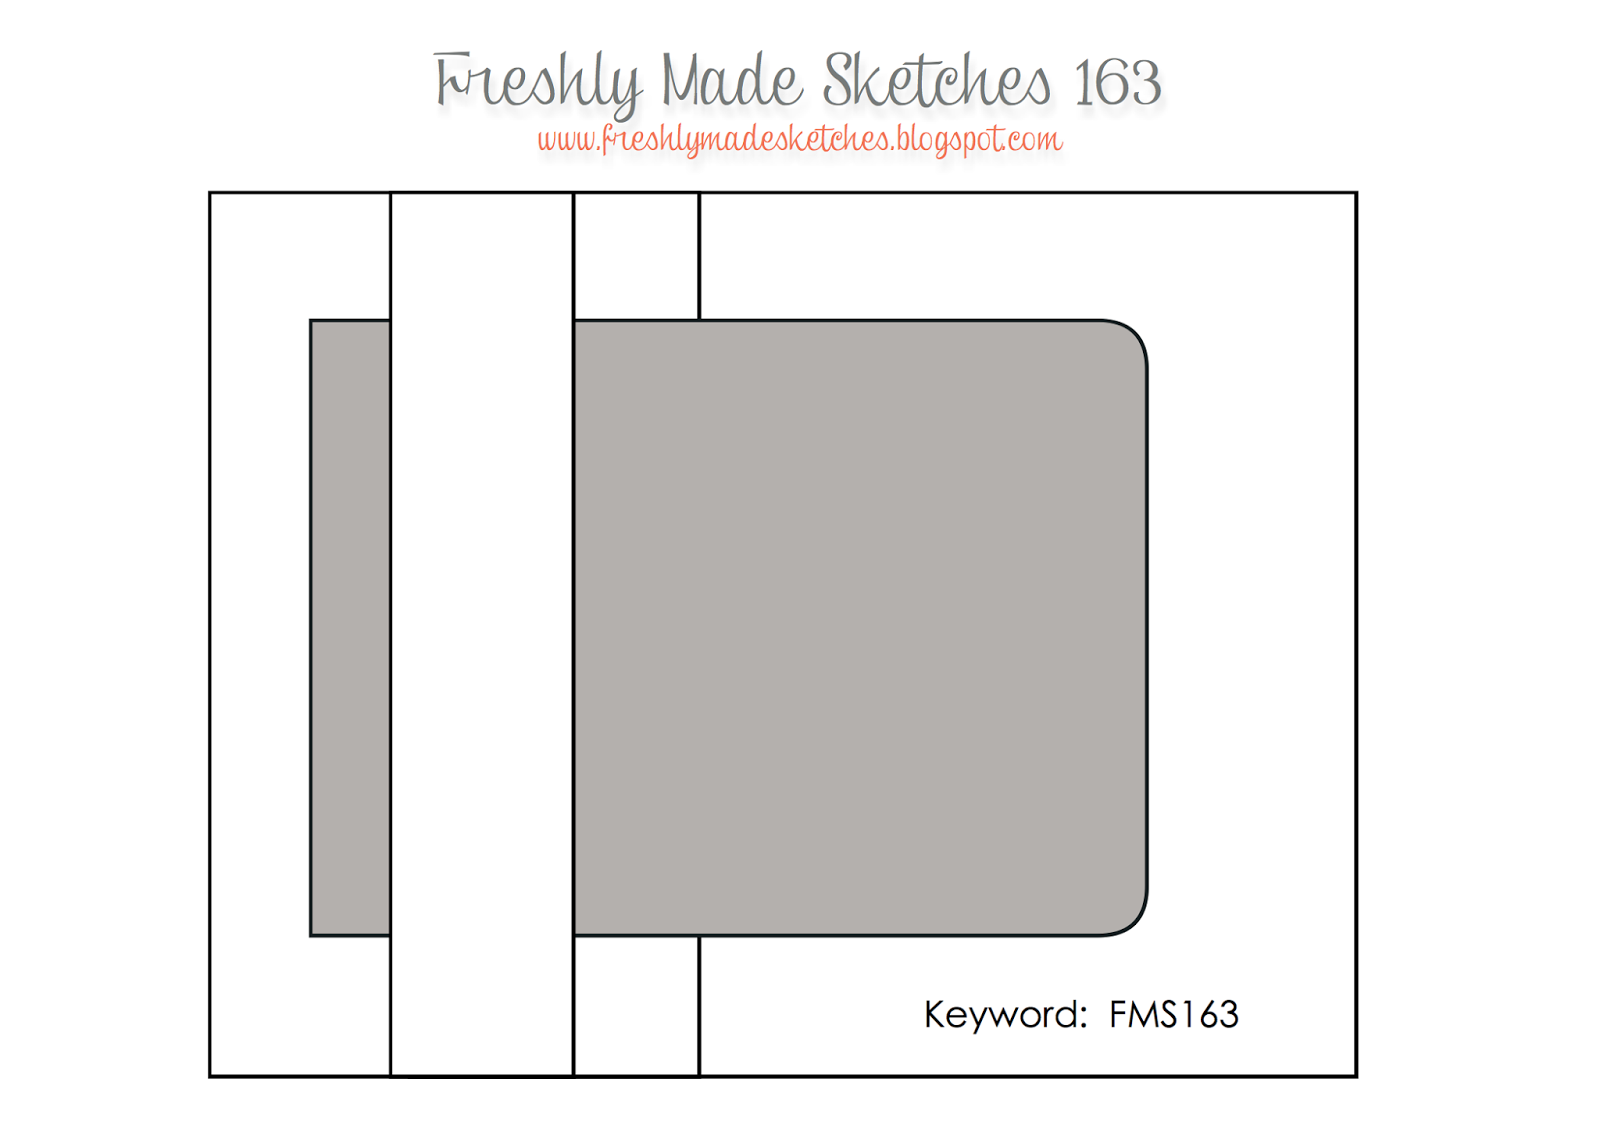
I took inspiration from another of the designs in the Nordic Noel DSP pack and paired it with the sentiment stamp from Cheerful Christmas for my card today:
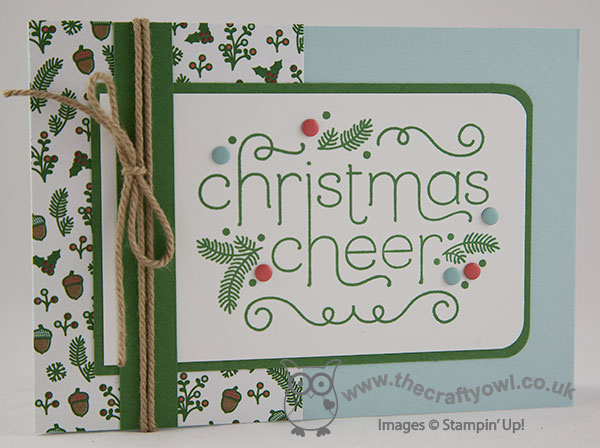
I used Soft Sky as my base and a piece of the Nordic Noel DSP featuring the acorns and pine sprigs for the left panel of my card. I stamped my feature sentiment in Garden Green on Whisper White and matted this onto a piece of Garden Green cardstock, rounding the corners on the right-hand side of both pieces. I used some Soft Sky and Calypso Coral Candy Dots to add a little colour to the main panel. Lastly, I added a strip of Garden Green and finished with a double loop of Baked Brown Sugar baker's twine. I love this thick twine - it's great for packaging but also works as a substitute for ribbon and ties a lovely bow.
I love the fresh look of this card; the Garden Green is definitely a festive colour, but pairing it with Soft Sky, Baked Brown Sugar and Calypso Coral and Whisper White adds a real crispness to it I think. That's all from me - I'm off to get ready for today's class featuring the Many Merry Stars kit; click here to order yours if you haven't already, before they're all gone.
Back tomorrow with another project and news of a fantastic one-week only demonstrator sign up offer - come back and check it out, you are not going to want to miss it! Until then, happy stampin'!
Stampin' Up! Supplies Used:
88828eaf-d6a2-4d34-9b84-dc8ff069a4d7|0|.0|96d5b379-7e1d-4dac-a6ba-1e50db561b04
Tags: Candy Dots, Cheerful Christmas, Christmas, Nordic Noel, Many Merry Stars, Shop online, Stampin' Up, Stampin' Up Card, Stampin' Up Card ideas, Stampin' Up Supplies, corner punch
Cards | Stamping
by Joanne James23. November 2014 07:00It's Sunday and time for another challenge over at The Paper Players where this week LeAnne has a great sketch for us:
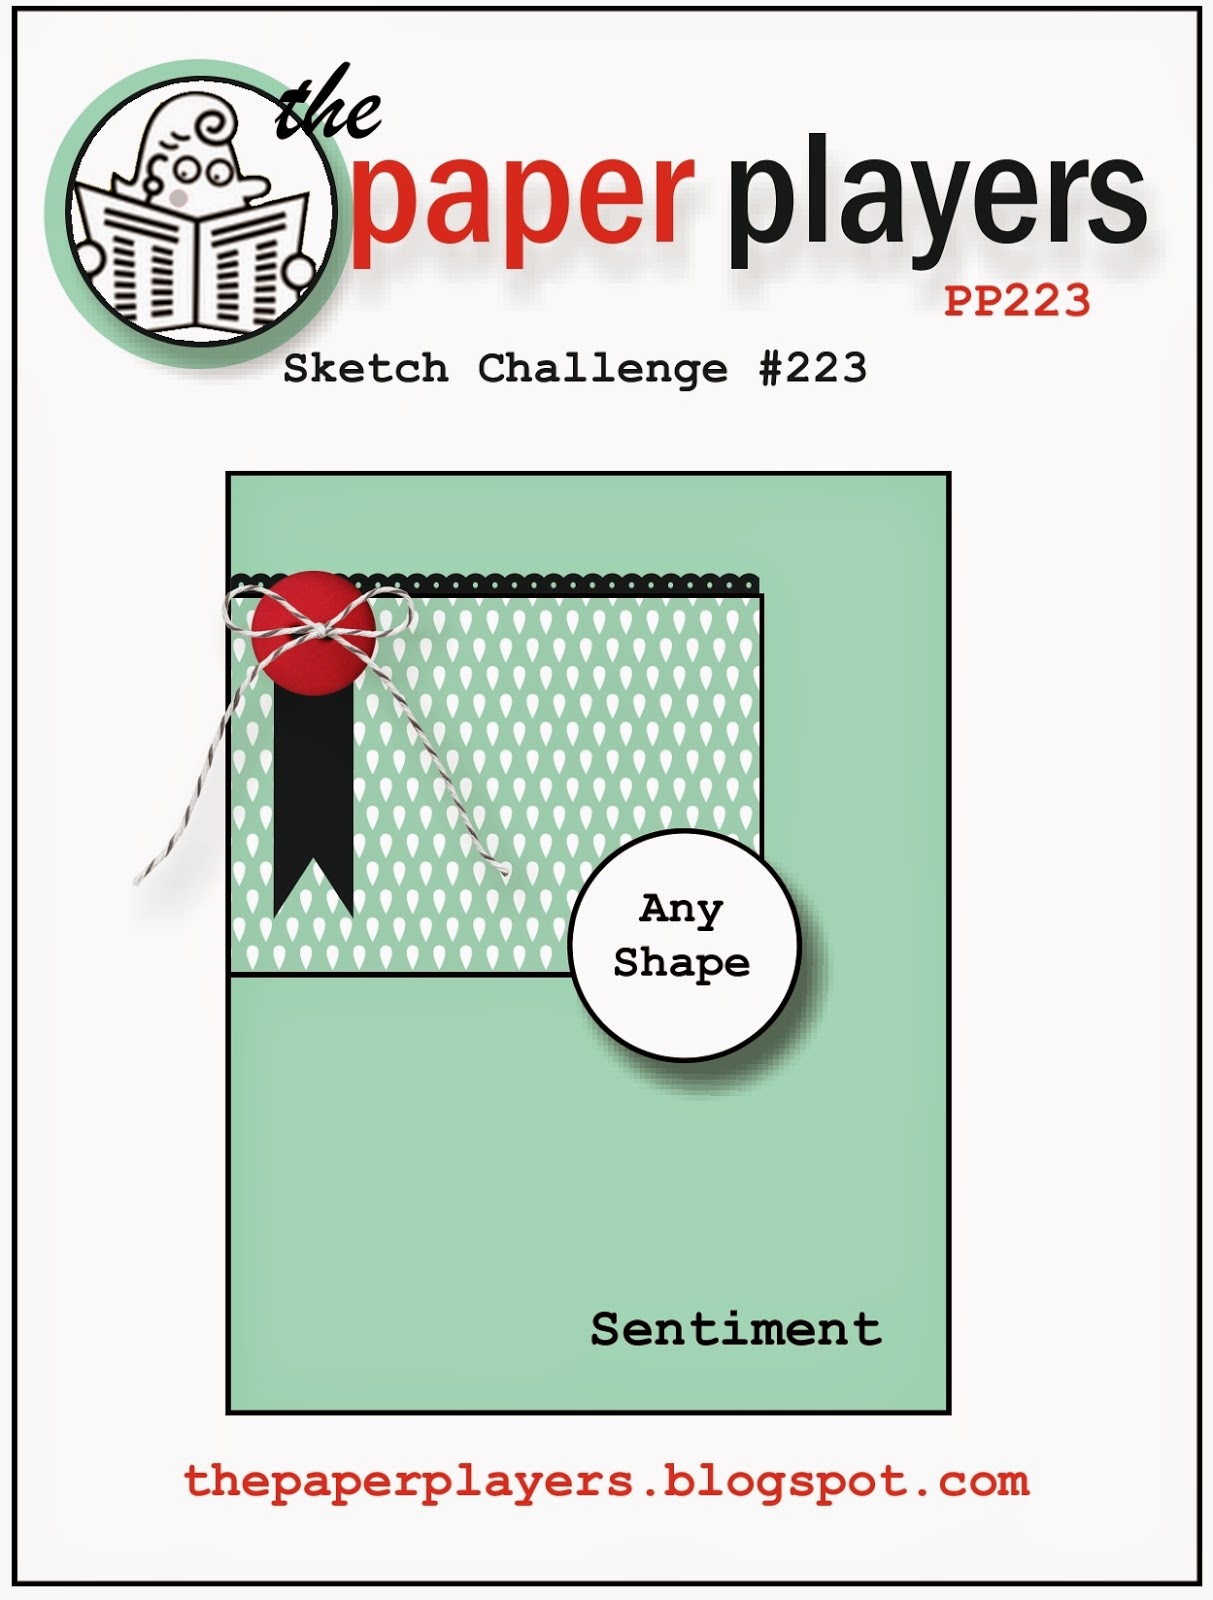
Sketch challenges are my absolute favourite and I had tons of ideas for this one; you may see some of the others later this week, but for today I'm sharing this Christmas card featuring some of my favourite Nordic Noel designer series paper:
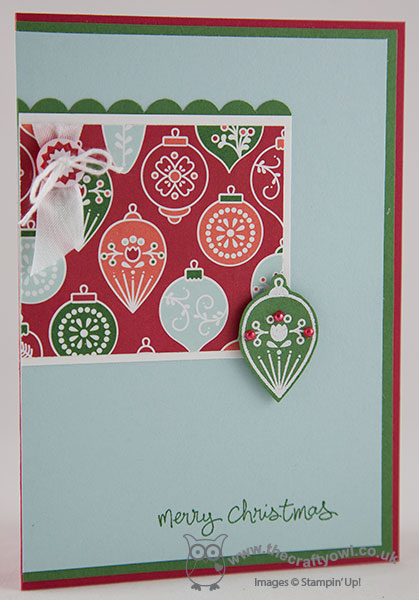
I kept my layout really simple as the paper is quite busy, but used lots of layers to incorprate the colours in the DSP. I added a piece of white seam binding ribbon tied with some baker's twine and a Nordic Noel button and to the bottom opposing corner a co-ordinating ornament in Garden Green that I stamped in Versamark and heat embossed in white, with a trio of pearls coloured with my Cherry Cobbler Blendabilities for effect. A sentiment from 'Good Greetings' finishes off my card.
I'm off to hockey and then have a date with an overflowing basket of ironing this afternoon. If you have something altogether more fun lined up and have time for a spot of crafting, then check out the cards by the other Paper Players designers this week for some great inspiration and then see what you can come up with? We would love to see you in the gallery this week.
Back tomorrow with another project; until then, happy stampin'!
Stampin' Up! Supplies Used:
c6bbecce-1fdc-4b57-8380-5796a73e64eb|0|.0|96d5b379-7e1d-4dac-a6ba-1e50db561b04
Tags: Scallop Trim Border Punch, Christmas, Nordic Noel, The Paper Players, Stampin' Up Supplies, Stampin' Up Card ideas, Stampin' Up Card, Stampin' Up, Shop online, Good Greetings, Good As Gold Card Kit
Cards | Stamping
by Joanne James22. November 2014 07:00It's the weekend - yay! Today I'm sharing my card for this week's challenge over at the Merry Monday Card Challenge, where Sue has the following challenge for us this week:
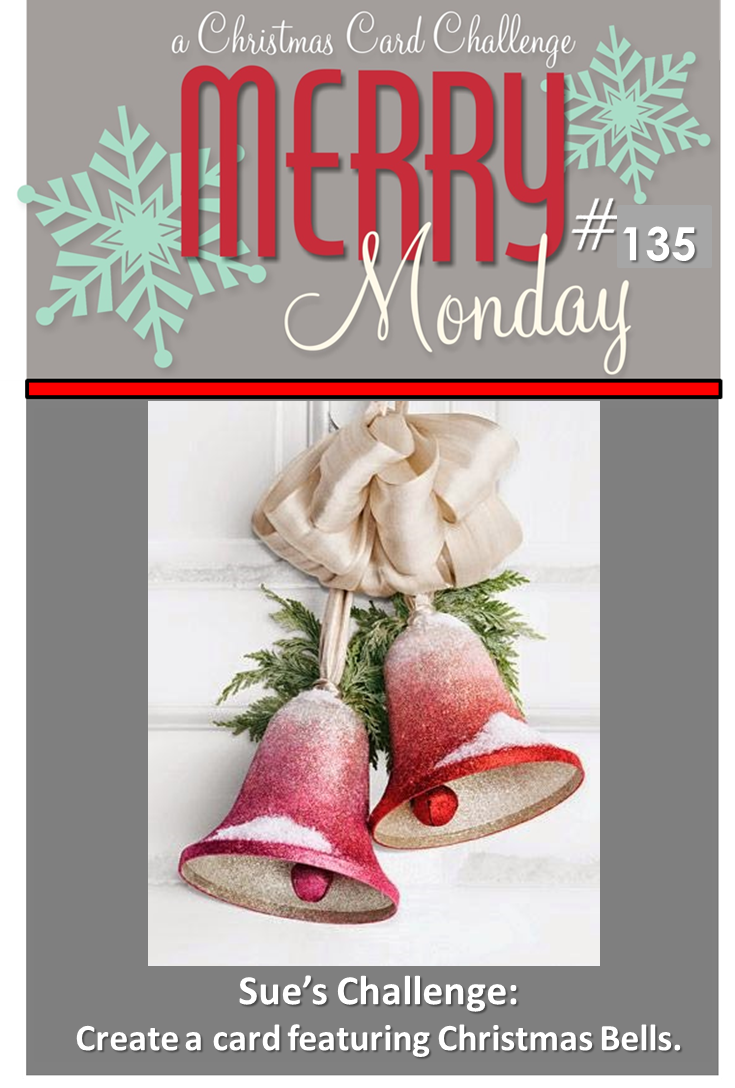
Hmmm - bells! These designers are really keeping me on my toes this week, as this is another one of those where investigation of my extensive supplies led me to conclude not a single bell image, die cut or embellishment of any kind! Not to be beaten, I decided it was time to think laterally; the obvious choice was to run to my e-cutter, but instead I thought I would try and create some jingle bells using punches. Here is my finished card:
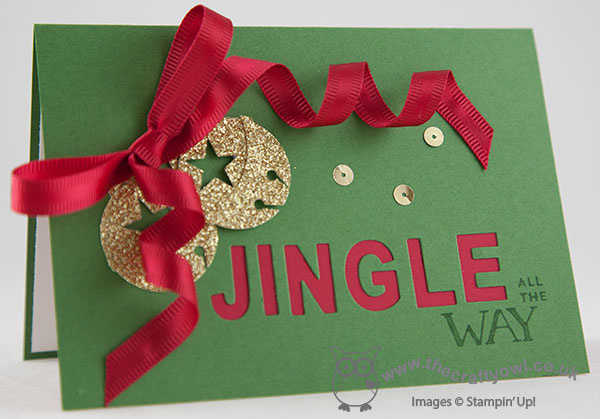
I had the urge to create something really glitzy today, so chose a plain background of Garden Green and decided on gold glimmer paper for my bells. They were surprisingly easy to make: I punched a 1" circle, then punched a star out of the top half. I punched two small circles with my crop-a-dile on the bottom half and used my paper snips to create the openings. Lastly, I punched a round edge using my 1 3/4" circle punch, adhered it to the centre of my bell and trimmed the ends. I also created a couple of gold bell hooks, but you can't really see these beneath the ribbon. I layered these onto my card base, popping one on a dimensional for a little lift, then finished with a rather extravagant bow. This red satin ribbon curls so beautifully I couldn't resist - even though this card is SOOO impractical for mailing!
My sentiment is a combination of the die cut using my Little Letters thinlits to spell 'jingle' and backed with Real Red cardstock, and the 'all the way' from the Mingle All The Way stamp set, which I selectively coloured with my Garden Green marker.
I'm also entering this card for the challenge over at Less is More where the theme this week is aptly 'Jingle All The Way', although I have another card planned with a slightly different slant for later in the week and it didn't occur to me that this one probably fits the theme slightly better!
I'm really pleased with my shiny jingle bells - what do you think? I'm off for my usual Saturday of sport today; back tomorrow with my Design Team card for this week's new challenge over at The Paper Players. Until then, happy stampin'!
Stampin' Up! Supplies Used:
by Joanne James21. November 2014 07:00Today's Christmas card uses the somewhat unconventional festive colour scheme over at The Challenge paired with the current Retrosketches layout for inspiration:
I decided to create another snowflake card using the Endless Wishes set, along with a few of the stamps in the Project Life December Wonder set that I happened to have out on my desk. This is such a great set, and not just for memory-keeping. Take a look:
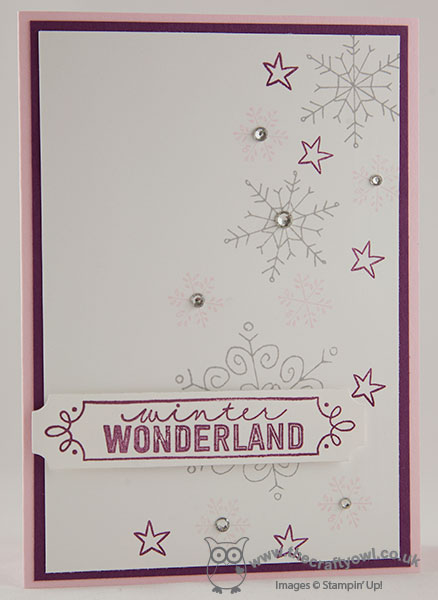
A Pink Pirouette base with a mat of Rich Razzleberry for a pop of colour, then a selection of snowflakes stamped in pink and grey and interspersed with some Razzleberry stars. I added a few rhinestones for a little sparkle and decided to use my sentiment from the Project Life set, stamped and framed and cut out with the co-ordinating framelits and popped up on a couple of dimensionals. Very simple, but quite pretty and super quick to put together.
Back tomorrow with another Christmas card with some fun punch art; until then, happy stampin'!
Stampin' Up! Supplies Used:
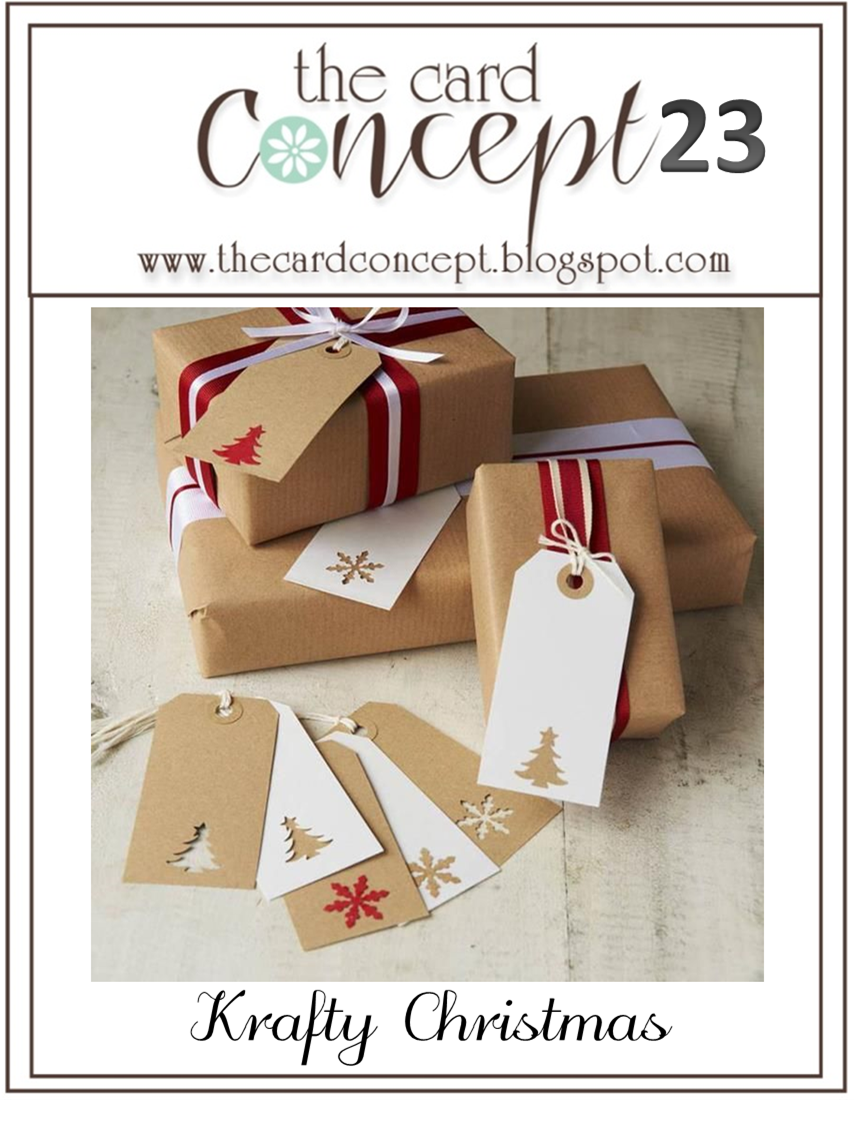
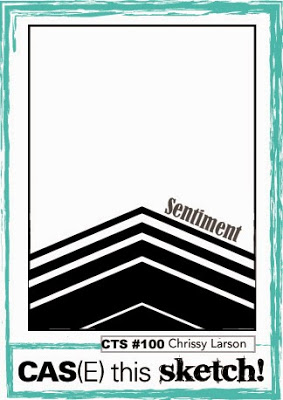
by Joanne James20. November 2014 12:47Today's card has been made with a few challenges in mind: The Card Concept has the theme of a Krafty Christmas and a lovely inspiration photo and I decided to use the sketch over at CAS(E) This Sketch for my layout, although I'm too late to link up there today:
Since my design is definitely CAS, I am also using this as my entry for 'Less is More' this week where the theme is more than one tree. So, on to my card! I love the Card Concept inspiration photo and decided to use the idea of the punched shapes and colours on my card:
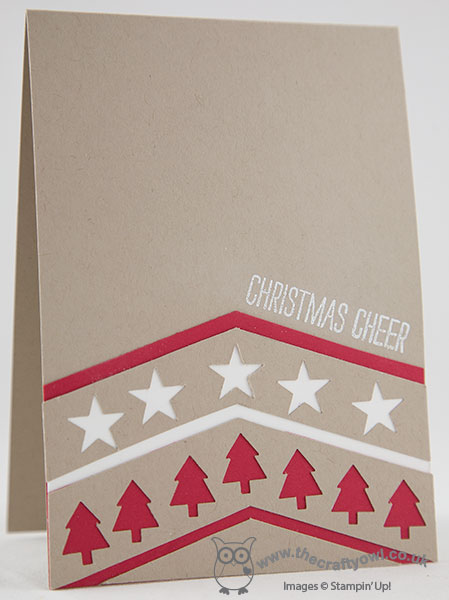
This sketch proved trickier to work with than I anticipated - I think it was all the angled lines! I punched a couple of panels of Crumb Cake with my retired mini tree punch and my star punch (I would have liked a snowflake punch, but alas I don't own one so a star had to do!) and backed them with Real Red and Whisper White, following the contours of the sketch. I stamped my sentiment in Versamark and heat embossed with white embossing powder. Then came the dilemma - I felt like my card was too CAS, as if it was missing something. I fiddled about and eventually decided to try it with a Real Red satin ribbon bow; I'm not sure if this then goes too far the other way, but thought I'd include both photos - perhaps you'll leave me a comment as to which one you prefer!
I'm off to school to watch a class assembly this afternoon - Rebecca is role playing the teacher today, so she went to school with her hair up in a bun this morning because 'that's what teachers do', even though I don't think I've ever seen one at her school with one! Back tomorrow with another project; until then, happy stampin'!
Stampin' Up! Supplies Used:
by Joanne James17. November 2014 13:23Happy Monday everyone! I have spent a pleasant morning catching up with a friend, whilst making a whole bunch of Christmas crackers for a little service project that I have going on - they are for a community senior citizen's Christmas luncheon in a couple of weeks time. Today I'm sharing with you my card for this week's challenge over at Freshly Made Sketches where Kim has a great sketch for us to work with; I also used the colour scheme over at Color Throwdown:
I decided to rotate the sketch through 90 degrees for my card - whilst most other cards in the gallery seem to have used the sketch conventionally, there are a few of us who chose to rotate, so a real variety of inspiration for you if this is a layout that appeals. Here is my card:
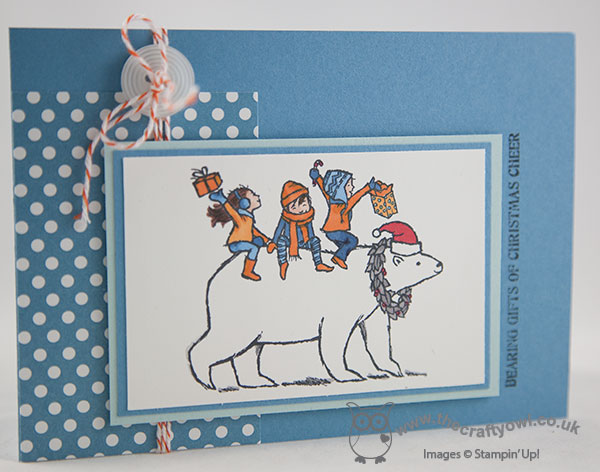
I used the stampset 'Bearing Gifts' for my card today, having 'borrowed' it from my daughter, who is currently using this set to make her own Christmas sets.It's a great set to stamp and colour so I took the opportunity to get my Stampin' Up! Blendabilities out again and set to work colouring the trio of gift givers on top of the polar bear. I used my Pumpkin Pie and Night of Navy sets, focusing on the lightest of the two blues, and did stray from the colour palette twice: once for the wreath around the bear's neck, which I coloured with Smoky Slate (I thought this would be OK as technically grey is a neutral) although not sure I will be forgiven for the red Santa hat. The thing is, try as I might, I just couldn't bring myself to colour it in any other colour - they just have to be red, right?!
I mounted my panel on a piece of Marina Mist and the a piece of Soft Sky, and having masked the sentiment off the main stamped image, decided to stamp it vertically directly onto the card base, as this suited my layout better. I used a piece of retired Marina Mist polka dot DSP behind my image, and tied a Naturals white button with a piece of Tangerine Tango baker's twine to finish.
Hope you like today's card - back tomorrow with another project. Until then, happy stampin'!
Stampin' Up! Supplies Used:
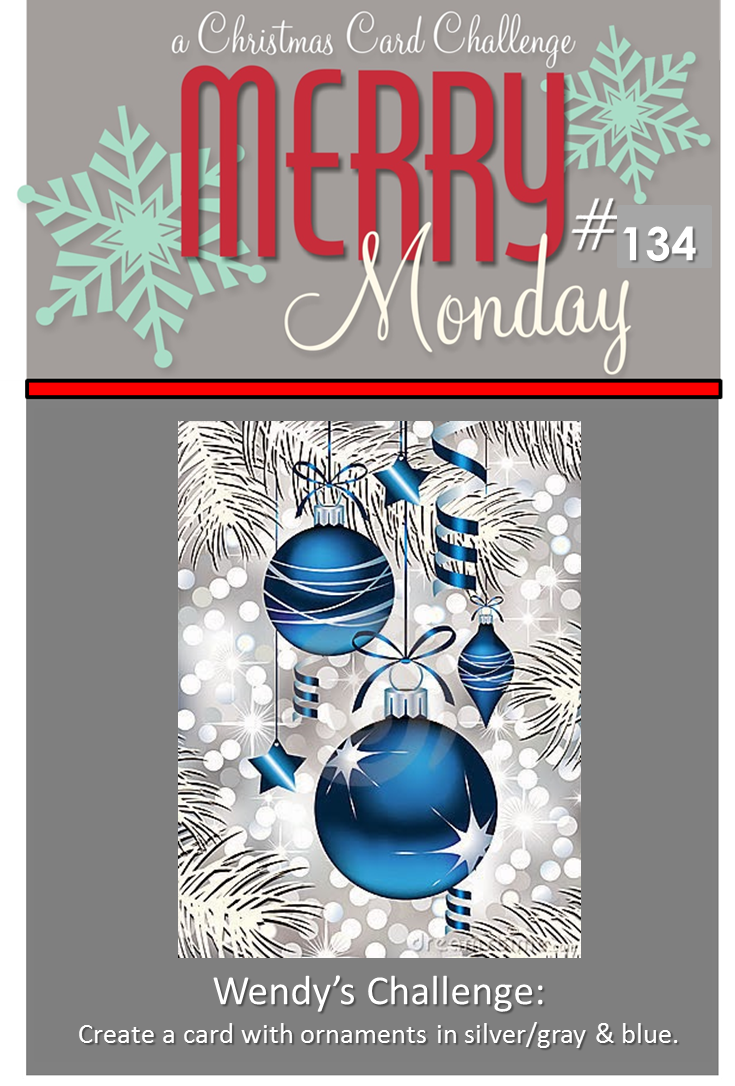
by Joanne James15. November 2014 20:47Today I'm sharing my card for this week's Merry Monday Christmas Card Challenge, where this week the challenge is to create a Christmas card with ornaments that are sliver/grey and blue:
I went for a little 'something old, something new' for today's card: I had a piece of last year's Winter Frost DSP on my desk, so decided to combine it with a couple of ornaments from this year's Cheerful Christmas set for today's card:
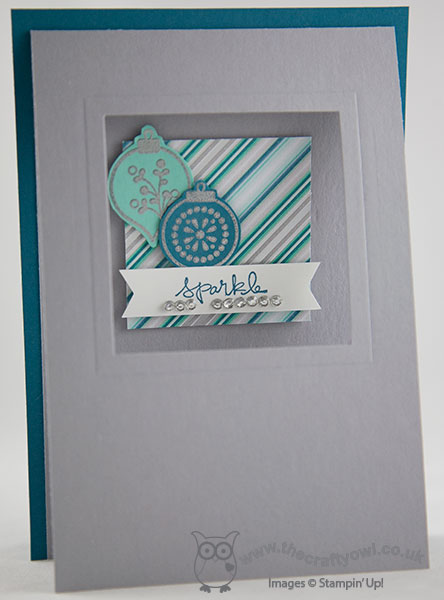
I used a single piece of Island Indigo to back my folded base of Smoky Slate and cut a square out of the front using my Big Shot and Square framelits, using the next size up to create an embossed frame. I used a square of Winter Frost DSP inside the framed area, and added a couple of baubles, one in Coastal Cabana and one in Island Indigo, both of which I stamped in Versamark and heat embossed in silver then fussy cut out with my paper snips. I popped one of on with a glue dot and the other with a dimensional and finished with my sentiment banner, which I finished with a row of tiny rhinestones for a little extra sparkle.
That's all from me for today; back tomorrow with my Design Team card for The Paper Players, where Ann has a new themed challenge for us. until then, happy stampin'!
Stampin' Up! Supplies Used:
81865de4-19fa-4615-bc4d-1a2c8ee31db5|0|.0|96d5b379-7e1d-4dac-a6ba-1e50db561b04
Tags: Big Shot, Cheerful Christmas, Christmas, Good Greetings, Winter Frost, Shop online, Stampin' Up, Stampin' Up Card, Stampin' Up Card ideas, Stampin' Up Supplies, Embossing
Cards | Stamping