Autumn-Winter Catalogue Items Now Available Only While Stocks Last and Dashing Along DSP To Buy!

by Joanne James5. November 2018 05:00

I'm just popping by with a quick post following an update by Stampin' Up! with regard to stock levels on certain products. Sales for a number of products have exceeded forecast and are continuing strong and due to their popularity might not be available for the entire catalogue sales period. The products in question are:

147816: Joyous Noel Specialty Designer Series Paper 
147890: Festive Farmhouse Elements 
147811: Santa’s Workshop Enamel Elements

I am definitely responsible in part for the first two items above; I used both at my recent Creative Escapes Craft Retreat and the ladies present got to both create with them and take some of each home in their goody bags. I just adore this paper - it is so beautiful!

In order to provide another holiday-themed option,the lovely people at Stampin' Up! have decided to make the recent promotional Dashing Along Designer Series Paper (item 149903) available for sale for £10.25 a pack. This beautiful, 12" x 12" (30.5 x 30.5 cm) traditional Christmas paper has a festive, eclectic feel and is perfect for layering. Coordinating colours are Cherry Cobbler, Garden Green, and Whisper White.

Here is a card I made at my recent Dashing Deer Technique Class that features one of the papers as a border of the central panel:

Here is the visual summary of the key products used on today's project for you to pin for easy reference:


You can see all of my 'How To' summaries on my 'How To - Tips and Techniques' Pinterest board in case you've missed any. 

You can see other samples showcasing these gorgeous papers here.

Enjoy your day and I'll be back later with another project. Until then, happy shopping!


Stampin' Up! Supplies Used:

Table built using Product Table Builder by The Crafty Owl - Independent Stampin' Up! Demonstrator.

Snowflake Showcase Pillow Box Creative Retreat Gifts

by Joanne James2. November 2018 19:00

As promised in my earlier post today (you can read that here if you missed it), today I'm sharing something a little different that I gave a sneak peek of on my Facebook page the week before last - a 3D project! Today is the perfect day to share it since it coincides with the launch of the Snowflake Showcase product suite yesterday - you can read all about that here.

The weekend before last I held my second residential craft retreat this year. I love these weekends: they are a great opportunity for me to spend quality time with my customers, some of whom I see at my regular classes but for many who follow my blog and shop with me online and for whom this is an opportunity to get away from it all for some quality crafting time amongst friends. I am grateful that they choose to spend a weekend with me crafting and as such in addition to their goody bags, they receive lots of little pillow gifts and table favours throughout their stay as a token of my appreciation. When they leave at the end of the weekend, I like to gift them a key ring that is unique to that retreat as a reminder of the fun time that they've had. It has to showcase some fabulous Stampin' Up! product too, both on the keyring and the packaging so for this one I just had to feature the limited edition, exclusive Snowflake Showcase products that went live on sale yesterday. So first up here is the packaging for my gift:


I dressed up one of the kraft pillow boxes available in the annual catalogue with some silver-trimmed ribbon and added a sentiment banner stamped tone-on-tone with the border stamp and then heat-embossed my sentiment in silver over the top. I then added the fabulous string of snowflakes diecut to the front of the box for a real 'wow'.

It didn't end there; I continued the snowflake theme inside with a keyring, that had a snowflake tree, a teeny-tiny sentiment and one of my craft retreat logos all stamped onto shrink plastic and reduced in size, along with one of the gorgeous snowflake trinkets that are also part of this suite. I made them in two colourways, Pool Party and Balmy Blue:


Here's a picture of them both together - gift and packaging. What do you think - cute enough to hang your keys from? 

I received such lovely comments from the ladies who attended my retreat, who all said they felt truly spoiled all weekend. Here's one of the pictures I shared over on my Facebook page of us at dinner on the Saturday evening, with some of them sharing another of their table gifts:


Christmas crackers, what else?! I will have more projects using the fabulous Snowflake Showcase in the coming weeks so look out for those and meanwhile do get in touch with me directly or via my online store to order yours whilst supplies last.

Equally, if you would like to be similarly spoiled and enjoy a fabulous crafty weekend away from it all, there are still spaces available on my March 2019 retreat which will be held in the West Midlands on 2-3 March - you can read more about it here and I would love it if you could join me! The dates for next October will be released soon and I already have a waiting list for this event, so if you would like to be one of the first to receive the details as they are published then do get in touch with me via [email protected] to register your interest as spaces are likely to be snapped up quickly!

Enjoy your evening and I'll be back tomorrow with another project. Until then, happy stampin'!


Stampin' Up! Supplies Used:

Table built using Product Table Builder by The Crafty Owl - Independent Stampin' Up! Demonstrator.

Snowflake Showcase Exclusive Products - Available Until 30th November Or While Supplies Last!

by Joanne James2. November 2018 07:00

Happy Friday everyone! I've had continuing blog and website issues to contend with this week, so all of my carefully scheduled blog posts have gone awry and you haven't heard from me in the timely manner I had hoped this week! This one should have gone live yesterday, but I'm pleased to be able to publish it finally because this is news of the release of an exclusive limited time collection of products called 'Snowflake Showcase' and trust me you are not going to want to miss it!

It seems following the success of the Blended Seasons stamp set and co-ordinating framelits a few months ago that you love an exclusive, limited offer - so here's another one: two stamp sets, one for Christmas and one all-rounder that both co-ordinate with the Snowfall Thinlits dies - available now until 30 November or whilst stocks last. What's more there are some co-ordinating Snowflake Trinkets and White Velvet paper sheets too. Here's a close up of the products in more detail:

I'm sure this set will be popular and I've taken orders for a few already having given the customers in my Facebook VIP Customer Group a sneak peek a few weeks ago (do get in touch if you would like to know more about the benefits associated with belonging to this group), so don't delay in placing your order - I wouldn't want you to be disappointed. Don't forget if you are placing an order online to also include this month's hostess code RW3QD6VN to receive a free thank you gift from me too! 

For more information on this set, please see today's second post here, which also includes a 3D project made using this gorgeous suite.

If you have any questions on any of the above, then please do get in touch - I am always happy to help!

Back shortly with my second post of the day; until then, happy shopping!


 Links to purchase the above items in my online store:

Table built using Product Table Builder by The Crafty Owl - Independent Stampin' Up! Demonstrator.

Bethlehem Edgelits Meets Twinkle Twinkle

by Joanne James30. October 2018 07:00

Today I'm sharing a card for the current Inspire.Create Challenge where they have a great sketch that I just couldn't resist:


I was tempted to go with a focal piece of designer series paper and one of the fabulous festive word dies we have for the horizontal element, but with some great Design Team examples of this, I decided to take a slightly different tack and explore options around the horizontal piece. I ended up making two cards, each with the same basic design, however one portrait and the other landscape - take a look:


And here's the landscape version that uses the whole of each of the diecut pieces:


Here's the low-down on today's card:

Bethlehem Edgelits - I decided that the landscapes in the Bethlehem Edgelits set would make a perfect horizontal feature on my card and that informed my decision to make two cards: one in a landscape orientation in order to accommodate them completely and a second in a portrait orientation that necessitated me trimming them to fit. For each card, I layered a white top layer on a Night of Navy bottom layer and embossed the sentiment in white onto the navy base layer. 

Twinkle, Twinkle Little Star - You might be wondering how I created my atmospheric night sky; furthermore, you might be surprised to know that there was no sponging, brayering or splattering required. This rather realistic sky is courtesy of one of the patterns in the Twinkle Twinkle designer series paper pack. Part of a suite originally designed for baby and children projects, many of the starry papers in this pack work for plenty of other projects - especially this one. It is easy to overlook certain packs of papers and to be fair the catalogue doesn't always make it easy to see some of the detail. The lovely people at Stampin' up! have produced this great video though that shows these papers in more detail:

Here's the papers from the current seasonal catalogue too:

And of course you can continue to follow my blog; you all know how much I love patterned paper!

A Night In Bethlehem - With the exception of the 'O Holy Night' sentiment on the front of the landscape card (this comes from the 'Illuminated Christmas' stamp set in the current seasonal stamp set), all of the stamping on my card comes from the Night in Bethlehem stamp set, which also has this beautiful verse that is great for the inside of your card: 


The silhouetted images are great for easy decorating of your envelopes too - love a co-ordinated envelope! I do like to make cards that remind us of the true meaning of Christmas and this set is one of my favourites for reminding us why we celebrate at this special time of year. So which of these cards is your favourite - the portrait or landscape version? I like them both but would love to know what you think - do leave me a comment below with your thoughts!

Here is the visual summary of the key products used on today's project for you to pin for easy reference:


You can see all of my 'How To' summaries on my 'How To - Tips and Techniques' Pinterest board in case you've missed any. 

Enjoy your day, however you choose to spend it. The James family is off to the dentist for our 6-monthly checkup followed by something special in store which I'll share with you later in the week. I'll be back tomorrow with another project though for sure. Until then, happy stampin'!


Stampin' Up! Supplies Used:

Table built using Product Table Builder by The Crafty Owl - Independent Stampin' Up! Demonstrator.

Santa's Workshop Card and Envelope Punch Board Gift Voucher Holder

by Joanne James29. October 2018 07:00

I so enjoyed making my cards for this week's challenge over at The Paper Players that I shared with you yesterday, that I just had to make more with those fabulous little elves. As such today I'm sharing another card that I made using products from the Santa's Workshop Suite, along with a gift voucher holder made using the Envelope Punch Board. Both of these use the current sketch over at Freshly Made Sketches as the basis for my layout:


First up is my card - full of busy elves! Take a look:


Here's the low-down on today's card:

More Santa's Workshop - I'm loving this elf patterned paper and whilst it's busy, it seemed the perfect background to accompany my sweet elf and his accompanying pile of Christmas presents. I love how the sentiment is in two halves and carries over neatly to the inside of my card:


Stitched Shapes and Layered Ovals - With all those elves, I wanted to keep the rest of my card fairly simple, so used a large stitched oval to create some additional white space around my sentiment, layered on a scallop-edged oval in Poppy Parade for definition. Whilst I don't often use ovals, preferring circles or squares generally, sometimes an oval is the shape that works best for balance. One thing I do use lots though are my Stitched Shapes Framelits - these are on my Top 5 Framelits Of All Time list (I must publish that list one of these days!) - a must have for adding subtle detail to your frames.

Envelope Punch Board Gift Card Holder - having made my card, I still had a couple of elves with flocked hats left that I had diecut from the Santa's Workshop DSP and decided that I would use the same basic layout but in a landscape orientation to get a headstart on my Christmas Gift Voucher holders. I created a simple wallet using my trusty Envelope Punch Board to create the closure; this is similar to ones I've created previously, only I decided to 'go large' this time and create a wallet large enough to hold £10 notes - I have growing nieces and nephews and these days, only cash will do so I am finding I need to come up with ever more creative ways to gift it! This wallet measures 6" x 6" square and again uses the sketch for the front layout (the stamp I used is from last year's retired Merry Little Labels set):


The wallet opens to reveal a sliding pocket insert, where the money sits in the pocket flap which opens to reveal Christmas wishes and with enough space above to include a personalised message: 


I love this style of wallet and make them often. If you would like the dimensions, then just leave a comment below - I'm thinking this might be worth another blog post in itself! 

This wallet would also be great to fill with Stampin' Up! gift vouchers for a crafty friend or even to treat yourself - if you would like to order Stampin' Up! gift vouchers for Christmas and receive them beautifully packaged in a wallet like this, then do get in touch and place your order.

Here is the visual summary of the key products used on today's project for you to pin for easy reference:


You can see all of my 'How To' summaries on my 'How To - Tips and Techniques' Pinterest board in case you've missed any. 

Enjoy your day and I'll be back tomorrow with another project. Until then, happy stampin'!


Stampin' Up! Supplies Used:

Table built using Product Table Builder by The Crafty Owl - Independent Stampin' Up! Demonstrator.

Santa's Workshop For The Paper Players PP416

by Joanne James28. October 2018 09:00

Today it's Sunday and time for this week's new challenge over at The Paper Players! It's the turn of the lovely Anne Marie to host this week and she has my favourite, a sketch challenge, for you to work with:


I decided that the sketch layers were perfect to showcase some designer series paper and since I am back creating for Christmas I knew exactly where to start - with a personal favourite this season. I ended up making not one, but two cards. Here's the first one: 


Here's the low-down on today's card:

Santa's Workshop - The Santa's Workshop Suite is my favourite in this year's seasonal  Stampin' Up! catalogue: with Santa, elves and Mrs Claus - what's not to love? The Santa's Workshop Specialty Designer Series Paper is the star of the suite - not only choc-full of cute designs, but four of the twelve sheets have a fabulous white flocking detail which adds great texture - it reminds me of the Fuzzy Felt of my childhood! I used three different sheets on my card: two for the panels (one with the diagonal flocked stripes, the other with Santa's elves diligently delivering everything on Santa's list) and a third for my Santa himself, complete with list.

Fun With Framelits - With the exception of the sentiment, there is no other stamping on the front of my card. Even the jolly Santa is cut from the designer paper; yes, this pack is another that has designs that can be cut with the Santa's Signpost Framelits that co-ordinate with the Signs of Santa stamp set. I could have stamped the Santa and coloured him, but then I wouldn't have had the flocking adorning his bobble hat and I just couldn't pass that up! 

A Little Colouring Too - I did a little stamping and colouring both inside my card and on the front of my envelope to complete my project; you can see the envelope on the main photos above and below; here's a peek at the inside:


How sweet is Mrs. Claus?! I actually liked this card I decided to create another one with the same design - this time, making more of the diagonal striped paper to really show off the flocking:


So which of these do you prefer? I think I actually like the second one better, but I suspect that is because it's a little less busy in terms of pattern and I just love the red and white with the felt flocked detail. Do leave me a comment and let me know what you think.

Here is the visual summary of the key products used on today's project for you to pin for easy reference:


You can see all of my Product and 'How To' summaries on my 'How To - Tips and Techniques' Pinterest board in case you've missed any. 

Before you reach for your ink and papers, check out what our amazing team has created to inspire you this week:

Here's a quick recap of our challenge rules:
 
1.  Create a new paper project
2.  Upload your creation to your blog with a link back to us and provide a direct link to the post featuring your challenge submission.
3.  Please link your card to no more than four challenges, TOTAL.
4.  Have FUN!

You can see all of my 'How To' summaries on my 'How To - Tips and Techniques' Pinterest board in case you've missed any. 

Enjoy your day and I'll be back tomorrow with another project. Until then, happy stampin'! 


Stampin' Up! Supplies Used: 

Table built using Product Table Builder by The Crafty Owl - Independent Stampin' Up! Demonstrator.

Feathers And Frost Festive Leaf Triptych For The Paper Players PP413

by Joanne James7. October 2018 09:00

Today it's Sunday and time for this week's new challenge over at The Paper Players- yay! It's the turn of the super-talented Sandy to host this week and she has a timely theme challenge for you to work with:


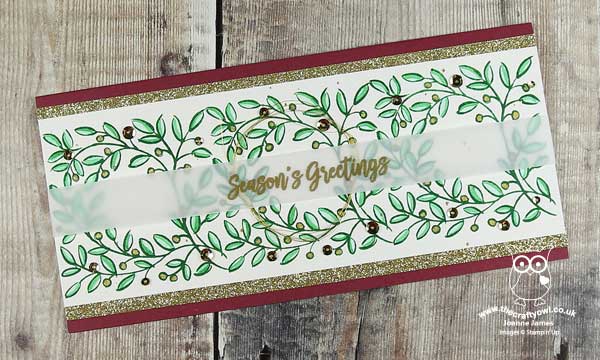
Trees and leaves - perfect for autumn and fall, with so many colours at this time of year. I'm on a festive roll though, so decided to go for a Christmas card - still with leaves though as opposed to a tree or trees, as you might expect. I have another Feathers and Frost card for you, but this time using the leaves only - take a look:


Here's the low-down on today's card:

No Feathers ... - The Feathers and Frost stamp set features a pair of robins and poinsettia flower as centre pieces for this leaf pattern, but I decided on this card that I wanted the leaves themselves to take centre stage. Don't get me wrong, I love the pair of robins (and have another project that features them lined up for another day) and have featured the flower on this card previously, but for today it's all about the leaves!

A Leaf Triptych - I decided to create a repeating pattern with a triptych of leaves, creating a longer than usual card (my card measures 21cm in length and is 11cm wide) and joining 3 of the leafy squares into a seamless row. I stamped them in my favourite festive green, Shaded Spruce, onto watercolour paper and used an aquapainter to pull some of the outline colour in and give a light wash over each leaf. When this had dried, I them went back in with some extra ink and my aquapainter and added an additional swipe of colour on each leaf. This is a rather labour-intensive way of colouring, but I think it really adds to the loose brushstroke effect of the stamp set.

... But Plenty of Frost - Whilst there's an absence of feathers, my card has plenty of frost - of the sparkly gold kind at least! I used my retired gold Wink of Stella pen to colour the berries in between my green leaves (you could use the new Vegas Gold Shimmer Paint to achieve the same effect) and flicked some across the surface of my card, along with a sprinkling of gold sequins, some loops of gold thread, gold glimmer paper border and finally my sentiment, which I stamped in Versamark and heat embossed in gold on a vellum strip and wrapped it around the centre of my card. Vellum is a great base to add a sentiment to a card where you don't want it to overly obscure the pattern or stamping beneath. It also enables me to link up with the lovely ladies over at Just Add Ink who are challenging us to use vellum on our cards this week - do check them out, they've some great ideas and suggestions on other ways you can use it in your cardmaking too.

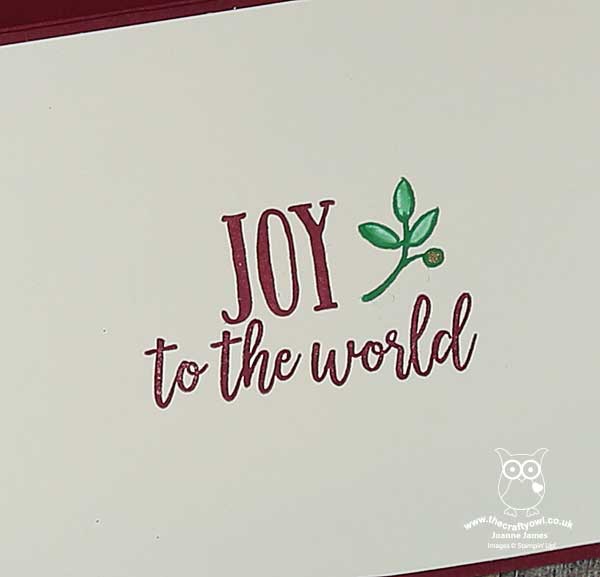
 I also did a little co-ordinated stamping on the inside of my card (and remembered to photograph it!):


Here is the visual summary of the key products used on today's project for you to pin for easy reference:


You can see all of my Product and 'How To' summaries on my 'How To - Tips and Techniques' Pinterest board in case you've missed any. 

Before you reach for your ink and papers, check out what our amazing team has created to inspire you this week:

Here's a quick recap of our challenge rules:
 
1.  Create a new paper project
2.  Upload your creation to your blog with a link back to us and provide a direct link to the post featuring your challenge submission.
3.  Please link your card to no more than four challenges, TOTAL.
4.  Have FUN!

You can see all of my 'How To' summaries on my 'How To - Tips and Techniques' Pinterest board in case you've missed any. 

So what do you think? Can you use leaves as the main focus and decoration on a Christmas card to good effect? I'd be interested to here your thoughts - do leave me a comment below. 

Enjoy your day and I'll be back tomorrow with another project. Until then, happy stampin'!


Stampin' Up! Supplies Used: 

Table built using Product Table Builder by The Crafty Owl - Independent Stampin' Up! Demonstrator.

Spectrum Inked Starry Sky For Hearts Come Home CAS Christmas Card

by Joanne James30. September 2018 17:00


Today I have an extra post for you - I've been trying to find the time to share this post since Wednesday but classes and life have gotten in the way! You can see my regular Paper Players post from earlier here. This is  a clean and simple Christmas card using one of my favourite background stamps that is perfect for this week's challenge over at Stamps Ink Paper:

My card also makes use of one of those useful products in the annual catalogue that at fist glance you might have overlooked - more about that in a moment. Here's my card:


 Here's the low-down on today's card:

The Perfect Starry Sky - I used the starry background stamp from the Bokeh Dots background stamp set to create a colourful night sky behind the houses on my card. One of the things I like about the Bokeh Dots background stamps is that they are smaller in size and can be used a a feature in their own right on a card, without covering the whole of the cardbase. 

A Rainbow of Colour -  Did you spot the Uninked Spectrum Ink Pads on page 202 of the annual catalogue? Easily overlooked, they can be inked with 5 separate colours of your choice and are particularly handy when paired with a stamp such as the one I've used here to create a night sky with hues of purple through to blue.  What stamps do you have in your collection that you could use with a spectrum ink pad to create colourful ink effects?

Hearts Come Home - I used the smallest of the Hometown Greetings Edgelits to create my border of houses, cutting it out of Whisper White cardstock brushed with a liberal coating of clear Wink of Stella for a subtle sparkle and shine. To finish, I stamped one of my favourite Christmas sentiments from the co-ordinating 'Hearts Come Home' stamp set in Night of Navy - never more approprate than at Christmas time.

Here is the visual summary of the key products used on today's project for you to pin for easy reference:


You can see all of my 'How To' summaries on my 'How To - Tips and Techniques' Pinterest board in case you've missed any. 

Enjoy your day and I'll be back tomorrow with another project. Until then, happy stampin'!


Stampin' Up! Supplies Used:

Table built using Product Table Builder by The Crafty Owl - Independent Stampin' Up! Demonstrator.

Copper and Merry Merlot Swirly Snowflakes Christmas Card and Triangular Gift Box

by Joanne James23. September 2018 09:00


Today it's Sunday and time for this week's new challenge over at The Paper Players! It's the turn of the fabulously creative Jaydee to host this week and she has my favourite, a sketch challenge, for you to work with:


I decided to continue getting a headstart on my Christmas card making preparations (so my projects are perfect for the challenge over at TGIF Challenges too this week) and spent a few hours making a more involved boxed Christmas card with a matching gift box too. First things first - here's my card:


Here's the low-down on today's card:

Diagonal Swirly Snowflake Border - Whilst I love a good sketch, I often struggle with the concept of a diagonal. I decided to alter the dimensions of Jaydee's sketch and create a horizontal fold out card as I wanted to use my Swirly Snowflakes Thinlits Dies to create a layered diagonal edge and I needed the extra width to balance my card and fit the entire border in (I'm sure she will allow me this liberty ;-) ). I snipped away the straight edge of my copper foil snowflakes and added a sentiment embossed in white, before adding my embellishment (more on that below). My card opens from the right to reveal a complete panel of my favourite copper-embossed Joyous Noel Specialty Designer Series Paper, then the left hand side lifts to reveal the sentiment inside, embellished with a narrow strip of copper washi tape:

Christmas Copper Snowflakes - I created a layered embellishment on the front of my card, using one of the copper snowflake wire elements as the centrepiece. I layered this with a Shimmery White diecut from the Eastern Medallions Thinlits set, with a centre of a clear epoxy droplet on a copper sequin, all layered up on a fancy double bow in the gorgeous Merry Merlot and Copper Reversible Ribbon. This showy embellishment adds a lot of dimension to the front of my card, so much so that it wouldn't fit in a standard envelope. Instead, I made a box with a co-ordinating belly band closure:

A Gift Box To Match - This kind of card takes a little while to make and is destined for someone who I know will appreciate the effort and time taken to create it. Whilst I was fully 'in the zone', I decided to create a co-ordinating gift box with a magnetic closure. The box measures approx. 15cm x 6cm x 5cm, so not huge but large enough for a small gift to accompany my card. I created a triangular box with a decorative flap created using the Swirly Snowflakes Thinlits for the border detail, based on this one I'd seen on Pinterest. I decorated the front panel of my box with more of that gorgeous Joyous Noel DSP too: 

And here's one last photo of all three of my project elements together - I hope you will agree, a lovely Christmas set in rich, festive colours:


Here is the visual summary of the key products used on today's project for you to pin for easy reference:


You can see all of my Product and 'How To' summaries on my 'How To - Tips and Techniques' Pinterest board in case you've missed any. 

Before you reach for your ink and papers, check out what our amazing team has created to inspire you this week:

Here's a quick recap of our challenge rules:
 
1.  Create a new paper project
2.  Upload your creation to your blog with a link back to us and provide a direct link to the post featuring your challenge submission.
3.  Please link your card to no more than four challenges, TOTAL.
4.  Have FUN!

You can see all of my 'How To' summaries on my 'How To - Tips and Techniques' Pinterest board in case you've missed any. 

Thank you Jaydee for a great sketch - who would have thought that it would have resulted in 3 projects in one go!

Enjoy your day; the weather has been dreadful here the past couple of days so I'm hoping I get the longer straw and get to stay home and craft whilst hubby takes the James Juniors to hockey trials this afternoon. I'll be back tomorrow with another project. Until then, happy stampin'!


Stampin' Up! Supplies Used: 

Table built using Product Table Builder by The Crafty Owl - Independent Stampin' Up! Demonstrator.

Wishing You Well Festive Wreath Made Easy With The Stamparatus

by Joanne James19. September 2018 10:00


I had a busy day yesterday, having been treated to a rare breakfast catch up with my sister-in-law, and lots of work and prep in between chasing various items around the garden in the face of the terrific winds we've been having here in the UK at the moment. I finished my day by hosting a Stampin' Up! party for the lovely Jane and her crafty friends yesterday evening to share all things Christmas.

Today I'm squeezing in another entry for the current challenge over at at As You See It where the team are all about getting back to basics with stamps, ink and paper:


I always send a card out to my customers when I mail them a new catalogue with a 'sneak peek' of what's inside. This is one of my big mass production exercises of the year though, so it needs to be something simple to enable me to get a large volume churned out within a reasonable time frame - yet I still want it to be pretty and have impact. Here's this year's Autumn-Winter catalogue card:


Here's the low-down on today's card:

Back To Basics - The theme over at As you See It this week is 'Back To Basics', creating cards using little more than stamps. ink and paper. There is something liberating though about creating with just stamps, ink and paper and it is fun to be able to share creations from time to time like this. They can be quick(er!) to create and show that it's still possible to create something pretty without needing a ton of supplies. My card uses only 5 items: a blank card base, two ink colours, one stamp set and one (optional) embellishment - basic supplies indeed! The 'Wishing You Well' stamp set is perfect for this kind of card; it's one of Stampin' Up!'s Distinktive stamps, where you can ink your stamp once yet create different opacities in a single stamped image, giving the illusion of dimension. The wreath and bow look layered, even though they have been stamped only once. Clever, right?

Mass Production Made Easy With The Stamparatus - My simple wreath with stamped bow and sentiment would be easy to stamp in multiples even if I did it 'freehand', but the days of that kind of mass-production are long gone for me now that I am the proud owner of the best ever stamping positioning tool, Stampin' Up!'s Stamparatus - this tool makes light work of this kind of stamping! I placed my wreath on one plate and my bow and sentiment on another, then inked and stamped without needing to reposition and got my simple stamping done in record time!

Add A Pearl - Or Thirteen - The dimensional inking of these stamps means that I could have just left my card as is, but I decided to add a sprinkling of tiny seed pearls throughout my wreath, a little like mistletoe berries, for some added interest. It seems despite my extensive ribbon collection, I'm more of a magpie - I can't resist a little sparkle or shimmer.

And The Winner Is ... I've been running a fun competition with my customers over on my Facebook page to see if they could guess correctly how long it took me to make 40 of these cards with the help of my Stamparatus. Well, the answer is just 17 minutes and 21 seconds - it took me longer than that to stick all of the pearls on afterwards! I'm pleased to announce the winner of my competition is Barbara Civil who guessed 17 minutes and 50 seconds - clearly already a seasoned Stamparatus user! Samantha Daglish gets the runner-up prize for her best guess of 7 minutes and 7 seconds; I'm afraid I'm just not that good however that is my new target! Congratulations both of you; look out for the postman as there will be a little something in the post to each of you to thank you for playing along this week!

Here is the visual summary of the key products used on today's project for you to pin for easy reference:


You can see all of my 'How To' summaries on my 'How To - Tips and Techniques' Pinterest board in case you've missed any. 

Enjoy your day; I have another day of prep, in readiness for an in-home kit party that I'm hosting for a group of friends this evening, although I am minus one of my James Juniors as Ben has gone to the Peak District for a few days with school on an outward bound trip so have a few less school runs for the next few days. I'll be back tomorrow with another project. Until then, happy stampin'!


Stampin' Up! Supplies Used:

Table built using Product Table Builder by The Crafty Owl - Independent Stampin' Up! Demonstrator.

Mini Catalogue

BROWSE THE CATALOGUE

The mini catalogue is now live! Read and download your copy here.

Shop Online

Access my online shop 24 x 7, 365 days of the year:

Current April hostess code:

VDKNV7BH

Shop Online

Join My Team

It's always a great time to join Stampin’ Up! New team members can get £130 worth of products for only £99 + free business supplies + free shipping + all the fun being a part of Stampin’ Up! Stampin' Up! has something for everyone: join my growing team and benefit from my support to enjoy Stampin' Up! however you choose.

If you're interested, call me for a chat to understand how I can help you realise your goals. Alternatively, if you have already decided to sign up and you just can't wait, please click here for the link to the online form where you can sign up and order your starter kit right away! 

Latest Kit!

Stampin Cut and Emboss

The Rock Legend Kit has all you need to make 8 cards with coordinating envelopes. Along with the new Panda Friends Kit, both are available from January 4th for just £14 each - get yours here!

2023-24 Annual Catalogue

BROWSE THE CATALOGUE

Click on the catalogue for a full list of current SU! supplies - if you would like to order any of the items featured, please drop me a line at [email protected] or give me a call on 07773 421446 - I'd be happy to help.

New Online Exclusives

There are new products available exclusively in the online store from 5 March - check them out here.

About Me

Hi I'm Joanne and live in Northampton and when I'm not looking after my husband and two beautiful children, am an avid crafter with a passion for all things Stampin' Up!

I must confess that I have never been a big rubber stamper - until I discovered Stampin' Up! that is. I love the fact that I can get such great results with co-ordinating stamps, inks, papers and punches - the possibilities are endless! Join me on my stamping journey as I share the things I love and be inspired to create amazing things yourself!

Follow Me

Monthly Newsletter

Box Builder

Click the button above to use Box Buster to create your custom box design using the Envelope Punch Board!

Kits Collection Now Available!

Stampin Cut and Emboss

The new Kits Collection from Stampin' Up! is now available!

Click here to see the current kits available and order yours online today.

I Design For


Stampin' Up Stuff

This is my personal blog and is not endorsed by Stampin’ Up! I hope you find it a plentiful source of ideas and personal inspiration but please don't copy my designs for contest submission or use for classes, publication or sale without express permission.