From My Heart Valentine's Card for PP476

by Joanne James2. February 2020 10:00

Today it's Sunday and time for this week's new challenge over at The Paper Players! It's the turn of my sweet friend Claire to host this week and she has a timely theme challenge for you to work with:


It's the first Sunday in February and the month of Valentine's so love is definitely in the air! I combined our challenge this week with the colour palette over at Global Design Project and Julee's Mojo Monday sketch and am linking up with Just Us Girls where they are looking for bows. All of these elements came together for my love-filled card - take a look:


Here's the low-down on today's card:

From My Heart - My card today features three of the patterns in the From The Heart specialty designer series paper. With playful patterns featuring red and pink foil accents on some designs, these papers are perfect for Valentine's Day cards and packaging. I used a pink and red random heart design for my largest panel and layered two of the foiled heart designs for the uppermost layer and focal point of my card. Check out the foil effect - so pretty:


Two Hearts Are Better Than One - I loved the layering of Julee's sketch and decided it would be a great way to showcase my favourite foiled heart pattern in the paper pack. I layered it on a pink heart from another of the designs, both of which I punched out using the punches in the Heart Punch pack: one has straight edges and the other scalloped and they nest together beautifully. I love it when you can punch shapes out of paper this easily - it makes card making a breeze! 

Add A Bow - I finished my card with a fancy glossy red satin ribbon bow. The foil detailing and the faceted gems make this card something special and a luxurious bow seemed like the perfect way to complete my card.

Here is the visual summary of the key products used on today's project for you to pin for easy reference:


You can see all of my Product and 'How To' summaries on my 'How To - Tips and Techniques' Pinterest board in case you've missed any. 

Before you reach for your ink and papers, check out what our amazing team has created to inspire you this week:

Here's a quick recap of our challenge rules:
 
1.  Create a new paper project
2.  Upload your creation to your blog with a link back to us and provide a direct link to the post featuring your challenge submission.
3.  Please link your card to no more than four challenges, TOTAL.
4.  Have FUN!

Enjoy your day; I will be crafting and getting ready for my technique class tomorrow and might even sneak in a movie this afternoon. To my fellow PP teamies and anyone else stateside who is watching the Super Bowl and hosting or attending a Super Bowl party - enjoy!

I'll be back tomorrow with another project. Until then, happy stampin'!


Stampin' Up! Supplies Used: 

Table built using Product Table Builder by The Crafty Owl - Independent Stampin' Up! Demonstrator.

A Gift Of Love Quilt-Inspired Valentine's Card

by Joanne James5. February 2017 09:00

It's Sunday and time for this week's new challenge over at The Paper Players! It's the turn of my sweet friend Claire to host this week and she has a timely theme challenge for us to work with:


I've been sharing lots of Valentine's-themed cards with you in recent weeks, almost all of which have featured the Sealed With Love bundle and Sending Love Designer Series Paper. For today though I wanted to go back to some products in the annual catalogue that would make a Valentine's card but are not designed specifically with that in mind. I had a few bits and pieces out on my desk, then when I saw this week's inspiration photo over at Fusion I knew exactly where I was headed - I even used the sketch layout too (turned through 90 degrees). Here's what I came up with:


Here's the low-down on today's card:

A Quilt Of Love - I drew inspiration from a number of elements of the Fusion photo for my card: the border of pink flowers (courtesy of the Jar of Love stamp set), the cream textured panel (created with the Happy Heart Textured Impressions Embossing Folder) and the red flower-entwined heart as a focal point. My colour scheme also came directly from the photo - here it is if it's one you would like to save to use too:


Have A Heart - I die cut the heart from the Sunshine Wishes Thinlits set and embellished this with flowers from the Jar of Love set and leaves from Swirly Bird too. 

A Gift Of A Sentiment - The sentiment on my pale pink banner comes from the exclusive hostess set 'A Gift of Love'. I love the soft script of the sentiments in this set and think this one is such a lovely way to let someone know how much they mean to you. 

I think this is a pretty Valentine's card that makes a softer alternative to the bright red and white colour schemes of my previous cards. I'm also linking up with the team over at SUO Challenges where they are also celebrating Valentine's this week.

Here is the visual summary of the key products used on today's project for you to pin for easy reference:


You can see all of my Product and 'How To' summaries on my 'How To - Tips and Techniques' Pinterest board in case you've missed any. 

Before you reach for your ink and papers, check out what our amazing team has created to inspire you this week:

The Paper Players Design Team
 
 
Here's a quick recap of our challenge rules:
 
1.  Create a new paper project
2.  Upload your creation to your blog with a link back to us and provide a direct link to the post featuring your challenge submission.
3.  Please link your card to no more than four challenges, TOTAL.
4.  Have FUN! 


I look forward to seeing what you create with our fun theme this week. Enjoy the rest of your weekend as it will be over all too quickly; we have a morning of sport and one of the James Juniors has a trampolining birthday party to attend this afternoon. I'll be back tomorrow with another project; until then, happy stampin'!


Stampin' Up! Supplies Used: 

Table built using Product Table Builder by The Crafty Owl - Independent Stampin' Up! Demonstrator.

My First Dress Up Pop Up Card

by Joanne James28. April 2013 20:14

Any of you who saw my Facebook post yesterday will know I am officially 'IN LOVE' with the Dress Up framelits and Pop 'n' Cuts Base in the Spring-Summer catalogue. I've been resisting purchasing them since the catalogue came out - I don't know why, because it really was love at first sight - but having used them at our last training session and spent a fun few hours with my downline Barbara playing fashion designers, I have finally succumbed. I have seen so many great examples of projects made with this set and I'm excited to share these with you in future blog posts.

Today I am going to share a card I made using all three elements: the pop 'n' cuts card base, the dress form and the framelits. So not much stamping today - Big Shot definitely required! I will share some projects later in the week that show how these can be used separately; when used together, they will make a pop up card with a mannequin to be dressed as you wish. For my first card, I used some of my favourite 'More Amore' DSP along with a Pool Party card base. Here's the outside of the card that you see when the card is folded shut:

Then when you open it, the inside looks like this:

How cute is that??! Dressed mannequin, complete with pearls and pretty cardi, in front of a mirror and dresser. What little - or big - girl wouldn't want to get this in the post for their birthday? Here's one last close-up of the mannequin:

This will, I feel, be the first of many such pop-up cards; come back tomorrow to see another use for this great set. Until then, happy stampin'!


Stampin' Up Supplies:

Stamps: One in a Million

Cardstock: Pool Party, Crumb Cake, Very Vanilla, More Amore DSP

Ink: Pool Party

Tools: Pop 'n' Cuts Base, Pop 'n' Cuts Dress Form, Dress Up Framelits, Ovals Framelits, Big Shot, Stamp-a-ma-jig, Small Heart Punch

Finishing Touches: Basics Pearls

Love Story Anniversary Card

by Joanne James26. February 2013 20:18

I know Valentine's Day is done and dusted, but this month I also celebrated my wedding anniversary, so forgive the hearts but I've another romantic card to share with you today.

The design of this card is cased from Brian King; you can see his original card here. I loved this card the first time I saw it and knew that I was going to have to re-create it. As I don't have the Hearts Framelits, my method was slightly different; I used a large heart punch to make the negative heart shape on the central panel, with the pink heart cut out using one of the Hearts a Flutter framelits and the white heart in the centre using the small heart punch. The winning element for me is the sentiment though - it summed up my thoughts perfectly and seems as appropriate after 14 years of marriage as it would on a wedding day. The colour combination also ticks my box; I find myself using lots of Grey and Melon Mambo lately.

Hope you like it; I'll be back with something different tomorrow. Until then, happy stampin'!


Stampin' Up Supplies:

Cardstock: Melon Mambo, Basic Grey, Whisper White

Stamps: One in a Million

Ink: Melon Mambo

Tools: Large Heart Punch, Hearts a Flutter Framelits, Small Heart Punch, Big Shot


Tags: , , , , , , , ,

Cards | Stamping

When is a Heart not a Heart? When it's a Flower!

by Joanne James3. February 2013 21:34

Back today as promised with a 3D project for you. I've seen a number of versions of similar pictures to these in cyberspace and am not sure who gets the credit for the original version - possibly the Australian company Mondo Cherry (you can check out their website here). Anyway, I've always wanted to have a go at creating one of these hearts, so inspired by my absolutely favourite new designer paper, More Amore, and hearts in a variety of shapes and sizes, this is what I came up with:

I kept things simple and just finished off with a few pearls to add interest. I love the way you get to see both sides of the paper in the design too - often one side is sacrificed for the other.


I think this would make such a lovely piece of wall art and would look beautiful in a little girl's bedroom. That's where this particular version is headed; my daughter loved it the moment she set eyes on it and has been desperate for me to take its picture and blog it so that it can be hung in its final destination! I love the effect that this kind of design creates; I may have a go with brighter colours and a more random pattern some other time - watch this space!

That's all for today - until next time, happy stampin'!


Stampin' Up Supplies:

Paper: Whisper White, More Amore (DSP)

Tools: Full Heart Punch, Small Heart Punch, Hearts a Flutter Framelits, Simply Scored, Bone Folder

Finishing Touches: Pearl Basic Jewels


Tags: , , , , , , , ,

3D Projects

Love Letters Straight From The Heart

by Joanne James1. February 2013 10:10

We are back to the LOVE theme today, with a cute set of four notelets with a coordinating box. I have designed them with Valentine's Day in mind, but these little 3" notelets are perfect for tucking into a lunchbox or loved one's pocket for a surprise love note.

I've used a selection of stamp sets to create this set:


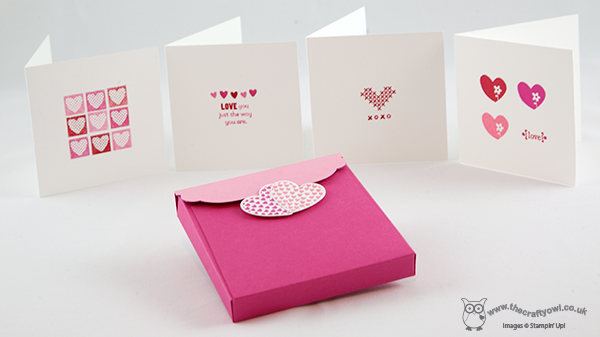
From the left, do you recognise the stamp used on the first card? I created the patchwork heart design by using my marker pens to colour the central section of the 'recover rapidly' Band-Aid stamp from the Sale-A-Bration Patterned Occasions stamp set, aligning each one with my trusty stamp-a-ma-jig to align them into a neat patchwork pattern. The second stamp is from a now retired set called 'Sprinkled Expressions' and the third uses the cross stitch heart from the Hoop La La set in the main catalogue. Lastly, the heart/flower stamp is one of 24 available in the set 'Spring Sampler' available in the new Spring Summer seasonal catalogue that goes live TODAY! There are lots and lots of lovely new items, some of which I've already featured and many of which you will see on my blog during the coming weeks and months. There is a link to the catalogue on the right hand side of my page; if you would like your own copy of the catalogue or would like to place an order, do get in touch with me at joanne@thecraftyowl and I will be happy to help.

I also whipped up a lovely two-tone box to keep them all in out of melon mambo cardstock with a co-ordinating regal rose flap shaped using one of the small Labels Collection framelits. To finish off, I stamped and cut a pair of hearts using the Hearts a Flutter set to tuck the box flap into and hold it in place.

My little girl has had her eye on these ever since she saw me putting them together, so I'm thinking I might slip the first one of mine into her school bag for a little surprise. The second might go into my husband's lunch box - assuming I stop crafting for long enough to make him a sandwich of course! I hope you are inspired to have a go and make something similar - do leave me a comment and let me know who you are sending yours to. Off to create now - until next time, happy stampin'!

Stampin' Up Supplies:

Stamps: Patterned Occasions, Sprinkled Expressions (retired), Hearts A Flutter, Hoop La La, Spring Sampler, Tiny Tags, Hearts a Flutter

Paper: Whisper White, Melon Mambo, Regal Rose

Stampin' Write Markers: Real Red, Melon Mambo, Regal Rose

Tools: Stamp-a-ma-jig, Hearts a Flutter Framelits, Labels Collection Framelits, Simply Scored

Love ... Hearts?

by Joanne James29. January 2013 12:15

Today's post is a little different in that it's a 3D project today, but still with a Valentine's theme. I saw these candles when I was out shopping, in the style of the 'Love Hearts' sweets that reminded me of my childhood and thought what a thoughtful token they would make for a loved one, presented in a nice little box of course!

So here's a picture of the closed box: 

And here's one of the box open, with the tealight inside: 

The box was really easy to make using the Simply Scored scoring tool. The base of the box is 2 1/2" square and is made out of Pool Party cardstock and decorated with some of the lovely More Amore speciality designer paper that will be available in the Spring/Summer catalogue, due out on February 1st (only 3 more days to go!).

I hope this inspires you to turn your humble tealights into something special. I'll be back again tomorrow with another project, but in the meantime, happy stampin'!


Stampin' Up Supplies:

Paper: Pool Party, More Amore Speciality Designer Series Paper*

Tools: 1 3/4" Circle Punch, Simply Scored


Tags: , , , , , ,

3D Projects | Boxes

Hearts A Flutter - Valentine's Wishes

by Joanne James27. January 2013 22:00

That most romantic time of year, Valentine's Day, is just around the corner so I thought it was about time I shared with you some of my latest creations with love in mind.

So first up is a Valentine's card in classic red and white.

I used my typeset alphabet for the white 'I' and 'YOU' and set on a red mat for definition, then used a layered heart as a substitute for 'LOVE'. The fancy base heart and top hearts are stamped and cut with the Hearts a Flutter stamps and framelits set featured in the new Spring/Summer catalogue, due out on February 1st, with a solid red heart punched using a full heart punch layered in between. Lastly, a scoreline around the red mat to add definition and it's done.

I'll be posting lots more Valentine's projects during the next couple of weeks, so do drop by and check them out. Until then, happy stampin'!


Stampin' Up Supplies:

Stamps: Hearts A Flutter*

Paper: Whisper White, Real Red

Ink: Real Red

Tools: Hearts a Flutter Framelits*, Full Heart Punch, Typeset Alphabet, Simply Scored

*available February 1st

Tags: , , , , , , ,

Cards | Stamping

Mini Catalogue

BROWSE THE CATALOGUE

The mini catalogue is now live! Read and download your copy here.

Shop Online

Access my online shop 24 x 7, 365 days of the year:

Current April hostess code:

VDKNV7BH

Shop Online

Join My Team

It's always a great time to join Stampin’ Up! New team members can get £130 worth of products for only £99 + free business supplies + free shipping + all the fun being a part of Stampin’ Up! Stampin' Up! has something for everyone: join my growing team and benefit from my support to enjoy Stampin' Up! however you choose.

If you're interested, call me for a chat to understand how I can help you realise your goals. Alternatively, if you have already decided to sign up and you just can't wait, please click here for the link to the online form where you can sign up and order your starter kit right away! 

Latest Kit!

Stampin Cut and Emboss

The Rock Legend Kit has all you need to make 8 cards with coordinating envelopes. Along with the new Panda Friends Kit, both are available from January 4th for just £14 each - get yours here!

2023-24 Annual Catalogue

BROWSE THE CATALOGUE

Click on the catalogue for a full list of current SU! supplies - if you would like to order any of the items featured, please drop me a line at [email protected] or give me a call on 07773 421446 - I'd be happy to help.

New Online Exclusives

There are new products available exclusively in the online store from 5 March - check them out here.

About Me

Hi I'm Joanne and live in Northampton and when I'm not looking after my husband and two beautiful children, am an avid crafter with a passion for all things Stampin' Up!

I must confess that I have never been a big rubber stamper - until I discovered Stampin' Up! that is. I love the fact that I can get such great results with co-ordinating stamps, inks, papers and punches - the possibilities are endless! Join me on my stamping journey as I share the things I love and be inspired to create amazing things yourself!

Follow Me

Monthly Newsletter

Box Builder

Click the button above to use Box Buster to create your custom box design using the Envelope Punch Board!

Kits Collection Now Available!

Stampin Cut and Emboss

The new Kits Collection from Stampin' Up! is now available!

Click here to see the current kits available and order yours online today.

I Design For


Stampin' Up Stuff

This is my personal blog and is not endorsed by Stampin’ Up! I hope you find it a plentiful source of ideas and personal inspiration but please don't copy my designs for contest submission or use for classes, publication or sale without express permission.