by Joanne James5. March 2014 09:52Good morning blog readers and crafters! Back nice and early this morning with the second of my video tutorial posts showing you how to make any size box using your Envelope Punch Board and my new Box Buster tool. I've started early on my Easter treat boxes, so today's box shows you how to make this cute box:
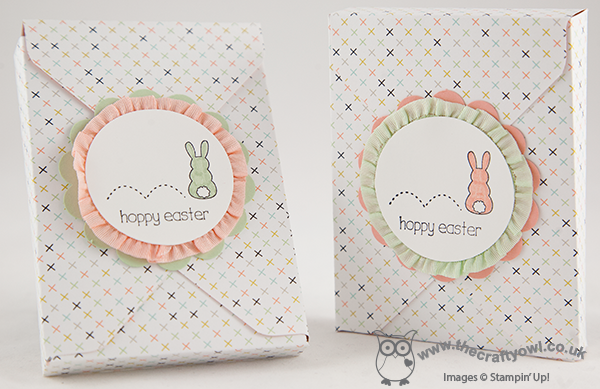
The finished dimensions of today's box are 100mm x 75mm x 15mm. It was designed to fit a specific Easter treat - but you'll have to watch the video below to find out what it was! My new Box Buster from The Crafty Owl tool is just great for that - you can easily create a box to fit your chosen contents, without any hassle or wasted paper - you just measure the thing you want to put in the box, input the dimensions into the Box Buster tool and it does all the hard work for you: it will tell you exactly what size paper you need and where to make your first and second punch markings.
Today's project was worked out in millimetres, but the Box Buster tool will let you construct your box in either millimetres or inches - you choose! Here's the link to today's video tutorial:
Wasn't that SOOO easy?! Keep following this week as there are more box tutorials to come, showcasing a variety of box types with handy hints and tips for making the most of your Envelope Punch Board and my new Box Buster tool.
Back soon with another project; until then, happy stampin' (and box making!)
Stampin' Up! Supplies Used:
184e6871-6a47-4103-a0a0-0c3eb90de4fd|0|.0|96d5b379-7e1d-4dac-a6ba-1e50db561b04
Tags: 3D Projects, boxes, circle punch, Eggstra Spectacular, Envelope Punch Board, Sale-a-bration, Sale-a-bration 2014, Stampin' Up Card, Stampin' Up, Shop online, scallop circle punch, Sweet Sorbet, video tutorial
3D Projects | Boxes | Envelope Punch Board | Sale-a-bration | Stamping | Video Tutorials
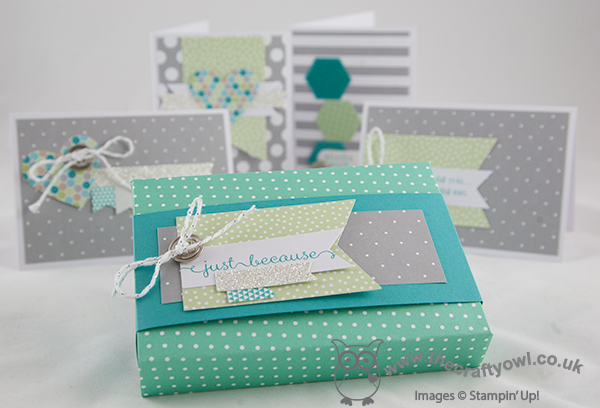
by Joanne James3. March 2014 22:26Good evening readers! Another busy day today with my first class of the month. The ladies in today's class made some great cards using their Happenings Simply Created Card Kits - pop by my Facebook page tomorrow if you would like to see what they created as I will be uploading some photos of their work.
Meanwhile, I promised you a special second blog post today that showed you how to make a box that can be used to hold four of the notelets created from part of the Happenings Simply Created Card Kit - so here it is! I've shot a few videos previously using the Envelope Punch Board, however this is the first box video. The reason I'm excited to share this particular video with you though is that I used a new tool of mine - Box Buster from The Crafty Owl - to work out the dimensions for my box and it was SO easy!!
For any of you that have made boxes using your Envelope Punch Board previously, you will know that the trickiest thing is working out where to make your first and second punches in order to create a box of the correct dimensions. It's easy for a square-based box, as the dimensions simply need to be divisible by 3, but what about when you want to create rectangular boxes of different heights, widths and depths? Following many templates and a considerable amount of test paper, I have developed a tool that means you can input your three chosen dimensions, in either millimetres or inches, and the Box Buster will calculate the size of the paper that you require and where you need to make both your first and second punches.
Watch the video to see just how easy it is to use (you will need to make a volume adjustment for sound during the middle section of the video; the section that shows the Box Buster in action uses different recording software to my usual video recordings and the sound volume settings are not only different but I've been unable to edit post-production - I do now know for next time though!):
You can find Box Buster from The Crafty Owl on my website here or via the permanent link on the right hand side of my blog page. Box Buster is a free tool and will be permanently available for anyone to use - why not visit the page now and add it to your 'favourites' so that you can access it quickly and easily the next time you need to make a box using your Stampin' Up! Envelope Punch Board? Whilst you're there, why not also check out the Product Table Builder from The Crafty Owl - a great tool if you are a Stampin' Up! demonstrator with an online store. And if you haven't already got an Envelope Punch Board, what are you waiting for? Click on the link at the bottom of today's post and purchase one from my online store today!
I'll be making more video tutorials this week showing you how easy it is to make boxes in a variety of different shapes and sizes, in both metric and imperial measurements, using Box Buster from The Crafty Owl and The Stampin' Up! Envelope Punch Board; do come back and check them out or subscribe to my YouTube channel.
Back tomorrow with another project; until then, happy stampin'!
Stampin' Up! Supplies Used:
by Joanne James3. February 2014 21:18This week is a busy week for me, with a couple of classes and lots more going on. I held my first class of the week today and we had a lot of fun making cards using all of the items that can be yours free with a £45 spend during Sale-A-Bration. I'll share some of these cards with you later in the week (I don't want to spoil things for those ladies that haven't made them yet!) but today I wanted to share a short video tutorial for the first of the projects I've made using the Scalloped Tag Topper Punch. The Scalloped Tag Topper Punch is new in the Spring-Summer seasonal catalogue and, along with its neighbour the Angled Tag Topper Punch, can be used to make easy gift tags and bookmarks in one simple step, as the top is shaped and the hole punched for you in one easy movement. It is an incredibly versatile punch and can be used to create lots more besides.
I have filmed a series of tutorials that show the versatility of these punches and the first of these shows you how to make a basic treat holder. Here are some of the ones I created:
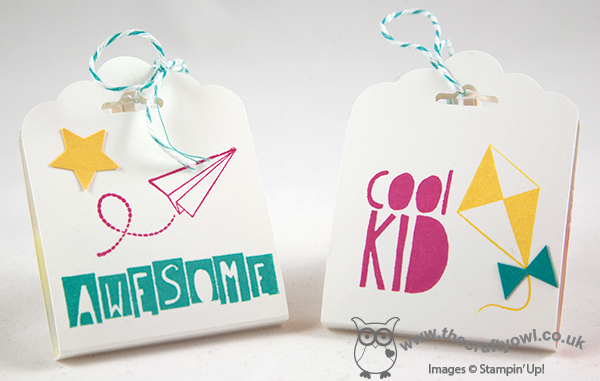
These were for my children as an after-school treat (they always complain I never greet them with sweets at the school gate, so this made a nice change!) and then I also created this more grown-up version:

I think these would make such lovely wedding favours and are so easy to make you could easily put together large quantities with minimal effort. I was inspired by these treat holders made by Mary Fish and adapted mine to suit the chocolate supplies on hand! Also, I have included both metric and imperial measurements in my tutorial, so you can create this treat holder with ease, whichever method you prefer.
So here's the first in my series of Scalloped Tag Topper Punch video tutorials - enjoy!
I hope you found my video useful; if you would like to purchase any of the items featured, please click on the links below and hop on over to my online store or give me a call if you're local to me and would like to save on postage costs. Back soon with news of some product shares that I've put together for those of you who have now had time to browse the new Spring-Summer catalogue and would like a little bit of everything! Until then, happy stampin'!
Stampin' Up! Supplies Used:
by Joanne James9. January 2014 21:37Today I've another of this month's Envelope Punch Board class projects to share with you - a rectangular box notecard holder and a set of notecards. So here is the box, complete with belly band:
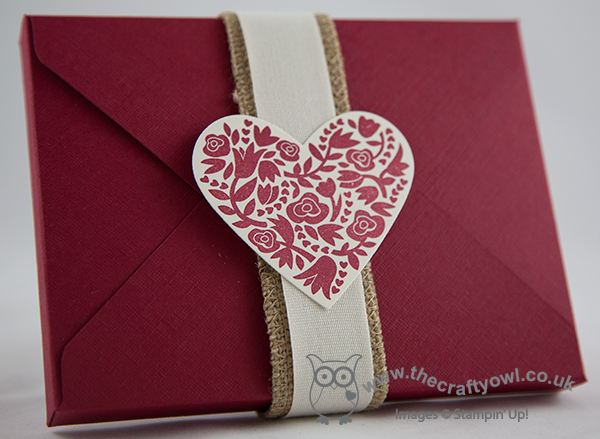
The box is made from Cherry Cobbler textured cardstock, which is great for boxes as it's really thick and has a lovely quality feel. In this photo I've finished with a belly band made from burlap and cotton ribbon; in class, we also made bows from Modern Medley paper using the Envelope Punch Board and created belly bands with bows on. Inside the box, we made a set of simple notelet cards, in co-ordinating vanilla and Cherry Cobbler and paired with Crumb Cake envelopes:
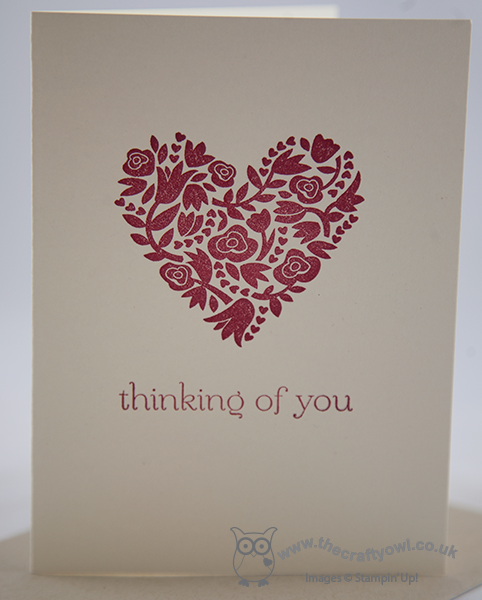
We used the Sweet Essentials sentiment stamps; this is a great set with sentiments to suit a variety of occasions. This set would make a lovely gift for someone and depending on the sentiment, it could be for a birthday or even created as a set of wedding thank you or acceptance cards.
The finished box base measures 5 3/4" x 4 3/8" and was made from a starter piece of 9" x 9" card stock. As with all boxes, whether square or rectangular, the piece of card you start with needs to be perfectly square; it's the points at which you punch and score that determine the finished dimensions of the box. To create this box, we punched and scored at 3 1/2" and 4 1/2".
Back tomorrow with another project; until then, happy stampin'!
Stampin' Up! Supplies Used:
7b96fc59-7eaf-47b6-9c78-2a8c064af419|2|5.0|96d5b379-7e1d-4dac-a6ba-1e50db561b04
Tags: 3D Projects, boxes, Envelope Punch Board, Flowerfull Heart, Hearts Framelits, Shop online, Stampin' Up, Stampin' Up Card, Stampin' Up Card ideas, Stampin' Up Supplies, Sweet Essentials
Boxes | Cards | Classes | Envelope Punch Board | Stamping
by Joanne James8. January 2014 15:26So for my second post today, I wanted to share with you one of the quick makes from my January classes, which are being held this week. This month we are featuring the Envelope Punch Board. Lots of my customers either purchased one or received one as a Christmas gift, but weren't really sure what to do with it other than make basic envelopes. They were truly inspired by my Easiest Ever Envelope Punch Board Cracker Video that I posted before Christmas, so I was keen to show them the full extent of their boards and just what they could do.
We started off by making square boxes - here's my version of the one we made:
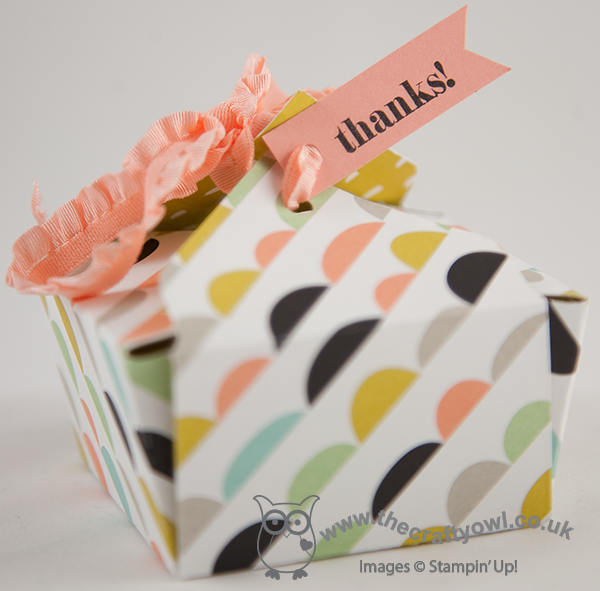
This is a simple 2" square box, made from a 6" x 6" square piece of paper, probably the easiest type of box to make. My class used the Modern Medley DSP for their boxes (there are some pictures over on my Facebook page if you would like to see them), but for my box here I thought I would give you another 'sneak peek' of product that will be available during this year's Sale-A-Bration promotion, starting 28th January. This is a sheet from the 'Sweet Sorbet' DSP collection - lovely fresh, spring colours with black (an unusual, but very workable colour combination). I finished my box with a small 'thanks' tag and some stretch ruffle trim in Crisp Cantaloupe to hold the box closed.
Back tomorrow with another of my class projects. until then, happy stampin'!
Stampin' Up! Supplies Used:
6aa5543d-b2e5-4d14-b8dc-304e99af2e39|0|.0|96d5b379-7e1d-4dac-a6ba-1e50db561b04
Tags: 3D Projects, boxes, Classes, Envelope Punch Board, Sale-a-bration 2014, Shop online, Stampin' Up, Stampin' Up Card, Stampin' Up Card ideas, Stampin' Up Supplies, Sweet Sorbet
3D Projects | Boxes | Envelope Punch Board
by Joanne James28. December 2013 20:33Another quick post from me today in between continuing festivities. We had one of our two annual trips to the pantomime today: this one our family visit to one of the smaller theatres in town, which is always guaranteed to put on a good show. This year was no exception - the performance of 'Wind In The Willows' was one of the best I've seen in some time and we all had a lovely time. If you're local to Northampton you really should visit the Royal before the run finishes - you won't regret it.
Now for today's project! As my regular blog readers will know, one of my other hobbies is biscuit baking and decorating. I've made lots of them in the last few weeks, mostly as gifts for teachers, friends and neighbours. I've packaged them in lots of different ways and often use jars tied with ribbon for my bite-size cookies, but one of my favourite methods of presentation for standard size biscuits has to be the Tag a Bag Gift Boxes - you can decorate and embellish, but I love the 'sneak peek' you get of the contents inside through the acetate sleeve. These boxes are also super sturdy, which is great for transporting their reasonably fragile contents. Many of my boxes were made and gifted before I got the chance to photograph them, but I managed to get a shot of my very last box before its departure:
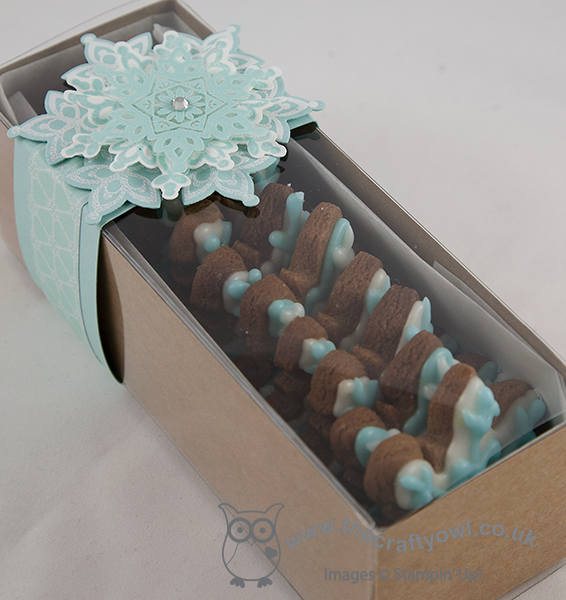
I finished the box with a belly band of Pool Party layered with a strip of Winter Frost DSP through the centre and finished with a pretty triple-layered snowflake, just right for my festive snowflake iced gingerbread biscuits in a co-ordinating colourway. This particular box of biscuits was destined for Aaron, the UPS man who delivers my Stampin' Up! parcels all year round; just one of the many people I like to show my appreciation for, especially at this time of year.
Tomorrow I have a special project to share: not a Christmas themed project, but rather something I made for a dear friend of mine as a Christmas gift. Here's a little glimpse just to whet your appetite:
Hopefully you're intrigued - pop back tomorrow to see the whole thing. Until then, happy stampin'!
Stampin' Up! Supplies Used:
by Joanne James26. December 2013 20:29Today I'm going to share another of my Christmas projects, this time a fun packaging solution for a cute chocolate snowman that I bought at my local supermarket. From the outside, it looked like a fairly straightforward nicely packaged box, complete with bow:
It's when the box is opened that the 'reveal' happens - the snowman is sitting in the middle with the inside of the box decorated with four co-ordinating stamped 'snow day' snowmen:

I love the snowman stamp set in the 'Snow Day' set and as soon as I saw the chocolate snowman I knew the two belonged together. The box base uses one 12" x 12" sheet of Crumb Cake cardstock and is a great way to turn a simple chocolate gift into something extra-special.
Today is going to be an early night for me I think; after all the food and excesses of the last few days and a lovely long walk in the fresh air this afternoon, I am absolutely shattered! Back tomorrow with another project; until then, happy stampin'!
Stampin' Up! Supplies Used:
e255bd13-0bdf-4533-8c21-96bf506938a9|0|.0|96d5b379-7e1d-4dac-a6ba-1e50db561b04
Tags: 3D Projects, boxes, Christmas, Big Shot, Gift Bow Bigz L Die, Snow Day, Shop online, Stampin' Up, Stampin' Up Supplies, Exploding Box, Season of Style
3D Projects | Boxes | Stamping
by Joanne James30. October 2013 20:36Good evening to you blog readers! I'm having a catch up this evening, since in addition to it being MDS Weekly Download Day I have another two fantastic offers to share with you this week. The first of this week's new offers is perfect for personalised packaging with minimum fuss and maximum convenience and impact:
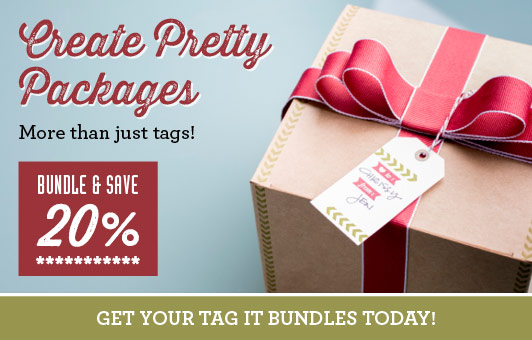
There are 2 separate bundles available:
Bundle 1 - Holiday Tag It Extra Large Box Bundle at £16.95, comprising:
- a Stamp A Tag Kit
- 3 Extra Large Gift Boxes
- a 9.1m roll of Cherry Cobbler 1" (2.5cm) Stitched Grosgrain Ribbon
Bundle 2 - Holiday Tag It Decorative Box Bundle at £17.95, comprising:
- a Stamp A Tag Kit
- 6 Decorative Window Gift Boxes
- a 9.1m roll of Cherry Cobbler 1" Stitched Grosgrain Ribbon
Both of these bundles represent a 20% saving on the individual prices, so now there's no excuse for every parcel to be packaged with the hand-finished touch. This offer is valid until 30th November, so if you would like to order either click on either of the above pictures to go straight to my online store or contact me to add to a local order today!
Back shortly with an MDS Offers post; until then, happy stampin!
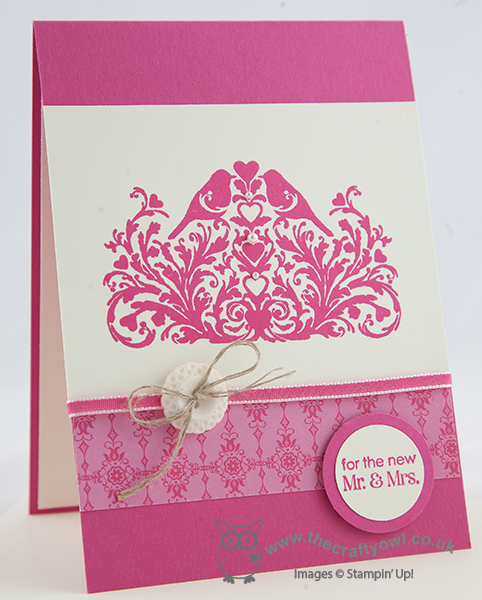
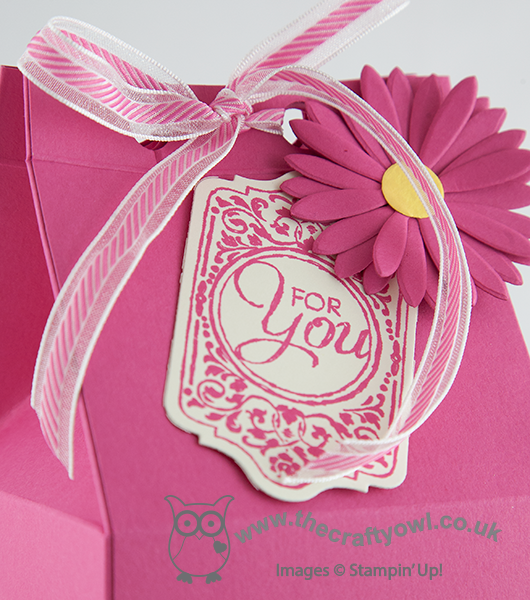
by Joanne James2. October 2013 21:06A quick post from me today to share a wedding card and gift box I made for my friends and neighbours, Annette and Jason, who got married at the weekend. The theme of the wedding was bright pink and the gerbera was a feature flower, both in the bridal and bridesmaids bouquets and on the invitations and wedding favours. Having made the wedding invitations (I will share these in a future post - I have 'mislaid' the photographs I took on completion!), I decided to make a wedding card that was pink but not flower-themed, but I did design a gift box that complemented the overall décor to house their gift.
Here is the card, using the lovely 'From This Day Forward' stamp, inspired by a similar card by Monica Gale here:
I also created a gift box with a belly band with a gerbera design, that echoed the design of the wedding stationery and favours. My box was inspired by this mini version by Sam MacDonald of Pootles Paparcraft here, and although whilst the shape is the same, the overall dimensions are considerably larger! here is my full size version:
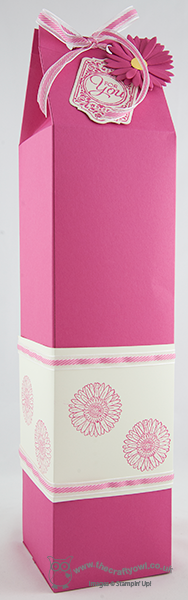
Very large, with a 9cm x 9cm square base, and very pink, but more sturdy than a gift bag and much more personal. I finished it off with some retired Melon Mambo organza ribbon (currently available to purchase on the Clearance Rack!) and a die-cut flower with co-ordinating Chalk Talk gift label. here's a close up of the detail:
The sun shone and the wedding day was perfect - what more can you ask for? Congratulations to the new Mr & Mrs Harrison - wishing you a happy future together.
Back tomorrow with another project and the detail behind the 2 week £25 sign up offer that begins on October 7th; until then, happy stampin'!
Stampin' Up Supplies Used (for the card only):


db51ab79-74bb-4cf0-a77c-ccfe6124d66d|0|.0|96d5b379-7e1d-4dac-a6ba-1e50db561b04
Tags: 3D Projects, boxes, Chalk Talk, Magnetic Platform, Big Shot, Shop online, Stampin' Up, Stampin' Up Card, Stampin' Up Card ideas, Stampin' Up Supplies, Weddings, From This Day Forward
3D Projects | Boxes | Cards | Stamping
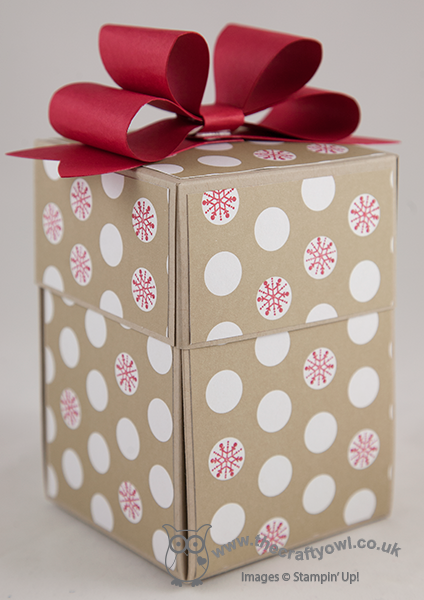
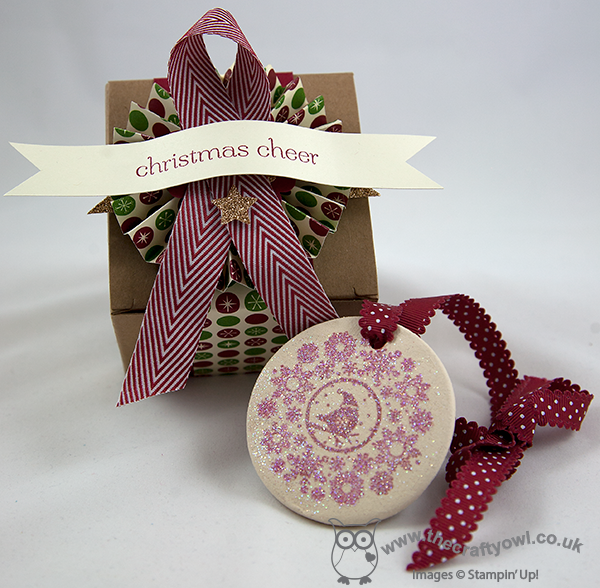
by Joanne James9. August 2013 22:13Today I'm sharing the last of the projects we made at last weekend's Christmas workshop: a stamped clay ornament and a decorated kraft gift box to put it in. Here's a photograph of the ornament:
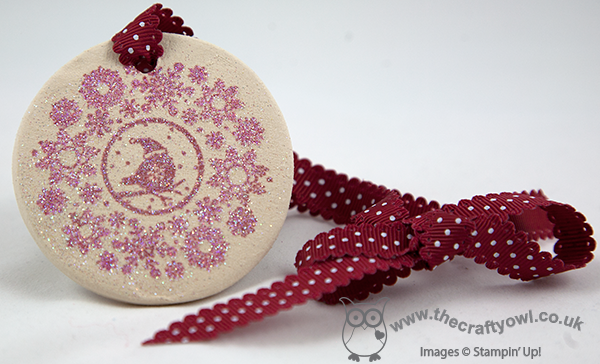
These clay ornaments have a natural finish and can be stamped straight onto the surface, without any additional preparation. As we were going all out for Christmas, once we had stamped our design onto the ornament we stamped the pattern again with Versamark, sprinkled with Heat and Stick Powder and heated with the heat gun, then sprinkled with Iridescent Ice glitter and heated once more. This gives the finished item a more muted colour and a lovely sparkle that catches the light.
We also decorated one of the lovely ready-made kraft boxes from the catalogue to go with it - here's the top of mine:
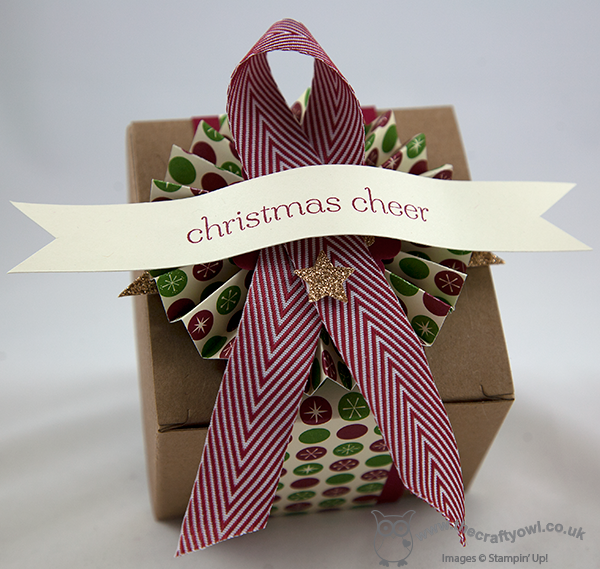
Together they would make a lovely gift for someone, if you could bear to part with them of course! I will be using mine to decorate my tree during the festive season, but I'm sure I can make another one or something else to go in the box! I hope you liked my first Christmas projects of the season - there will be lots more where this came from. If you would like to join any of my classes, do get in touch for more details; my September card classes will be featuring the Mosaic Madness stamp set and then from October we will be doing Christmas cards all the way through until the end of the year.
Back tomorrow with the first of the weekend birthday cards: my brother-in-law is celebrating his 'big 40' with a party tomorrow and then my own 'Baby James' will be 6 on Sunday, so I've a few birthday cards to share. Until then, happy stampin'!
Stampin' Up Supplies:
Stamps: Sweet Essentials, Four Seasons (hostess - retired)
Cardstock: Cherry Cobbler, Be of Good Cheer Designer Series Paper (retired)
Ink/Stampin' Write Markers: Real Red
Tools: Simply Scored, Big Shot, 1 1/4" Circle Punch, 7/8" and 1 3/4" Scallop Circle Punches, Merry Minis (star)
Finishing Touches: Champagne Glimmer Paper, 3/4" Cherry Cobbler Chevron Ribbon, Cherry Cobbler 1/2" Scallop Dots Ribbon (retired)
e7e73cc0-5033-4d82-85e2-91c273e55149|0|.0|96d5b379-7e1d-4dac-a6ba-1e50db561b04
Tags: 3D Projects, Be of Good Cheer, Big Shot, boxes, Christmas, circle punch, Classes, Four Seasons, Kraft Gift Boxes, Merry Minis, scallop circle punch, Stampin' Up, Stampin' Up Supplies, Sweet Essentials
3D Projects | Boxes | Classes | Stamping