by Joanne James16. August 2014 21:54I've spent a pleasant afternoon today with the ladies at my local hair and beauty salon celebrating their 3rd anniversary since opening (Pamper Me Hair & Beauty in Northampton - if you're local look them up, they're a lovely bunch). So another quick share today - I'm linking up with The Card Concept where the theme is to make a wedding card:
As much as I loved the photo inspiration for this challenge, I wanted to use Shimmery White and silver for my card - I had a clear idea in mind of what I wanted to create. Here's my card:
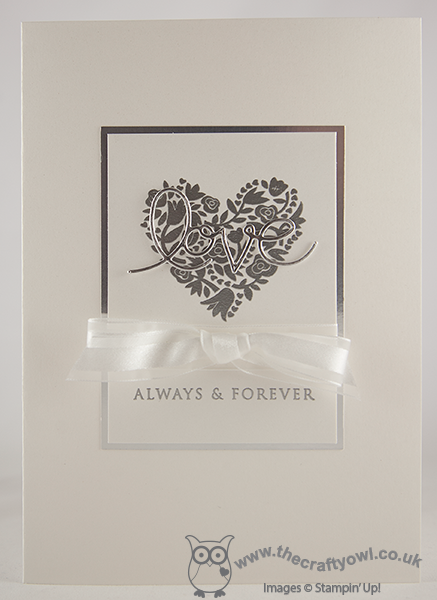
This card uses some of my favourite 'vintage' stamps and tools of all time - Expressions Thinlits and that beautiful Flowerfull Heart stamp. The card is still my usual clean and layered style, but I do think the silver elements and the bow give a real 'classy and elegant' feel. This is one of those cards that looks so much better in real life - so very opulent, even with a relatively simple design.
That's all from me today - back tomorrow with my Design Team post this week for The Paper Players - and it's a fun one!
Until then, happy stampin'!

Stampin' Up! Supplies Used:
by Joanne James12. February 2014 09:56So I didn't quite manage to squeeze in another 'make' for you yesterday, but I'm here bright and breezy (or should that be windswept, given the gales we've had here for the last day or so!) this morning with today's card. Given my recent dalliances with the colour black, I thought I would try something different using black cardstock and one of my most favourite stamps - yes, the Flowerfull Heart (still available to order until Friday if you'd like one - click on the link to my online shop below!) Here is my card:
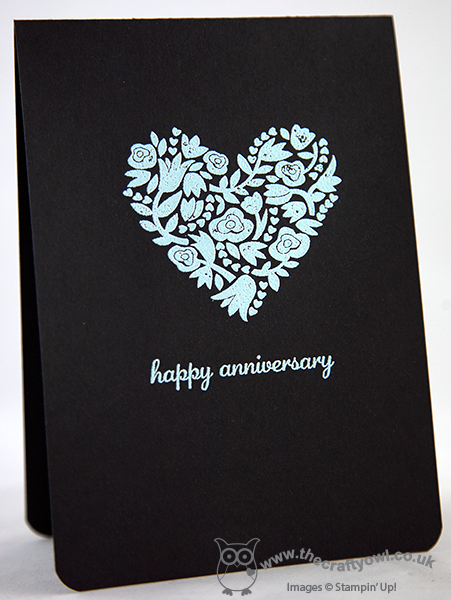
Now, I know you might be thinking "Anniversary card - on black??!" but hear me out! I wanted to use this stamp again with some heat embossing; I toyed with gold (well, it worked pretty well on this card I think) but eventually decided to use Pool Party embossing powder. My colour combination was inspired by one of the DSP patterns in the Sweet Sorbet pack that is available as one of the free Sale-A-Bration gifts currently when you spend £45 or more - the little blue Pool Party flowers with black centres. I would not necessarily have thought about using these colours together had it not been for this paper. A simple sentiment from the 'Express Yourself' hostess set (such a versatile set of greetings in a very usable font, it can be yours when you host a Stampin' Up! party - contact me to book yours) finishes this simple card.
So what do you think - a colour combination that works or one to be avoided, especially on a romantic card? I'd love to know what you think. I'm also linking this card up with the 'One Layer Card - Anything Goes' challenge over at Less is More this week (currently the only card using black for it's 'white space' - should I be worried?!) and CAS(E) This Sketch as my card uses their sketch again:
Funny how you can use the same two starting points, yet end up with two cards that couldn't be more different. Back tomorrow with another project; until then, happy stampin'!
Stampin' Up! Supplies Used:
9fe4b513-b28f-441e-b5cc-fe0fd6c2169c|0|.0|96d5b379-7e1d-4dac-a6ba-1e50db561b04
Tags: Embossing, Flowerfull Heart, Host a Party, Express Yourself, one layer cards, Sale-a-bration 2014, Shop online, Stamp-a-ma-jig, Stampin' Up, Stampin' Up Card, Stampin' Up Card ideas, Stampin' Up Supplies, Anniversary, Weddings
Cards | Host a Party | Promotions | Sale-a-bration | Stamping
by Joanne James27. January 2014 19:47A quick post from me this evening! With just one more day to go, I had intended to share another card using a Sale-A-Bration 'sneak peek' to whet your appetite for tomorrow, however I've had an idea that I've wanted to try for a couple of weeks with my Flowerfull Heart stamp and since today is the last day you can purchase this stamp, I thought I'd have one last share with you. I decided to use this week's layout at Freshly Made Sketches as my starting point:

As my regular readers will know, I struggle with the concept of 'vintage' (I much prefer clean lines!) but instinctively I thought this was one of the few stamps in my set that might work for the vintage look, so here's my attempt:
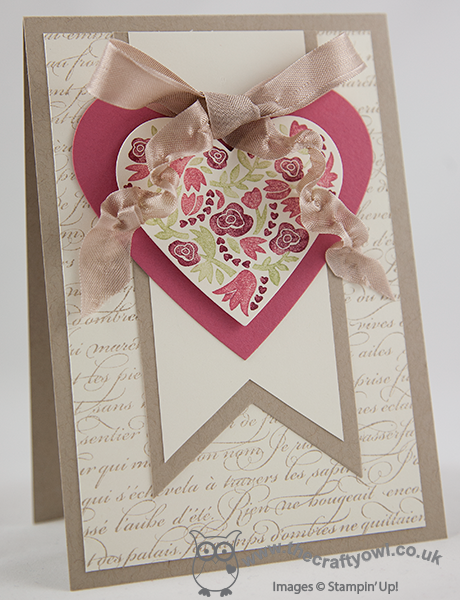
I say 'attempt' because whilst I quite like the finished card, I'm not sure it meets the criteria for a truly vintage look. I like the Crumb Cake, the more muted effect by colouring the stamp with markers and the ribbon works. however, not a pearl or doily in sight - think I might have to go off and do a little more research on this one! If anyone would like to leave some suggestions as to how I could improve the vintage feel of this card, do let me know - all comments welcome. Click on the links below if you would like to purchase any of the items used above, including the stamp - last chance today!
Back tomorrow with the start of Sale-A-Bration - hope you're all as excited as I am!! Until then, happy stampin'!
Stampin' Up! Supplies Used:
by Joanne James20. January 2014 20:33Today I have another Flowerfull Heart card to share with you; this time a larger A5 size card that could be used for a wedding, anniversary, birthday or Valentine's for someone special. So here is my card:
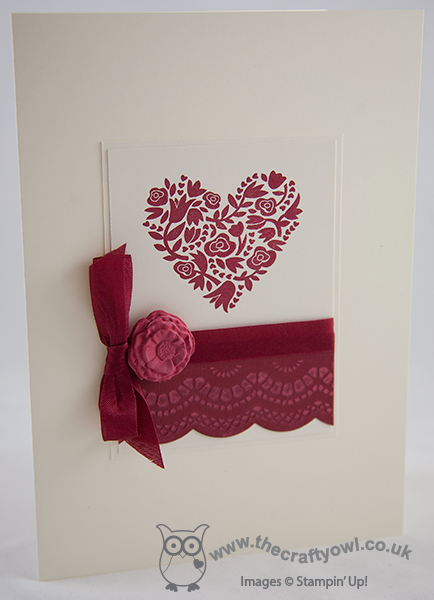
I love this card! It is elegant in its simplicity, yet at the same time packed with detail. Whilst the card has a lot of 'white space' (the actual base card colour is Very Vanilla, just to confuse you!), I created a double-layered centre panel on which I stamped both the Flowerfull Heart in Cherry Cobbler and then edged the bottom with some Cherry Cobbler Core'dinations cardstock, which I embossed then sanded lightly to show the contrasting layer. I covered the join with some Cherry Cobbler seam binding ribbon which I tied in a bow at the side, then lastly finished with a flower made from Stampin' Up!'s Simply Pressed Clay, which I first coloured with Cherry Cobbler reinker before moulding. Here's a close up of the flower:
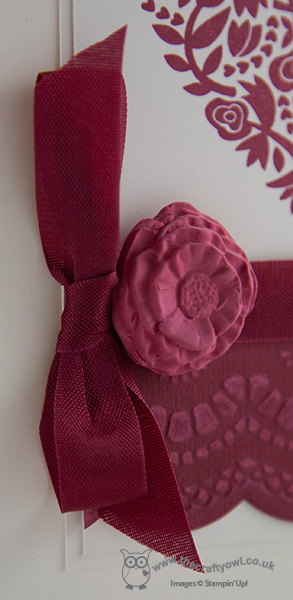
These really are so easy to make: you just press the clay into the mould, pop it out and leave it to dry. you can colour it before or after you put it in the mould, depending on the effect you're after.
A quick post from me today; having barely got rid of my last cold, I now seem to be catching another, so it's a hot drink and early night for me!
Back tomorrow with another project; until then, happy stampin'!
Stampin' Up! Supplies Used:
by Joanne James10. January 2014 19:45Evening lovely blog readers! So big news of the day: my voice is (almost) back! Great news for me, not so great for my youngest when he announced he had lost his trainers following his PE lesson just 3 days into the new term - but that's a story for another time!
Today I'm going to share the last of this week's class projects: a gift card holder, once again made with the Envelope Punch Board. I've seen a few holders made in this way on the internet, but I adapted mine slightly to enable me to make it from half a sheet of A4, using metric measurements. So here is the finished gift card holder from the outside:

No apologies for once again using the Flowerfull Heart stamp (I still love it!), this time overlaid with 'love' cut from gold foil using the Expressions Thinlits die (don't forget these are only available to purchase until the 1st February). There's also another sneak peek of new product available in the Spring-Summer catalogue that launches on 28th January; did you spot it? Yes, it's the lovely gold washi tape which I paired here with Very Vanilla to make my pocket. There are lots of silver and gold items in the new catalogue, so if this is your thing, stay tuned - there will be more to come. The flap closure for the gift card holder is the bit you need the Envelope Punch Board for - it makes the two notches that enable the holder to stay closed and keep the gift card firmly in place.
When you unclasp the flap, this is what you see inside:
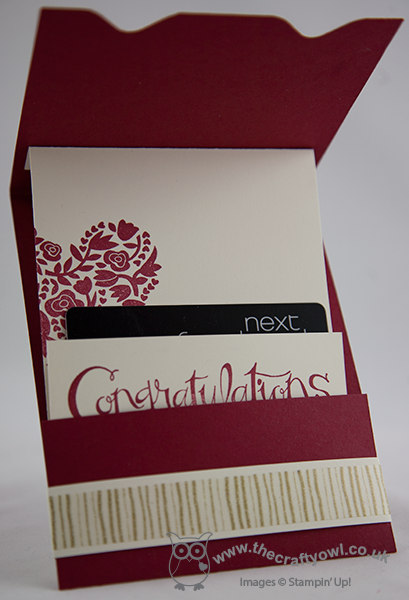
The insert is attached to the opening flap so that it slides out of the pocket as you open it and presents the gift card. I designed my gift card holder with a wedding or engagement gift in mind - vouchers or money seem very popular gifts these days, but you could easily adapt it for a birthday or other occasion. One thing is for sure - when it's as easy to make as this, there's really no excuse for a simply sticking a voucher in an envelope or worse still a carrier bag (believe me, it happens!!)
That's all the projects from my classes this week - I hope they've inspired you to go and be adventurous with your Envelope Punch Board. If you live local to me in Northampton and would like to attend any of my Stampin' Up! papercraft and card classes, you can find the current schedule of my card and project classes on my website here; please contact me for further information regarding location and any equipment you will need to bring. Classes must be booked at least 2 weeks in advance of the class date.
Back tomorrow with a Sale-A-Bration sneak peek; until then, happy stampin'!
Stampin' Up! Supplies Used:
2cbf2591-39f6-471a-9a05-7822cc150877|1|5.0|96d5b379-7e1d-4dac-a6ba-1e50db561b04
Tags: 3D Projects, Classes, Envelope Punch Board, Flowerfull Heart, Gift Voucher, Sassy Salutations, Shop online, Stampin' Up, Stampin' Up Card, Stampin' Up Card ideas, Stampin' Up Supplies, Weddings, Valentines
3D Projects | Cards | Classes | Envelope Punch Board | Stamping
by Joanne James9. January 2014 21:37Today I've another of this month's Envelope Punch Board class projects to share with you - a rectangular box notecard holder and a set of notecards. So here is the box, complete with belly band:
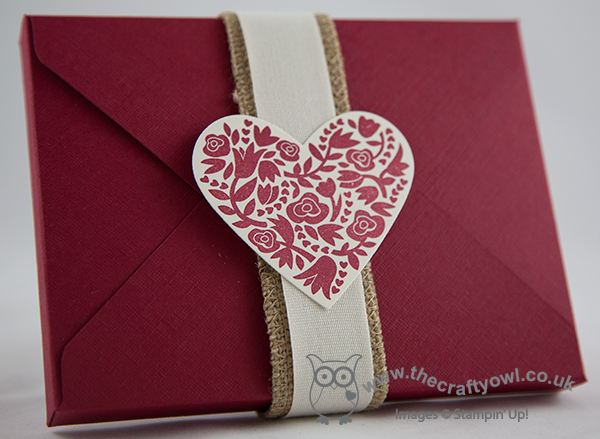
The box is made from Cherry Cobbler textured cardstock, which is great for boxes as it's really thick and has a lovely quality feel. In this photo I've finished with a belly band made from burlap and cotton ribbon; in class, we also made bows from Modern Medley paper using the Envelope Punch Board and created belly bands with bows on. Inside the box, we made a set of simple notelet cards, in co-ordinating vanilla and Cherry Cobbler and paired with Crumb Cake envelopes:
We used the Sweet Essentials sentiment stamps; this is a great set with sentiments to suit a variety of occasions. This set would make a lovely gift for someone and depending on the sentiment, it could be for a birthday or even created as a set of wedding thank you or acceptance cards.
The finished box base measures 5 3/4" x 4 3/8" and was made from a starter piece of 9" x 9" card stock. As with all boxes, whether square or rectangular, the piece of card you start with needs to be perfectly square; it's the points at which you punch and score that determine the finished dimensions of the box. To create this box, we punched and scored at 3 1/2" and 4 1/2".
Back tomorrow with another project; until then, happy stampin'!
Stampin' Up! Supplies Used:
7b96fc59-7eaf-47b6-9c78-2a8c064af419|2|5.0|96d5b379-7e1d-4dac-a6ba-1e50db561b04
Tags: 3D Projects, boxes, Envelope Punch Board, Flowerfull Heart, Hearts Framelits, Shop online, Stampin' Up, Stampin' Up Card, Stampin' Up Card ideas, Stampin' Up Supplies, Sweet Essentials
Boxes | Cards | Classes | Envelope Punch Board | Stamping
by Joanne James6. January 2014 21:09Today has been a fun day, with my first class of the year. A fun - if quiet! - time was had by all, with all my ladies being very accommodating of my continued voiceless state. I'll share more on our class makes later in the week, but today I'm sharing a card that I am entering for this week's Pals Paper Arts challenge, PPA186, which is to use the following colours:
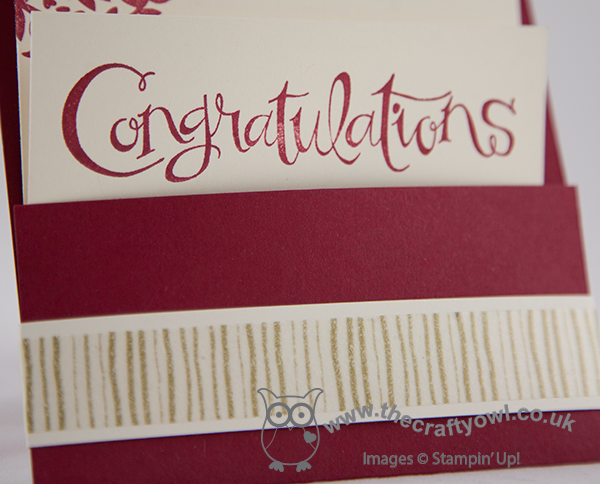
With this in mind, I inked up my Flowerfull Heart stamp again but this time made a slider card - take a look:
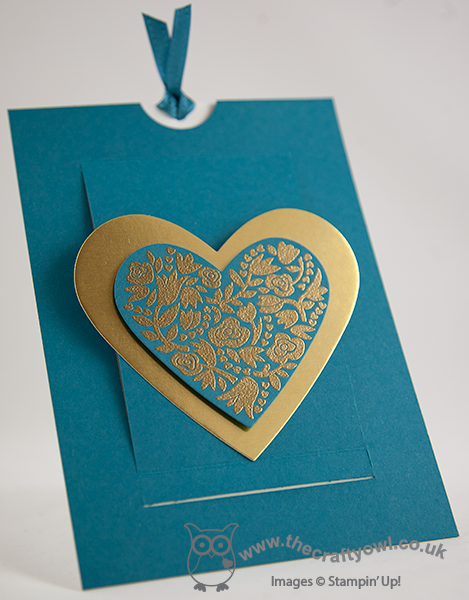
I stamped the heart in Versamark and heat embossed with gold embossing powder, then layered the heart on another one made from gold foil. When the ribbon end is pulled, it reveals the message inside:
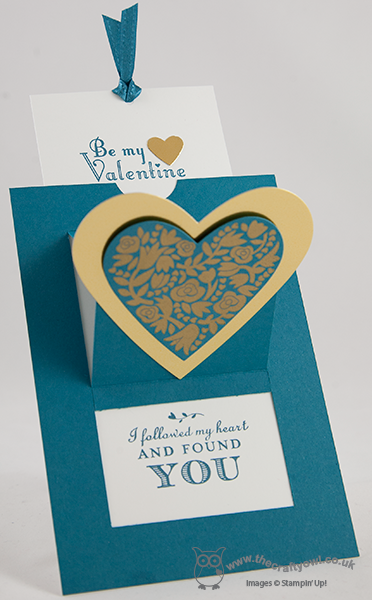
The inside of the slider card is stamped with my favourite stamp from the 'Follow My Heart' set on the lower inside panel, and the valentine stamp from the 'Delightful Dozen' on the extending top section (I replaced the stamped heart with a gold foil one). I think this would make a lovely masculine valentine's card; the gold foil and embossing adds a real luxurious feel.
I will be sharing a video tutorial on how to make this card as soon as my voice returns, so stay tuned. Meanwhile, check out the inspiration from the designers and participants over at Pals Paper Arts here.
Back tomorrow with another card; until then, happy stampin'!
Stampin' Up! Supplies Used:
1aaaf41f-cd5c-4638-ad4c-132b9f354924|0|.0|96d5b379-7e1d-4dac-a6ba-1e50db561b04
Tags: Big Shot, Flowerfull Heart, Heart Punch, Hearts Framelits, Delightful Dozen, Magnetic Platform, Follow My Heart, Embossing, Valentines, Shop online, Stampin' Up, Stampin' Up Card, Stampin' Up Card ideas, Stampin' Up Supplies
Cards | Stamping
by Joanne James5. January 2014 20:39Today I'm sharing another card using my current 'stamp of the moment', the Flowerfull Heart, but this time on a non-romantic card that could be used for a birthday or just to send someone 'happy post'. I've also got a sneak peek of some new product that will be available at the end of the month as part of this year's Sale-A-Bration promotion. Excited? Well, let's take a look! Here's my card:

Aren't those Spring colours so fresh, after the darker winter colours that we've been using so much of in recent months? The base of my card is Crisp Cantaloupe, one of the feature colours of the Designer Series Paper that I've used, which is one of the products that will be available during Sale-A-Bration this year. I used Sahara Sand for my flag, which I embellished with an In-Colour Boutique Detail and some Calypso Coral baker's twine, but the star of the show is once again the Flowerfull Heart. Sale-A-Bration is always a great time to earn additional products and benefits, and is one of the best times of the year to host a party. I am already taking booking for parties during the Sale-A-Bration period, which runs from 28th January - 31st march 2014, so if you'd like to get in on the action, call me on 07773 421446 or email me joanne@thecraftyowl.co.uk to arrange a party today.
A busy day for me tomorrow, with the first of this month's classes. Likely to be something of a challenge, as I have been completely without voice for the last 2 days, nothing more than a faint whisper. I'll let you know how it goes - I think I might have to take a whistle!
Back tomorrow with another project; until then, happy stampin'!
Stampin' Up! Supplies Used:
041ff602-6e15-440a-a1c1-bc12e6a8cea7|0|.0|96d5b379-7e1d-4dac-a6ba-1e50db561b04
Tags: Flowerfull Heart, In Colours, Sale-a-bration, Sale-a-bration 2014, Hearts Framelits, Big Shot, Magnetic Platform, Shop online, Stampin' Up, Stampin' Up Card, Stampin' Up Card ideas, Stampin' Up Supplies
Cards | Stamping
by Joanne James3. January 2014 21:35I've another busy day today, so a quick post from me with another 5" square card made using the Flowerfull Heart stamp. This time paired with Strawberry Slush Core'dinations cardstock. So here is today's card:
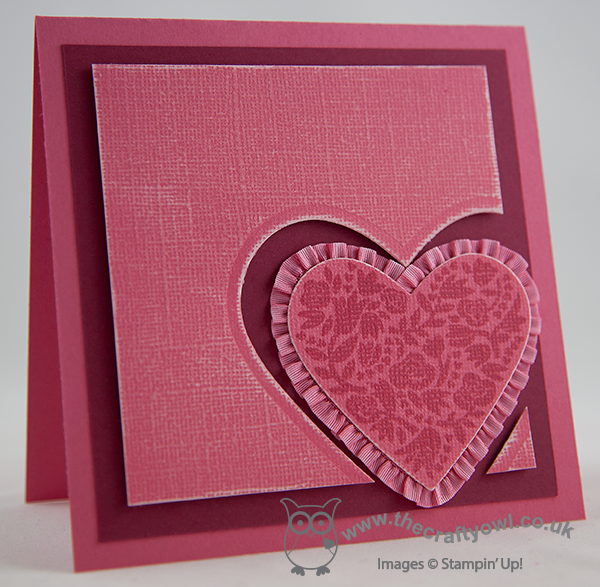
This card has a lovely textured surface and can be sanded to reveal a monochromatic inside layer which can add real interest to a card. I also like the effect you get when you stamp on it as a result of the textured surface. I edged my heart in Strawberry Slush Ruffle Stretch Trim, which gives this card a rather feminine look. I must confess this card is a little pink and frilly for my taste, but as anticipated, when my daughter looked through my recent samples she declared this card her out and out favourite. Knowing her as I do, there are only two things that could be added to improve further: glitter and sequins!! Maybe not this time, but perhaps that should be my starting point for another card ...
Hoping for a quieter day tomorrow that will allow some time for crafting. Either way my blog post is prepared so I will have something lovely to share with you. Until then, happy stampin'!
Stampin' Up! Supplies Used:
a1aa941f-8b98-4201-b71f-708a7ab22f7b|0|.0|96d5b379-7e1d-4dac-a6ba-1e50db561b04
Tags: Big Shot, Hearts Framelits, Flowerfull Heart, Magnetic Platform, Valentine's, Valentines, Core'dinations, Shop online, Stampin' Up, Stampin' Up Card, Stampin' Up Card ideas, Stampin' Up Supplies
Cards | Stamping
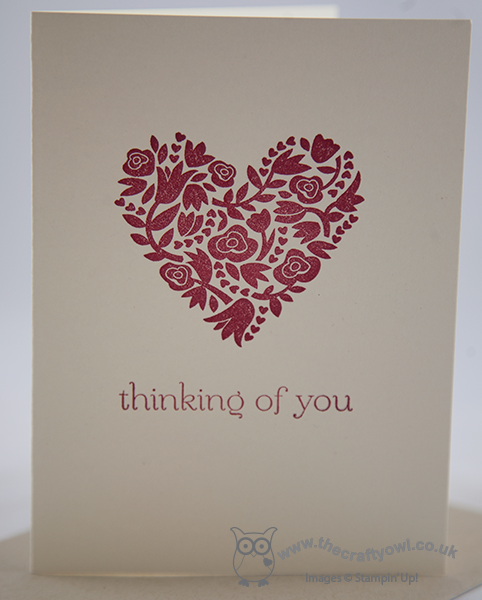
by Joanne James3. January 2014 15:55Good day, blog readers! I am sounding cheerier than I am feeling today; having got through Christmas without so much as a sniffle, I'm paying for it now. Since New Year's Eve I have been battling the worst cold I've had in ages - typical. Anyways, not to be deterred, today I have a special announcement - I have a new love in my life! I know you often here me say I love new products, but I an honestly say that I've never had as much fun with a single stamp as I'm having with the 'Flowerfull Heart' stamp that's available as part of the 'Whole Lot of Love' promotion. Along with the other items in this promotion, this stamp is only available until the end of January, but I can assure you I'll be sharing lots of ideas using this stamp this month.
Whilst this stamp is heart-shaped, the flower design means this stamp lends itself to a wide variety of cards, and not all valentine-related. All that said, for my first card I decided upon a classically elegant anniversary card:
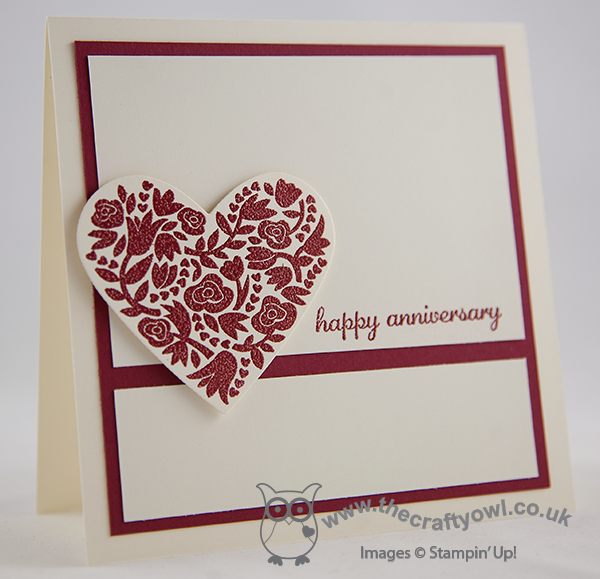
I went with the classic colours of Very Vanilla and Cherry Cobbler and stamped both the image and sentiment in Versamark and heat embossed in Cherry Cobbler embossing powder. You can just see the texture in the photo, but you can't really appreciate the glossy finish which looks beautiful in real life. the other thing I love about this stamp is that it fits inside one of the Hearts Framelits perfectly, so makes cutting out a cinch.
This card is very 'me' and true to my style; I'll be back to share another card I made with this stamp tomorrow. Until then, happy stampin'!
Stampin' Up! Supplies Used: