Framed All is Calm Advent Calendar Using Tiny Treat Boxes

by Joanne James4. November 2014 23:00

A late post from me today as I've spent a lovely day crafting with friends, followed by James family piano lessons this evening (3 out of 4 of us are learning!) so have only just got around to it. Our craft session was fun - we finished off some projects we started a little while ago, which always gives a good sense of achievement. With Christmas creeping ever closer, today I thought I would share with you the advent calendar I made for the James juniors, which is a case of a project by the lovely Julie Kettlewell. I love the Tiny Treat Boxes in this year's Stampin' Up! seasonal catalogue, which are of course perfect for making advent calendars. The sample in the catalogue shows just how easy it is to make something to a basic design, however having seen Julie's project a little while ago - you can see her original project here - I knew I wanted to create something similar. So without further ado, here is my framed advent calendar in all its glory:

Isn't it beautiful?! It is framed in a 20" frame/50cm, so is a substantial piece in terms of size and it makes a real statement. I chose to make mine using the All is Calm Speciality Designer Series Paper, here are some close ups:

This is the central panel, with a sentiment stamped using the Epic Alphabet and some trees punched using the Tree Punch and decorated with some frosted sequins.


Each of the boxes is covered on 5 sides using the All is calm DSP, then a number label made from a layered section using a 1 3/4" scalloped circle punch and a 1 3/8" circle punch, and numbers cut out of Dazzling Diamonds Glimmer Paper using the Perfect Print Numbers Bigz Die and the Big Shot.

This is a great project to showcase all of the lovely papers within the All is Calm DSP stack.

I adhered my boxes so that the flaps would open upwards and put my numbers in order from one through twenty four, however you could 'mix and match' if that's more your style. Each pack of treat boxes contains 25 boxes, so you have one spare to package an extra special treat for Christmas Day if that's your thing. I'm really pleased with how my calendar turned out and am busy acquiring lots of little treats to fill my boxes for the month of December. I can see this project becoming a real heirloom piece that we bring out year after year.

Hope you like today's project; back tomorrow with the new Wednesday Weekly Deals and my Design Team post for this week's challenge over at Colour Me...! Until then, happy stampin'!


Stampin' Up! Supplies Used:

Table built using Product Table Builder by The Crafty Owl - Independent Stampin' Up! Demonstrator.


Birthday Cupcake - and Bicycles!

by Joanne James31. May 2014 10:41

A really quick post from me today as I have a very busy work day ahead, but a bonus project for you too today - read on! I made today's card a couple of weeks ago for one of Rebecca's friends who was celebrating her 9th birthday. It got me thinking - at 9 years old, suddenly some girls are less about cute and desperate to 'grow up', so I needed to make a card that was girly but not too 'cutesie' (I think that's a word!). Birthday Basics DSP is always my 'go to' paper for cards like this - here's my card:

I went for a 'fun fold' card featuring the Another Great Year stamp set. I stamped the main stamp onto Very Vanilla then stamped it again onto a sheet of Crisp Cantaloupe and coloured the words with markers before adhering to the vanilla layer. I then created a fun scalloped circle closure to hold the card shut, with a co-ordinating paper-pieced cupcake taking centre stage, which I adhered with a dimensional onto the panel featuring colourful birthday balloons:

Doesn't that cupcake look delicious? Below you can see how I created the card base from two pieces of cardstock, along with my stamped sentiment inside:

Another reason for my paper choice was that the gift was a gift voucher to spend at a local cycling store for accessories for a new bicycle, and the Birthday Basics paper has the perfect design for a themed gift card holder, made using my Envelope Punch Board:

I've made these gift voucher holders before (you can find instructions on a previous post here) - the colours mean that both items look great together. Today's card uses lots of retiring colours and products, so if you need to stock up on any you should hop over to my online store by clicking on the links below - the Itty Bitty Punches that I used to create the little flower on the gift card holder above have already sold out!! 

Right, must dash - I need to link today's post up with the current SUO Challenge of 'Something Yummy' - if I'm quick I might just make it! back tomorrow with another project, until then happy stampin'!


Stampin' Up Supplies Used:

Table built using Product Table Builder by The Crafty Owl - Independent Stampin' Up! Demonstrator.


Make a Wish Simple Pop-up Card

by Joanne James19. May 2014 19:19

I haven't had any time for crafting today, so I'm going to share with you a simple pop up card designed by Monica Gale that I made at our quarterly training session last month and that I made with my ladies at our recent Fresh Prints All Day Craft Event - here is the outside of the card:

I added a few layers of Fresh Prints papers onto a Coastal Cabana card base, then stamped the 'Make a Wish' stamp from the Perfect Pennants set in Crumb Cake and punched out with a 2 3/8" Scalloped Circle punch layered onto a 2 1/2" circle out of Real Red cardstock, The banner was cut from a scrap of DSP and the 'a' stamped on red card and punched out and popped on a dimensional for added dimension. To decorate, I stamped a star from 'Simply Stars' in Real Red on Whisper White cardstock, added a DSP star using the Merry Minis star punch and secured with a gold glimmer brad with a twist of gold threaded baker's twine behind for a little added sparkle.

Inside the card there is a really simple little pop up made by cutting two short horizontal slits in the liner, which is made out of a notelet:

A few more stars and a simple birthday greeting and it's done - a fun little pop card suitable for either gender. I'm hoping to get into my craft room tomorrow and catch up on my crafting, although there is a big basket of ironing competing for my attention, so might need to get that out of the way first!

Either way, back tomorrow with another project; until then, happy stampin'!


Stampin' Up! Supplies Used:

Table built using Product Table Builder by The Crafty Owl - Independent Stampin' Up! Demonstrator.


Fresh Prints Envelope Punch Board Tote and Notelets

by Joanne James9. May 2014 20:39

Good evening lovely blog readers! I've had a busy day today with lots of household chores and last minute preparations for an all day class that I'm running tomorrow with some of my favourite crafting ladies. Today I thought I would share with you one of the projects that we are making at our class tomorrow - a cute little tote made using the Envelope Punch Board:

This project was designed by Monica Gale and is one that I made at our last team quarterly training day. It's made using the papers from the Fresh Prints DSP stack and decorated with a tag stamped from the 'Hello Lovely' stamp set. I just love the colours and patterns in this paper stack and as a card maker these papers offer such great value for money at just £6.25 for 48 sheets. We are also making a set of thank you notelets to go inside - this would make such a nice little gift for someone. I'm looking forward to making this and lots of other projects with my ladies tomorrow; if you live in or around Northampton and would be interested in attending any of my cardmaking or project classes, you can find my current class schedule here or just contact me for more information.

That's all from me; back tomorrow with another project. until then, happy stampin'!

Stampin' Up! Supplies Used:

Table built using Product Table Builder by The Crafty Owl - Independent Stampin' Up! Demonstrator.


Video Tutorial 2: Make Any Size Box Using Your Envelope Punch Board and Box Buster from The Crafty Owl

by Joanne James5. March 2014 09:52

Good morning blog readers and crafters! Back nice and early this morning with the second of my video tutorial posts showing you how to make any size box using your Envelope Punch Board and my new Box Buster tool. I've started early on my Easter treat boxes, so today's box shows you how to make this cute box:

The finished dimensions of today's box are 100mm x 75mm x 15mm. It was designed to fit a specific Easter treat - but you'll have to watch the video below to find out what it was! My new Box Buster from The Crafty Owl tool is just great for that - you can easily create a box to fit your chosen contents, without any hassle or wasted paper - you just measure the thing you want to put in the box, input the dimensions into the Box Buster tool and it does all the hard work for you: it will tell you exactly what size paper you need and where to make your first and second punch markings.

Today's project was worked out in millimetres, but the Box Buster tool will let you construct your box in either millimetres or inches - you choose! Here's the link to today's video tutorial:


Wasn't that SOOO easy?! Keep following this week as there are more box tutorials to come, showcasing a variety of box types with handy hints and tips for making the most of your Envelope Punch Board and my new Box Buster tool.

Back soon with another project; until then, happy stampin' (and box making!)


Stampin' Up! Supplies Used:

Table built using Product Table Builder by The Crafty Owl - Independent Stampin' Up! Demonstrator.


All Wrapped Up - Simple Christmas Gift Wrapping Ideas

by Joanne James22. December 2013 21:17

Well it's been another busy few days here in the James household with a trip to the movies on Friday, a fun trip iceskating yesterday and swimming, grocery shopping and a pre-Christmas festive family get-together this evening. The big day is almost upon us, but I finally managed to get some photographs taken today in between all my last minute Christmas preparations and today would like to share some of my quick but attractive festive packaging ideas for stocking-fillers and small gifts. Here's the first one - a simple pouch made using the envelope punch board:


I made lots of these in various colours to tie in with the Winter Frost DSP stack to package some little gifts for the lovely ladies who have attended my classes over the past year (I can't tell you what's inside though - it's not Christmas Day yet ;-)! )

The second of my projects is a little stocking filler I made for my daughter - a pair of hairclips decorated with Frosted Finishes Embellishments and packaged in a cute little triangular carton that I made using a sheet of the Winter Frost DSP stack:

I embossed the 'warm wishes' sentiment from the 'Snow Day' stamp set using silver embossing powder and it added a real feel of luxury to the finished packaging. For the clips, I simply adhered a Frosted Finishes Embellishments using Crystal Effects to a couple of standard hair clips.

My last packaging idea that I'm going to share today is one of the lovely little muslin bags, which I stamped with the 'Love and Joy' single stamp and decorated with another Frosted Finishes embellishment, a ribbon tie and a little Dazzling Diamonds for some extra sparkle:

These bags are a great size and perfect for a little sweet treat or a small gift such as nail polish or some candles, or maybe a miniature bottle of a favourite tipple, a pack of playing cards or a micro torch for a more masculine gift.

So some easy ideas to make those little gifts extra special.

I have a date with a very large ironing basket tomorrow evening (the exciting life I lead!), but all being well will be back with another post as I've a few more Christmas-themed things to share and am running out of time in which to do it.

Until then, happy stampin'!


Stampin' Up! Supplies Used:

Table built using Stampin' Up! Product Table Builder from The Crafty Owl.


Christmas Banners A Plenty!

by Joanne James20. October 2013 20:51

Well, today has been a fun day with a Christmas Build a Banner project class this morning. Following many laughs and giggles and a fair number of inky fingers, the lovely ladies attending my class each made a festive banner using a variety of papers and embellishments and the Build a Banner set. So there are lots of photos in this post! First of all, here is my finished banner that served as their inspiration:

My colours are Bermuda Bay and Coastal Cabana, with rosettes made from some of the lovely Winter Frost DSP and Smoky Slate chevron ribbon and finished with Coastal Cabana bows. Here's some close-ups of the rosettes - the grey one:

And here's one of the Pool Party ones:

Here's a close up of one of the bows, so easy to put together using the new Bow Bigz Die:

And lastly one showing some of the added glimmer on the flag itself:

Here are two of the ladies' lovely finished banners. Firstly, Kathy's, also in the grey/blue colourway:


And this one is Julie's, in the red-green colourway with champagne glimmer accents:


Aren't they just beautiful? I didn't manage to get photos of the other two, but I can assure you they were just as lovely. We are all feeling a little more ready for Christmas now, with one more thing ticked off our Christmas home décor list. The Build A Banner kits are great and come highly recommended; at £17.95 for the full kit including stencils and just £8.95 for the basic set, they are great value. Rebecca has put first dibs on the remaining 9 pieces in my banner kit for a name banner for her bedroom (pictures will no doubt follow in due course!). I can see me having to buy another one so that Ben can have one too ...

If you live in or around Northampton and would like a current class schedule

Back tomorrow with another project; until then, happy stampin'!


Stampin' Up Supplies Used:

 Build a Banner Simply Created KitBuild A Banner Refill KitDesigner Rosette Bigz XL DieGift Bow Bigz L DieWinter Frost Specialty Designer Series PaperFestive Flurry Framelits DiesSmoky Slate 3/4 Chevron Ribbon


Silver Glimmer Paper - by Stampin' Up!Season Of Style Designer Series Paper Cherry Cobbler 1 Grosgrain Stitched Edge Ribbon


Retrosketches #82 - All I want for Christmas is You!

by Joanne James26. September 2013 12:02

Another Christmas card and another challenge today! I'm loving the Season of Style paper stack, which is just perfect for making lots of Christmas cards and here's one of the designs in all its glory:

I'm entering this card for the Retrosketches #82 Challenge which has this great layout sketch as inspiration:

I stayed with the square shape and orientation and made a feature of the fun 'All I want for Christmas' stamp in the Christmas Messages stamp set. It comes with a co-ordinating stamp, which I've used here on the inside of my card:

The links to the products I used for this card are included below. Back tomorrow with another card; until then, happy stampin'!


Stampin' Up! Supplies Used:

 Season Of Style Designer Series Paper StackChristmas Messages Clear-mount Stamp Set2-3/8 Inch Scallop Circle Punch - by Stampin' Up!1-3/4 Inch Circle Punch - by Stampin' Up!

Circles Collection Framelits DiesOld Olive Stampin' Write Marker - by Stampin' Up!Cherry Cobbler Stampin Write Marker - by Stampin' Up!


The Great Outdoors and Other Things!

by Joanne James10. September 2013 19:52

Well, I can't believe it's actually been six days since I last posted a blog entry, but it has! It's not that I've not been 'making', far from it; just that I've had some urgent makes that I sent even before photographing (oops!) and it was my birthday at the weekend and whilst I didn't make myself a card, my parents celebrated their 45th wedding anniversary on the same day and I have two friends who also share my birthday so I was busy sorting cards for them. I have lots of friends and family with birthdays in September, so am still trying to finish these cards before I really get into the Christmas spirit! And this week I have two card classes too, so busy, busy!

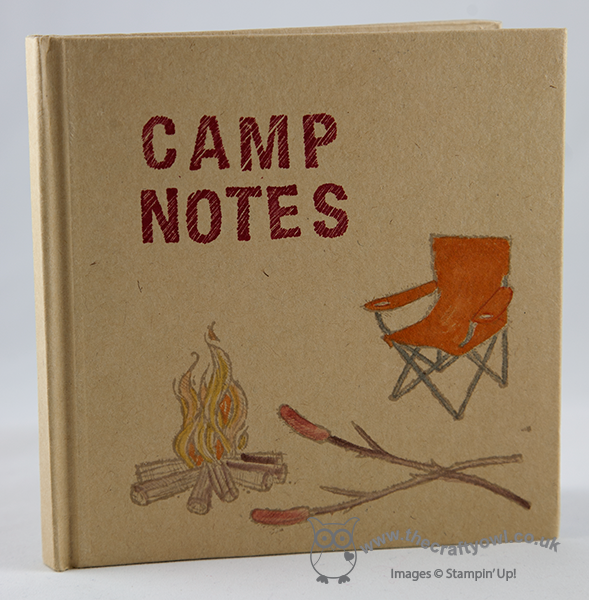
Anyway, today's share is a quick 'make' and birthday card with the 'Great Outdoors' stamp set. I play an active role in the Parents' Association at James Juniors' school and last weekend was the now annual Dads, Lads and Lasses Camping Weekend. No Mums allowed, except to help with the planning, organising and shopping beforehand! The weekend was choc-full of great activities: a treasure hunt, mini beast hunt, stargazing and campfire breadmaking to name but a few. Another of the activities was to create a mini camp journal; everyone had a mini journal to stamp, colour and decorate and the 'Great Outdoors' stamp set was just perfect for this. Here's the simple one I created to give the children some inspiration:
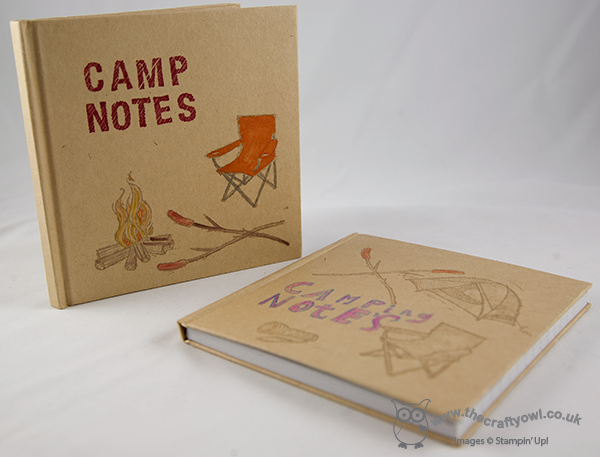
The children created some fantastic journals and filled them with tales and memories of their weekend. The photo at the end of the post shows Rebecca's 'work in progress' (and this is just the outside of the book!) alongside mine.

I have one other photo to show you from the weekend; not a great picture I'm afraid, but it was a last-minute one taken with my phone - shock, horror!! One of the young campers was celebrating his birthday on the Sunday, so I made a themed card for the children to sign collectively as a special way to remember how he spent his 7th birthday. Here it is: 

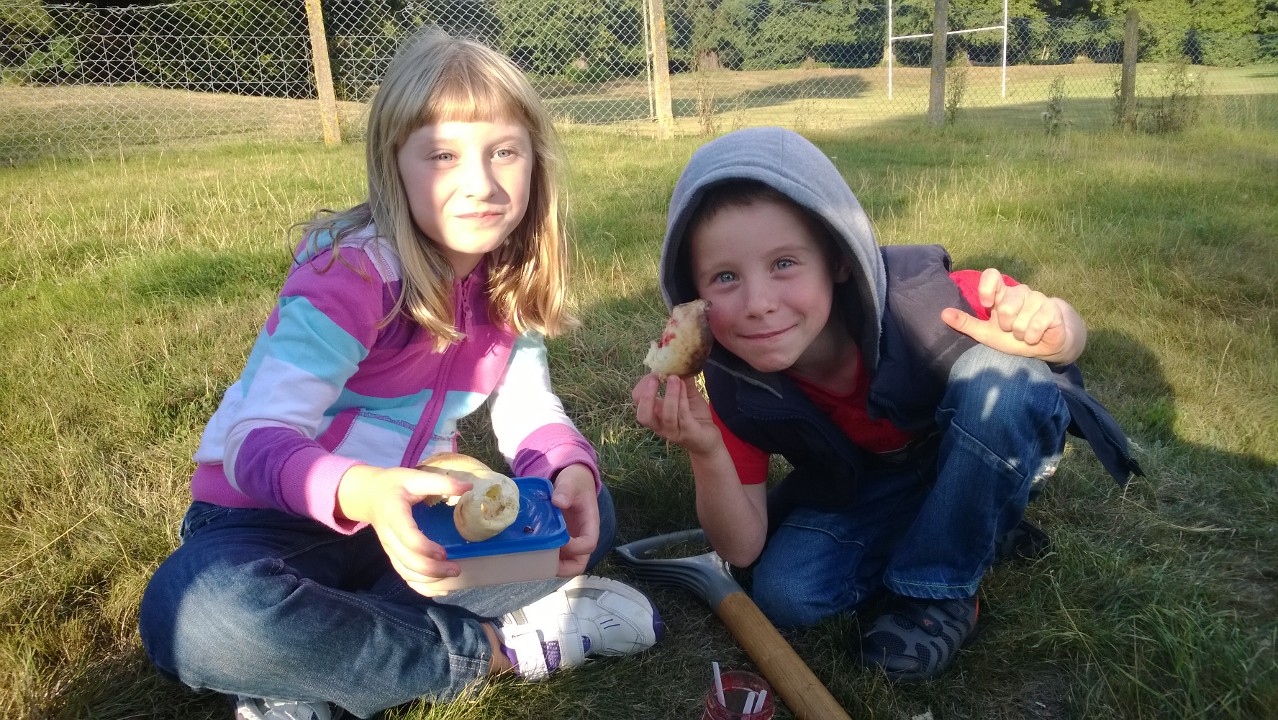
I made a mask to enable me to stamp the tents in a row and fussy-cut the campfire and popped it up on dimensionals. Lastly, here's a picture of my happy campers eating their campfire-baked bread with jam:
I will be back tomorrow with another of my recent cards; hopefully blog normality is about to be restored! Until then, happy stampin'!


Stampin' Up Supplies:

Stamps: The Great Outdoors, ABC-123 Sketch Alphabet, Memorable Moments

Cardstock: Whisper White, Old Olive

Ink/Stampin' Write Markers:  Old olive, Soft Sky, Cherry Cobbler, Pumpkin Pie, Daffodil Delight, Crumb Cake, Chocolate Chip

Tools: Scallop Circle Punch, Circle Punch
 

Christmas Ornament and Decorated Box

by Joanne James9. August 2013 22:13

Today I'm sharing the last of the projects we made at last weekend's Christmas workshop: a stamped clay ornament and a decorated kraft gift box to put it in. Here's a photograph of the ornament:

These clay ornaments have a natural finish and can be stamped straight onto the surface, without any additional preparation. As we were going all out for Christmas, once we had stamped our design onto the ornament we stamped the pattern again with Versamark, sprinkled with Heat and Stick Powder and heated with the heat gun, then sprinkled with Iridescent Ice glitter and heated once more. This gives the finished item a more muted colour and a lovely sparkle that catches the light.

We also decorated one of the lovely ready-made kraft boxes from the catalogue to go with it - here's the top of mine:

Together they would make a lovely gift for someone, if you could bear to part with them of course! I will be using mine to decorate my tree during the festive season, but I'm sure I can make another one or something else to go in the box! I hope you liked my first Christmas projects of the season - there will be lots more where this came from. If you would like to join any of my classes, do get in touch for more details; my September card classes will be featuring the Mosaic Madness stamp set and then from October we will be doing Christmas cards all the way through until the end of the year.

Back tomorrow with the first of the weekend birthday cards: my brother-in-law is celebrating his 'big 40' with a party tomorrow and then my own 'Baby James' will be 6 on Sunday, so I've a few birthday cards to share. Until then, happy stampin'!

Stampin' Up Supplies:

Stamps: Sweet Essentials, Four Seasons (hostess - retired)

Cardstock: Cherry Cobbler, Be of Good Cheer Designer Series Paper (retired)

Ink/Stampin' Write Markers: Real Red

Tools: Simply Scored, Big Shot, 1 1/4" Circle Punch, 7/8" and 1 3/4" Scallop Circle Punches, Merry Minis (star)

Finishing Touches: Champagne Glimmer Paper, 3/4" Cherry Cobbler Chevron Ribbon,  Cherry Cobbler 1/2" Scallop Dots Ribbon (retired)


Mini Catalogue

BROWSE THE CATALOGUE

The mini catalogue is now live! Read and download your copy here.

Shop Online

Access my online shop 24 x 7, 365 days of the year:

Current April hostess code:

VDKNV7BH

Shop Online

Join My Team

It's always a great time to join Stampin’ Up! New team members can get £130 worth of products for only £99 + free business supplies + free shipping + all the fun being a part of Stampin’ Up! Stampin' Up! has something for everyone: join my growing team and benefit from my support to enjoy Stampin' Up! however you choose.

If you're interested, call me for a chat to understand how I can help you realise your goals. Alternatively, if you have already decided to sign up and you just can't wait, please click here for the link to the online form where you can sign up and order your starter kit right away! 

Latest Kit!

Stampin Cut and Emboss

The Rock Legend Kit has all you need to make 8 cards with coordinating envelopes. Along with the new Panda Friends Kit, both are available from January 4th for just £14 each - get yours here!

2023-24 Annual Catalogue

BROWSE THE CATALOGUE

Click on the catalogue for a full list of current SU! supplies - if you would like to order any of the items featured, please drop me a line at [email protected] or give me a call on 07773 421446 - I'd be happy to help.

New Online Exclusives

There are new products available exclusively in the online store from 5 March - check them out here.

About Me

Hi I'm Joanne and live in Northampton and when I'm not looking after my husband and two beautiful children, am an avid crafter with a passion for all things Stampin' Up!

I must confess that I have never been a big rubber stamper - until I discovered Stampin' Up! that is. I love the fact that I can get such great results with co-ordinating stamps, inks, papers and punches - the possibilities are endless! Join me on my stamping journey as I share the things I love and be inspired to create amazing things yourself!

Follow Me

Monthly Newsletter

Box Builder

Click the button above to use Box Buster to create your custom box design using the Envelope Punch Board!

Kits Collection Now Available!

Stampin Cut and Emboss

The new Kits Collection from Stampin' Up! is now available!

Click here to see the current kits available and order yours online today.

I Design For


Stampin' Up Stuff

This is my personal blog and is not endorsed by Stampin’ Up! I hope you find it a plentiful source of ideas and personal inspiration but please don't copy my designs for contest submission or use for classes, publication or sale without express permission.