Father's Day Captain America Hero Card

by Joanne James14. June 2016 14:45

I'm back again! Apologies for yesterday's lack of blog post; at this time of year the last few weeks of the academic year are always busy, so it sometimes means my daily blog schedule is disrupted. Do bear with me - it's often not for want of things to share and more the time to write the posts, in amongst other commitments to my family, customers and team. There will always be posts to coincide with my design team commitments; there just might be the odd day when I don't make it to the laptop! Anyway today I do have a fun share that uses this week's colours over at The Paper Players again and the sketch layout at CAS Colours and Sketches:


My fellow Paper Player LeAnne, who chose this week's colours, also chose to use this sketch for her Sunday card (you can check it out along with the other Paper Player Team cards here) and whilst I was working on my team card, I also came up with this one that would make a fun last-minute Father's Day card:


I am using a few retired products on today's card, but you could quite easily substitute these with other similar products such as the scalloped tag topper punch, layered circle thinlits and an alternative alphabet stamp set such as the new Labeler Alphabet. Here's the low-down on today's card:

My Hero Captain America - The layered circle element on my card is inspired by the shield belonging to that all-American superhero Captain America. I used my circle framelits and the challenge colours, with a circle of silver foil card, to create my shield. I decided to make this card into a Father's Day card, but the sentiment could also be adapted for a younger boy's birthday card, which given the popularity of Marvel comic book heroes with my 8 year old and his friends currently is something I definitely need to look into!

Calling All Heroes - I used the Retired 'Calling All Heroes' stamp set for my custom sentiment on my tag; this comic book script adds just the right feel for my card. For my UK readers who might be thinking 'what set?' this set was available only in the USA. I was sent a set by the lovely LeAnne (thank you again!) and I knew that I would get lots of use from it with its fun comic book and superhero images. I also used other images from the set to decorate the inside of my card. For me it's a keeper!

It's In The Stars - Lastly, I punched a white star for the centre of my shield using the medium star punch and embossed the background panel for my cardfront using the Lucky Stars embossing folder to add texture and interest and tie in with my overall theme. 

Here is the visual summary of the key products used on today's project for you to pin for easy reference:


You can see all of my 'How To' summaries on my 'How To - Tips and Techniques' Pinterest board in case you've missed any. 

Enjoy your evening. I'm off to bake and ice some cupcakes for a very special birthday girl who will be celebrating tomorrow. I'll be back then with another project; until then, happy stampin'!


Stampin' Up! Supplies Used:

Table built using Product Table Builder by The Crafty Owl - Independent Stampin' Up! Demonstrator.

Swirly Bird World's Greatest Guy Sailing Card

by Joanne James6. June 2016 07:00

Happy Monday everyone! What a lovely day we had here in the UK yesterday - sunshine at last! I'm here bright and early this week as I have a busy one: two monthly technique classes today and tomorrow, my Project Life memory keeping class, a drop-in coffee and card session at Bells in Northampton and my Annual Catalogue Open House at the end of the week to look forward to, amongst other things! Today I'm back with another masculine card, this time for the colour challenge over at Pals Paper Arts:

Pals Paper Arts Color Challenge #PPA303

I thought these colours would suit a little ocean scene - I originally started out with the sketch I used for yesterday's card, but eventually my idea morphed into this:

Here's the low-down on today's card:

Sail Away With The Swirly Bird - It's official - I am in love with the Swirly Bird stamp set and co-ordinating thinlits! This bundle is definitely at the top of my list of favourite things from the new annual catalogue. It has flowers and birds, boats and kites and the splatters you see in the background behind my boat - such a fun set! I stamped my boat in Sahara Sand, then for the sails I stamped one in Night of Navy and the other in Mint Macaron (stamped off first) then overstamped the stripes in Night of Navy and clear heat embossed them for a lovely shine.

A Life on the Swirly Scribbles Ocean Wave - The sea on my card was made using a die from the co-ordinating Swirly Scribbles Thinlits: I cut it out of the top Mint Macaron layer, which was attached to my base layer with dimensionals, and paper-pieced the negative pieces into the space on my Night of Navy base layer. It's a little difficult to see in the photograph, but this gives a lovely added dimension to my rolling waves.

A Swirly Greatest Greeting - I wanted my sentiment to follow the curve of my cardstock, so I used my sentiment from the 'Greatest Greetings' stamp set and curved it to follow the contours of the cut line before adhering to my stamp and stamping it. This is much easier to do with photopolymer stamps, however since I hadn't adhered the word image to the back of the stamp it was a little more sticky than would otherwise have been the case and held in place on my block long enough for me to get a shaped image. I then finished this with some retired Mint Macaron It's My Party enamel dots. 

I love this fresh colour scheme and although my card features only the tiniest pieces of Sahara Sand for the hull of my sail boat, I think my design really makes the most of these colours.

Here is the visual summary of the key products used on today's project for you to pin for easy reference:

You can see all of my 'How To' summaries on my 'How To - Tips and Techniques' Pinterest board in case you've missed any. 

I'm off to get ready for my class. I'll be back tomorrow with another masculine project; until then, happy stampin'!


Stampin' Up! Supplies Used: 

Table built using Product Table Builder by The Crafty Owl - Independent Stampin' Up! Demonstrator.

Copper Embossed You're My Anchor Masculine Card

by Joanne James5. June 2016 09:00

It's Sunday and time for a new challenge over at The Paper Players! It's the turn of the super-talented Claire to host our challenge this week and she has a timely theme for you to play along with:


With only a couple of weeks to go until Father's Day, today's challenge is a great opportunity for you to get your cards made (and posted if necessary!) in a timely manner. For my card this week I debated with myself what stamps to use: old or new! In the end I ended up making not one but 3 cards, each using a different set. I will be sharing them all over the next three days so if you're in need of masculine inspiration be sure to check back for three very different cards, each of which would work for both Father's Day or a male/Dad's birthday.
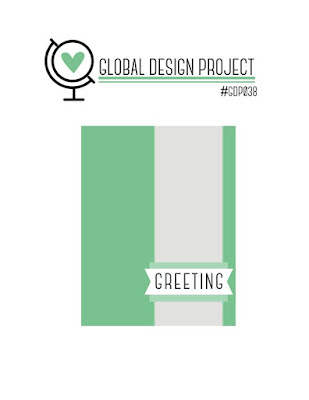
For today's card I used this week's sketch over at the Global Design Project and decided to go with one of my favourite existing masculine sets, Guy Greetings, along with some new product - copper embossing powder. Take a look:
 

Here's the low-down on today's card:

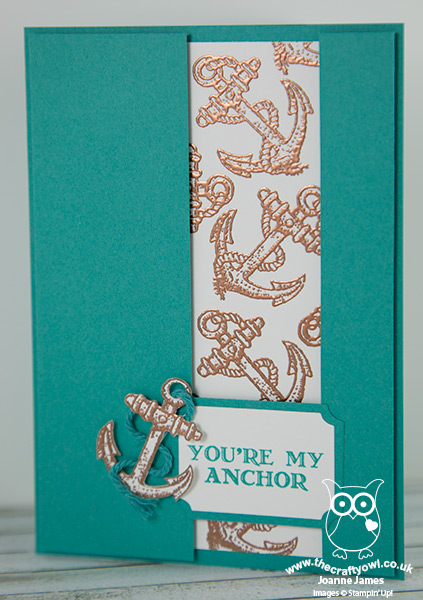
Add Shine With Copper - Heat embossing adds a 'wow' to any project and the new copper embossing powder is no exception. I stamped my anchors from the 'Guy Greetings' stamp set in Versamark onto a panel of Whisper White and heat embossed them in copper. Check out the lovely sheen that you get when the light bounces off it on my card above! I chose Bermuda Bay for the base and top split layer above my recessed anchor panel; it looks great with the copper and reminds me of the sea, so seemed appropriate for today's card. 

A Multi-Purpose Guy Greeting - I saved my 'Happy Father's Day' sentiment for the inside of my card and chose the anchor one for the front. It ties in with my visuals of course, but would also make this card a multi-purpose masculine card that could be used for other occasions too.

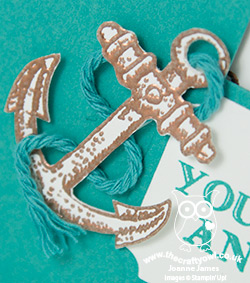
A Layered Label And Embellished Anchor - I used a layered label from the Tags & Labels Framelits set for my sentiment, modifying the mat as I wanted it to have a thinner border than the standard framelit size. This was easy to do: I just cut a standard sized one, then cut it again to remove a slice off two of the four sides. To finish I embossed another anchor in copper, then fussy cut it by hand, removing the rope pieces. I then took some thick Bermuda Bay baker's twine and wrapped it around the anchor where the embossed rope would have been and secured it in place with glue dots. You can see it in more detail in the thumbnail at the top of today's post.

Here is the visual summary of the key products used on today's project for you to pin for easy reference:
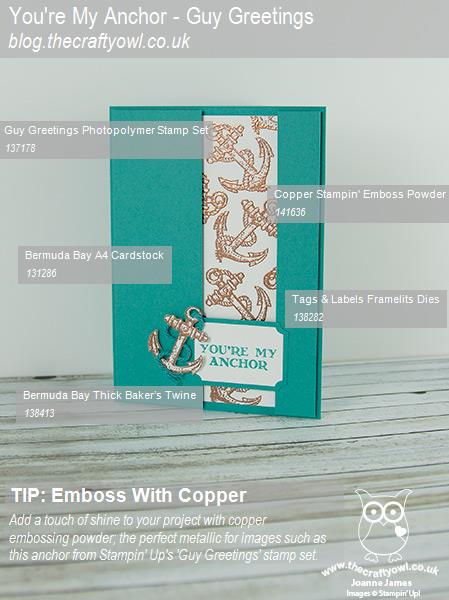
 

You can see all of my 'How To' summaries on my 'How To - Tips and Techniques' Pinterest board in case you've missed any. 

Before you reach for your ink and papers, check out what our amazing team has created to inspire you this week:

The Paper Players Design Team
 
 
Here's a quick recap of our challenge rules:
 
1.  Create a new paper project
2.  Upload your creation to your blog with a link back to us and provide a direct link to the post featuring your challenge submission.
3.  Please link your card to no more than four challenges, TOTAL.
4.  Have FUN! 


I look forward to seeing your masculine creations in our gallery this week. The weather hasn't been great here this week, however yesterday was a little warmer and today is forecast the same, so I'm looking forward to a BBQ lunch in the garden - doesn't food always taste better if eaten in the open air? I think so! Then I'm hoping to spend some time in the afternoon preparing for my Annual Catalogue Open House on Friday later this week. I hope you enjoy your Sunday too.

I'll be back tomorrow with another masculine project; until then, happy stampin'!


Stampin' Up! Supplies Used: 

Table built using Product Table Builder by The Crafty Owl - Independent Stampin' Up! Demonstrator.

Sea Street Nautical Colour Block Card

by Joanne James17. May 2016 07:30

A quick post from me today with a great clean and simple card for the man in your life! My card today was inspired by the inspiration photo over at Fusion and the sketch over at CAS Colours and Sketches:


I love the nautical-themed inspiration photo and knew just the thing to make it work with the sketch - take a look:

Here's the low-down on today's card:

Blocks of Primary Colour - To keep a 'clean and simple' feel to my card, I restricted myself to a red, white and blue colour palette. These three colours also reinforce the nautical feel of my card. I popped these coloured pieces up on dimensionals to emphasise the diagonal channel. Here's my colour palette if you'd like to save it:


A Diagonal Slant - The diagonals on the sketch were perfect to showcase two rows of nautical flags from the 'Sea Street' stamp set that I still had out n my desk after making yesterday's project.

A Big, Bold Happy Birthday - I finished my card with a big 'Happy Birthday' from the retiring hostess set 'Happy Birthday Everyone'. Such a great sentiment set - I'll be sorry to see this one go!

Here is the visual summary of the key products used on today's project for you to pin for easy reference:


You can see all of my 'How To' summaries on my 'How To - Tips and Techniques' Pinterest board in case you've missed any. 

That's all from me today; I have another busy day planned with a team meeting and networking event on the cards. back tomorrow with another project. Until then, happy stampin'!


Stampin' Up! Supplies Used:

Table built using Product Table Builder by The Crafty Owl - Independent Stampin' Up! Demonstrator.

Masculine Mini Treat Bag Thinlit Card and Self-Closing Gift Bag Punch Board Bag

by Joanne James7. June 2015 10:00

Yay it's Sunday and time for a new challenge over at The Paper Players - and this week I'm the hostess! With Father's Day approaching, I thought that masculine cards would make a great theme this week and it would at least encourage me to be organised!

I have lots of photos to share with you today, as I made not just one but two projects: a fun card using the mini treat bag thinlits and a matching gift bag using my new Gift Bag Punch Board - oh how I love this!

So first to my card: I've seen a few of these fun cards on Pinterest using the Mini Treat Bag Thinlits Die to create a fancy shirt with a sliding insert (one of my favourites is this one by Julie Kettlewell) and have been wanting to have a go at creating my own version for a while. Here it is: 

I have used the now retired Adventure Bound DSP for my card - this paper is just so fabulous for masculine cards and I hope you all stocked up before it retired! The Mini Treat Bag Thinlits are great for making simple slider cards as well as treat bags; I added silver buttons, a pocket punched with my hexagon punch and with a snippet of Island Indigo chevron ribbon in for a handkerchief. For my insert, I cut it taller than my pocket, then snipped in a third of the way each side to create my turned down collar and added my bow tie. The picture below shows the insert with my stamped sentiment from the 'Guy Greetings' stamp set and a pair of shoes to finish off this dapper outfit:

Pleased as I was with this cute little card, I couldn't stop there; I had to create a matching gift bag using my new Gift Bag Punch Board. I think this is going to be one of my new favourite tools - it is so easy to use and offers so many creative possibilities that go beyond the constraints of the board. Here is my bag:

I made my bag using the 'L' measurements on the board and used a sheet of Whisper White cardstock measuring 9 1/2" x 12". Once I'd punched the bottom according to the board instructions, I flipped it around and did the same on the other end, cutting away all except the long flap on the back of the bag, which I then also punched in the middle to create my collar. I then used the collar as the close mechanism for my bag, by tucking it underneath the bow tie - the photo below of the open bag illustrates that more clearly:

I then added two pieces of DSP with co-ordinating lapels and a large silver button threaded with a piece of white jute ribbon trim to finish my bag. Here are both items together:

I'm really pleased with this project duo; the gift bag is large enough for a couple of pairs of socks, some toiletries, a sweet treat (or two!) - pretty much anything that might be on a Dad's wish list. I hope you like them too and they inspire you to create some fun masculine projects this week! Before you reach for your ink and papers, check out what our amazing team has created to inspire you this week, including our three new guest designers:

The Paper Players Design Team
 
 
Here's a quick recap of our challenge rules:
 
1.  Create a new paper project
2.  Upload your creation to your blog with a link back to us and provide a direct link to the post featuring your challenge submission.
3.  Please link your card to no more than three challenges, TOTAL.
4.  Have FUN! 

I look forward to seeing your masculine creations in the gallery this week. I'm off to finish preparations for this week's technique classes and tackle my mountain of ironing. How does the saying go - no rest for the wicked?!

Back tomorrow with another project; until then, happy stampin'!


Stampin' Up! Supplies Used:

Table built using Product Table Builder by The Crafty Owl - Independent Stampin' Up! Demonstrator.


Guy Greetings Strong Man Card

by Joanne James2. June 2015 17:17

It's been all busy here at the James' today: I have had the first of my Stampin' Up! Annual Catalogue Launch Open House sessions and enjoyed welcoming lots of guests to share in the delights of the new catalogue. More on that later in the week, meanwhile for all you lovely blog readers I have a card that I made for a few challenges today: CAS(E) This Sketch, CAS-ual Fridays who are calling for use of tan, white and one bright colour and Less Is More, where they are looking for two legs or four:


So with all that in mind and Fathers Day just around the corner, here is today's card:


I thought the sketch was an interesting one and whilst my choice of two legs might not seem altogether adventurous, this is the only stamp in my Guy Greetings stamp set that I haven't inked up to date since as much as I love the set, I'm not sure about this fella! I did all my stamping in Soft Suede, stamping the man again on Tangerine Tango cardstock and fussy cutting out his trousers and paper piecing them onto my card base. The arrows I used with my sentiment are from an old photopolymer set (can't remember the name) and I popped the 'DAD' onto a small punched oval over some Tangerine Tango baker's twine for a little more added colour and emphasis. 

That's all from me for today; I'll be back tomorrow with a card for this week's new challenge over at Create With Connie and Mary using a brand new stamp set, so do pop back as you're not going to want to miss it. until then, happy stampin'!


Stampin' Up! Supplies Used:

Table built using Product Table Builder by The Crafty Owl - Independent Stampin' Up! Demonstrator.


Tags: , , , , , , ,

Cards | Stamping

To A Classic Masculine Card

by Joanne James3. May 2015 10:00

It's Sunday and time for a new challenge over at The Paper Players. There were some great takes on Anne's sketch last week and today we are kicking off with a challenge from the talented Sandy, who has chosen a great theme for you to play along with this week:


I used this week's layout over at Mojo Monday as the basis for my card (although I didn't go tall and skinny!). As soon as I knew Sandy's theme this week, I knew immediately that I wanted to do something using the vintage car in the 'Guy Greetings' stamp set. Here's what I came up with:

I decided the layout was perfect for showcasing some of the fabulous masculine patterned papers in the 'Adventure Bound' DSP stack too and used the plaid paper as the inspiration for my colour scheme. The base and mat layers are Smoky Slate, with a layer of Island indigo in between along with a band in the same colour across the front of the card, which I tied with a piece of thread split from the white jute ribbon in the current Occasions catalogue. I then used my piece of DSP for the vertical panel and stamped my car in Island Indigo onto a 2" punched circle of Whisper White, with the sentiment stamped in the same colour onto a banner of Smoky Slate, which I then laid over the top.

A great masculine card that could be paired with any of the other sentiments in the same stamp set for a special husband, dad or grandad, and would be suitable for a birthday or Father's Day alike. 

So before you reach for your paper and inks, check out what our amazing team has created to inspire you this week:

The Paper Players Design Team
 
Here's a quick recap of our challenge rules:
 
1.  Create a new paper project
2.  Upload your creation to your blog with a link back to us and provide a direct link to the post featuring your challenge submission.
3.  Please link your card to no more than three challenges, TOTAL.
4.  Have FUN! 

I look forward to seeing how many different modes of transport get into the gallery this week. I'm off to enjoy a nice long Bank Holiday weekend here in the UK - let's hope the sun shines!

Back tomorrow with another project; until then, happy stampin'!


Stampin' Up! Supplies Used:

Table built using Product Table Builder by The Crafty Owl - Independent Stampin' Up! Demonstrator.


You're My Anchor Masculine Monochromatic Card

by Joanne James28. April 2015 09:00

So today I'm sharing a card that I made for this week's Pals Paper Arts challenge, where they have a great sketch for us this week:


The minute I saw this sketch, I knew exactly what I wanted to do with it. In my quest to use up some of my retiring DSP, I knew that the anchor stamp in the 'Guy Greetings' stamp set would work perfectly with some of the papers in the Maritime DSP set, specifically the navy rope and red anchor paper. I decided upon a 5 1/2" square card and I set to work, although my card didn't quite work out as I initially planned. Let me show you my card and then I'll share the story:

My initial intention had been to use the rope paper as you see above, but flip it for the second section and use the red anchor pattern on the reverse. But after much flipping, trimming and trading of circle mounts for my anchor, I ended up unable to make the patterns work together. They just didn't look right to me and the sentiment banner I had cut interfered with my anchor too much, so I decided to ditch the red and use a plain panel of Night of Navy and heat emboss my sentiment onto it directly in white, leaving my embossed anchor uncluttered and the rope pattern beautifully showcased. As I stood back to admire my handiwork and did a check back to the sketch, I realised that my card is a virtual case of Brian King's Design Team card for the challenge which you can see here - oh dear! This wasn't conscious, although I've shared my love of Brian's work on my blog here before and I am so drawn to his clean and uncluttered style. So I'm hoping he will take it as a compliment and the Pals will allow my linkup as an example of a card truly inspired by a member of their DT this week!

Back tomorrow with a new set of Wednesday Weekly Deals and another project. Until then, happy stampin'!


Stampin' Up! Supplies Used:

Table built using Product Table Builder by The Crafty Owl - Independent Stampin' Up! Demonstrator.
 

Tags: , , , , , , , , ,

Cards

Teenager Cards Made Easy with My Digital Studio

by Joanne James3. March 2015 15:00

Today I have something a little different for you! The current challenge over at SUO Challenges is 'Cards For Teens', sometimes a tricky group to create for. Most of the children's cards I create are for the under-10s so I wouldn't consider my self experienced in this field at all although having purchased an e-cutter recently and looking through My Digital Studio for inspiration, I discovered a stamp that is perfect for a birthday card for male teens that ultimately led me to make a few cards. Here's the first one:


Using Pacific Point as my base colour, I used the 'Extreme Skateboard' stamp image and converted it to a cut file which I then cut out of Basic Black cardstock using my e-cutter. Before adhering to my cardbase, I added some spatter and stripes in Memento Black ink and Encore Silver Metallic to create a grungy background. I also added a retired 'Awesome' stamp from the 'Cool Kid' set to this card.

For my second card, I used the negative space of the skateboarder to create a black card with a graduated rainbow sponged skateboarder behind and added some letters cut with my Little Letters thinlits to spell 'Cool' - something all teens think applies to them I think:

Finally, I used the cut skateboarder and adhered him to a sponged rainbow starburst background - I also stamped some black stars on top of this to add to the effect:

I love all of these cards, bit I think the bottom one is my favourite. It has an almost psychodelic feel. This is one of the projects that I submitted for the Convention Design Challenge in Brussels last November, although haven't shared until now. I gave the first card to my skateboard-mad 13 year old neighbour for his birthday and he pronounced it 'sick' - as I looked puzzled and slightly disappointed, he rushed to explain this was a good thing - apparently in teen-speak this is high praise! Clearly, what do I know!!!

If you struggle with teenage cards too, do check out the DT samples and the SUO gallery, where there's lots of teen inspiration.

Back tomorrow with a new set of Wednesday Weekly Deals and another project. Until then, happy stampin!


Stampin' Up! Supplies Used:

Table built using Product Table Builder by The Crafty Owl - Independent Stampin' Up! Demonstrator.


No One Else Could Fill These Shoes Masculine Card

by Joanne James25. February 2015 09:00

I have another monochromatic masculine card for you today - I still had the papers and stamp set out on my desk from yesterday's card and couldn't resist creating another sample using this week's sketch over at As You See It:

This is a great sketch for combining patterns or images and I had a few ideas as to how I was going to use it so don't be surprised if you see me use it again. For today though, it's all about the shoes - take a look at my card and you'll see what I mean:


I used Very Vanilla as my base and this time a piece of checked Typeset paper on black for my panels, then I narrowed the four square elements of the sketch so that I could fit in four pairs of shoes - you can never have too many pairs of shoes, right?! A stapled banner sentiment, some wide chevron ribbon and some funky shoe laces to highlight one of the pairs of shoes and done!

Making this card reminded me of the Robert Redford/Michelle Pfeiffer movie "Up Close & Personal" - such a great movie, but the scene where she sees his shoes with the red laces at the end ... if you haven't seen it, I won't spoil it for you, but if you're an old-fashioned romantic I can highly recommend it - just don't forget the tissues!

Back tomorrow with another project; until then, happy stampin'!


Stampin' Up! Supplies Used:

Table built using Product Table Builder by The Crafty Owl - Independent Stampin' Up! Demonstrator.


Tags: , , , , , ,

Cards | Stamping

New Online Exclusives

There are new products available exclusively in the online store from 5 November - check them out here.

Latest Kits!

Stampin Cut and Emboss

The Layered Landscapes Kit and Nature's Paintings Kit are the latest kits in the online store - get yours here!

Shop Online

Access my online shop 24 x 7, 365 days of the year:

Current November hostess code:

9NKXDTTR

Shop Online

Mini Catalogue

BROWSE THE CATALOGUE

'Tis The Season - the new Stampin' Up! Mini Catalogue is here! For more details and to download your copy click here

Scrapbooking

Stampin' Up! has introduced a new range of 12x12" scrapbooking product and kit - the full range is now available to purchase online. To download a copy of the new digital Scrapbooking Catalogue click here.

2024-25 Annual Catalogue

BROWSE THE CATALOGUE

Click on the image to download your copy of the 2024-25 annual catalogue. For a full list of current SU! supplies, go to my online store. If you would like any help or advice, please drop me a line at joanne@thecraftyowl.co.uk or give me a call on 07773 421446 - I'd be happy to help.

Join My Team

It's always a great time to join Stampin’ Up! During October you can get even more in your starter kit! New team members can get £160 worth of products for only £99 + free business supplies + free shipping + all the fun being a part of Stampin’ Up! Stampin' Up! has something for everyone: join my growing team and benefit from my support to enjoy Stampin' Up! however you choose.

If you're interested, call me for a chat to understand how I can help you realise your goals. Alternatively, if you have already decided to sign up and you just can't wait, please click here for the link to the online form where you can sign up and order your starter kit right away! 

About Me

Hi I'm Joanne and live in Northampton and when I'm not looking after my husband and two beautiful children, am an avid crafter with a passion for all things Stampin' Up!

I must confess that I have never been a big rubber stamper - until I discovered Stampin' Up! that is. I love the fact that I can get such great results with co-ordinating stamps, inks, papers and punches - the possibilities are endless! Join me on my stamping journey as I share the things I love and be inspired to create amazing things yourself!

Follow Me

Monthly Newsletter

Box Builder

Click the button above to use Box Buster to create your custom box design using the Envelope Punch Board!

Kits Collection Now Available!

Stampin Cut and Emboss

The new Kits Collection from Stampin' Up! is now available!

Click here to see the current kits available and order yours online today.

I Design For


Stampin' Up Stuff

This is my personal blog and is not endorsed by Stampin’ Up! I hope you find it a plentiful source of ideas and personal inspiration but please don't copy my designs for contest submission or use for classes, publication or sale without express permission.