by Joanne James27. May 2016 08:00
Happy Friday everyone! Today I'm sharing a card that I made in my shaker card technique class that featured the Hearth & Home Thinlits at the back end of last year:
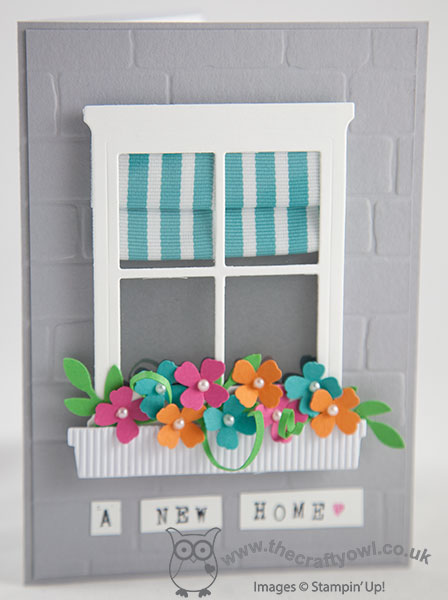
So long ago I know, and whilst some of the products on this card are retiring (namely the flower and bird punches, the Alphabet Rotary Stamp and the ribbon), the Hearth & Home Thinlits are staying so it's still worth a share! Not only that, but the new Foam Adhesive Strips that are coming in the new catalogue will make this kind of card a breeze.
This one isn't a shaker card; I made a little video tutorial to show how I created my colourful roman blind window treatment and have finally got around to editing it, so here it is:
I'm so glad the Hearth & Home Thinlits are staying, they really are so useful. I'm looking forward to seeing what new ribbons are coming our way to see how I can give my next window a makeover!
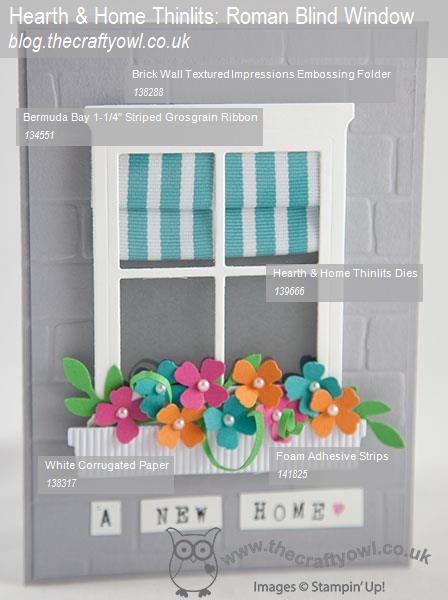
Here is the visual summary of the key products used on today's project for you to pin for easy reference:
You can see all of my 'How To' summaries on my 'How To - Tips and Techniques' Pinterest board in case you've missed any.
That's all from me today; back tomorrow with another project. Until then, happy stampin'!
Stampin' Up! Supplies Used:
cdc2776c-8413-4e72-b849-6214b15b5101|0|.0|96d5b379-7e1d-4dac-a6ba-1e50db561b04
Tags: Alphabet Rotary Stamp, Classes, Hearth and Home, New Home, Itty Bitty Accents Punch Pack, bird builder punch, Brick Wall TIEF, Stampin' Up, Stampin' Up Card, Stampin' Up Card ideas, Stampin' Up Supplies
Cards | Shop Online | Stamping | Video Tutorials
by Joanne James23. October 2015 21:24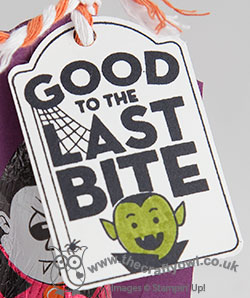
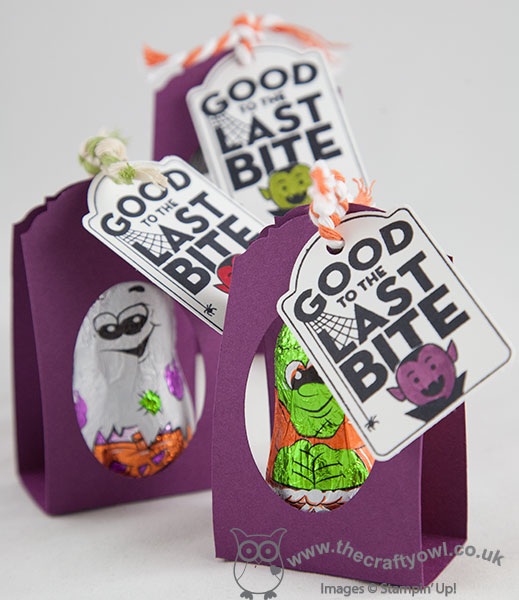
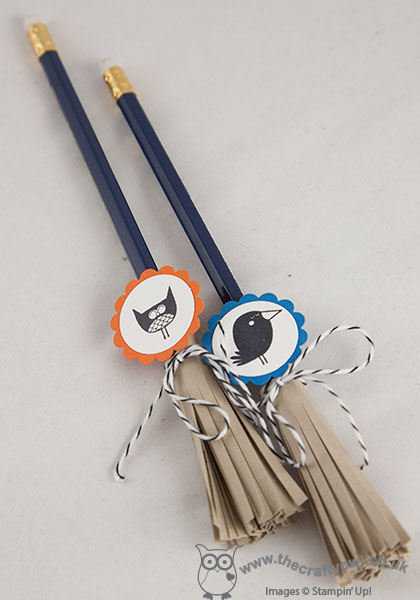
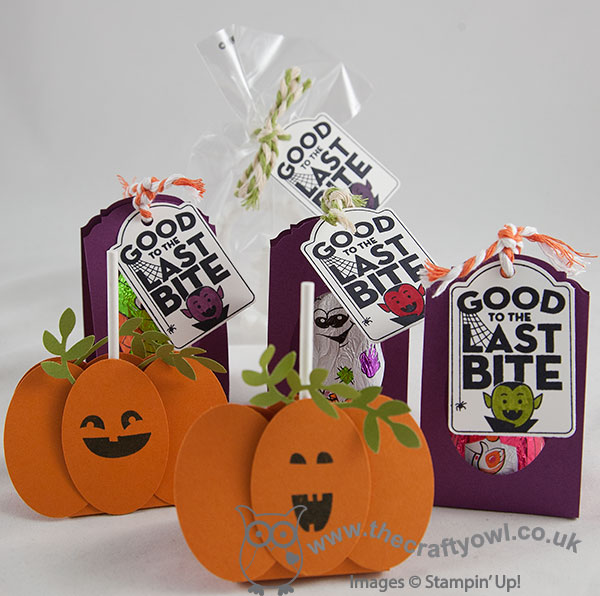
A quick post today to share some fun little Halloween treats that I've been preparing for a fundraiser that I'm attending next week. A friend of mine is raising funds for the Outspan School in Uganda where she sponsors a student and she invited me along to do a little crafting with the children and raise a few pennies.
We will be making a selection of sweet treats and fun Halloween favours, some of which I've shared with you before, such as these fun Halloween chocolate characters, with their Merry Everything Note Tag punched tags:
Some broomstick pencils, made with fringe scissor toppers:
Along with some pumpkin lollipops, made with the oval punch and some bird punch leaves:

A fun selection of treats that I'm sure we will have lots of fun making.
Back tomorrow with another project; until then, happy stampin'!
Stampin' Up! Supplies Used:
bc400e84-9d12-4654-a86b-91f284361968|0|.0|96d5b379-7e1d-4dac-a6ba-1e50db561b04
Tags: Halloween, On Point TIEF, Ornate Tag Topper Punch, Merry Everything, Note Tag Punch, bird builder punch, Fringe Scissors, Shop online, Shop Stampin' Up online, Stampin' Up, Stampin' Up Card, Stampin' Up Card ideas, Stampin' Up Supplies
Cards | Shop Online | Stamping
by Joanne James21. October 2015 21:30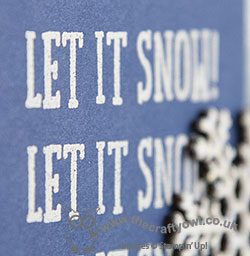
Just time to sneak in a creative post today with a couple of cards for this week's CAS(E) This Sketch Challenge. They have a great sketch this week and I managed to make not one but two cards (and will be using this layout for a couple more too!). Here's the sketch:

I wanted to make a Christmas card and whilst originally I had planned on an execution to my second card below, I was inspired byChrissy's card on the CAS(E) This Sketch design team and decided to take a slightly different tack and use some Designer Series Paper and a layer - here's my card:
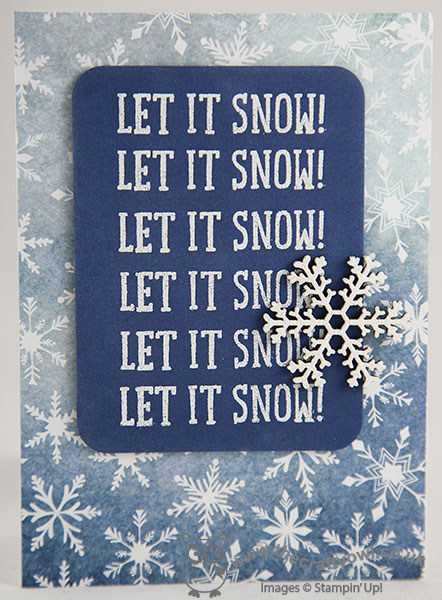
I covered the front of my extra thick Whisper White cardstock base with a piece of snowflake-patterned Season of Cheer DSP and made a panel out of Night of Navy, cut out with my Project Life framelit and Big Shot, and repeatedly stamped the ' Let it snow!' sentiment from the 'Snow Place' stamp set in Versamark and heat embossed it in white. To finish I took a Snowflake Elements embellishment, stamped it in White kraft ink and heat embossed it in white, then stamped it again in Versamark and heat embossed it in Iridescent Ice to give it a wonderful sparkle. This snowflake DSP is one of my favourites in the Season of Cheer pack - I love the ombre effect of the finish and those snowflake embellishments are gorgeous, whether left plain or jazzed up a little as I did here. The photo doesn't show just how wonderfully sparkly the snowflake is in real life - it's really something!
For my second card I went with an every day card and decided to make something bright and colourful:
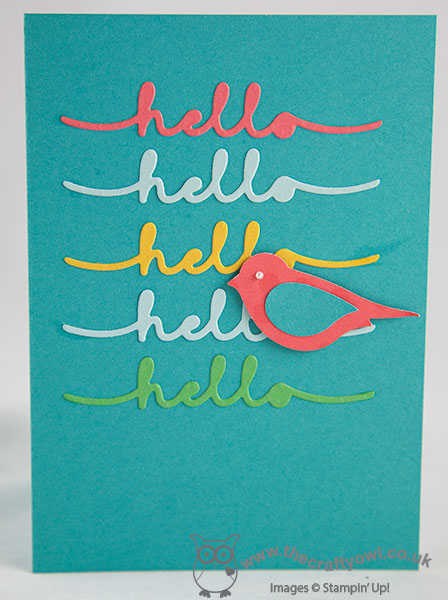
I used a Bermuda Bay card base and I took my colour inspiration from the Cherry on Top DSP stack of papers. I created my repeated 'Hello' sentiment using my Greetings thinlits. I decided to add a simple punched bird as my embellishment this time, punched from a piece of Watermelon Wonder Color Me Irresistible Specialty DSP - you can't really see it in the photo, but I love the subtle embossed pattern this adds in real life - and a little Bermuda Bay wing.
Two very different takes on this week's sketch - do let me know which one you prefer in the comments below! Back tomorrow with my card for this week's new challenge over at Create With Connie and Mary. Until then, happy stampin'!
Stampin' Up! Supplies Used:
9afbb0a1-8674-442f-9725-656a3f685780|0|.0|96d5b379-7e1d-4dac-a6ba-1e50db561b04
Tags: Big Shot, bird builder punch, Greetings Thinlits, Christmas, Snow Place, Snowflake Elements, Shop online, Shop Stampin' Up online, Season Of Cheer, Stampin' Up, Stampin' Up Card, Stampin' Up Card ideas, Stampin' Up Supplies
Cards | Shop Online | Stamping
by Joanne James20. October 2015 22:27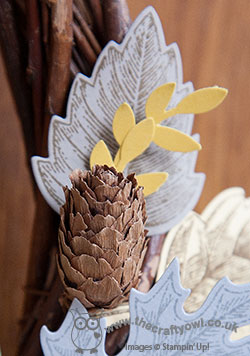
I've had a busy day today with my 'Shake It Up!' Children's Craft Class making the shaker cards featured in the 'To You And Yours Shaker Cards Project Kit'. We all had tremendous fun and made lots of great cards. I'll share a picture from our class at the end of today's post, however in the meantime my blog project to share with you today is the one that my Facebook followers had a sneak peek of last week that I made with a lovely group of ladies - our Autumn leaf wreaths. We based our design on this one created by Stampin' Up! Artisan Designer Alison Okamitsu; I made a large wreath like Alison's to hang on my front door and the ladies liked it so much they wanted to create a similar, smaller version - here is ours:
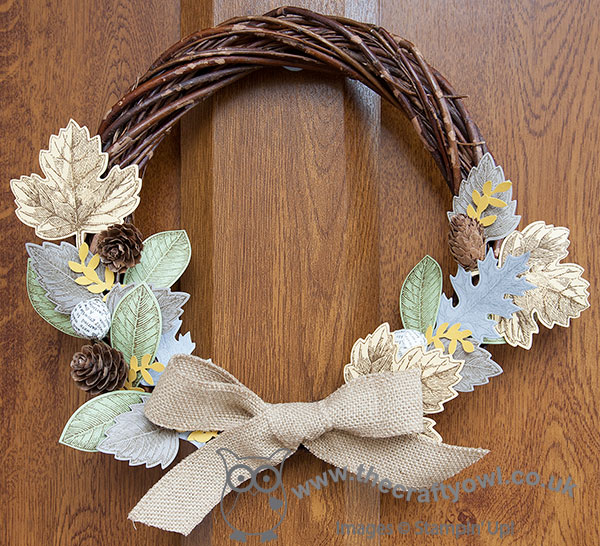
We used a selection of muted colours and the wonderful Vintage Leaves stamp set and cut out the leaves using our Big Shot and co-ordinating Leaflets Framelits (one of the catalogue 15% off bundles if you are a bargain-hunter!), some pinecones, a few leaves punched with the bird builder punch and a burlap bow to finish. Isn't that pretty? The ladies were all so very pleased with their wreaths and their stamping as this is something of a first for them!
This was a private class that I held for a group of like-minded friends who often invite me to run a class just for them. If you have a group of friends that you would like to arrange a crafty get-together with, or would simply like to join in with one of my existing scheduled classes, then do get in touch - I would love to hear from you! Don't forget the offer of additional Stampin' rewards is also still valid until the 9th November - party sales of £200 or more will earn an extra 3% of Stampin' Rewards (formerly known as Hostess Credits) so if you have a long wish list, I've still a few slots left so contact me to book your party today!
Before I go, let me share a photo of the James Juniors proudly displaying their handiwork from this morning's class:
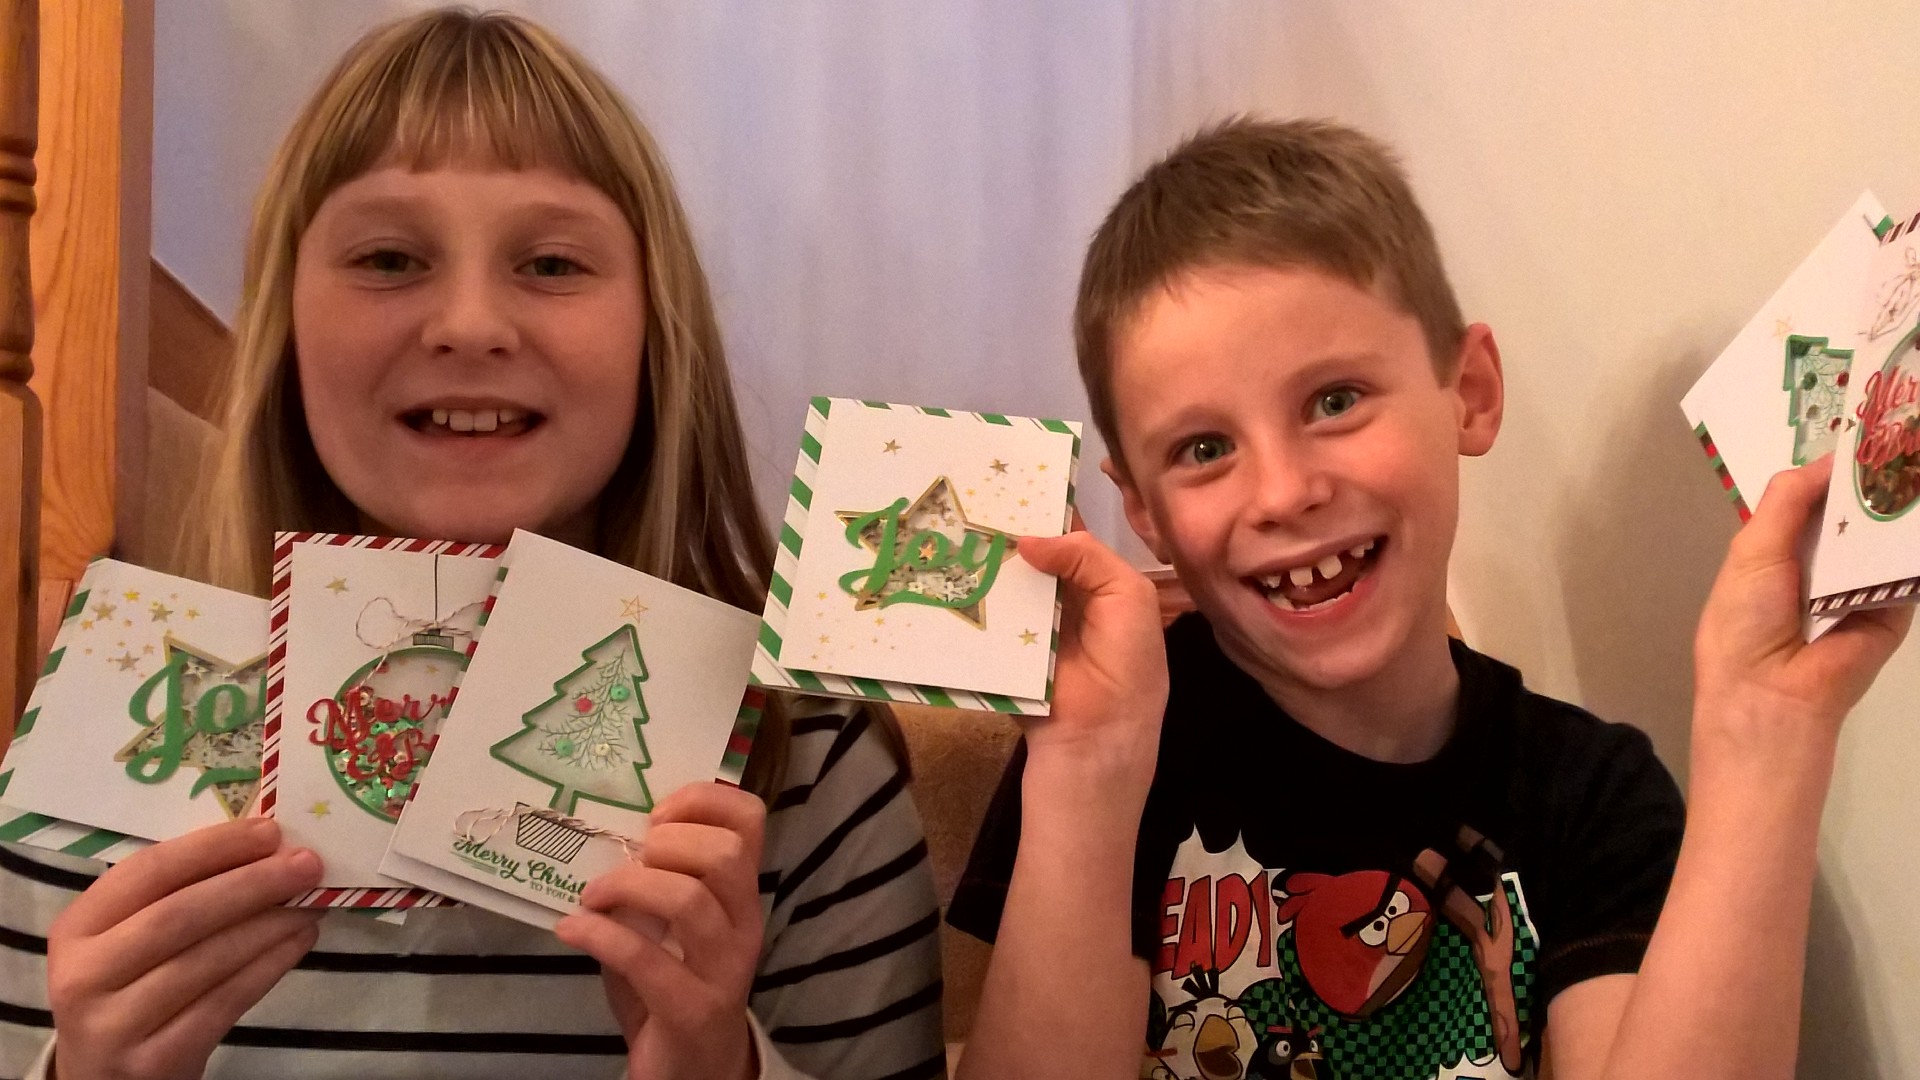
Like mother, like daughter (and son!) as the saying goes - what else can I possibly add?!
Back tomorrow with another project; until then, happy stampin'!
Stampin' Up! Supplies Used:
2b67097e-46e3-44ed-acb4-608b6cab4e8c|0|.0|96d5b379-7e1d-4dac-a6ba-1e50db561b04
Tags: 3D Projects, Wreaths, Vintage Leaves, Leaflets Framelits, Big Shot, Autumn, bird builder punch, Shop online, Shop Stampin' Up online, Stampin' Up, Stampin' Up Card, Stampin' Up Card ideas, Stampin' Up Supplies, To You And Yours Shaker Cards Project Kit, Children's Craft Groups, Children's parties, Christmas
3D Projects | Cards | Children's Parties | Classes | Shop Online | Stamping
by Joanne James5. August 2014 19:54Well, it's been a little colder here in the UK today and we've had a fair amount of rain, which has kept us largely indoors for most of the day, but we made the most of it with some early morning baking (chocolate chip muffins - yum!), an indoor picnic and a pleasant few hours catching up with friends so all in all not a bad Tuesday.
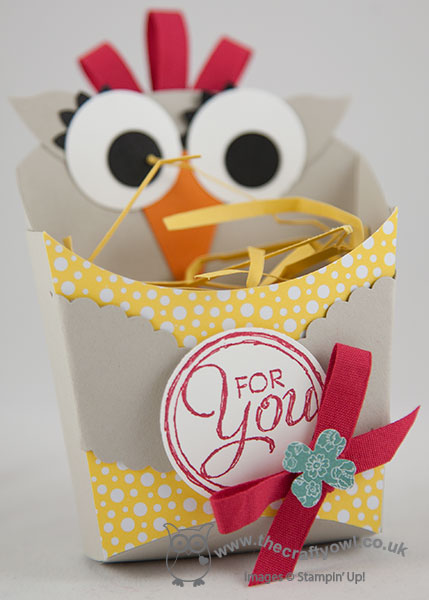
Today I thought I would share another 3D project with you - a cute little owl gift box made using the Fry Box Bigz L Die that we made at our last team training session. Check out this cute little fella:
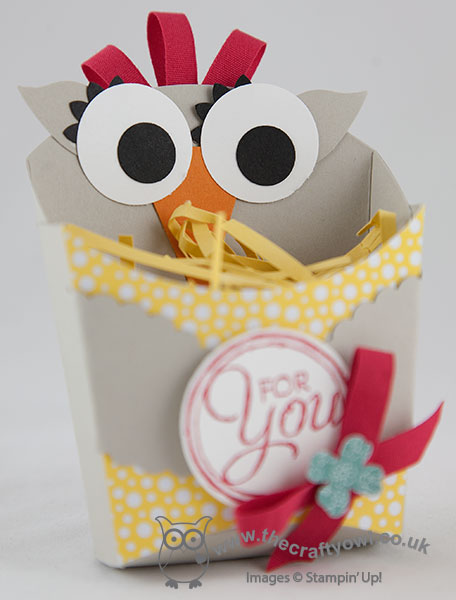
As 'The Crafty Owl', I was always going to like this cheeky chap, but the die itself has so many dress-up possibilities! The owl was so easy to make: the front of the box was covered with a piece of All Abloom DSP, then some black and white circles punched with the 1/2" and 1" circle punches, black eyelashes using the largest flower from the Boho Blossoms punch, ears from the Bird Builder punch and a Pumpkin Pie triangle nose from the Petite Pennants Builder punch then some Sahara Sand Scallop Ovals for wings. Some 1/4" red cotton ribbon was used to create a little plume of feathers and to tie a bow to adorn the 'For You' stamped greeting from the Chalk Talk stamp set, which was finally finished with a punched flower. Some filling was cut from yellow cardstock using the fringe scissors to support the box contents.
These fry boxes are the perfect size for a little gift or a few chocolates - look out for lots more variations on this in future posts.
Back tomorrow with the new weekly deals and my Design Team card for this week's challenge over at Colour Me...!
Until then, happy stampin'!
Stampin' Up! Supplies Used:
20e4e93b-5cc9-4ed2-824e-6c82962164c9|0|.0|96d5b379-7e1d-4dac-a6ba-1e50db561b04
Tags: 3D Projects, boxes, Fry Box Bigz L Die, Chalk Talk, circle punch, Itty Bitty Accents Punch Pack, Scallop Oval Punch, Boho Blossoms, bird builder punch, Petite Pennants Builder, All Abloom, Fringe Scissors, Shop online, Stampin' Up, Stampin' Up Supplies
3D Projects | Boxes
by Joanne James17. February 2014 21:26Today I've had the most fun day. I was privileged to be invited to run a Crafty Owl birthday party for a 10 year old and her classmates, which was great fun. We made some wall art and they had a fun time punching shapes and using the Big Shot to create their masterpieces. When I run a craft party, I always create a punch art kit for the party bags so that the children can continue the crafty fun at home. For today's party, the birthday girl loves horses so I knew that a pony needed to feature on my card. I had a quick surf on Pinterest for some general inspiration then set to work creating my card. This is what I came up with:
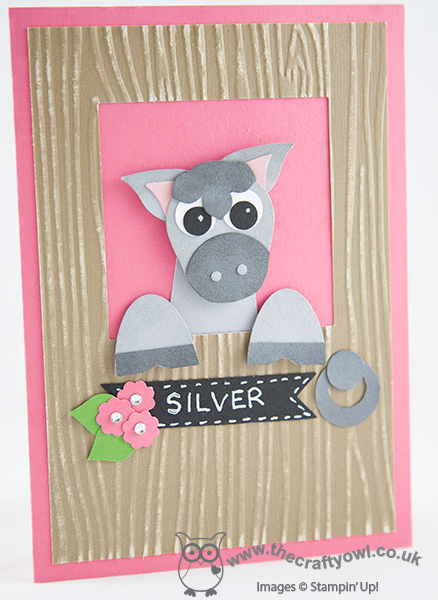
I used a variety of punches to create my card (see full list below) and some Core d'inations cardstock embossed with the woodgrain embossing folder to give texture to my stable door. I've always loved grey horses so made my card with a grey pony, but since my eight year-old informed me that this made it look like a donkey, the kits I made for the party girls all had brown horses to remove any doubt!
The girls loved their kits and I'm sure they will have had as much fun completing them as they did at the party itself. I'm linking today's card up with the challenge over at SUO Challenges where the theme this week is 'Punch Art', so this card fits perfectly.
I ended my day with a trip to the cinema to see the new Lego Movie; it was a great children's movie for half term and fulfilled one of Ben's main aims for the week, so all in all a good day was had by all.
Back tomorrow with another project; until then, happy stampin'!
Stampin' Up! Supplies Used:
45792198-643c-4601-ba20-b3a210ed6332|1|5.0|96d5b379-7e1d-4dac-a6ba-1e50db561b04
Tags: Big Shot, Owl Punch, bird builder punch, Bitty Banners Framelits, Itty Bitty Punches, Woodgrain TIEF, Merry Minis, Children's parties, Shop online, Stampin' Up, Stampin' Up Card, Stampin' Up Card ideas, Stampin' Up Supplies, Petite Petals Punch
Cards | Children's Parties | Host a Party | Punch Art
by Joanne James28. January 2014 22:06After all the news-related posts of the day, I thought I would share a quick creative post of a card I made using some of the new products that feature in the Stampin' Up! Spring-Summer catalogue released today. Today's card is my entry for this week's sketch challenge over at Create With Connie and Mary; last week I was delighted to be chosen as one of the 'Top 3 Picks' for the colour challenge with the card I featured here. This week's challenge is to design a card using the following sketch layout:

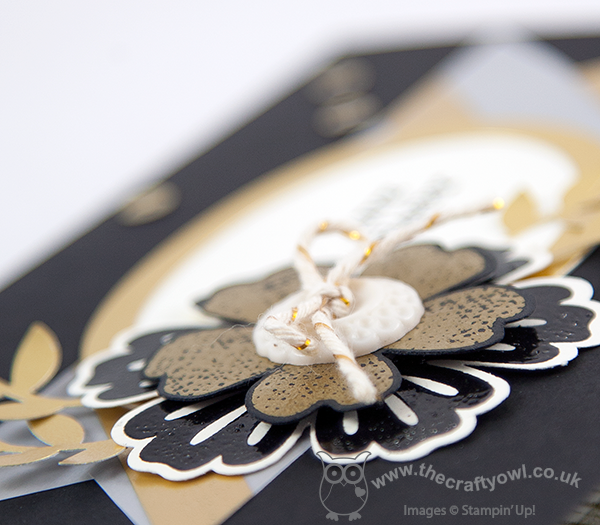
Here is my finished card:
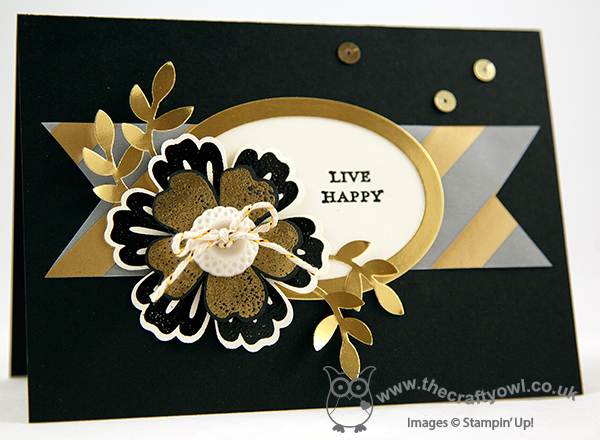
So if you were expecting spring pastels, I'm afraid you're already disappointed!! This card is something of a departure for me - I don't often use black as a card base, but I was inspired recently by this card created by Justin Krieger (check out his blog here - I love his style.) and decided that black would provide the perfect backdrop to showcase lots of the new gold products that feature in the new seasonal catalogue.
I stayed quite faithful to the sketch and edged my oval in gold foil and embellished with a layered flower using the Flower Shop and Mixed Bunch stamp sets. I embossed the bottom flower in black on Very Vanilla and the top layer in gold on black to give it a luxurious feel - the photo at the bottom of this post really shows the detail. I finished with a vintage button threaded with the new gold baker's twine and some gold foil leaves punched from my two step bird punch. The background banner is made from one of the gold vellum sheets, another new product; each pack contains 3 designs (it also includes a spot and a heart pattern) and I love them! I finished by adding my floating dots of gold sequins, which I removed from the thread so that I could use them individually. Oh and I almost forgot - the 'Live happy' sentiment is one of those included in the Sale-A-Bration stamp set, 'You're Lovely'.
I hope you like my card; if you would like to see what the designers and other participants did with this sketch, pop over to the CCMC page for more design inspiration.
Back tomorrow with a video tutorial for you and an exciting make using a new stamp set from the Spring-Summer seasonal catalogue. Until then, happy stampin'!
Stampin' Up! Supplies Used:
by Joanne James24. May 2013 21:19As promised, I'm back today with the last of the owl punch cards from this month's class. Our last card was another alternative use for this versatile punch; this time, to make a cute giraffe punch art card:
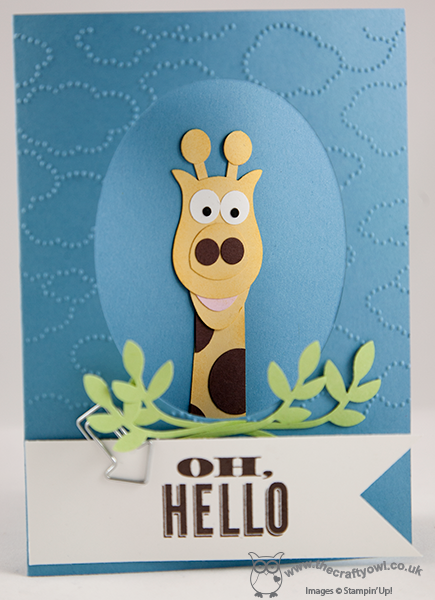
To make this card, the owl's body (minus his feet!) becomes the giraffe's head - clever, right?! We then used a variety of circle punches and the large oval punch to create the rest of him. The edges of the finished giraffe were sponged in So Saffron ink to add dimension and I placed him inside the card looking out, for added interest. The oval aperture was easy to make using an oval framelit and a few branches from the Bird Builder punch were added to give the giraffe something to munch on. I finished this card with embossed clouds and an 'Oh Hello' sentiment highlighted with a Cute Clip (love these!), but you could just as easily use a happy birthday greeting - I think this would make a lovely card for a little person.
I hope you like the finished card - there were a few interesting adaptations to this card by the ladies at my class: everything from hearts added to the sentiment banner to eyelashes on the giraffe. That's one of the things I love about teaching classes - whilst I scope out the original design, it can still be adapted or customised to make it individual to you. If you would like to attend my stamping classes, please do get in touch via joanne@thecraftyowl.co.uk for more details. Next month's class is a One Sheet Wonder class using the Secret Garden stamp set and framelits.
Back tomorrow with another project - until then, happy stampin'!
Stampin' Up Supplies:
Stamps: Oh Hello
Cardstock: Whisper White, Marina Mist, Pink Pirouette, So Saffron, Chocolate Chip, Basic Black, Certainly Celery
Ink/Stampin' Write Markers: Early Espresso
Tools: Owl Punch, Cloudy Day Textured Impressions Embossing Folder, 1" Circle Punch, 3/4" Circle Punch, Bird Builder Punch, Oval Framelits, Itty Bitty Shapes Punch (circle), Large Oval Punch
Finishing Touches: Cute Clip
978903eb-96a2-4560-8b79-e81e3b888ce1|0|.0|96d5b379-7e1d-4dac-a6ba-1e50db561b04
Tags: bird builder punch, circle punch, Cloudy Day Textured Impressions Embossing Folder, Classes, Cute Clips, Itty Bitty Punches, Oh Hello, Owl Punch, Ovals Framelits, Punch Art, Stampin' Up, Stampin' Up Card, Stampin' Up Card ideas, Stampin' Up Supplies, large oval punch
Cards | Classes | Punch Art
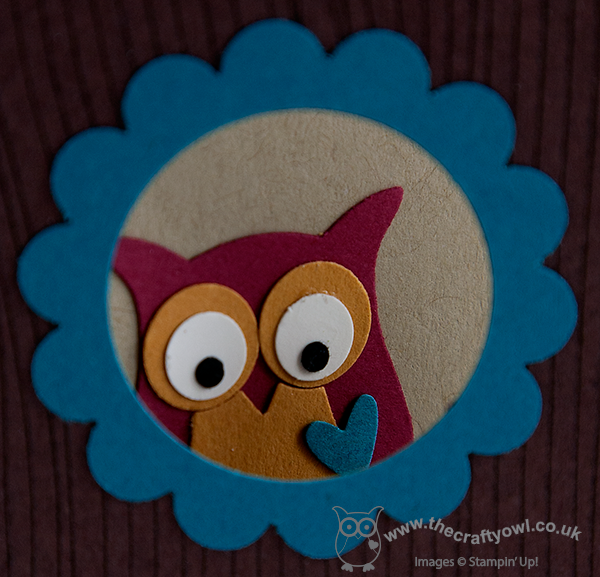
by Joanne James21. May 2013 20:54I've been busy card making today, but I thought it was about time I shared some of the cards that we made in this month's card class, featuring the owl punch. The class centred around the versatility of this punch and with the exception of the card I'm sharing today, the other cards we made were about using the punch to make things other than a straight forward owl. So on to today's card! This is the somewhat unassuming front of the card:

A nice woodgrained stamped tree trunk with a someone peeping out to say 'Oh Hello'. Open up the card and this is what you find:
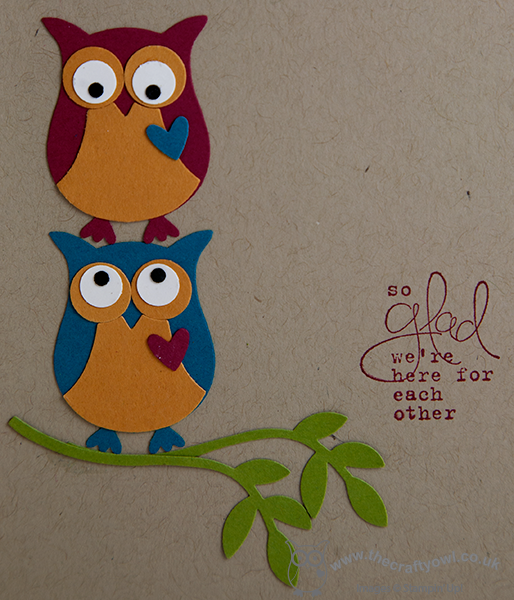
A cute pair of owls keeping each other company, balancing on a branch. I chose to use bright colours for the owls so that they would stand out against the neutral Crumb Cake background. This would make a great card for a good friend, or even an anniversary card for your 's'owl' mate' (apologies - couldn't resist the pun!)
Back tomorrow with another owl card - until then, happy stampin'!
Stampin' Up Supplies:
Stamps: Oh Hello, Bloomin' Marvelous (Sale-A-Bration - retired), Woodgrain
Cardstock: Whisper White, Basic Black, Crumb Cake, Chocolate Chip, Island Indigo, Raspberry Ripple, More Mustard, Old Olive
Ink/Stampin' Write Markers: Island Indigo, Raspberry Ripple
Tools: Owl Punch, 1 3/4" Scallop Circle Punch, 1 1/4" Circle Punch, Bird Builder Punch
f490a71c-c4a5-4c2c-972b-6bb7a0d72f68|0|.0|96d5b379-7e1d-4dac-a6ba-1e50db561b04
Tags: bird builder punch, Bloomin' Marvelous, circle punch, Classes, Oh Hello, Owl Punch, scallop circle punch, Stamp-a-ma-jig, Stampin' Up, Stampin' Up Card, Stampin' Up Card ideas, Stampin' Up Supplies, Woodgrain
Cards | Classes | Punch Art | Stamping