Circle Of Spring 3D Easel Drawer Card

by Joanne James14. April 2017 18:10

Today I'm sharing a card using this week's colours over at Color Throwdown:

These colours are so very pretty and I was also inspired by the florals to create a 3D easel drawer card today using the retiring stamp set 'Circle of Spring' - take a look:


Here's the low-down on today's card:

Circle Of Spring - I stamped the floral wreath from Circle of Spring and coloured it in with my Calypso Coral, Peekaboo Peach, So Saffron and Wild Wasabi Stampin' Write markers. I then cut it out with my Wondrous Wreath framelits and added a diecut bow too. Both the stamp set and framelits that I've used on my card today are retiring from the annual catalogue at the end of May and are available only whilst stocks last. The Circle of Spring stamp set is currently showing as low inventory, so if this is on your 'must have' list then do order as soon as possible to avoid disappointment.

A Card And Gift In One - I recently made some easel drawer cards similar to this one for Mother's Day with a group of 21 Girl Guides - this stamp set also contains a 'happy Mother's Day' greeting - who had a lot of fun colouring their stamped images. They used a variety of pastel colours and they all looked so pretty when complete (it's a shame I was too busy to take a photograph of them all together - you'll have to take my word for it!) We made our cards on top so that they would open to enable a personal message to be written inside. The most exciting part though for the girls was the fact that this is a gift and card in one - the drawer pulls open to reveal 4 chocolates fitting perfectly inside:


The hardest thing for the girls was to not eat a chocolate or two whilst they were crafting! 

All You Need Is A Sheet of 12" x 12" - The easel drawer card is really easy to make using just one sheet of 12" x 12". It needs to be cut as follows:

  • One piece of 6" x 6", scored at 1.5" on each side for the drawer itself
  • One piece of 3" x 10", scored at 2", 3.5", 6.5" and 8" on the long side, to form the wrap for the drawer
  • One piece of 3" x 6", scored at 3" and 4.5" on the long side, with the 3" section adhered to the top of the drawer wrap at the front and the 1.5" scored sections folded towards you like a mountain.
  • One piece of 3" x 6", scored at 3" on the long side for the card - this is adhered to the front section of the 1.5" x 3" section above (see the photo).

I hope that all makes sense - a video tutorial for another time, I think! To finish, I decorated the drawer section with co-ordinating paper from the Subtles DSP stack. 

These little boxes would also make nice wedding favours - you can get two box cards out of 3 sheets of 12" x 12" cardstock so they would be pretty economical too. 

Here is the visual summary of the key products used on today's project for you to pin for easy reference:


You can see all of my 'How To' summaries on my 'How To - Tips and Techniques' Pinterest board in case you've missed any. 

Enjoy your day and I'll be back tomorrow with another project. Until then, happy stampin'!


Stampin' Up! Supplies Used:

Table built using Product Table Builder by The Crafty Owl - Independent Stampin' Up! Demonstrator.


Frosted Medallions Snowflake

by Joanne James4. December 2016 09:00

It's Sunday and time for a new challenge over at The Paper Players! It's the turn of our fearless leader the wonderful Nance to host this week and she has a fun wintery theme to get your creative juices flowing:
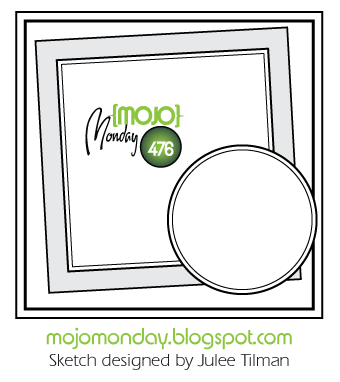
       

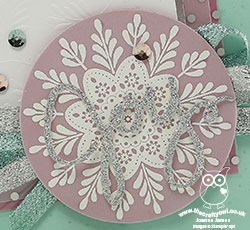
Use a snowflake (or two!) on your card. I decided that I wanted to feature the large frosted medallion snowflake from the stamp set of the same name on my card this week and this week's Mojo Monday sketch gave me the perfect layout - here's my card:
 

Here's the low-down on today's card:

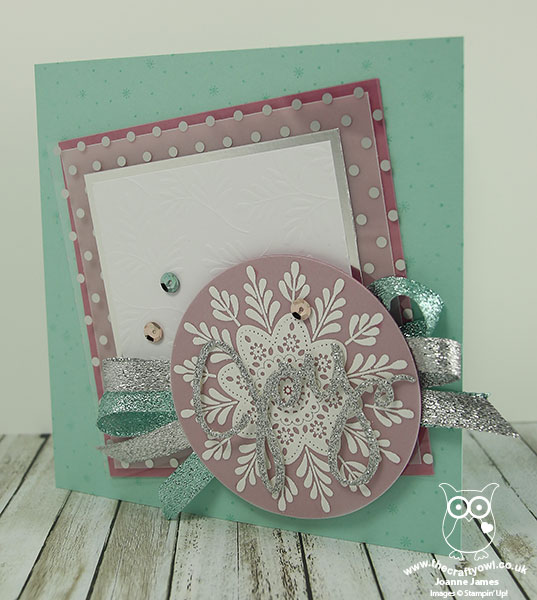
All About The Layers - My card this week has 9 layers in total, rather a lot even by my standards! Can you spot them all? They are, in order: Pool Party card base, Sugarplum square panel, vellum square, Fabulous Foil Designer Acetate, silver foil, Fancy Frost Specialty DSP, Sweet Sugarplum circle, a vellum circle with the frosted medallion stamped in Versamark and heat embossed in white and lastly the word 'joy' cut out of silver glimmer paper with my Wonderful Wreath framelits. A lot of layers indeed, yet I think they all play a part in contributing to the balance of the card design.

Glitter, Glitter - I used lots of elements to add sparkle to my card, from the Fabulous Foil Acetate, to the glimmer paper and sprinkle of Fancy Frost sequins, along with a rather fancy bow in silver (current) and Pool Party (retired) glitter ribbon beneath my snowflake. This card is definitely not practical for posting, but will make a nice special one to be hand delivered. The snowflake/glitter combination means I am linking up with CAS-ual Fridays too where these are both the order of the day!

A Contemporary Colour Combination - you may recognise my colour combination this week as the one our very own lovely Nance used for her pines card last week - you can see her card here. This isn't a colour combination I would ordinarily choose for a Christmas card, and I did start out using just white, silver and Sweet Sugarplum, but I felt it needed something more. I decided to add in the Pool Party as it looked so great on Nance's card and voila - an altogether brighter card, so thank you Nance! If you like this colour combination, feel free to save it:
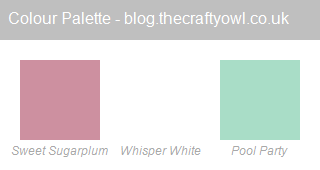
 

So only one main snowflake on my card, but it is a big one! That said, I did use the snowflake background stamp from the Pretty Pines stamp set on my card base to add a little background decoration, so there are lots more there too!

Here is the visual summary of the key products used on today's project for you to pin for easy reference:
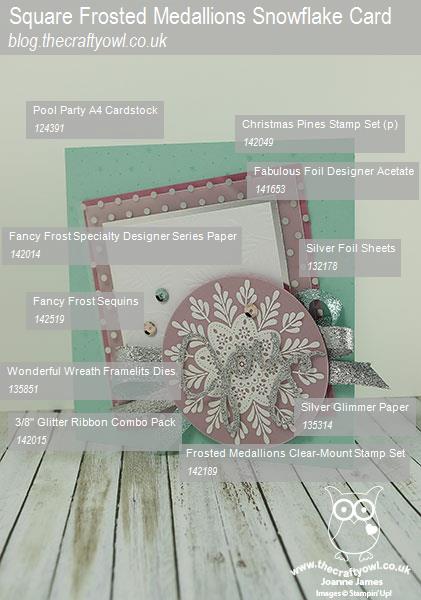
 

You can see all of my 'How To' summaries on my 'How To - Tips and Techniques' Pinterest board in case you've missed any. 

Before you reach for your ink and papers, check out what our amazing team has created to inspire you this week:

The Paper Players Design Team
 
 
Here's a quick recap of our challenge rules:
 
1.  Create a new paper project
2.  Upload your creation to your blog with a link back to us and provide a direct link to the post featuring your challenge submission.
3.  Please link your card to no more than four challenges, TOTAL.
4.  Have FUN! 


I look forward to seeing what you create with our theme this week. We are off for our usual Sunday morning of sport, followed by a spot of lunch and then we are going to watch a basketball game this afternoon - go Northampton Neptunes!

Enjoy the rest of your weekend as it will be over all too quickly; I'll be back soon with another project; until then, happy stampin'!


Stampin' Up! Supplies Used:

Table built using Product Table Builder by The Crafty Owl - Independent Stampin' Up! Demonstrator.

Wondrous Wreath Circular Christmas Card

by Joanne James4. September 2016 10:00

It's Sunday and time for a new challenge over at The Paper Players! It's the turn of the lovely Jaydee to host this week and she has a great theme for you to work with:


What a great theme this week - so many possibilities! I rarely make a circular card, so decided today I would give it a go! I have been on a roll with Christmas cards lately and a circular theme works perfectly for another one - take a look:


Here's the low-down on today's card:

An Oldie But Goodie - The Wondrous Wreath stamp set is a returning seasonal set that is in the current catalogue and is perfect for the theme of this week's challenge. I stamped both layers of leaves in Cucumber Crush, stamping off the base layer once first to achieve the two-tone green. I added some pearls coloured with a red Sharpie for my berries. I used my retired circle framelits to create my card base, using the largest circle. I knew there was a good reason to keep hold of these!

Pinecone Embellishment - My sweet wreath embellishment is made from the new Cherry Cobbler Silky Taffeta Ribbon and some mini pinecone embellishments, tied on with linen thread. I love it when we get a new catalogue - there are always fun new trinkets and charms that are perfect for dressing up projects!

Merry and Bright - My banner is from the new 'Stitched With Cheer' stamp set. I stamped it in Versamark and heat embossed in Copper - I just can't get enough of it! This stamp set is another that co-ordinates with the existing Bunch of Banners framelits dies - always good to get more mileage from existing items you own :-)

Such a fun card! I made a bright green envelope to co-ordinate too using my Envelope Punch Board so this card is officially good to go - another one for my stash.

Here is the visual summary of the key products used on today's project for you to pin for easy reference:


You can see all of my 'How To' summaries on my 'How To - Tips and Techniques' Pinterest board in case you've missed any. 

Before you reach for your ink and papers, check out what our amazing team has created to inspire you this week:

The Paper Players Design Team
 
 
Here's a quick recap of our challenge rules:
 
1.  Create a new paper project
2.  Upload your creation to your blog with a link back to us and provide a direct link to the post featuring your challenge submission.
3.  Please link your card to no more than four challenges, TOTAL.
4.  Have FUN! 


I look forward to seeing what you create with this week's theme.

Back tomorrow with another project; until then, happy stampin'!


Stampin' Up! Supplies Used:

Table built using Product Table Builder by The Crafty Owl - Independent Stampin' Up! Demonstrator.

New Wednesday Weekly Deals Are Here!

by Joanne James24. February 2016 08:00

It's Wednesday and you know what that means: a new collection of Wednesday Weekly Deals! These offers are valid for one week only. As always, a new collection of deals will be announced next Wednesday.

If you want to take advantage of any of the deals on offer, you can support my business by placing your order online by clicking here or using the link to my store on the right hand side of my blog page where it says 'Shop Online' or with me in person. Don't forget to add the new Hostess Code for February UYGWGF4W if your order is under £150 and be sure to make sure that you don't check the 'no contact' box if you'd like to be kept updated with the progress of you order and receive a little thank you in the post from me. 

Here's a summary of this week's one-week only Wednesday deals - click on each item to go to the online store to purchase:

Table built using Product Table Builder by The Crafty Owl - Independent Stampin' Up! Demonstrator.

A few choice items this week - I think I may have to add that embossing folder to my collection! 

Back later with today's creative project; until then, happy shopping!

Hearth and Home Merry Moments Christmas Shaker Card

by Joanne James20. November 2015 21:10

Today I'm sharing another of the cards from this month's technique class - a Christmas shaker card using the 'Happy Scenes' stamp set and some of the paper from the Merry Moments DSP Stack for wallpaper:

I stamped the scene in Mossy Meadow, sponged in some sky and stamped some snow flakes in Soft Sky, then using my white gel pen I coloured in the snowflakes and the settled snow on the trees - it's amazing what a difference this makes to the finished scene, it adds a subtle yet definite dimension. The shaker is filled with some clear glass glitter and the window itself finished with a Cherry Cobbler bow, made with the Wonderful Wreath framelits. There's one other cute feature of this card - did you see the dado rail? I created it from the edge of a second window, trimming along the crease line and snipping in half. I think it's a nice way to cover the join of the designer series papers, which are incidentally cut from a single sheet and reversed to show both sides.

That's all from me today; back tomorrow with another project. until then, happy stampin'!


Stampin' Up! Supplies Used:

Table built using Product Table Builder by The Crafty Owl - Independent Stampin' Up! Demonstrator.


Pear Pizzazz Peaceful Wreath

by Joanne James7. November 2015 22:34

A quick blog post from me today to share a card I made for the current Fab Friday Challenge where this have a great sketch to work with:

I decided that green was the order of the day today and decided to create a calming wreath in greens and silvers using the Peaceful Wreath stamp set:

I stamped the beautiful Peaceful Wreath in Garden Green on Whisper White and coloured it loosely with an aquapainter and Pear Pizzazz ink, highlighting each of the berries with some silver Dazzling Details, before cutting it out using my Wonderful Wreath framelits . I stamped my sentiment in Versamark and heat embossed them in silver, added a split banner, some silver cord trim and some rhinestones for a little extra sparkle. 

I love greens - and with the hustle and bustle of the last couple of days, their calming influence is just what need. 

I'll be back tomorrow with a new challenge over at the Paper Players; until then, happy stampin'!


Stampin' Up! Supplies Used:

Table built using Product Table Builder by The Crafty Owl - Independent Stampin' Up! Demonstrator.


It's Most Definitely Not Beginning To Feel A Lot Like Christmas!

by Joanne James24. July 2015 20:38

So as I type this sat in blisteringly hot temperatures (I'm not complaining - the sun is heavenly!) I can't quite believe that today I'm going to share a Christmas card with you. Yes, that's right - a Christmas card!! Today I've been able to get my first look at the new Autumn-Winter seasonal catalogue that will be available to customers September 1st - and all I can say is, my wish list is long!!! I will be sharing more on that in coming weeks once our pre-order period starts, however right now if you can't wait for your copy, then get in touch with me and lets chat about becoming a demonstrator - I would love you to join the 'ooos' and 'aaahs' that I'm having with my current team members as we drool over the catalogue sneak-peek together!

Meanwhile, you may have noticed that Stampin' Up! has reintroduced a permanent line of Christmas stamps and papers in our annual catalogue too - great news for those of us who like to prepare for Christmas all year round! - and some of the stamps included are some favourites from last Christmas, such as the one that features on today's card: Wondrous Wreath. I made this card at our recent team quarterly training session, which was all about making use of what is already avialable to get a jump start on preparing for the festive season. Here's my card:

This card was designed by Monica Gale and is similar in concept to one I designed last season which you can see here. This one is easier to recreate and uses the Woodgrain embossing folder to create the wooden effect on the door. It also features some other products that can now be found in the annual catalogue that are perfect for festive projects: the Bow Builder Punch, the Merry Moments DSP and my favourite Expressions Natural Elements.

That's all the festive fun I have for today - I'm off to get a cooling glass of Sangria after all that typing! Back tomorrow with another project; until then, happy stampin'!


Stampin' Up! Supplies Used:

Table built using Product Table Builder by The Crafty Owl - Independent Stampin' Up! Demonstrator.

Gift Packaging Made Easy with the Gift Box Punch Board and Banner Framelits

by Joanne James27. December 2014 16:40

Merry Christmas to you all, my lovely blog readers! After a welcome few days break hosting Christmas for my family, today I'm back to the blog! I have a couple of pre-Christmas makes to share still; do you ever find yourself so busy crafting in the run up to the big day that you spend more time 'in the moment' rather than recording it and sharing? Well, this year that was definitely me! Today I am being treated to a day of rest - my seven year old has declared that he is doing the cooking today, from his new boy's cookbook (doing well so far - fresh fruit and pancakes for breakfast, followed by shepherd's pie for lunch) - so whilst he prepares a feast of chicken dippers for tea, I thought I would take the opportunity to get back into my blog. 

Today's share is some lovely gift packaging made with the Gift Box Punch Board, Envelope Punch Board and the Big Shot and Banner Framelits. I decorated some gifts using boxes made with the gorgeous Under the Tree speciality DSP and the Gift Box Punch board and some easy die cut tags to co-ordinate:


If your gift fits the standard boxes that the Gift Box Punch Board makes, it is a quick and easy 'no glue' packaging solution. With some ribbon and a fancy tag they really look the part:


I also made some bottle tags using the Banner framelits and a circle punch, again decorating with some simple wreaths cut with the Wonderful Wreath framelits - here's a close up:


As my regular readers will know, I am a big fan of the Envelope Punch Board and it is still my tool of choice for creating custom boxes - this is so easy to do with my BoxBuster tool - it enables you to create the perfect box size first time with no paper wastage. Here's one I made for my niece's Christmas gift that is the perfect case in point, this time finished with a tag made with the tree punch to co-ordinate with the Under The Tree paper:


If you are a fan of creating easy, attractive gift packaging, you will be pleased to know that the Gift Box Punch Board is carrying over and will still be available when the current Autumn-Winter seasonal catalogue ends. The Envelope Punch Board is always available as a standard annual catalogue item - phew, I don't know what I'd do if this tool was ever discontinued!

Back tomorrow with another of my pre-Christmas makes and a special announcement, so check back then for more crafting lovliness!

Until then, happy stampin'!


Stampin' Up! Supplies Used:

Table built using Product Table Builder by The Crafty Owl - Independent Stampin' Up! Demonstrator.


Peace and Joy Wondrous Wreath Card

by Joanne James17. December 2014 09:30

It's Wednesday and time for my last challenge as a designer over at Colour Me...! It has been a great 6 months working with these lovely ladies and the various colour palettes week on week and I would like to say a big 'thank you' to Tara and Hayley for the opportunity and to my fellow designers, Claire Broadwater, Julia Altermann and Sherrie Mannion and the various monthly guest designers for their collective inspiration. So we are ending the year with a playful colour palette with a distinctive festive feel:


I used this week's sketch over at Mojo Monday as the inspiration for the layout of my card and decided to stick with the festive feel of our inspiration photo to make another Christmas card:

I used Baked Brown Sugar for my base with a mat of Real Red, then a split panel of Very Vanilla and Always Artichoke, the bottom layer of which I embossed with the Stylish Stripes TIEF. I stamped my Good Greetings sentiment onto the vanilla layer in red (this set is now available on the Year End Closeouts Clearance Rack if you want to pick up a bargain!). I stamped a piece of Baked Brown Sugar with the Hardwood stamp to create the background for my wreath, then stamped my wreath in Always Artichoke with red berries and cut it out with my wreath framelits and popped it up on a couple of dimensionals. To finish, I added a ribbon and bow in Real Red Cotton Ribbon. 

Feel free to leave a comment on today's card, before hopping over to check out the amazing cards by the rest of the Colour Me...! team:

 
We look forward to seeing your playful creations - what does this palette inspire you to create? 
 
Back tomorrow with another project; until then, happy stampin'!
 
 
Stampin' Up! Supplies Used:
Table built using Product Table Builder by The Crafty Owl - Independent Stampin' Up! Demonstrator.
 

Smoky Slate Wondrous Wreath Christmas Card

by Joanne James3. December 2014 10:00

Today's second creative post is for this week's Colour Me...! card challenge where we are working with a monochromatic colour scheme of Smoky Slate:


I love this week's inspiration photo - so cute! I went with a Christmas card today, although not a snowflake or sleigh in sight:

Today's card proved difficult to photograph, but I can attest that the silver embossed berries, bow and sentiment add a lovely touch of sparkle to this monochromatic card.

Feel free to leave a comment on today's card, before hopping over to check out the amazing cards by the rest of the Colour Me...! team:

And our talented guest designer for December
 
I have another card tomorrow using this colour scheme too, so pop back and take a look! We look forward to seeing your monochromatic creations - what does this palette inspire you to create? 
 
Back tomorrow with another project; until then, happy stampin'!


Stampin' Up! Supplies Used:
 
Table built using Product Table Builder by The Crafty Owl - Independent Stampin' Up! Demonstrator.


Current Promotions

Stampin Cut and Emboss

Save up to 30% off on all your favourite kits from 1 to 31 October! 

Click here to see the current kits available and order yours online today.

Join My Team

It's always a great time to join Stampin’ Up! During October you can get even more in your starter kit! New team members can get £160 worth of products for only £99 + free business supplies + free shipping + all the fun being a part of Stampin’ Up! Stampin' Up! has something for everyone: join my growing team and benefit from my support to enjoy Stampin' Up! however you choose.

If you're interested, call me for a chat to understand how I can help you realise your goals. Alternatively, if you have already decided to sign up and you just can't wait, please click here for the link to the online form where you can sign up and order your starter kit right away! 

Shop Online

Access my online shop 24 x 7, 365 days of the year:

Current October hostess code:

4XPEYCB9

Shop Online

Scrapbooking

Stampin' Up! has introduced a new range of 12x12" scrapbooking product and kit - the full range is now available to purchase online. To download a copy of the new digital Scrapbooking Catalogue click here.

Mini Catalogue

BROWSE THE CATALOGUE

'Tis The Season - the new Stampin' Up! Mini Catalogue is here! For more details and to download your copy click here

2024-25 Annual Catalogue

BROWSE THE CATALOGUE

Click on the image to download your copy of the 2024-25 annual catalogue. For a full list of current SU! supplies, go to my online store. If you would like any help or advice, please drop me a line at joanne@thecraftyowl.co.uk or give me a call on 07773 421446 - I'd be happy to help.

Latest Kits!

Stampin Cut and Emboss

The Christmas Ornaments Kit and Card Keeper Kit are the latest kits in the online store - get yours here!

New Online Exclusives

There are new products available exclusively in the online store from 5 November - check them out here.

About Me

Hi I'm Joanne and live in Northampton and when I'm not looking after my husband and two beautiful children, am an avid crafter with a passion for all things Stampin' Up!

I must confess that I have never been a big rubber stamper - until I discovered Stampin' Up! that is. I love the fact that I can get such great results with co-ordinating stamps, inks, papers and punches - the possibilities are endless! Join me on my stamping journey as I share the things I love and be inspired to create amazing things yourself!

Follow Me

Monthly Newsletter

Box Builder

Click the button above to use Box Buster to create your custom box design using the Envelope Punch Board!

Kits Collection Now Available!

Stampin Cut and Emboss

The new Kits Collection from Stampin' Up! is now available!

Click here to see the current kits available and order yours online today.

I Design For


Stampin' Up Stuff

This is my personal blog and is not endorsed by Stampin’ Up! I hope you find it a plentiful source of ideas and personal inspiration but please don't copy my designs for contest submission or use for classes, publication or sale without express permission.