Easter Promise Heat Embossed Crocus – PP480

by Joanne James1. March 2020 10:00

Today it's Sunday and it's also the first of March - happy St David's Day to all my fellow Welsh men and women! It's time for this week's new challenge over at The Paper Players! It's the turn of the wonderful Anne Marie to host this week and she has a theme challenge for you to work with:


 I am in a bit of a clean and simple card making groove of late - and today I have another CAS creation for you. I decided to take this week's sketch over at CAS Colours & Sketches and make another Easter card - take a look:


Here's the low-down on today's card:

Turn Up The Heat - Do you remember the first time you practised heat embossing? It's one of those techniques that is always a real 'wow' as you turn on your heat gun and see the powder turn into molten metallic magic on your stamped image. It adds such a great shine to projects and a raised edge that makes it easy to colour inside too. If you look at the close up photo below you can see the dimension and shine that it adds:


My top tip for a neat effect and minimal splatter when heat embossing is to always rub your cardstock with an embossing buddy before you stamp your image in Versamark and sprinkle with your embossing powder; this will keep the powder where you want it and not cause it to stick in areas where it isn't required.

Crocus Colours - The colour scheme on today's card is inspired by the most common traditional crocus colours: a warm honey yellow, bright purple and pale yellow. I used a Highland Heather base - I embossed the front using my Subtles Embossing Folder - and coloured my flowers using Highland Heather, Mango Melody and So Saffron Stampin' Blends markers to compliment my gold heat embossing.

Easter Promise - The stamp set I used today is called 'Easter Promise' and has both sentiments and these gorgeous crocus flowers that are perfect for celebrating Easter. I heat embossed the trio of crocus and then used my largest Stitched Circle Die to create a partial diecut around them (that's the 'hat' shape on the sketch!) and I then heat embossed my sentiment and fussy cut it so that I could position it where I wanted it. I also decorated the envelope front and back and the inside of my card and continued with the heat embossing and colouring theme:

For a CAS card it took a little while with all of the heat embossing and colouring, but it was so worth it - this card is so, so pretty! Here is the visual summary of the key products used on today's project for you to pin for easy reference:


You can see all of my Product and 'How To' summaries on my 'How To - Tips and Techniques' Pinterest board in case you've missed any. 

Before you reach for your ink and papers, check out what our amazing team has created to inspire you this week:

Here's a quick recap of our challenge rules:
 
1.  Create a new paper project
2.  Upload your creation to your blog with a link back to us and provide a direct link to the post featuring your challenge submission.
3.  Please link your card to no more than four challenges, TOTAL.
4.  Have FUN!

Enjoy your day; I will be spending the day at home escaping the winds and rain and hoping to get some quality time in my craft room in between catching up on household chores and making sure the youngest of the James Juniors is prepared for this week's mock Common Entrance examinations - not much then!  I'll be back tomorrow with another project. Until then, happy stampin'!


Stampin' Up! Supplies Used: 

Table built using Product Table Builder by The Crafty Owl - Independent Stampin' Up! Demonstrator.

An Easter Chick for AYSI 220

by Joanne James28. February 2020 12:00

As I type my post it's miserable and raining outside so I'm glad to have something bright and cheery to share with you! Today I'm sharing my design team card for our new challenge over at As you See It where it's time for a cheery colour challenge from the lovely LeAnne:


I used Jen B's current sketch over at Freshly Made Sketches for my layout and decided LeAnne's colours would be perfect for a sweet Easter chick - take a look:


Here's the low-down on today's card:

A Colour Confession - I feel I need to confess upfront as the eagle-eyed amongst you will have spotted I used Daffodil Delight in place of the Mango Melody that LeAnne chose on today's card. This was a genuine oversight on my part (lots on at the moment and having designed my card on the move just grabbed for the wrong supplies!) I didn't have time to remake, which is a shame as I'm sure my cute chick would look equally warm and fluffy in Mango Melody, but I'm hoping you will all forgive me. It does give me an opportunity to point out though that if you are ever put off participating in colour challenges because you don't have the 'correct' colour to hand, most of them - and certainly those for As You See It and The Paper Players which I design for - are perfectly ok for you to substitute with the nearest colour in your stash, whatever the brand. I actually used only the smallest drop of Grapefruit Grove - for my chick's beak and legs - and the same for Poppy Parade - for his comb and also to accent my banner with some gorgeous (retired) Poppy Parade mini striped ribbon. 

Welcome Easter - The star of my card today is the super-cute Easter chick. He features in the 'Welcome Easter' stamp set in the Spring mini catalogue and is perfect for some quick colouring. The set also features a sweet lamb and cute bunny (keep an eye out for him in another post over the next few days, as he will be making an appearance!) along with some Easter/baby sentiments and a few smaller stamps, a couple of which I used to add a little decoration to the inside of my card:


How cute is that?!

Gingham Gorgeousness - Lastly, I embossed my cardfront with my Subtle Embossing Folder for some light texture and interest and used a piece of gingham to make a quick banner using my Triple Banner Punch (so useful!) out of the now retired Gingham Gala DSP. This paper was a deliberate choice, as I wanted to incorporate a little more white into my card. I've linked to the Brights DSP pack below though as the gingham pattern it contains is a good match that is readily available. There is definitely something about colourful gingham that makes me feel like Spring - does it give you that feeling too?

Here is the visual summary of the key products used on today's project for you to pin for easy reference:


You can see all of my 'How To' summaries on my 'How To - Tips and Techniques' Pinterest board in case you've missed any. 

Before you put your creative thinking caps on, why not check out the blogs of the other As You See It team members:

Amy Jasper

Heather Cooper

Jan Clothier

Jane Knudsen

LeAnne Pugliese

Here's a summary of our challenge rules:

  • Create any card, scrapbooking page, 3D project or packaging project that fits the challenge.
  • Please include the challenge graphic and link back to the challenge in your blog post. Turn off word verification so we can leave you lots of lovely comments. Make sure you link the post not the whole blog to the Linky. Use #AYSIXXX when uploading to a public gallery.
  • If you’re unsure about ‘the rules’, check the details under the Challenge Guidelines tab on the As You See It Challenge homepage.
  • In a colour challenge, black or other neutral can be used in outlines and sentiments but no other colours should be included. Stampin’ Up colours are used for reference but colours that are a close match are welcome.

We look forward to seeing your creations in the AYSI gallery.

Enjoy your day and I'll be back tomorrow with another project. Until then, happy stampin'!


Stampin' Up! Supplies Used:

Table built using Product Table Builder by The Crafty Owl - Independent Stampin' Up! Demonstrator.

Bloom and Grow Purple Clean And Simple Birthday Card

by Joanne James25. August 2019 20:00

I managed to get a few hours in my craft room yesterday and finished some cards for a few challenges that I wanted to play. The first was using the gorgeous purple-based colour palette over at CAS Colours and Sketches this week which I really couldn't resist; I also used the current CAS(E) This Sketch layout:


I love purples and couldn't resist creating some pretty florals using the Bloom and Grow bundle:


This card was actually super simple: I used my Subtles embossing folder to emboss my Highland Heather card base, then stamped my sentiment on a piece of Whisper White, backed with a piece of Gorgeous Grape that I added a scalloped border to using one of the dies in the Budding Blooms Dies set. I stamped one of the floral images onto Whisper White and coloured it using my Stampin' Blends and Stampin' Write Markers, adding a little clear Wink of Stella to the dark purple berries for a subtle sparkle and shine. A little decoration to the inside using the same set completes my card:


This is the first card I've made using the Bloom and Grow stamp set, but it's a great set for clean and simple cards and once I'd started I couldn't stop so I hope you like it as I have a few more to share this week, in between more Christmas card sneak peeks too!

Here is the visual summary of the key products used on today's project for you to pin for easy reference:


You can see all of my 'How To' summaries on my 'How To - Tips and Techniques' Pinterest board in case you've missed any. 

Enjoy the rest of your evening and I'll be back tomorrow with another project. Until then, happy stampin'!


Stampin' Up! Supplies Used:

Table built using Product Table Builder by The Crafty Owl - Independent Stampin' Up! Demonstrator.

Magnolia Lane Memories and More No Stamping Card

by Joanne James19. August 2019 21:00

Happy Monday everyone! Today I'm sharing a super quick card using the CAS Colours and Sketches layout and the theme over at Just Add Ink:


I was thrilled to see the JAI theme this week; when you're busy and short on crafty time, what can be better than a 'no stamping' card? I had the Magnolia Lane Memories and More Card pack out on my desk still following last week's class, so chose card and set to work:


I backed my card with a panel of Early Espresso, added a sentiment sticker, some co-ordinating twine and a trio of pearls to my Petal Pink card base, that I had already run through my Subtles embossing folder and I was done! I even added a larger M&M card to the inside for a pre-decorated interior:

Seriously - it took longer to photograph and watermark my card and type up this post than it did to make it!

 As a result I did manage to get a couple more cards made this afternoon, so I will share those with you tomorrow.

Here is the visual summary of the key products used on today's project for you to pin for easy reference:


You can see all of my 'How To' summaries on my 'How To - Tips and Techniques' Pinterest board in case you've missed any. 

Enjoy your evening and I'll be back tomorrow with another project. Until then, happy stampin'!


Stampin' Up! Supplies Used:

Table built using Product Table Builder by The Crafty Owl - Independent Stampin' Up! Demonstrator.

Botanical Bliss Anniversary Cards

by Joanne James18. May 2019 09:00

Hurrah for the weekend! Today I'm sharing a couple of cards I made using the current sketch over at Fab Friday that are also perfect for the celebrations over at AsYouSeeIt where it's all about the twos as they celebrate their 200th challenge - woohoo!:


I needed an anniversary card so decided to make something using my Botanical Tags Thinlits as one of them features a pair of birds - take a look:


Here's the low-down on today's card:

Botanical Tags - I bought this bundle because I fell in love with the detail on these tags, but I think this is the first time I've used them properly on a card and the detail is so pretty. I decided to go with a dark colour and back it with a handcut tag using a scrap of Wood Textures DSP left over from another project. I think this tag works well for a wedding or anniversary card - they could be love birds, right? 

Layers and Textures - My card feels quite busy for me: tags, twine, banners, an embossed background and a stitched rectangle sentiment and foliage branch - that's a lot going on in one place! Aside from the diecut tag, the shapes are all quite simple and my patterned papers are used in quite small quantities so as not to overwhelm and I quite like the effect.  

Take Two In Green - I liked my first card so much, I decided to create another one in a green Mint Macaron/Tranquil Tide colourway. I switched out the embossed background from Subtle to Layered Leaves which adds a little more detail, and the back piece of DSP comes from the Tranquil Textures DSP as opposed to Share What You Love, and I added a flower embellishment to my slightly larger sentiment piece, but otherwise the cards are the same:

The colour scheme for the first card was inspired by the piece of floral DSP I used for my banner, but I quite partial to greens, particularly in home decor. What do you think - which one do you prefer? 

Here is the visual summary of the key products used on today's project for you to pin for easy reference:


You can see all of my 'How To' summaries on my 'How To - Tips and Techniques' Pinterest board in case you've missed any. 

Enjoy your day and I'll be back tomorrow with another project. Until then, happy stampin'!


Stampin' Up! Supplies Used:

Table built using Product Table Builder by The Crafty Owl - Independent Stampin' Up! Demonstrator.

Dear Doily Sympathy Card for JAI455

by Joanne James6. May 2019 09:00

Today we have a public holiday here in the UK so we are enjoying an extra-long weekend - well, as much as you can when both James Juniors are revising for end-of-year exams and the weather outside is rather grey and chilly! We are at least enjoying the slower pace and I'm hoping I might even sneak in a little crafting later too. First up I'm sharing a card for this week's challenge over at Just Add Ink where the team are making sympathy cards:

These are sometimes difficult cards to make and it's sometimes good to have a few of these on hand that you can simply reach for when needed rather than need to make from scratch. There is a gorgeous set in the Spring-Summer catalogue that will sadly be retiring next month but is perfect for this type of card - take a look:


Here's the low-down on today's card:

Dear Doily - So when I first saw the Dear Doily set in the seasonal catalogue, it wasn't at the top of my wish list, however my dear crafty friend Jan Clothier had this set and created so many fabulous samples with it (check them out on her blog here) that I eventually decided I 'needed' it and now I'm sad that this set is going away! The Doily Builder Thinlits are already sold out in the UK and have been for some time, however the stamp set is still available. It has some beautiful images but it's really the words in this set that get me; the gorgeous swirly font for the main words I used on the front of today's card that can then be paired with a number of alternatives depending on whether your card is to show thanks, friendship or sympathy. I used the latter on the inside of my card:


For a sympathy card, it is often difficult to find the right words and I think this set really hits the mark as far as that is concerned.

Make Your Mark With Markers - I kept my card fairly simple, using the Doily Builder Thinlits to create both some inset diecutting on the back panel and a frame for my sentiment which I really wanted to be the focal point of my card, but I did choose to add a single stem of lavender using one of the other stamps in this set. I coloured it with my Stampin' Write markers, colouring the stem in Tranquil Tide and the buds in Powder Pink with a little edging in Blackberry Bliss to create a variation in colour. Using your markers is a great way to add variagated colour to a single stamp; just ink them up and 'huff' on your stamp, and it will stamp a beautiful multi-coloured image.

A Fresh Colour Combination - I kept my colour palette subtle for today's card, with the exception of Blackberry Bliss which acts as a strong accent colour for my focal point. if this is a colour combination that appeals to you, please feel free to save it for future inspiration:


Here is the visual summary of the key products used on today's project for you to pin for easy reference:


You can see all of my 'How To' summaries on my 'How To - Tips and Techniques' Pinterest board in case you've missed any. 

There is some great inspiration from the team and in the gallery over on the Just Add Ink page so you should definitely click on the link and check them out if this is something you often struggle with. Meanwhile, enjoy your day and I'll be back tomorrow with another project. Until then, happy stampin'!


Stampin' Up! Supplies Used:

Table built using Product Table Builder by The Crafty Owl - Independent Stampin' Up! Demonstrator.

First Steps New Baby Boy Welcome Card for AYSI197

by Joanne James9. April 2019 14:00

Today I'm sharing a card for the current challenge over at As You See It where the ladies have a great sketch to play with:

This is one of those versatile sketches that is a 'keeper' and can be used in so many ways. I still had my gingham papers out on my desk following Sunday's cards and decided it was perfect for a baby card - take a look:


Here's the low-down on today's card:

First Steps - My focal point sentiment comes from the 'First Steps' stamp set, an adorable collection of sweet baby images that are perfect for cards, invites, showers, samplers and more. I stamped my sentiment using my Stamparatus so that I could ink it several times and get a really solid image, then having stamped off first stamped the tiny footprints behind it in the same colour.  

Subtle Textures - I embossed my top panel with the Subtles embossing folder to add a little texture without detracting from the sentiment. I added a little more detail with the soft organdy ribbon and used my layers and scalloped border/mat detail to add a little more interest and to tie in my panel of Balmy Blue gingham check across the bottom. 

Monochromatic Blue - I kept my card simple with a monochromatic Balmy Blue and Whisper White colour combination however this design could be easily replicated in pink for a girl or any of the other colours in the Gingham Gala designer series paper stack for a more gender-neutral design.

Here is the visual summary of the key products used on today's project for you to pin for easy reference:


You can see all of my 'How To' summaries on my 'How To - Tips and Techniques' Pinterest board in case you've missed any. 

Enjoy your day and I'll be back tomorrow with another project. Until then, happy stampin'!


Stampin' Up! Supplies Used:

Table built using Product Table Builder by The Crafty Owl - Independent Stampin' Up! Demonstrator.

A Joey New Baby Welcome!

by Joanne James18. March 2019 10:00

Another Monday and a new start to the week! Today I'm sharing a card a baby card using this week's sketch over at CAS Colours and Sketches that also fits this week's challenge over at Just Add Ink:


I still had my Animal Expedition papers out on my desk from the card that I will be sharing tomorrow so decided to make a quick new baby card - take a look:


Here's the low-down on today's card:

J is For Joey - So today's card features the cute koala/kangaroo combo that I cropped from the Animal Expedition papers using my Animal friends framelits. I was reminded when I read the post over at Just Add Ink that 'joey' is another name for a young kangaroo and that this would therefore work for their challenge this week. This is a bonus entry for me though, as I thought this little joey would be perfect for my baby card today - my scheduled Just Add Ink entry is coming up tomorrow and you are definitely going to want to pop by and see where my musings over the letter 'J' took me - it was just too easy to go with the Design Team's suggestions! Another tip from me when cropping these animals from your designer series paper: crop the identical shape out of extra thick white cardstock and adhere your DSP diecut to it for a more rigid element to prevent it getting squashed in the post.

A Hidden Gem - I used one of the other dies in the Animal Friends set for the vertical 'banner' element of the sketch - an inset vine that has some leaves that are remove completely and some that are attached, allowing them to be brushed up and add a little interest to the design. I genuinely hadn't noticed this die in the set before, hence my reference to it as a 'hidden gem'; I really like it and I can see me using it on lots of cards for added subtle detail.

Subtle Texture - After diecutting the vertical vine element, I ran my layer of Blushing Bride cardstock through the Big Shot with my Subtle embossing folder for a little extra texture and interest. It is indeed subtle, but I think it makes a nice addition before adding my sentiment and diecut animal pair on top.

Here is the visual summary of the key products used on today's project for you to pin for easy reference:


You can see all of my 'How To' summaries on my 'How To - Tips and Techniques' Pinterest board in case you've missed any. 

Enjoy your day and I'll be back tomorrow with another project. Until then, happy stampin'!


Stampin' Up! Supplies Used:

Table built using Product Table Builder by The Crafty Owl - Independent Stampin' Up! Demonstrator.

Jolly Holly Christmas Card With The Christmas Traditions Punch Box

by Joanne James26. November 2018 11:10

Another Monday, another week! Hope you all had lovely weekends -  did you spend them shopping for Black Friday deals? I did start my Christmas shopping at last - I'm suddenly feeling under pressure to start ticking things off that particular list. i can't quite believe that one month today will be Boxing Day!! Anyway, let's not dwell on that - today I'm sharing a card using this week's sketch over at Freshly Made Sketches:

The lovely Kim has a great sketch this week, with lots of creative possibilities. I decided my card was going to be all about the holly - take a look:


Here's the low-down on today's card:

A Jolly Holly Christmas - I decided that holly was going to be the theme for my card today and used the square shape to feature a piece of the holly patterned paper from the Santa's Workshop designer series paper and tied my sentiment and holly embellishment (one of the self-adhesive pieces from the Santa's Workshop Memories & More card pack) into my theme. I even carried it over to the inside of my card and added a stamped sprig of holly alongside my sentiment from the super-useful Merry Christmas To All stamp set:

Christmas Traditions - I found the perfect holly-related sentiment for my card in the Christmas Traditions Punch Box that is featured on pages 2-3 of the Autumn/Winter catalogue: 


Just like the Darling Label Punch Box in the annual catalogue (which incidentally has 10% off in the current stamp and kit sale as part of today's Online Extravaganza - order yours here), this festive-themed tin is choc-full of crafting goodies for creating through the festive season: with a block, two ink spots, set of 6 stamps and a Christmas Traditions Punch, all you need is to add some cardstock and adhesives and you are all set for some festive fun! Perfect for tags, cards and embellishments for your home-baked goodies, this set would make a lovely seasonal gift for a crafter or someone who likes to add a personal touch to their packages during the festive season. 

Lots of Layers - I added some texture to my card base with the Subtle Dynamic Textured Impressions Embossing Folder, but otherwise all of the detail and interest on today's card is focused around the square element. In order to really draw the eye to it, I stacked the base behind the holly DSP with 3 layers, made easy with the Layering Square Framelits, using the base colours of the paper and adding a piece of Poppy Parade ribbon for a pop of red - so festive!

Here is the visual summary of the key products used on today's project for you to pin for easy reference:


You can see all of my 'How To' summaries on my 'How To - Tips and Techniques' Pinterest board in case you've missed any. 

I hope you like today's card - tomorrow's card also features the Christmas traditions Punch Box, so be sure to come back and check it out. I have a few more errands before I get back into my painting and decorating - it's a long job! Enjoy your day and I'll be back tomorrow with another project. Until then, happy stampin'!


Stampin' Up! Supplies Used:

Table built using Product Table Builder by The Crafty Owl - Independent Stampin' Up! Demonstrator.

Painted Harvest For The Paper Players PP414

by Joanne James14. October 2018 09:00

Did you miss me? A whole week since I last blogged: having been nurse to the men of the James household the week before, they thoughtfully shared their bugs with the girls and for the latter part of this week Rebecca and I have been suffering and feeling decidedly under the weather with streaming colds. Combined with trying to make the final preparations for my residential craft weekend next week, it's left no time for blogging. Luckily for you it's Sunday, so I've put my box of Kleenex to one side and squeezed in a little creative time for this week's new challenge over at The Paper Players! It's the turn of the wonderful Jaydee to host this week and she has an autumnal colour challenge for you to work with:


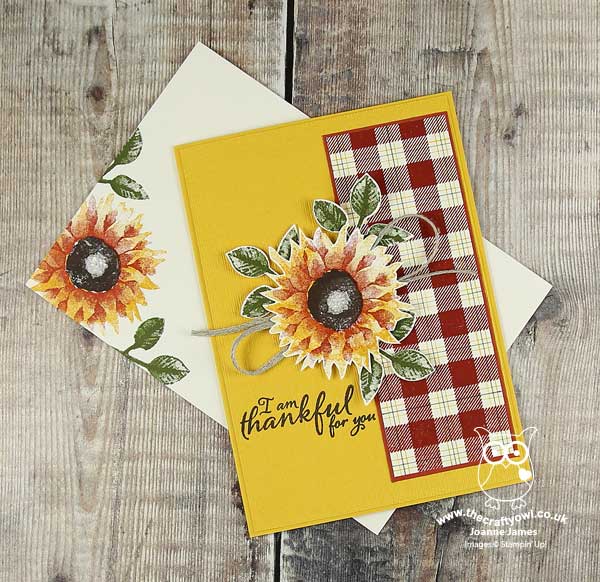
I immediately thought of sunflowers when I saw Jaydee's colour palette and decided to combine with the challenge over at The Card Concept and use the sketch over at CAS Colours and Sketches and got my paper snips out to do a little fussy cutting - take a look:


Here's the low-down on today's card:

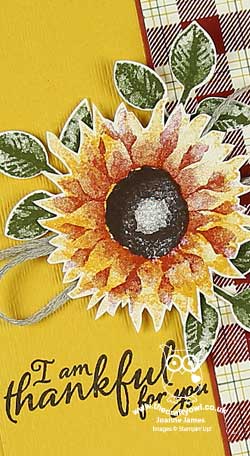
Painted Harvest Sunflower - Painted Harvest has been sat on my shelf and not been used for a long while, so today's card sets out to make amends. I used the mix of Crushed Curry, Cajun Craze and Mossy Meadow to create my layered bloom and double-stamped leaves and then fussy cut my flower to add dimension and interest, whilst using my leaf punch to make easy work of the leaves, adding some braided linen trim to finish. 

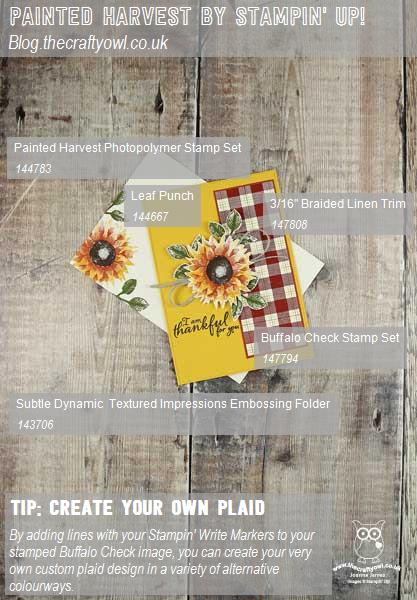
Customised Buffalo Check - This is my first outing for the fabulous Buffalo Check background stamp that I used for my features panel on the right, which I decided to customise from the off and having stamped it in Cajun Craze on Very Vanilla, I added a line of Mossy Meadow and a line of Crushed Curry either side of this with my Stampin' Write markers to create a more colourful plaid. I can see that this is a stamp that is going to get a lot of use - so many creative possibilities!

So Subtle Texture - After stamping on my sentiment, I ran my Crushed Curry card base through the Big Shot with my Subtles Dynamic Textured Impressions Embossing Folder for added texture. It is subtle, for sure, but I am loving the additional detail that this embossing folder gives to otherwise plain backgrounds. I also stamped this sentiment from the Painted Harvest set on the inside to complete my card:


Here is the visual summary of the key products used on today's project for you to pin for easy reference:


You can see all of my Product and 'How To' summaries on my 'How To - Tips and Techniques' Pinterest board in case you've missed any. 

Before you reach for your ink and papers, check out what our amazing team has created to inspire you this week:

Here's a quick recap of our challenge rules:
 
1.  Create a new paper project
2.  Upload your creation to your blog with a link back to us and provide a direct link to the post featuring your challenge submission.
3.  Please link your card to no more than four challenges, TOTAL.
4.  Have FUN!

I can't wait to see what you create with this week's colours and look forward to visiting your blogs this week! Enjoy the rest of your weekend as it will be over all too quickly. We will be focusing all our efforts on beating the lurgy that has descended upon us in the hope that next week is a slightly more productive one! I'll be back soon with another project; until then, happy stampin'!


Stampin' Up! Supplies Used: 

Table built using Product Table Builder by The Crafty Owl - Independent Stampin' Up! Demonstrator.

Mini Catalogue

BROWSE THE CATALOGUE

The mini catalogue is now live! Read and download your copy here.

Shop Online

Access my online shop 24 x 7, 365 days of the year:

Current April hostess code:

VDKNV7BH

Shop Online

Join My Team

It's always a great time to join Stampin’ Up! New team members can get £130 worth of products for only £99 + free business supplies + free shipping + all the fun being a part of Stampin’ Up! Stampin' Up! has something for everyone: join my growing team and benefit from my support to enjoy Stampin' Up! however you choose.

If you're interested, call me for a chat to understand how I can help you realise your goals. Alternatively, if you have already decided to sign up and you just can't wait, please click here for the link to the online form where you can sign up and order your starter kit right away! 

Latest Kit!

Stampin Cut and Emboss

The Rock Legend Kit has all you need to make 8 cards with coordinating envelopes. Along with the new Panda Friends Kit, both are available from January 4th for just £14 each - get yours here!

2023-24 Annual Catalogue

BROWSE THE CATALOGUE

Click on the catalogue for a full list of current SU! supplies - if you would like to order any of the items featured, please drop me a line at [email protected] or give me a call on 07773 421446 - I'd be happy to help.

New Online Exclusives

There are new products available exclusively in the online store from 5 March - check them out here.

About Me

Hi I'm Joanne and live in Northampton and when I'm not looking after my husband and two beautiful children, am an avid crafter with a passion for all things Stampin' Up!

I must confess that I have never been a big rubber stamper - until I discovered Stampin' Up! that is. I love the fact that I can get such great results with co-ordinating stamps, inks, papers and punches - the possibilities are endless! Join me on my stamping journey as I share the things I love and be inspired to create amazing things yourself!

Follow Me

Monthly Newsletter

Box Builder

Click the button above to use Box Buster to create your custom box design using the Envelope Punch Board!

Kits Collection Now Available!

Stampin Cut and Emboss

The new Kits Collection from Stampin' Up! is now available!

Click here to see the current kits available and order yours online today.

I Design For


Stampin' Up Stuff

This is my personal blog and is not endorsed by Stampin’ Up! I hope you find it a plentiful source of ideas and personal inspiration but please don't copy my designs for contest submission or use for classes, publication or sale without express permission.