Feel Goods and World Of Dreams To Start The Week!

by Joanne James27. April 2015 10:33

Good morning everyone! It's Monday and I'm here bright and early with not one, but two cards for you today! The first is a chalkboard card using this week's colours over at The Color Throwdown:

I couldn't resist some bright yellow on a Monday morning, so decided to dig out my 'Feel Goods' stamp set and pair it with the sun in the 'So You' stamp set to create the following card:

I used a base of Daffodil Delight and a piece of chalkboard paper, then stamped both the sun outline and the sentiment and heat embossed them in white. I found a small piece of retired yellow polka dot paper in my scrap box and stamped the sun again onto it and cut out the pieces and paper-pieced them onto my card. I would say you could substitute with something out of the current Brights Paper Stack, but since this is on the retiring list and already sold out, you will all need to raid your current supplies for this one! To finish, I added a gel pen line around the edge of my chalkboard and just wiped over the card lightly with some Whisper White craft ink. It adds a cool chalkboard effect in real like, although the photo does just look a little 'untidy' I think! I'm also linking this card up with Diane at Pixie's Snippets Playground since I was good and actually used up some of my scrap box snippets on this card - that so hardly ever happens!

My second card is using the colours over at Colour Q and this week's Cas(E) This Sketch:


I'm still enjoying my re-acquaintance with my aqua painter as a means of watercolouring and when I saw this week's CAS(E) This Sketch I knew it would offer me the opportunity for a little watercolouring behind this sweet bird couple silhouette from the 'World of Dreams' stamp set: 

I stamped both the bird image and the sentiment (from the retired 'Good Greetings' stamp set) in versamark and heat embossed in black - this has a lovely sheen in real life - onto watercolour paper and then using my aquapainter, I picked up the inks in the challenge colours (I substituted Pear Pizzazz for Kiwi Kiss as I don't have this retired colour) and simply coloured in a 'halo' effect behind the silhouette image. I then adhered my finished piece to a base of Bermuda Bay cardstock. I think this will make a lovely anniversary card for my box - my own wedding anniversary doesn't come round again until next February; now that's what I call organised!

Right, that's me done for today - I have some admin to crack on with, dinner to prepare and a large basket of ironing to do - well, at least the sun is shining! Back tomorrow with another project; until then, happy stampin'!


Stampin' Up! Supplies Used:

Feel Goods Card:

Table built using Product Table Builder by The Crafty Owl - Independent Stampin' Up! Demonstrator.


World Of Dreams I Love Us card:

Table built using Product Table Builder by The Crafty Owl - Independent Stampin' Up! Demonstrator.


Christmas Star - Gold and Silver

by Joanne James23. December 2013 21:51

Today a quick post to share the Christmas cards I made for my Mum and Dad and Mother-in-law respectively - and a little 'sneak peek' of some new product that will be available in the Spring-Summer seasonal catalogue at the end of January. I wanted to use the single stamp 'Christmas Star' for my cards; this is such a great statement stamp but feel like I haven't used it anywhere near enough this season. I was inspired by this Brian King card I saw a while ago here. For my version, I decided to use the same design for each card, but create it in two different colourways. Here's the first one in silver and Midnight Muse:

I wanted the star to take centre stage, so kept the design fairly simple and embossed the star then hand cut and scored along the point lines to create a lovely 3-dimensional effect. I adhered the star to the card with rolled glue dots at the end of each point; this is a better option where you don't want the bulk of a dimensional. To finish I added the Christmas sentiment from the 'Delightful Dozen' stamp set.

For the second version, I used gold and Cherry Cobbler:

Did you spot the 'sneak peek' of the new product? Yes, shiny gold sequins - just one of a number of new gold products that will make their appearance in the Spring-Summer seasonal catalogue in just over a month's time. I just couldn't resist using a few to finish off my Christmas projects.

So here's a picture of both cards together; the question is, which one do you prefer?

I must say, I think it's a tough call - I like them both, and I'm not sure which I would choose as my favourite. Both were well received by the recipients, so I guess that's the main thing!

Tomorrow is Christmas Eve, so will be a day of food preparations for the big day, along with a few fun things too. I'll be back to share another Christmas project too; until then, happy stampin'!


Stampin' Up! Supplies Used:

Table built using Stampin' Up! Product Table Builder from The Crafty Owl.


Tags: , , , , , , , , ,

Cards | Stamping

Easiest Ever Crackers with the Stampin' Up! Envelope Punch Board - Video Tutorial

by Joanne James16. November 2013 21:42

Yay - it's the weekend! I've been busy doing homework and more convention swaps today, along with other lovely items for my convention friends, all of which I will share with you another time ... because today I'm going to show you the easiest ever way to make Christmas Crackers using the new Stampin' Up! Envelope Punch Board! Not just pictures, but a video too. The new envelope punch board from Stampin' Up! has been hugely popular as lots of my customers will testify and it really is a versatile piece of kit. As I mentioned in a previous post, the board can be used not only to make envelopes, but also boxes in a variety of shapes and sizes and other 3D items such as crackers.

As we are fast approaching the start of the festive season, what better than to make some lovely Christmas crackers to decorate your Christmas tree, as table favours for the festive table or even to house a couple of chocolates as a little gift for someone special? Here are the ones I make in my video, along with a picture of some other ones that I've made:
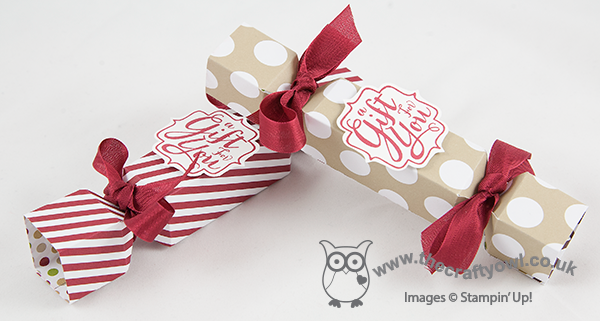
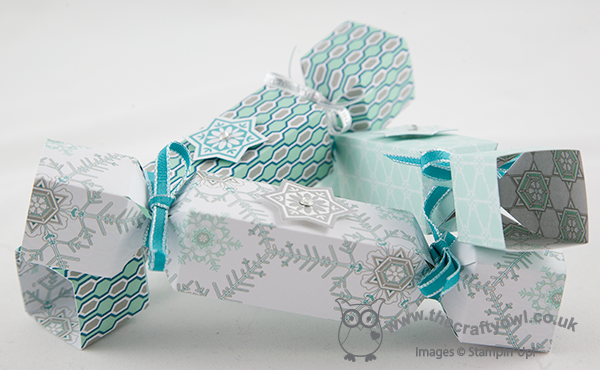
I've seen lots of videos and tutorials on how to make them in a variety of sizes and styles, but if you want to make lots I think by far the easiest way is to use the current Designer Series Paper Stacks in the seasonal catalogue as your starting point: each sheet measures 4.5"x6.5" so it makes the score measurements really easy: 1", 2", 3" and 4" on the short side, and 1", 1.5", 2", 4.5", 5" and 5"5 on the long side. Simply score, punch stick and done - you can make a cracker in just a couple of minutes. Add a minute or two more to add some decoration and you could be mass producing these in no time. If you don't use the paper stacks, any designer paper cut to the basic measurement will do; I would avoid using solid colour standard cardstock as this is much thicker and whilst your envelope punch board will punch through a double thickness of cardstock, it is quite hard work and you risk damaging your punch and board as it isn't really designed with this in mind.

In my video, I also show a boxed set of crackers that I made using the Winter Frost Designer Series Paper Stack - here is the photo again:
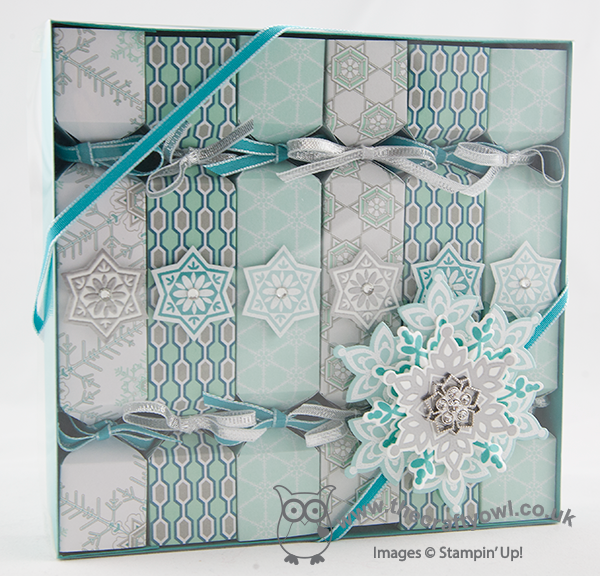
This box set would make a lovely gift for someone - if you would like to make a box for your crackers, the dimensions you will need are as follows:

Box Base: Sheet of cardstock (I used Bermuda Bay) 8 1/4" x 8 1/2". Score at 1 1/8" and 7 1/8" across the short side, then rotate through 90 degrees and score at 1 1/8" and 7 3/8" on the long side.

Box lid: Acetate window sheet size 8 1/4" x 8 1/2". Create a shim for your score board using an offcut of window sheet, then with your shim in place, score the lid to the same dimensions as the base above (1 1/8" and 7 1/8" across the short side, 1 1/8" and 7 3/8" on the long side). This will ensure your box lid fits snugly.

I then decorated my box with some embossed die cut snowflakes using the Festive Flurry Stamp Set and Framelits, Bermuda Bay ribbon and a Frosted Finishes embellishment.

So without further ado, grab your paper stack and watch my video tutorial and start making your Christmas crackers today!


Stampin' Up Supplies Used:


New Single Stamps and MDS Digital Downloads

by Joanne James17. September 2013 19:58

This is the first of two posts today, as there's lots of news to share! Firstly, I'm excited to announce that there is a new series of never-before seen single stamps available from today, all with a Christmas theme:

These stamps are available as clear-mount only (blocks available separately) and won't be sent in typical SU! cases or packaging; they'll be packaged in cello bags. If you'd like a case for your stamp, you can buy Clear-Mount Stamp Cases that come in packs of four separately (these are available in the main catalogue).

There are 8 different stamps to choose from, starting from £4.50. These stamps are only available through 31 January 2014 and will be great for cards and tags during the festive season, so get them while you can! Choose one or collect all eight - the choice is yours.

Secondly, as today is Tuesday it's the day for this week's My Digital Studio (MDS) downloads - click on the date buttons below to link to my online store to view them in more detail and to purchase. I've also included the links to the downloads for the last two weeks in case you're new to all this and want to catch up!

September 17, 2013 - Digital DownloadsSeptember 10, 2013 - Digital DownloadsSeptember 3, 2013 - Digital Downloads

This week's downloads include the new in-colour ribbons, the Thankful brush and tablescape kit and some of the Christmas stamps from the current seasonal catalogue. 

If you haven't already looked at MDS, you should really consider downloading the free trial version from my store: you get a really comprehensive trial version for 30 days absolutely free, to help you decide whether you would like to go ahead and purchase the full version for £13.95. I would urge you to download it and take a look: whatever your area of interest - scrapbook pages, photo albums, cards, home décor and more - you will be amazed at the things you can create.

I'll be sharing some of my own MDS projects here on my blog in coming weeks - if you've already downloaded and started creating, do share your creations with me - I would love to see them.

Back shortly with today's creative post; until then, happy stampin!

Tags: , , , , ,

My Digital Studio | Promotions | Shop Online | Stamping

Mini Catalogue

BROWSE THE CATALOGUE

The mini catalogue is now live! Read and download your copy here.

Shop Online

Access my online shop 24 x 7, 365 days of the year:

Current March hostess code:

S9F2XJJW

Shop Online

Join My Team

It's always a great time to join Stampin’ Up! New team members can get £130 worth of products for only £99 + free business supplies + free shipping + all the fun being a part of Stampin’ Up! Stampin' Up! has something for everyone: join my growing team and benefit from my support to enjoy Stampin' Up! however you choose.

If you're interested, call me for a chat to understand how I can help you realise your goals. Alternatively, if you have already decided to sign up and you just can't wait, please click here for the link to the online form where you can sign up and order your starter kit right away! 

Latest Kit!

Stampin Cut and Emboss

The Rock Legend Kit has all you need to make 8 cards with coordinating envelopes. Along with the new Panda Friends Kit, both are available from January 4th for just £14 each - get yours here!

2023-24 Annual Catalogue

BROWSE THE CATALOGUE

Click on the catalogue for a full list of current SU! supplies - if you would like to order any of the items featured, please drop me a line at [email protected] or give me a call on 07773 421446 - I'd be happy to help.

New Online Exclusives

There will be new products available exclusively in the online store from 5 March - check them out here.

About Me

Hi I'm Joanne and live in Northampton and when I'm not looking after my husband and two beautiful children, am an avid crafter with a passion for all things Stampin' Up!

I must confess that I have never been a big rubber stamper - until I discovered Stampin' Up! that is. I love the fact that I can get such great results with co-ordinating stamps, inks, papers and punches - the possibilities are endless! Join me on my stamping journey as I share the things I love and be inspired to create amazing things yourself!

Follow Me

Monthly Newsletter

Box Builder

Click the button above to use Box Buster to create your custom box design using the Envelope Punch Board!

Kits Collection Now Available!

Stampin Cut and Emboss

The new Kits Collection from Stampin' Up! is now available!

Click here to see the current kits available and order yours online today.

I Design For


Stampin' Up Stuff

This is my personal blog and is not endorsed by Stampin’ Up! I hope you find it a plentiful source of ideas and personal inspiration but please don't copy my designs for contest submission or use for classes, publication or sale without express permission.