Christmas wouldn't be Christmas without Dasher!

by Joanne James27. November 2014 11:21

Yesterday evening I was at a Stampin' Up! event where demonstrators got a 'sneak peek' of what's in store for Sale-A-Bration; all I'm going to say at this point is boy do you all have something to look forward to, and I highly recommend you consider asking for a Stampin' Up! gift voucher from your nearest and dearest for Christmas (contact me for details!) and hold back some of your January Sales budget to take advantage, as you are not going to miss it!!

Today though I am back onto Christmas cards with another to share with you, having had a few days break. Well, it is now officially 'the season' I think! I used this week's sketch over at Addicted to CAS for my card today where the team are celebrating their second birthday - congratulations! - and which was designed with the theme over at Less is More in mind.

Now the theme this week is 'Jingle All the Way' and you would think that this card from earlier in the week might be a more appropriate fit, but the lovely ladies over at Less is More went on to say "we would like to see some reference to any of these things.... bells, reindeer, Santa, elves, stockings, presents, decorations, Christmas songs/music/instruments... in fact anything Christmassy!" and I immediately took this as the opportunity to bring my Dasher stamp out of retirement to create a card with a reindeer on it. Well, Christmas wouldn't be Christmas unless he made at least one appearance on a card this season, after all it's almost tradition! So here is my card:

I used Cherry Cobbler for my base and stamped my reindeer in Versamark on a piece of Baked Brown Sugar and heat embossed it in Early Espresso embossing powder to give it a lovely rich sheen. I matted this piece on a base of last year's Season of Style DSP stack, which I cut into pieces and mounted with mitred corners as the pattern was actually a chevron, but I wanted it to be diagonals going around the frame (I hope that makes sense when you look at the photograph, it just seems difficult to explain!)I then popped this piece onto my base using dimensionals, so that I could run a couple of loops of Baked Brown Sugar thick baker's twine around the base beneath it. I used my tiny hole punch to put a couple of semi-circle grooves in each side so that the twine would rest in them and stay in position - a useful tip if you're creating this type of card. To finish, I added my sentiment stamped from 'Endless Wishes' and a trio of candy dots to balance the main image.

I hope you like today's card and before I go would like to give a big shout out to Chrissie, Sarah and Anne over at Less is More, both for recognising this card in their top 3 of the recent one layer challenge but also for their tireless dedication to commenting on the cards in the LIM gallery and for their general helpfulness and constructiveness; I think my CAS style has improved a lot with their input, so I for one am grateful!

That's all from me today; I'm off out for lunch with a friend (a rare treat!) and then back to finish some work before the school run! Back tomorrow with another project; until then, happy stampin'!


Stampin' Up! Supplies Used:

Table built using Product Table Builder by The Crafty Owl - Independent Stampin' Up! Demonstrator.


Snow Day Snowman Exploding Box

by Joanne James26. December 2013 20:29

Today I'm going to share another of my Christmas projects, this time a fun packaging solution for a cute chocolate snowman that I bought at my local supermarket. From the outside, it looked like a fairly straightforward nicely packaged box, complete with bow:

It's when the box is opened that the 'reveal' happens - the snowman is sitting in the middle with the inside of the box decorated with four co-ordinating stamped 'snow day' snowmen:


I love the snowman stamp set in the 'Snow Day' set and as soon as I saw the chocolate snowman I knew the two belonged together. The box base uses one 12" x 12" sheet of Crumb Cake cardstock and is a great way to turn a simple chocolate gift into something extra-special.

Today is going to be an early night for me I think; after all the food and excesses of the last few days and a lovely long walk in the fresh air this afternoon, I am absolutely shattered! Back tomorrow with another project; until then, happy stampin'!


Stampin' Up! Supplies Used:


Table built using Stampin' Up! Product Table Builder from The Crafty Owl.


Tags: , , , , , , , , , ,

3D Projects | Boxes | Stamping

Merry Christmas Monster Hugs!

by Joanne James25. December 2013 21:05

Well, it's here at last - Merry Christmas lovely blog readers! We've had a lovely day today that has involved much present unwrapping, eating and Lego building - don't you just love Christmas?!

I still have a few Christmas things that I haven't shared with you, so today thought I would share the Christmas cards I made for my little James juniors. I was inspired by Lizy Bartaby's card here - I loved the idea of the Santa Monster Hugs but took my cards a step further by making them into pop-ups using my Pop 'n' Cuts base; I'm always looking for new ways to use this. So I made a co-ordinating pair of his and hers santa monster hugs. Here's the little girl santa monster:

Cute, huh? Here's the little boy monster that is her partner-in-crime:

How cute are these? I made my hats using an oval punch with a section cut out using the word window punch to create the curve of the hat. I made the brim using a 'squashed' scallop circle as I don't own a scalloped oval punch, which would of course make this slightly easier. A pop up card and chocolate coins - I'm not sure which the children thought was best (who I am kidding - the chocolate, of course!)

I'm sure this won't be the last we'll be seeing of these little guys - but for now, I hope you have all had a wonderful Christmas and that Santa brought you everything that was on your wish list.

Back tomorrow with another project; until then, happy stampin'!


Stampin' Up! Supplies Used:

Table built using Stampin' Up! Product Table Builder from The Crafty Owl.


Non-Christmas Card Alternatives Trio

by Joanne James18. December 2013 22:07

Well, what can I say - a seven day absence from my blog - unheard of!! I know this is a busy time of year and I've certainly no shortage of lovely things to share with you, but my real issue has been keeping up, both with the photography (lots of makes are leaving the house before being photographed!) and blog writing itself. The James juniors have finished school for the Christmas holidays already, and in addition to all of the usual pre-Christmas preparations, I have been having so much fun with them I've had little time for anything else this past week.

No festive project to share today - instead the alternative trio of cards made following the same layout used in my December Christmas card class (you can see the Christmas versions here) but with distinctly non-Christmas card designs. So here they are:

This one uses some of the Print Poetry paper stack that is currently available to buy on the clearance rack, whilst stocks last. The second one:

This one has quite a retro feel, with the colour scheme inspired by the retired Sycamore Street SAB paper - my customers love this paper, so are still looking for ideas and ways to use it. Lastly, the third card featuring a bow made with the Gift Bow Bigz Die:

This card actually uses a couple of the things we used to make the Christmas card version - the Seasons of Style paper stack paper and the 'Wishing You' stamp set and proves that these things can be used for non-Christmas as well as Christmas cards if you use alternative colours.

I liked the way all three of these cards turned out and the fact that they gave me a few cards to add to my stash ready for the year ahead. This really is a quick post from me, but before I go I thought I'd share one festive picture of the masterpiece created by my super-creative children today - our very first gingerbread house, from scratch! We made the house yesterday and they built and decorated it today. I'm pleased to say it's all their own work - I for one, think it's rather impressive:

Complete with gingerbread boy and girl and Christmas tree in the garden and following a considerable 'snowfall', of course! Tomorrow I have a day of present wrapping in store, so with Christmas music and tape in hand will be a woman on a mission!

I will hopefully not leave it so long before my next post; until next time, happy stampin'!


Stampin' Up! Supplies Used: 

Table built using Stampin' Up! Product Table Builder from The Crafty Owl.

Season of Style Christmas Card Trio

by Joanne James6. December 2013 22:23

Another busy day today so a late post - I'm still putting the final touches to a couple of video tutorials that I've prepared to go with my next couple of posts, so meanwhile I'm going to share with you three of the Christmas cards that we made at this month's card class. Each one features the Season of Style paper and a variety of different stamps. So here is the first one: 

This card uses the 'Love and Joy' single stamp on a set of layered pieces cut with the Deco Labels framelits. This was our second card:

This card uses the 'Warmth and Wonder' hostess set and is a CASE of a card I fell in love with by Mary Fish, who created a similar card using the Winter Frost colour scheme; you can see her original card here. Here is the third card that we made:

This uses a similar layout to one of the cards featured in the seasonal catalogue that showcases the 'Wishing You' stamp set, but I incorporated a small bow made with the Gift Bow Bigz Die for added impact. The last card was the Midnight Muse circle thinlit card I made a while ago featuring a bauble and two ways to make labels using the mosaic punch; the ladies in my class loved this card when they first saw it and were keen to have a go at it themselves. If you missed this card and would like to see it, you can find it here.

I also made alternative non-Christmas cards that followed each of the above design layouts, as I had a customer who didn't want to make Christmas cards (far too organised!); I'll share these cards with you next week.

I hope you liked the above cards, especially the last one - I love my Gift Bow Die and I have some great projects to share with you over the next few days using this useful product. Until next time, happy stampin'!

Stampin' Up! Supplies Used:

Table built using Stampin' Up! Product Table Builder from The Crafty Owl.


Perfect Blend Coffee Cup Card and Gift Card Holder

by Joanne James5. December 2013 13:31

Where is this week going?! I am so busy and feeling like Christmas is getting nearer and nearer and I am sooo not ready! Didn't manage to squeeze a blog post in yesterday as there was so much going on, so thought I'd better do a quick one today over lunch as I'm out again later and won't get the opportunity. Which is a shame, as I've still so many lovely Christmas projects to share! Today is a super quick card and gift card holder set that was designed by my lovely upline's upline Monica Gale at a recent Convention team gathering. Both items feature the 'Perfect Blend' stamp set. Firstly, here's the card: 

This is one of those cards that requires some paper snipping, but it's not tricky and worth it for the overall effect. We also made a matching gift card holder, which is just the right size for the credit-sized card coffee gift cards available from some of the large coffee house chains:

How cute is this?! I love the colours here and the little bow clip use to secure the gift card holder shut. I have a few friends who love a nice cup of coffee, so I might have to make a few more of these - not least because I received some extra Season of Style washi tape in a parcel that arrived yesterday, one of the things I won in a recent Stampin' Up! competition for World Cardmaking Day back in October - you can see my winning card here.

That's it for today. As always, if you would like to have a go at making either of the above project, the links to purchase the items you will need are included in the table below. Back tomorrow with a special Christmas project; until then, happy stampin'!

Stampin' Up! Supplies Used:

Table built using Stampin' Up! Product Table Builder from The Crafty Owl.


Tags: , , , , , , ,

3D Projects | Cards | Stamping

Easiest Ever Crackers with the Stampin' Up! Envelope Punch Board - Video Tutorial

by Joanne James16. November 2013 21:42

Yay - it's the weekend! I've been busy doing homework and more convention swaps today, along with other lovely items for my convention friends, all of which I will share with you another time ... because today I'm going to show you the easiest ever way to make Christmas Crackers using the new Stampin' Up! Envelope Punch Board! Not just pictures, but a video too. The new envelope punch board from Stampin' Up! has been hugely popular as lots of my customers will testify and it really is a versatile piece of kit. As I mentioned in a previous post, the board can be used not only to make envelopes, but also boxes in a variety of shapes and sizes and other 3D items such as crackers.

As we are fast approaching the start of the festive season, what better than to make some lovely Christmas crackers to decorate your Christmas tree, as table favours for the festive table or even to house a couple of chocolates as a little gift for someone special? Here are the ones I make in my video, along with a picture of some other ones that I've made:
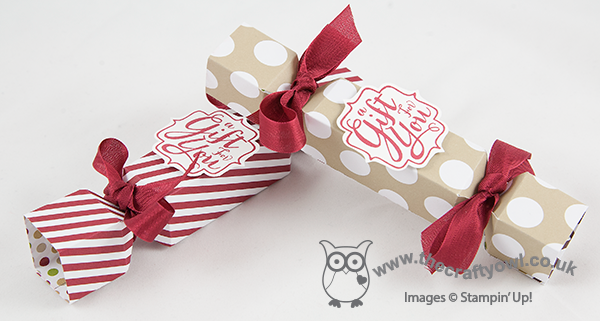
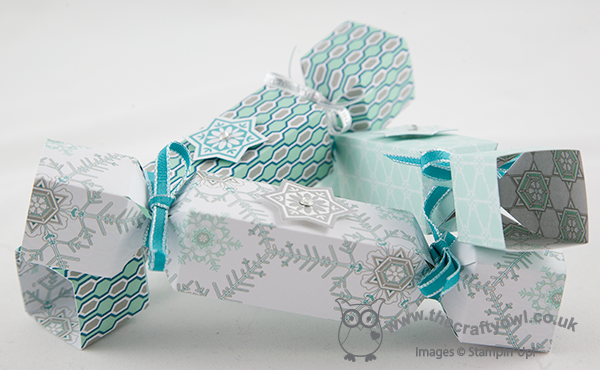
I've seen lots of videos and tutorials on how to make them in a variety of sizes and styles, but if you want to make lots I think by far the easiest way is to use the current Designer Series Paper Stacks in the seasonal catalogue as your starting point: each sheet measures 4.5"x6.5" so it makes the score measurements really easy: 1", 2", 3" and 4" on the short side, and 1", 1.5", 2", 4.5", 5" and 5"5 on the long side. Simply score, punch stick and done - you can make a cracker in just a couple of minutes. Add a minute or two more to add some decoration and you could be mass producing these in no time. If you don't use the paper stacks, any designer paper cut to the basic measurement will do; I would avoid using solid colour standard cardstock as this is much thicker and whilst your envelope punch board will punch through a double thickness of cardstock, it is quite hard work and you risk damaging your punch and board as it isn't really designed with this in mind.

In my video, I also show a boxed set of crackers that I made using the Winter Frost Designer Series Paper Stack - here is the photo again:
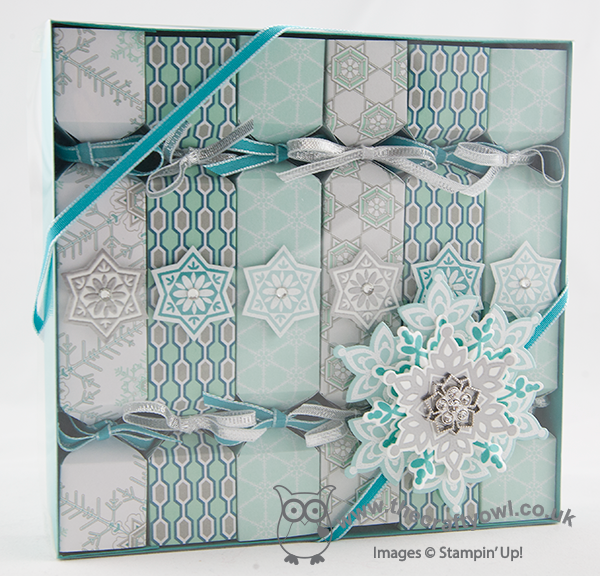
This box set would make a lovely gift for someone - if you would like to make a box for your crackers, the dimensions you will need are as follows:

Box Base: Sheet of cardstock (I used Bermuda Bay) 8 1/4" x 8 1/2". Score at 1 1/8" and 7 1/8" across the short side, then rotate through 90 degrees and score at 1 1/8" and 7 3/8" on the long side.

Box lid: Acetate window sheet size 8 1/4" x 8 1/2". Create a shim for your score board using an offcut of window sheet, then with your shim in place, score the lid to the same dimensions as the base above (1 1/8" and 7 1/8" across the short side, 1 1/8" and 7 3/8" on the long side). This will ensure your box lid fits snugly.

I then decorated my box with some embossed die cut snowflakes using the Festive Flurry Stamp Set and Framelits, Bermuda Bay ribbon and a Frosted Finishes embellishment.

So without further ado, grab your paper stack and watch my video tutorial and start making your Christmas crackers today!


Stampin' Up Supplies Used:


Christmas Banners A Plenty!

by Joanne James20. October 2013 20:51

Well, today has been a fun day with a Christmas Build a Banner project class this morning. Following many laughs and giggles and a fair number of inky fingers, the lovely ladies attending my class each made a festive banner using a variety of papers and embellishments and the Build a Banner set. So there are lots of photos in this post! First of all, here is my finished banner that served as their inspiration:

My colours are Bermuda Bay and Coastal Cabana, with rosettes made from some of the lovely Winter Frost DSP and Smoky Slate chevron ribbon and finished with Coastal Cabana bows. Here's some close-ups of the rosettes - the grey one:

And here's one of the Pool Party ones:

Here's a close up of one of the bows, so easy to put together using the new Bow Bigz Die:

And lastly one showing some of the added glimmer on the flag itself:

Here are two of the ladies' lovely finished banners. Firstly, Kathy's, also in the grey/blue colourway:


And this one is Julie's, in the red-green colourway with champagne glimmer accents:


Aren't they just beautiful? I didn't manage to get photos of the other two, but I can assure you they were just as lovely. We are all feeling a little more ready for Christmas now, with one more thing ticked off our Christmas home décor list. The Build A Banner kits are great and come highly recommended; at £17.95 for the full kit including stencils and just £8.95 for the basic set, they are great value. Rebecca has put first dibs on the remaining 9 pieces in my banner kit for a name banner for her bedroom (pictures will no doubt follow in due course!). I can see me having to buy another one so that Ben can have one too ...

If you live in or around Northampton and would like a current class schedule

Back tomorrow with another project; until then, happy stampin'!


Stampin' Up Supplies Used:

 Build a Banner Simply Created KitBuild A Banner Refill KitDesigner Rosette Bigz XL DieGift Bow Bigz L DieWinter Frost Specialty Designer Series PaperFestive Flurry Framelits DiesSmoky Slate 3/4 Chevron Ribbon


Silver Glimmer Paper - by Stampin' Up!Season Of Style Designer Series Paper Cherry Cobbler 1 Grosgrain Stitched Edge Ribbon


Have Yourself a Merry Christmas - Spots

by Joanne James12. October 2013 20:27

It's the weekend and today I have the last of the cards from this week's class to share with you. This time another Merry Little Christmas, but with spots instead of stripes:


This time I used two of the stamps in the Merry Little Christmas set, and stamped the 'Merry' part of the main stamp again in Gumball Green and cut out with paper snips into a little banner to add some dimension. I also embossed the background piece of Cherry Cobbler with the Stylish Stripes embossing folder to add texture. Another simple yet effective design.

All the ladies at this month's classes were very pleased with their makes and we are already looking forward to next month when we will be adding to our Christmas card collection. If you would like to join us, please contact me for more details.

Back tomorrow with a birthday card; until then, happy stampin'!


Stampin' Up Supplies Used:

 Stylish Stripes Textured Impressions Embossing FolderBig Shot Die-Cut Machine - by Stampin' Up!Season Of Style Designer Series Paper StackGumball Green Classic Stampin' PadStamp-A-Ma-Jig - by Stampin' Up!

Cherry Cobbler Classic Stampin' Pad

Have Yourself a Merry Christmas - Stripes

by Joanne James10. October 2013 20:29

Today I'm sharing another of this week's class Christmas cards. This one uses the 'Merry Little Christmas' stamp and some of the papers in the Season of Style paper stack:

I love that the designer series paper stacks in the seasonal catalogue enable you to make some great cards with minimal stamping as the paper does a lot of the work for you in terms of colour and pattern; at £6.25 a stack they are great value for cardmakers too, and each stack has 4 different paper designs to choose from. For this card we stamped a simple flag and layered on some DSP edged with Chocolate Chip and created a couple of smaller flags made from offcuts from other projects. Did you notice the little button beneath the twine bow on the card? We were aiming to keep all of our cards post-friendly and largely flat in design, so instead of adding a real button we instead used a cardstock button made with the Sweet Buttons Embosslits to allow for added detail but without the bulk.

I had my second class of the week last night with a great bunch of ladies, who made me laugh so much my eyes watered! I was also delighted to see some of the great cards they've been making with My Digital Studio having downloaded their 30 day free trial. Unfortunately I didn't have my camera with me, so couldn't take any pictures but will be sure to get some next time to share with you. I was particularly pleased to hear them say how easy they found it to use, with no prior knowledge or experience. If you haven't downloaded your copy yet, I urge you to go to my online store and download your free trial version today. Equally, if you would like to join one of my monthly card classes, do get in touch for more details.

Back tomorrow with another project; until then, happy stampin'!


Stampin' Up Supplies Used:

Stamps: Merry Little Christmas

Cardstock: Whisper White, Chocolate Chip, Cherry Cobbler, Season of Style DSP

Ink/Stampin' Write Markers: Cherry Cobbler

Tools: Sweet Buttons Embosslits, Big Shot, Stamp-a-ma-jig

Finishing Touches: Cherry Cobbler Baker's Twine

Scrapbooking

Stampin' Up! has introduced a new range of 12x12" scrapbooking product and kit - the full range is now available to purchase online. To download a copy of the new digital Scrapbooking Catalogue click here.

Mini Catalogue

BROWSE THE CATALOGUE

'Tis The Season - the new Stampin' Up! Mini Catalogue is here! For more details and to download your copy click here

Shop Online

Access my online shop 24 x 7, 365 days of the year:

Current September hostess code:

JQEHTZGK

Shop Online

2024-25 Annual Catalogue

BROWSE THE CATALOGUE

Click on the image to download your copy of the 2024-25 annual catalogue. For a full list of current SU! supplies, go to my online store. If you would like any help or advice, please drop me a line at joanne@thecraftyowl.co.uk or give me a call on 07773 421446 - I'd be happy to help.

Join My Team

It's always a great time to join Stampin’ Up! New team members can get £130 worth of products for only £99 + free business supplies + free shipping + all the fun being a part of Stampin’ Up! Stampin' Up! has something for everyone: join my growing team and benefit from my support to enjoy Stampin' Up! however you choose.

If you're interested, call me for a chat to understand how I can help you realise your goals. Alternatively, if you have already decided to sign up and you just can't wait, please click here for the link to the online form where you can sign up and order your starter kit right away! 

Latest Kits!

Stampin Cut and Emboss

The Christmas Ornaments Kit and Card Keeper Kit are the latest kits that will be arriving in the online store later this month - get yours here!

New Online Exclusives

There are new products available exclusively in the online store from 3 July - check them out here.

About Me

Hi I'm Joanne and live in Northampton and when I'm not looking after my husband and two beautiful children, am an avid crafter with a passion for all things Stampin' Up!

I must confess that I have never been a big rubber stamper - until I discovered Stampin' Up! that is. I love the fact that I can get such great results with co-ordinating stamps, inks, papers and punches - the possibilities are endless! Join me on my stamping journey as I share the things I love and be inspired to create amazing things yourself!

Follow Me

Monthly Newsletter

Box Builder

Click the button above to use Box Buster to create your custom box design using the Envelope Punch Board!

Kits Collection Now Available!

Stampin Cut and Emboss

The new Kits Collection from Stampin' Up! is now available!

Click here to see the current kits available and order yours online today.

I Design For


Stampin' Up Stuff

This is my personal blog and is not endorsed by Stampin’ Up! I hope you find it a plentiful source of ideas and personal inspiration but please don't copy my designs for contest submission or use for classes, publication or sale without express permission.